Sourdough Mini Loaves Recipe
Bake golden sourdough mini loaves with this easy, beginner-friendly recipe. Perfect for gifting, small batches, or sampling your favorite sourdough flavor.
- Prep Time: 17 hours
- Cook Time: 40 minutes
- Total Time: 17 hours, 40 minutes
- Yield: 3 mini loaves 1x
- Method: Baking
- Cuisine: American
Ingredients
Scale
For the levain (an active starter):
- 35 g sourdough starter
- 35 g bread flour
- 35 g water
For the bread dough:
- 500 g bread flour (I use King Arthur organic bread flour)
- 375 g water
- 100 g levain (active starter at peak)
- 10 g sea salt (I use Redmond ancient fine sea salt)
10 g white rice flour (for dusting)
Instructions
- Make a levain (an active starter): Feed your starter in the morning at a 1:1:1 ratio (35g starter, 35g flour, and 35g water), and wait 4-6 hours for it to peak.
- Autolyse: Mix water and flour with your hand or a dough whisk into a large mixing bowl until you have a shaggy dough. Cover the bowl with a plastic film or a damp tea towel and let it sit for 30 minutes.
- Mix the dough: Add the levain (your active starter) and mix it in. Then, sprinkle in the sea salt. Use your hand to mix thoroughly for 3 to 10 minutes. A longer mix builds a stronger gluten network. Cover the bowl with plastic wrap or a damp kitchen towel and let it rest for 30 minutes. Once the levain is added, bulk fermentation begins.
- Fold the dough: Start with two sets of stretch and folds, spaced 30 minutes apart. Then perform two sets of coil folds, also 30 minutes apart. For each set, stretch the dough in all four directions. Between folds, cover the bowl with plastic wrap or a damp kitchen towel and let the dough rest for 30 minutes.
- Continue bulk fermentation: Allow the dough to keep fermenting. Bulk fermentation is complete once you see visible bubbles across the surface and along the sides, if you are using a glass bowl. The edges of the dough will appear slightly domed, and if you gently shake the bowl, the dough should have a soft, wobbly jiggle.
- Divide and preshape: Divide the dough into three equal parts, then preshape each into a round. Let rest uncovered for 15 minutes.
- Shape the dough: Lightly dust your work surface with white rice flour. Gently flip each dough round and shape it into a mini batard. Place the dough seam side down in a lightly greased mini loaf pan.
- Cold proof: Cover the loaf tins with a towel or place each in a plastic bag. Refrigerate the dough for at least 12 hours, or up to 48 hours. The longer it chills, the tangier the flavor.
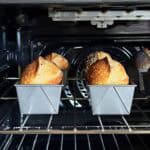
- Bake mini loaves: Place an empty steam pan (such as a roasting pan or cast-iron skillet) on the lower rack and preheat your oven to 500°F (260°C). Once preheated, bring water to a boil. Take the loaf pans out of the fridge and score the dough. Bring the tins to the middle rack of the oven. Carefully pour about 350-400g (or 1½ to 2 cups) of boiling water into the steam pan, then quickly close the oven door. Lower the temperature to 430°F (220°C) and bake for 20 minutes. After that, remove the steam pan and bake for an additional 15–17 minutes, until the crust is nicely browned.
- Cool the bread: Use oven mitts to remove the mini loaf pans, carefully release the loaves, and let them cool on a wire rack for at least 2 hours before slicing.
Notes
- Storage and freezing: Keep your sourdough bread at room temperature for 3 to 5 days. For longer storage, freeze individual slices for 1–2 weeks or whole mini loaves for 1–2 months.
- Multiple batches: If baking several loaves, allow the oven to return to 500°F (260°C) before loading the next batch. Adjust the baking temperature and time as needed by testing.
- Safety tip: Always use oven mitts or silicone gloves when handling hot pans. When pouring boiling water into the steam pan, wear safety goggles.
- Check for doneness: Your mini loaves are fully baked when the internal temperature reaches 205–210°F (96–99°C). Use a digital thermometer to check.
- Want to create a custom formula for your loaf? Try my sourdough calculator.
- Need help getting started? Check out my beginner's sourdough bread guide to learn sourdough basics first.
- Note: Nutritional information does not include the white rice flour used for dusting.
Nutrition
- Calories: 667
- Sugar: 0.5g
- Sodium: 1299mg
- Fat: 1.8g
- Saturated Fat: 0.3g
- Carbohydrates: 139.9g
- Fiber: 5g
- Protein: 18.9g
- Cholesterol: 0mg
Find it online: https://sourdoughtalk.com/sourdough-mini-loaves/