Stand Mixer Sourdough Bread Recipe
This artisan-quality stand mixer sourdough bread is made in a KitchenAid stand mixer, featuring a soft, airy crumb and golden crust. Perfect for beginners and seasoned bakers alike.
- Prep Time: 22 hours
- Cook Time: 40 minutes
- Total Time: 22 hours, 40 minutes
- Yield: 1 loaf 1x
- Category: Sourdough Recipes
- Method: Baking
- Cuisine: American
Ingredients
Scale
For the levain (an active starter):
- 22 g sourdough starter
- 22 g bread flour
- 22 g water
For the bread dough:
- 300 g bread flour (I use King Arthur organic bread flour)
- 225 g cold water (75% hydration)
- 60 g levain (active starter at peak)
- 6 g fine sea salt (I use Redmond ancient fine sea salt)
10 g white rice flour (for dusting)
Instructions
- Make a levain (an active starter): Feed the "mother" starter in the morning at a 1:1:1 ratio (22g starter, 22g flour, and 22g water), and wait 4-6 hours for it to peak.
- Autolyse: In the bowl of a stand mixer, combine cold water and flour, then mix for 1-2 minutes on Speed 1 until a shaggy dough forms. Cover the bowl with a clean tea towel or a plastic cap and let it rest at room temperature for 30 minutes.
- Add levain: Add the active starter at peak and mix the dough on Speed 2 for 3-4 minutes. Cover the bowl with a clean tea towel or a plastic cap and let it rest at room temperature for 30 minutes. Bulk fermentation begins once the starter is added.
- Add salt: Sprinkle the salt over the dough and mix for 5-6 minutes on Speed 3, until the dough starts to pull from the sides of the bowl. Check the gluten development using the windowpane test. Transfer the dough to a fermentation container, cover it with a clean tea towel or a plastic cap, and let it rest at room temperature for 30 minutes.
- Continue bulk fermentation: Perform two sets of coil folds, with a 30-minute rest between sets. After the final set of coil folds, let the dough continue bulk fermentation and monitor its rise closely. Bulk fermentation is done when the dough shows bubbles on the surface and along the sides, the edges appear slightly domed, and the dough gently wobbles when you shake the bowl.
- Preshape and shape: Lightly flour your work surface, preshape the dough into a round, and let it rest for 10-15 minutes. Perform the final shaping into a battard, then place it in a prepared 8-inch oval banneton.
- Proof: Cover the banneton with a clean towel, disposable plastic cap, or place it inside a reusable plastic bag. Refrigerate overnight (8–14 hours).
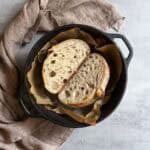
- Bake: Preheat the oven to 500°F (260°C) with a Dutch oven inside for 30 minutes. Transfer the dough onto parchment paper, score the top, and place it inside the Dutch oven. Decrease the oven temperature to 450°F (232 °C), then bake, covered, for 20 minutes; uncover and bake for another 17-20 minutes, until golden and crisp. Remove the bread from the Dutch oven and let it cool on a wire rack for at least 2 hours before slicing.
Notes
- Mixer note: Mixer models vary. For sourdough dough, most manufacturers recommend Speed 1–2. This recipe was tested with 300 g flour and brief mixing at Speed 3. Always follow your mixer manufacturer’s guidelines.
- Use the dough hook: Use the dough hook, not the paddle attachment, when mixing sourdough dough.
- Avoid high speeds: Do not start the mixer at a high speed. Begin mixing on a low speed to protect both the dough structure and the mixer motor.
- Use cold water: Mix the dough with cold water. You can even chill the water in the refrigerator overnight before mixing.
- Watch the mixer while it runs: Keep an eye on it. Some mixers can “walk” on the counter during kneading, especially with heavier doughs. If this happens, hold the mixer or move it back on the counter to keep it stable.
- Control dough temperature: Keep the dough temperature around 75-80°F (24–27°C) while mixing. Use an infrared thermometer to check the dough temperature occasionally without stopping the mixer. If the dough temperature rises above 80°F (27°C), cover the mixer bowl and refrigerate the dough for about 15 minutes to cool it down. Then continue mixing.
- Check gluten development: At the end of mixing, check the dough strength using the windowpane test.
- Plan the folds: If the dough has reached about 90% of a windowpane, perform 2-3 sets of coil folds during bulk fermentation. If the dough is less developed, start with 1 set of stretch and folds, then finish with 2 sets of coil folds.
- Handle hot equipment safely: Always use oven mitts or silicone gloves when handling hot pans or Dutch ovens.
- Check for doneness: Your bread is fully baked when the internal temperature reaches 205–210°F (96–99°C). I usually aim for 207°F (97°C) or higher. Use a digital probe thermometer to check.
- Store the bread properly: Store sourdough bread at room temperature for 3-5 days. Freeze for up to 3 months. Thaw at room temperature. Freeze individual slices for up to 1-2 weeks, a whole loaf for 1-2 months.
- Want to create a custom formula for your loaf? Try my sourdough calculator.
- Need help getting started? Check out my beginner's sourdough bread guide to learn sourdough basics first.
- Note: Nutritional information does not include the white rice flour used for dusting.
Nutrition
- Calories: 1201
- Sugar: 0.9g
- Sodium: 2340mg
- Fat: 3.2g
- Saturated Fat: 0.5g
- Carbohydrates: 251.8g
- Fiber: 8.9g
- Protein: 34.1g
- Cholesterol: 0mg
Find it online: https://sourdoughtalk.com/stand-mixer-sourdough-bread/