
If you have ever baked sourdough, you know the sourdough baking schedule is everything. Miss your starter's peak, and your dough might not rise as expected. That is why keeping a clear timeline is key.
I have created four sample sourdough schedules to help you design a timeline that fits your routine, environment, and baking pace. Make sure to print out my Sourdough Baking Schedule Template.
You can follow my Beginner's Sourdough Bread or Master Sourdough Bread recipe, depending on your experience and confidence level.
These examples are based on my kitchen conditions: a room temperature of 73°F (23°C) during the day and 69°F (21°C) at night, with humidity around 41-43%. Since every kitchen is a little different, you will want to adjust your schedule to match your own temperature and humidity levels.
When mixing the dough, I aim for a desired dough temperature (DDT) of 75-76°F (24°C). To monitor bulk fermentation, I use both the dough temperature and the percentage rise method developed by Tom Cucuzza, along with an aliquot jar method using a small 2.7-ounce container marked with milliliters and ounces.
Baking schedule with overnight levain
DAY 1 - 11:30 PM
Build the levain: Take 6 g of starter and place it into a clean 16-oz jar. Feed it with 60 g of flour and 60 g of water, following a 1:10:10 ratio. Use room-temperature water for best results. Keep feeding your "mother" starter regularly as usual.
Note: This feeding ratio is an example only. The right ratio depends on how active your starter is and what flour you use. You should know your starter well enough to predict how long it will take to reach its peak, so if you feed it in the evening, it will be ready to mix with your dough in the morning.
DAY 2
8 AM: Fermentolyse: Mix levain at peak with 95% of water and flour. Cover the dough and let it rest for 30 minutes.
8:30 AM: Add the remaining water and salt. Mix it by hand. Take a piece of dough and place it in an aliquot jar to track its rise. Cover the jar and keep it near the dough bowl.
8.40 AM: Cover the dough and let it rest for 30 minutes.
9:10 AM: Do the first set of stretch and folds. Check the dough temperature and make a note. Cover the dough and rest it for 30 minutes.
9:40 AM: Do the second set of stretch and folds. Check the dough temperature again and make a note. Let the dough rest for another 30 minutes.
10:10 AM: Do the first set of coil folds. Check the dough temperature and make a note. Cover the dough and rest it for 30 minutes.
10:40 AM: Do the second set of coil folds. Check the dough's temperature and make a note. Cover the dough and rest for another 30 minutes.
11.10 AM: Check the dough temperature every 30 minutes and make notes. Monitor how much the dough has risen in the aliquot jar.
1.30-2.00 PM: Preshape the dough and rest for 15-30 minutes. Shape the dough and place it in a banneton. Then, bring it to the fridge at 39°F (4°F) for cold proofing.
DAY 3 - 8:00 AM
Bake the dough straight from the fridge. Let the bread cool for at least 2 hours before slicing it.
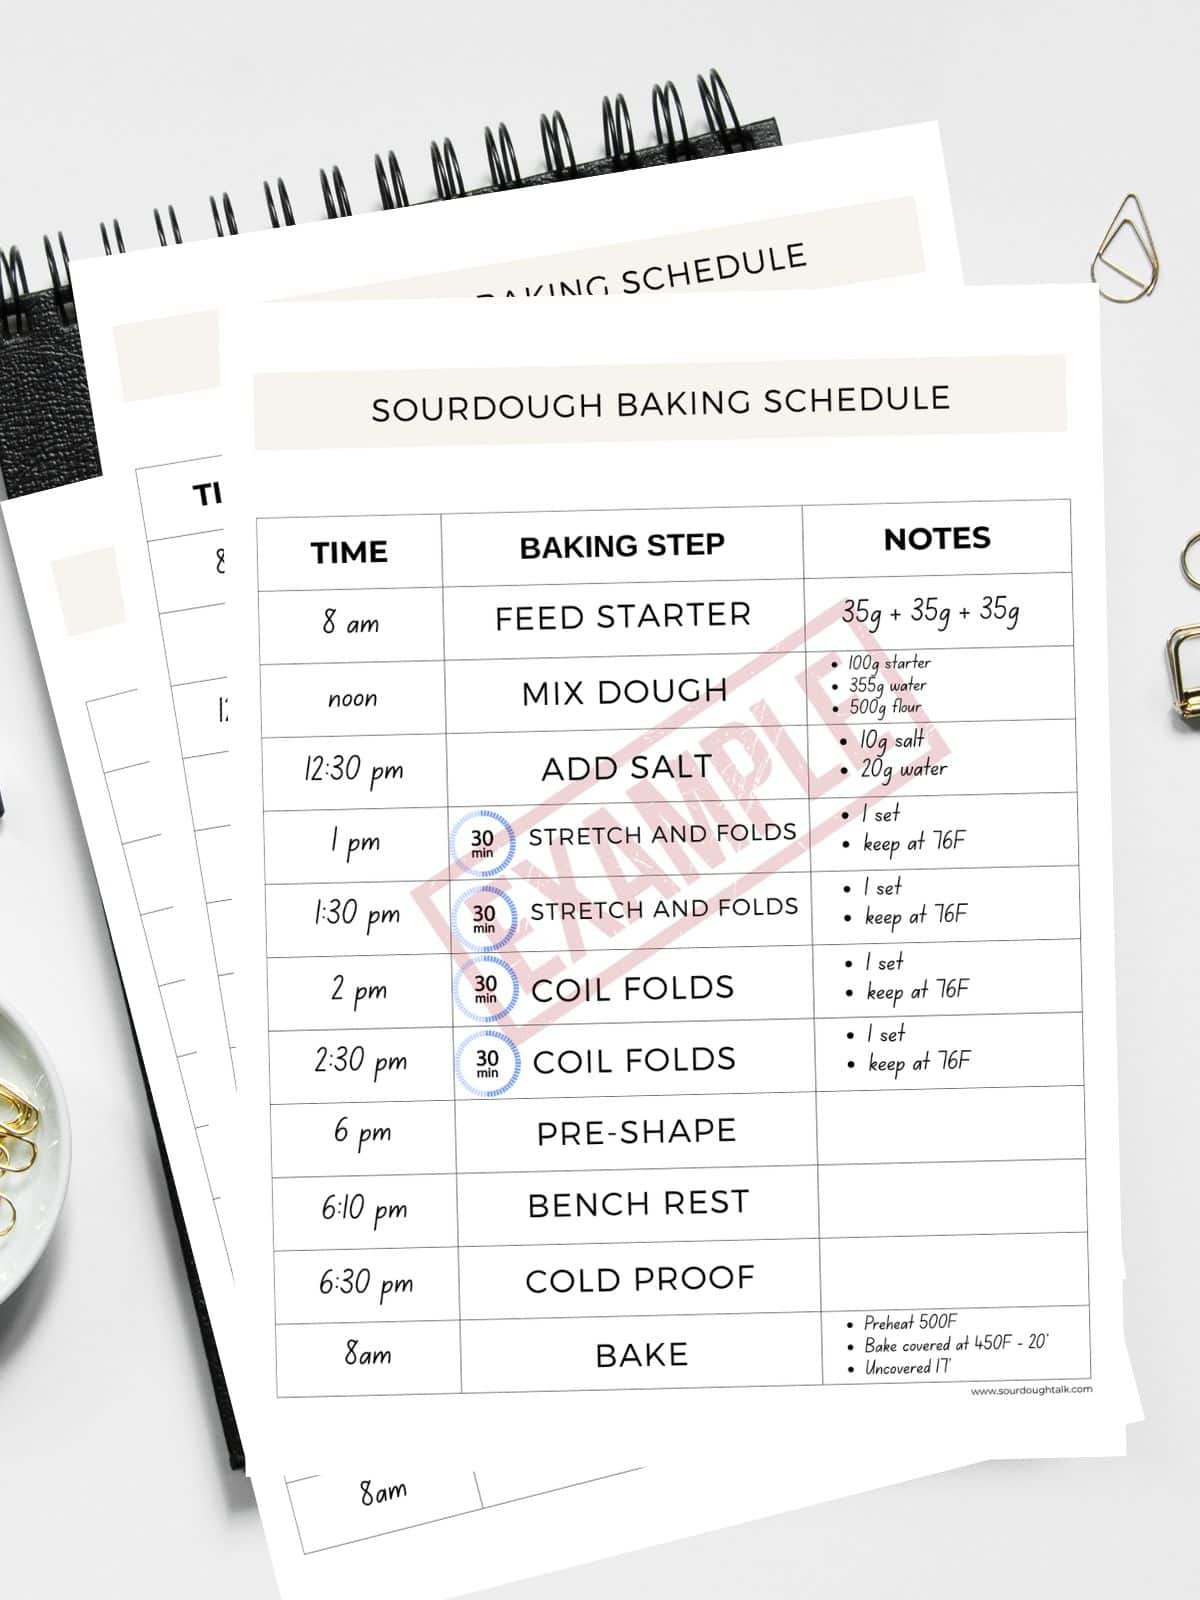
Baking schedule with same-day levain
DAY 1
8 AM: Build the levain: Take 35g of starter and place it in a clean 16-oz jar. Feed it 35g of flour and 35g of water using a 1:1:1 ratio (35g starter, 35g flour, 35g water). Let it peak.
8:05 AM: Feed the "mother" starter with a regular feeding ratio, for example, 1:3:3 (feeding it twice daily). This step can be easily overlooked, and the "mother" starter can be discarded by mistake. But if you do, you will still have enough leftover levain to continue caring for your starter. I always make a little extra levain than needed, just in case.
12 PM: Fermentolyse: Mix the levain at peak with 95% of the water and flour. Cover the dough and let it rest for 30 minutes.
12:30 PM: Add the remaining water and salt and mix. Take a piece of dough and place it in an aliquot jar. Cover the jar and set it near the dough bowl.
12.40 PM: Cover the dough and let it rest for 30 minutes.
1:10 PM: Do the first set of stretch and folds. Check the dough temperature and record it. Cover the dough and let it rest for 30 minutes.
1:40 PM: Do the second set of stretch and folds. Check the dough temperature and write it down again. Cover the dough and let it rest for another 30 minutes.
2:10 PM: Do the first set of coil folds. Check the dough temperature and record it. Cover the dough and let it rest for 30 minutes.
2:40 PM: Do the second set of coil folds. Check the dough temperature and record it. Cover the dough and let it rest for 30 minutes.
3.10 PM: Check the dough temperature every 30 minutes and write it down. Monitor the percentage rise closely.
5.30-6.00 PM: Preshape the dough and rest for 15-30 minutes. Shape the dough and place it in a banneton. Bring it to the fridge at 39°F (4°F) for cold proofing.
DAY 2 - 8:00 AM
Bake the dough directly from the fridge. Let the bread cool for at least 2 hours before slicing it.
Workday timetable without a proofing box
Here is an example of how to bake sourdough bread outside of the typical 9-to-5 working hours. While it can be challenging without a proofing box (shaping the dough late at night), it is possible.
DAY 1
7:30 AM: Build the levain: Take 6g of starter and put it in a clean 16-oz jar. Feed it 66g of flour and 66g of water using a 1:11:11 ratio (6g starter, 66g flour, 66g water). To slow down the fermentation, use cold water and leave the starter on the kitchen counter. The idea is to get your starter at peak by the time you come home from work.
Note: This feeding ratio is an example only. The right ratio depends on how active your starter is and what flour you use. You should know your starter well enough to predict how long it takes to reach its peak. The idea is to get your starter at peak by the time you come home from work.
7.35 AM: Feed the "mother" starter with a regular feeding ratio, for example, 1:3:3 (feeding twice daily). Be careful not to accidentally throw away the "mother" starter. Even if you do, you will still have enough levain to keep your starter going. That is why I always make a bit more than needed.
5:30 PM: Mix levain at peak with room-temperature water, flour, and salt. Take a piece of dough and place it in an aliquot jar. Cover the jar and put it next to the dough bowl. Cover the dough and let it rest for 30 minutes.
6:00 PM: Do the first set of stretch and folds. Check the dough temperature and record it. Cover the dough and let it rest for another 30 minutes.
6:30 PM: Do the second set of stretch and folds. Check the dough temperature and record it. Cover the dough and let it rest for another 30 minutes.
7:00 PM: Do the first set of coil folds. Check the dough temperature and record it. Cover the dough and let it rest for another 30 minutes.
7:00 PM: Do the second set of coil folds. Check the dough temperature and record it. Cover the dough and let it rest for another 30 minutes.
7:30 PM: Check the dough temperature every 30 minutes and make notes. Monitor the percentage rise closely.
11:00 PM - 12:30 AM: Pre-shape the dough, let it rest, and shape it. Then place the dough in a banneton and refrigerate it at 39°F (4°C) for cold proofing.
DAY 2, 6 AM
Bake the dough straight from the fridge. Let the bread cool for at least 2 hours before slicing it.
Workday timetable using a proofing box
A Brod & Taylor proofing box makes baking more manageable. After feeding your starter at night, mix everything in the morning and let the dough rise in the proofing box while you are at work. When you get home, shape the dough and refrigerate it overnight before baking the next day.
DAY 1
9 PM: Build the levain: Take 6g of starter and put it in a clean 16-oz jar. Feed it 60g of flour and 60g of water using a 1:10:10 ratio (6g starter, 60g flour, 60g water). Make sure to use room-temperature water. Continue feeding the "mother" starter at your regular feeding ratio.
Note: This feeding ratio is an example only. The right ratio depends on how active your starter is and what flour you use. You should know your starter well enough to predict how long it will take to reach its peak, so if you feed it in the evening, it will be ready to mix with your dough in the morning.
DAY 2
7:00 AM: Mix levain at peak with room-temperature water, flour, and salt. Take a piece of dough and place it in an aliquot jar. Cover the jar and place it next to the dough bowl. Cover the dough and let it rest for 30 minutes.
7:20 AM: Do the first set of stretch and folds. Check the dough temperature and record it. Cover the dough and let it rest for 20 minutes.
7:40 AM: Do the second set of stretch and folds. Check the dough temperature and record it. Cover the dough and let it rest for 20 minutes.
8:00 AM: Do the first set of coil folds. Check the dough temperature and record it. Cover the dough and let it rest for 20 minutes.
8:20 AM: Do the second set of coil folds. Check the dough temperature and record it. Place the dough and the aliquot jar in the proofing box set at 70°F (21°C). It should rise about 75% over the next 8-12 hours.
5:30-6:00 PM: Pre-shape the dough, let it rest, and then shape it. Place the dough in a banneton and refrigerate it at 39°F (4°C) for cold proofing.
DAY 3, 7 AM
Bake the dough straight from the fridge. Let the bread cool for at least 2 hours before slicing it.
How to keep your sourdough schedule organized
One of the best ideas I have seen (and personally use!) came from a Facebook post where someone used a whiteboard with a dry-erase marker to track their sourdough schedule.
You can:
- Use a small magnetic whiteboard and stick it to your fridge.
- Write each step with its time and action (Feed starter, Mix dough, Stretch + Fold, etc.).
- Use a whiteboard eraser and adjust as you go.
- Add checkboxes or doodles for fun to make the process feel more interactive and motivating.
If you prefer something reusable but neater, you can also use a laminated printout of your favorite timeline and write on it with a dry-erase marker or use a clear acrylic board.
As a tech enthusiast, consider using a shared Google Sheet or Notes app. You can even set reminders for each step.
How to create your own custom whiteboard
You can easily get or make a reusable whiteboard that fits your exact sourdough schedule.
Option 1: Order a custom-printed whiteboard
Many print-on-demand or office supply websites (like Vistaprint, Zazzle, Etsy sellers, or local sign/print shops) can print any design directly onto a dry-erase surface.
What should you include in your design? I suggest creating a permanent table layout with rows for each step (Feed Starter, Mix Dough, Add Salt, Stretch + Fold, etc.) and leaving a blank space beside each step to write the time with a marker.
Option 2: DIY version
You can easily make one at home. Here is how:
- Print out my Sourdough Baking Schedule Template.
- Slip it into a clear acrylic photo frame or a plastic sleeve.
- Use a fine-tip point marker to write times directly on the surface.
Option 3: Magnetic or fridge version
If you prefer to keep it nearby, consider using a magnetic whiteboard sheet. You can use a permanent marker for the table lines and headings, and a dry-erase marker for writing and erasing the daily times.
Tips for creating your sourdough baking timetable
- Adjust your baking timeline: Consider your starter's time to peak (from feeding to peak) and your skill level, whether you prefer using the aliquot jar method or skipping it. Also, choose between autolyze, fermentolyse, or mix all the ingredients at once.
- Get organized: Weigh the recipe ingredients ahead of time, especially on weekdays.
- Adapt to kitchen temperature: If your kitchen is warm, use less starter, cold or chilled water, place the dough in a cooler spot, and/or lower the dough hydration to slow down fermentation. In a cooler kitchen, try using more starter, warm water, a warmer spot for the dough, and/or raising the dough hydration to speed up fermentation.
- Find out your starter's times to peak: Experiment to determine these times for your starter, both at night and during the day. Test with room temperature and chilled water to determine when your starter reaches its peak. For my starter, it takes about 10 hours to peak when fed at a 1:10:10 ratio at night (69°F / 20.5°C), and about 4-6 hours to peak when fed at a 1:1:1 ratio at 76°F / 24.5°C.
- Use a proofing box: Experiment with different temperatures to keep your dough from under- or over-proofing. You will need to adjust the timing based on your own testing and results.
- Keep your starter and levain separate: Always make levain and feed the "mother" starter separately. This way, you won't accidentally discard the "mother" starter or use up all the levain for the recipe, leaving no leftovers to continue your starter.
- Consider a Brod & Taylor Sourdough Home: If you bake often, this tool will help you maintain your starter at the precise temperature you need.
Let's talk sourdough
Creating a sourdough baking timetable might seem challenging at first, but it is all about finding what works for you. You can easily adapt your schedule around your work hours or daily routine. With time and practice, you will develop a baking rhythm that works for you.
Whether you have a busy job or are a stay-at-home parent, you can absolutely bake beautiful sourdough bread. Many bakers even turn their love for sourdough into thriving cottage baking businesses.
Have a question or want to share your own routine? Drop a comment below.
Ready to keep learning?
Once your baking schedule is in place, let's dive deeper into using and managing your sourdough starter. The next question is how much sourdough starter to use. The amount of starter directly affects fermentation speed, flavor, and dough strength.

Comments
No Comments