


Quick Summary: This beginner sourdough bread recipe makes one loaf of about 950g from just four ingredients: bread flour, water, an active sourdough starter, and salt. At a forgiving 68% hydration, the dough stays easy to handle.
Total time is about 21 hours, mostly hands-off fermentation that shifts with your kitchen temperature, with only about 30 minutes of active work. You will mix, build strength with stretch-and-folds and coil folds, bulk ferment until the dough is well risen and airy, shape, cold-proof overnight, and bake in a Dutch oven at 450°F (232°C).
With thousands of loaves baked, I created this recipe specifically for novice bakers. The dough is easy to handle, the instructions are simple to follow, and every step includes photos so you always know what your dough should look like.
You do not need expensive tools. You do not need advanced sourdough knowledge. You only need an active sourdough starter, four basic ingredients, and a little patience. A bowl, a tea towel, a kitchen scale, and a Dutch oven (or a lidded pot/roasting pan alternative) are enough.
And if you have heard that sourdough is pricey, here is why sourdough bread is expensive, and why baking your own costs just a fraction of buying it.
By the end of this guide, you'll know exactly how to mix, ferment, shape, proof, and bake your first loaf of sourdough bread.
If this is not your first loaf and you have already spent time learning the fundamentals, including starter maintenance, bulk fermentation, dough temperature, target percentage rise, shaping, and proofing, you are ready for my Master Sourdough Bread recipe.
Note: The terms "levain" and "active starter" are often used interchangeably, and I will be using both throughout this post.
What is sourdough bread?
Sourdough bread is a naturally leavened bread made without commercial yeast. Instead, it relies on a fermented mixture of flour and water called a sourdough starter, which contains wild yeast and beneficial bacteria.
This natural fermentation process is what gives sourdough its signature tangy flavor, chewy texture, and crisp crust. Unlike quick-rise breads, sourdough develops slowly over time, which also helps improve its digestibility and overall flavor.
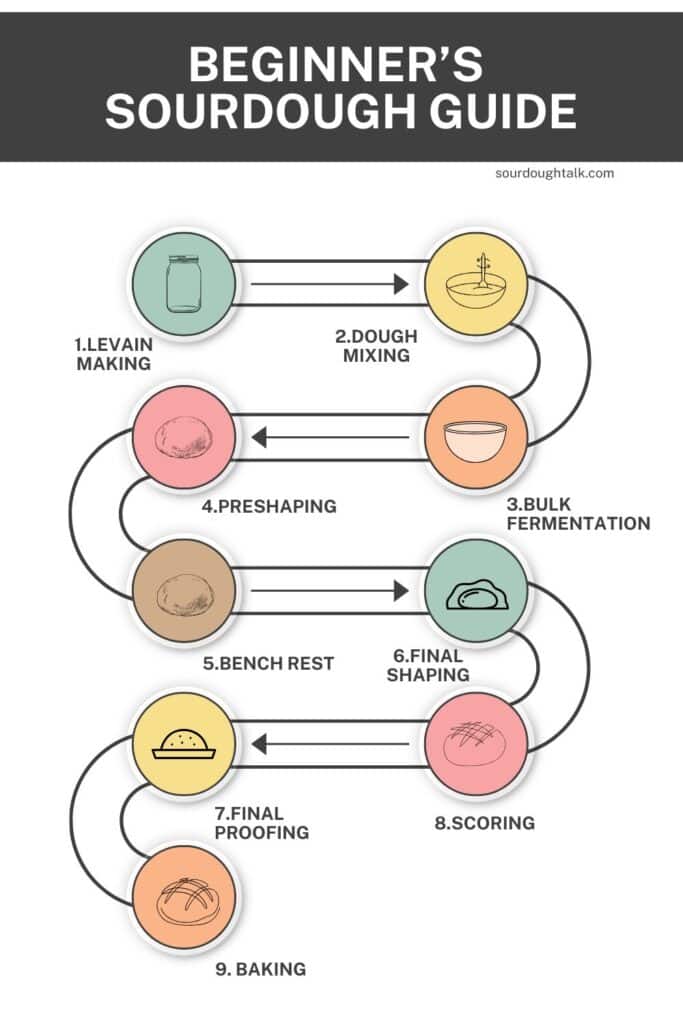
Your Beginner's Guide to Sourdough
This post is part of a series that walks you through every step, from feeding your starter to pulling the loaf from the oven.
Why most beginner sourdough recipes fail
Most beginner sourdough issues come from misunderstanding fermentation rather than the recipe itself. This is why choosing the right sourdough bread recipe is so important, especially when you are learning the basics.
One of the most common issues is dough that is too wet. High-hydration dough is difficult to handle, making shaping challenging and resulting in flat, weakly structured loaves.
Fermentation mistakes are another major cause of failure. Under-fermented dough produces dense bread with little rise, while over-fermented dough becomes weak, collapses easily, and struggles to hold its shape.
A weak, acidic sourdough starter almost always leads to baking failure. It won't generate enough fermentation to properly leaven the dough, leading to poor rise and texture.
Kitchen temperature also plays a significant role. A cold kitchen slows bulk fermentation, making the dough seem stalled or underproofed, even if you follow the recipe to the letter. The recipe author's room temperature may be very different from yours, which is why bulk fermentation times vary so much from one kitchen to another.
And the biggest mistake: following the clock instead of the dough. Sourdough responds to visual and physical cues, not to strict timing.
How is this sourdough bread recipe different?
This easy sourdough bread recipe differs from others online because it is specifically designed for beginners learning how to bake their very first sourdough loaf. Here is what makes it special:
- Every step is explained in detail, accompanied by clear instructions and step-by-step photos, making it easy to follow.
- The recipe uses a low-hydration dough (68%) and a simple method, skipping the complex sourdough science (yes, for now).
- Unlike many other recipes, this one does not require fancy baking tools.
- A sample baking timeline helps you stay organized and manage your time effectively.
What you need to know before baking your first sourdough loaf
Before you bake your first sourdough loaf, let's cover a few common beginner concerns that often cause confusion and lead to inconsistent results.
- Dutch oven is helpful, but not required. It traps steam for better oven spring and crust. If you don't have one, you can still bake using Dutch oven alternatives.
- All-purpose flour works. You can start with AP flour, but bread flour gives more strength and makes handling easier for beginners.
- Fridge starter needs to be reactivated. A cold starter should be fed 1-2 times at room temperature until it becomes active and bubbly again.
- Banneton is optional. It helps shape the dough, but a bowl lined with a floured towel works just as well.
- Expect a long process (8-24 hours). Most of the time is bulk fermentation, not active work. If this is your first time baking sourdough bread, try making the recipe over the weekend. This will give you plenty of time to learn, follow each step carefully, and enjoy the process without feeling rushed.
To learn more about common sourdough terms and abbreviations, check out my sourdough glossary.
Ingredients
This recipe is designed for a single loaf of bread using 500g of flour. Make sure the sourdough bread ingredients are at room temperature before starting. You will need a digital kitchen scale to measure the ingredients accurately.
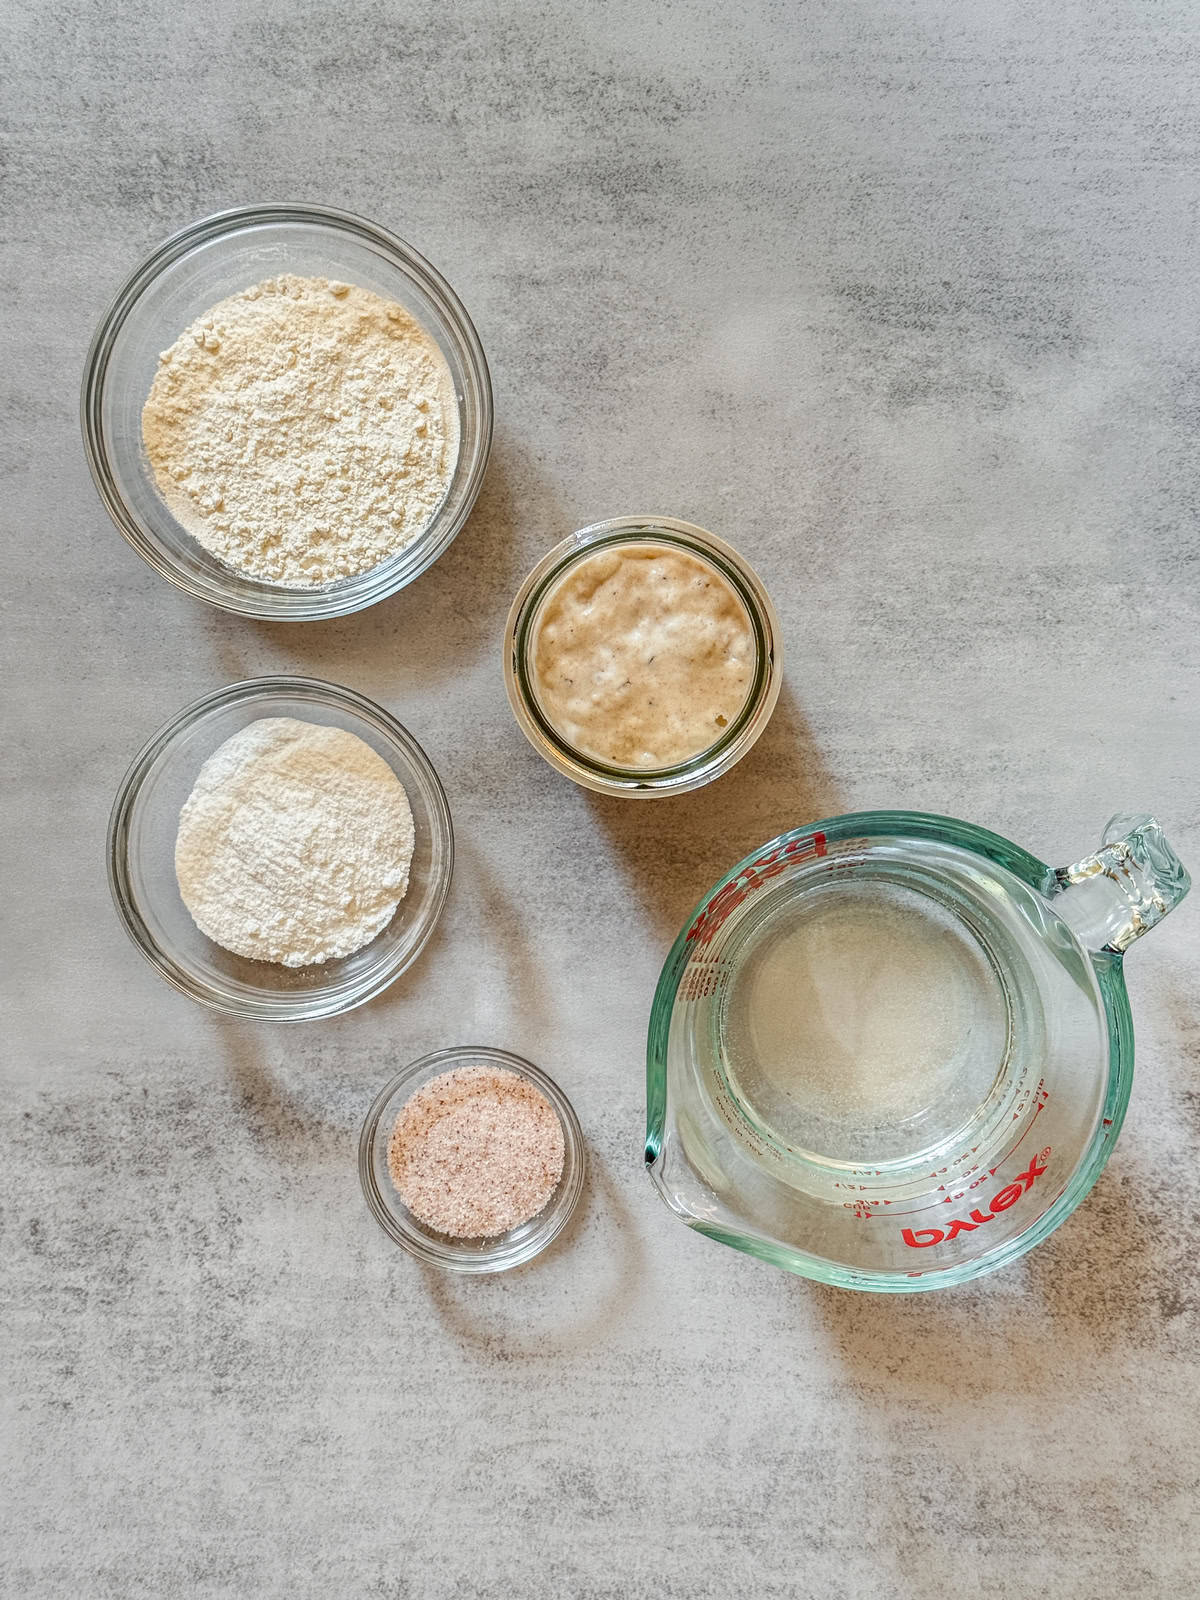
- Sourdough starter: Use a sourdough starter at peak. You can make it from scratch (here is a beginner sourdough starter recipe) or purchase a dehydrated starter from my Etsy shop.
- Flour: As a beginner, start with unbleached bread flour with a high protein content. I use King Arthur bread flour with a protein content of 12.7%.
- Water: Opt for unchlorinated tap water, filtered or spring water. To dechlorinate tap water, let it sit in an open container overnight. Avoid distilled water as it lacks minerals.
- Salt: Use fine sea salt. Avoid iodized table salt.
- White rice flour: Use it to dust the work surface and a proofing bowl.
Here is the formula for beginner's sourdough bread:
| Ingredient | Baker's Percentage | Weight |
|---|---|---|
| Bread flour | 100% | 500g |
| Water | 68% | 340g |
| Levain/Active Starter, 100% hydration | 20% | 100g |
| Salt | 2% | 10g |
- Total dough weight is 950g. If you need to adjust the bread formula for your own loaf, try my sourdough calculator.
- My kitchen temperature is 73°F (23°C), with a humidity level of 40%
- Bulk fermentation: 6-7 hours with a 75% increase in dough size (you will learn how to adjust bulk fermentation later)
- Proofing time: 14 hours cold-proof in the fridge
- Baking in a conventional oven: 450°F (232°C) with the lid on for 20 minutes; without the lid, 17-20 minutes.
What equipment do you need?
- A kitchen scale for precise measurements.
- A large mixing bowl for enough space to mix and fold the dough.
- A straight-sided container or a 2L glass measuring cup is optional but highly recommended for tracking bulk fermentation.
- A medium-sized bowl for proofing (an alternative to a banneton) supports the dough while it proofs in the refrigerator. I am using a 2-½ quart mixing bowl for this recipe.
- A linen or cotton towel is used to cover the dough and prevent drying during bulk fermentation. I love using flour sack towels.
- Parchment paper helps transfer the dough to the oven and prevents sticking.
- A sharp knife or a bread lame (if you have one) is used to score the dough.
- A Dutch oven or roasting pan traps steam during baking. This 5-qt Dutch oven is one of the best on the market.
- Long oven mitts protect your hands from the high heat when handling the Dutch oven or roasting pan. These silicone gloves are my favorite.
- Bread knife for slicing sourdough into clean, even slices. Read more about choosing the best bread knife.
Sourdough baking schedule (73°F / 23°C kitchen)
The beginner's sourdough bread takes two days to make. On the first day, the active starter (levain) is prepared in the morning, and the dough is mixed in the afternoon. After shaping, it is cold-proofed in the fridge overnight, then baked the next day.
This schedule is based on a room temperature of 73°F (23°C). If your kitchen is warmer, the process will move faster; if it is cooler, it will take longer. Adjust the timing as needed, taking into account your kitchen's specific conditions. Use this timeline as a flexible guide, not a strict rule.
Day 1: Mix and ferment the dough
- 8:00 AM: Feed your sourdough starter.
- Noon: Mix the dough: combine water, levain, flour, and salt, cover, and let it rest for 30 minutes.
- 12:30 PM: Do the first set of stretch and folds. Cover and rest for 30 minutes.
- 1:00 PM: Second stretch and fold. Cover and rest for 30 minutes.
- 1:30 PM: Perform the first coil fold. Cover and rest for 30 minutes.
- 2:00 PM: Second coil fold. Cover the bowl and let the dough rest on the counter.
- 5:45 PM: Pre-shape the dough and let it rest for 15 minutes.
- 6:00 PM: Shape the dough and place it into a bowl lined with a clean cotton towel. Let it rest for 30 minutes.
- 6:30 PM: Transfer the dough to the refrigerator for cold proofing.
Day 2: Bake the bread
- 8:00 AM: Preheat the oven.
- 8:30 AM: Take the dough from the fridge and score.
- 8:40 AM: Bake.
- 9:20 AM: Cool on a wire rack for 2 hours.
How to make beginner's sourdough bread (step-by-step guide)
***The recipe card below includes the complete ingredient list, instructions, and a printable version for easy reference.
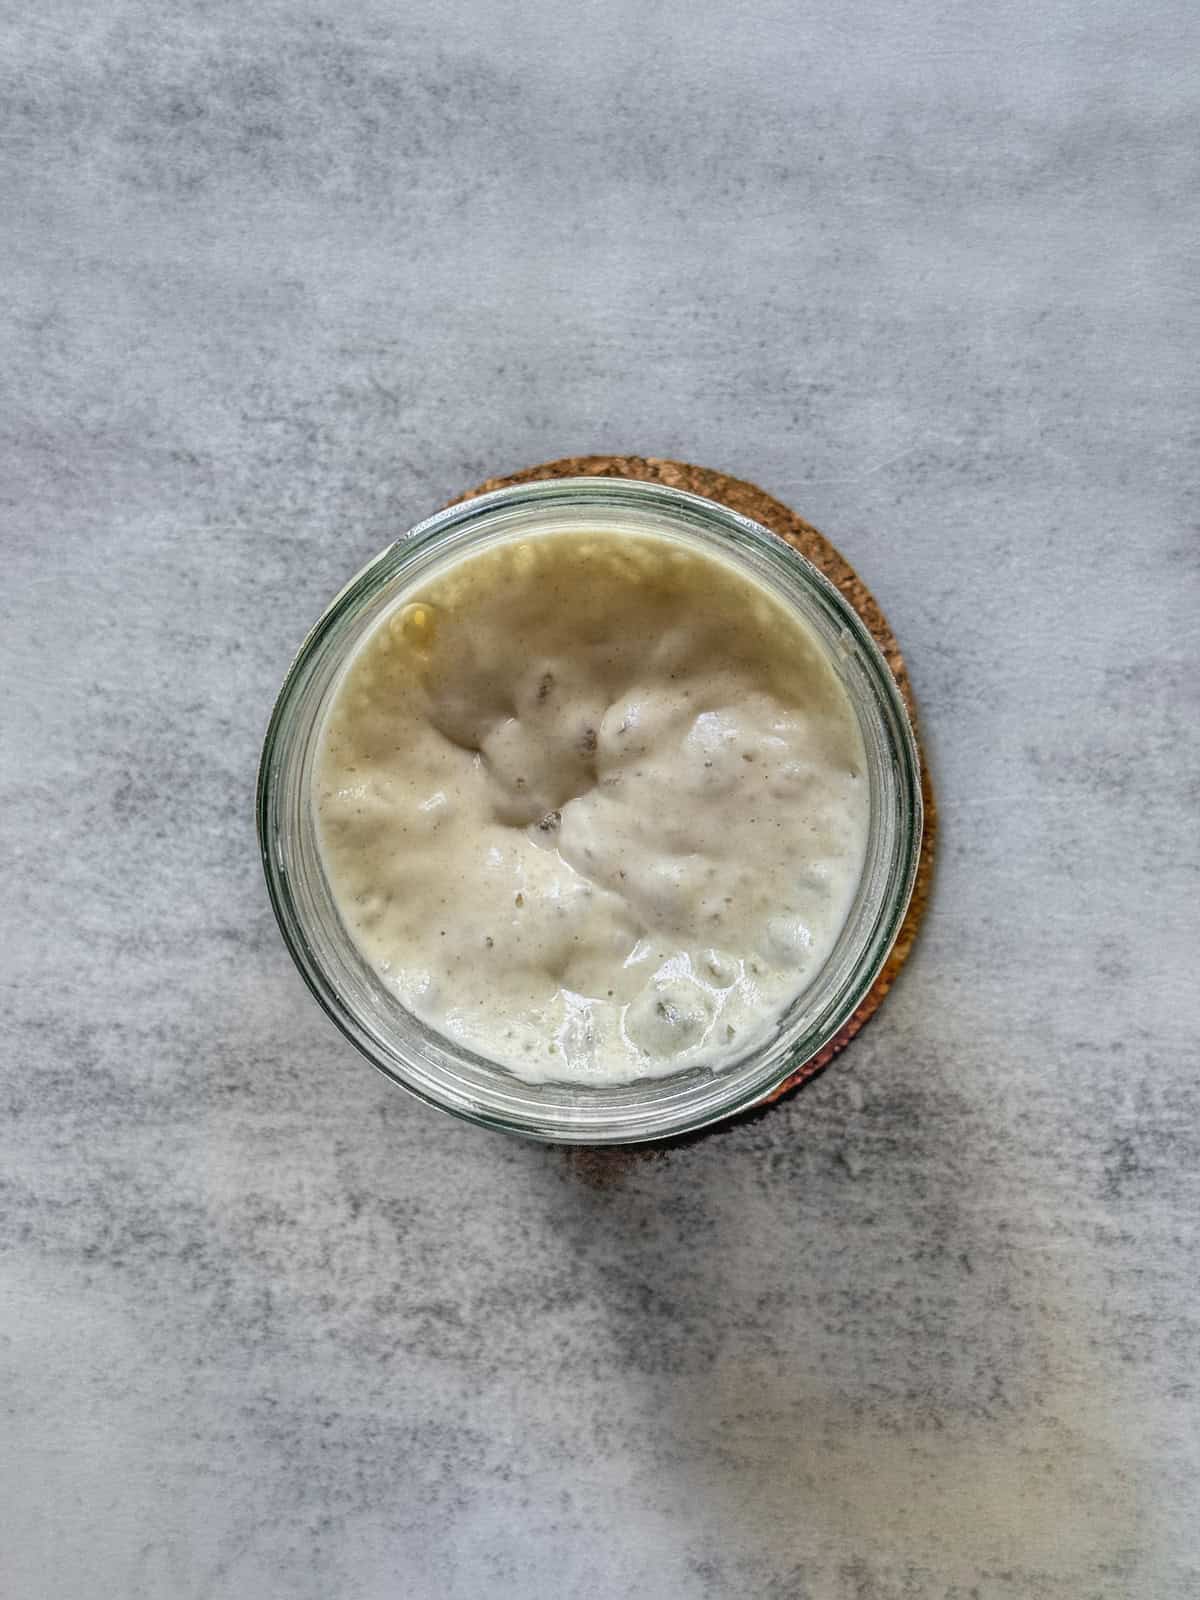
1. Make levain (active starter) - 8 AM
You can make levain (active starter) overnight, but I suggest a 1:1:1 levain build used immediately at peak.
As a beginner, you might not know how long it takes for your starter to peak with a specific feeding ratio. If you feed it the night before, it could be tricky to get the timing just right for the morning.
But don't worry. You can learn this with time. For now, let's keep it simple and make the levain in the morning.
Now, prepare the following ingredients:
| Ingredient | Baker's Percentage | Weight |
|---|---|---|
| "Mother" starter, 100% hydration | 33% | 35g |
| Bread flour | 33% | 35g |
| Water | 33% | 35g |
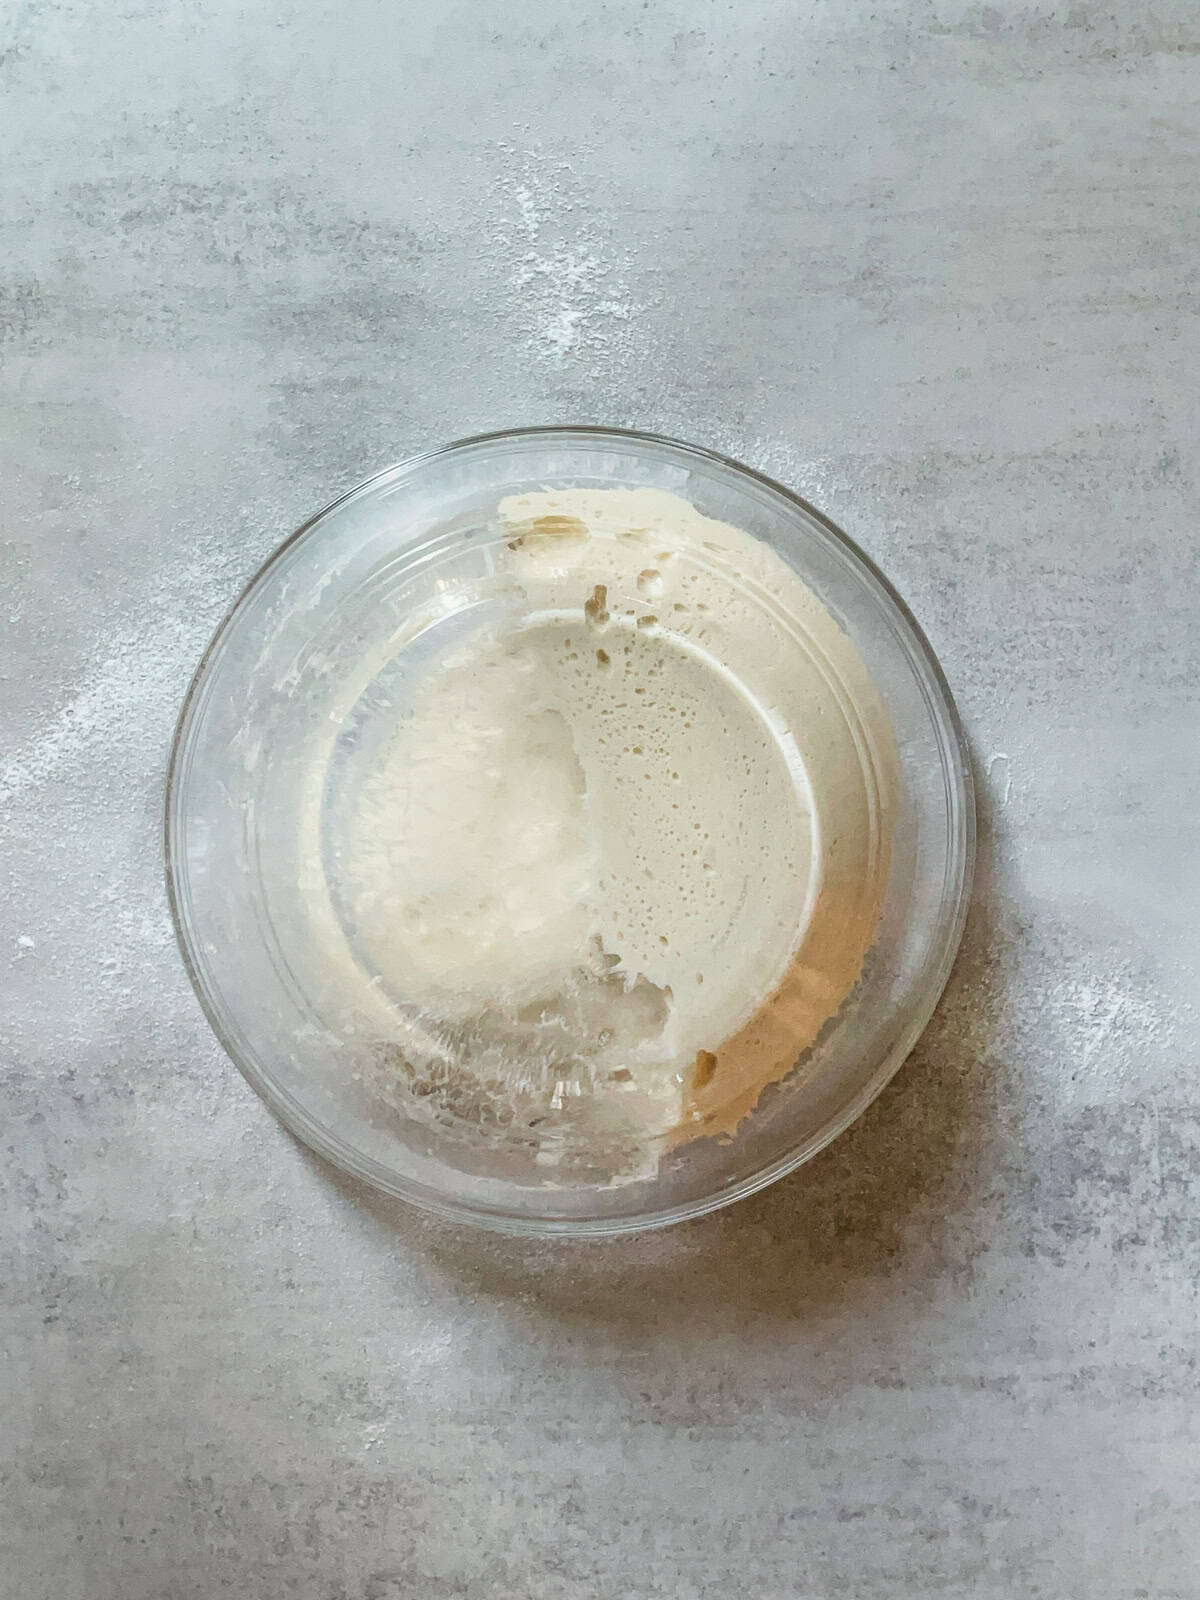
Take 35g of "mother" starter (either fed last night or straight from the fridge) and place it in a clean jar.
Add 35g of room-temperature water and mix with a jar spatula. Then add 35g of bread flour and stir until it reaches a pancake-batter consistency.
Loosely cover the jar and let it ferment in a warm spot in your kitchen (74-76°F or 23-24°C). The starter will reach its peak in 4 to 6 hours.
Please pay attention to how the true sourdough starter peak looks.
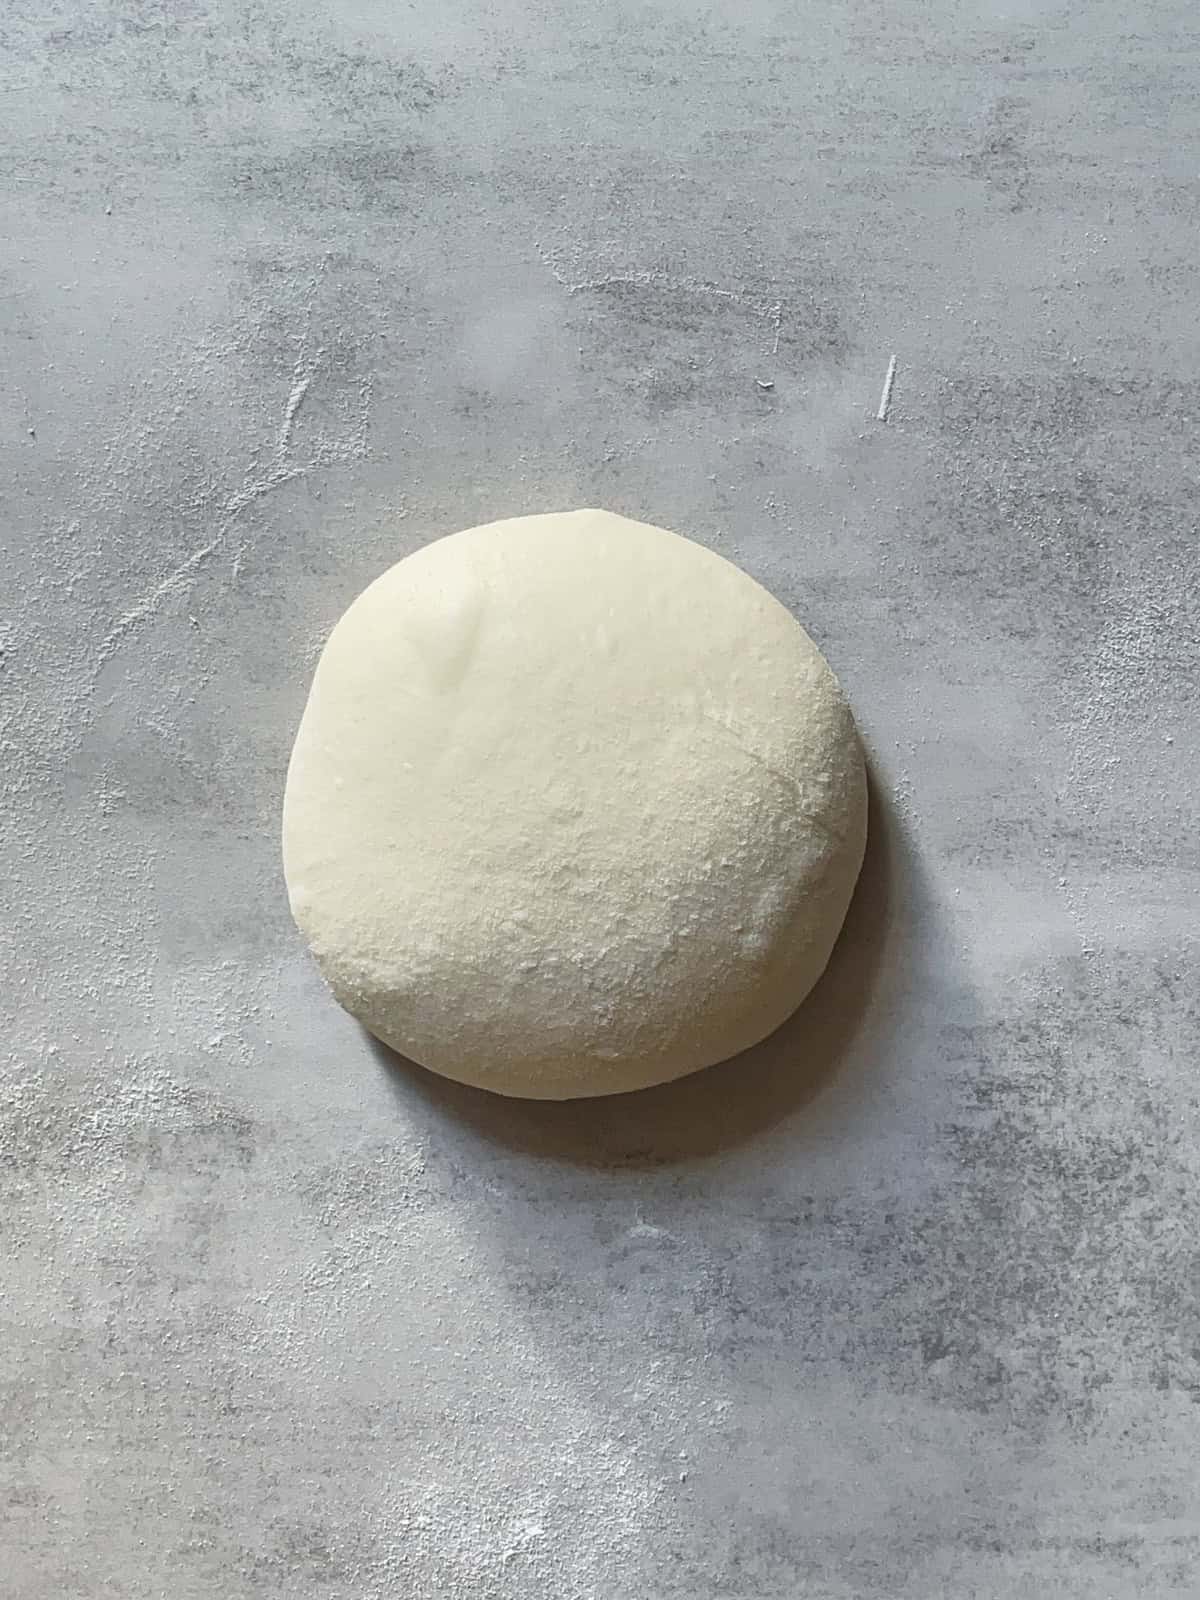
2. Mix the dough - Noon
This sourdough bread recipe was created in a kitchen at 73°F (23°C) and 40% humidity. Your kitchen might be warmer or cooler, so you may need to adjust the recipe (see details below).
Prepare a large mixing bowl and a smaller bowl filled with room-temperature water to wet your hands.
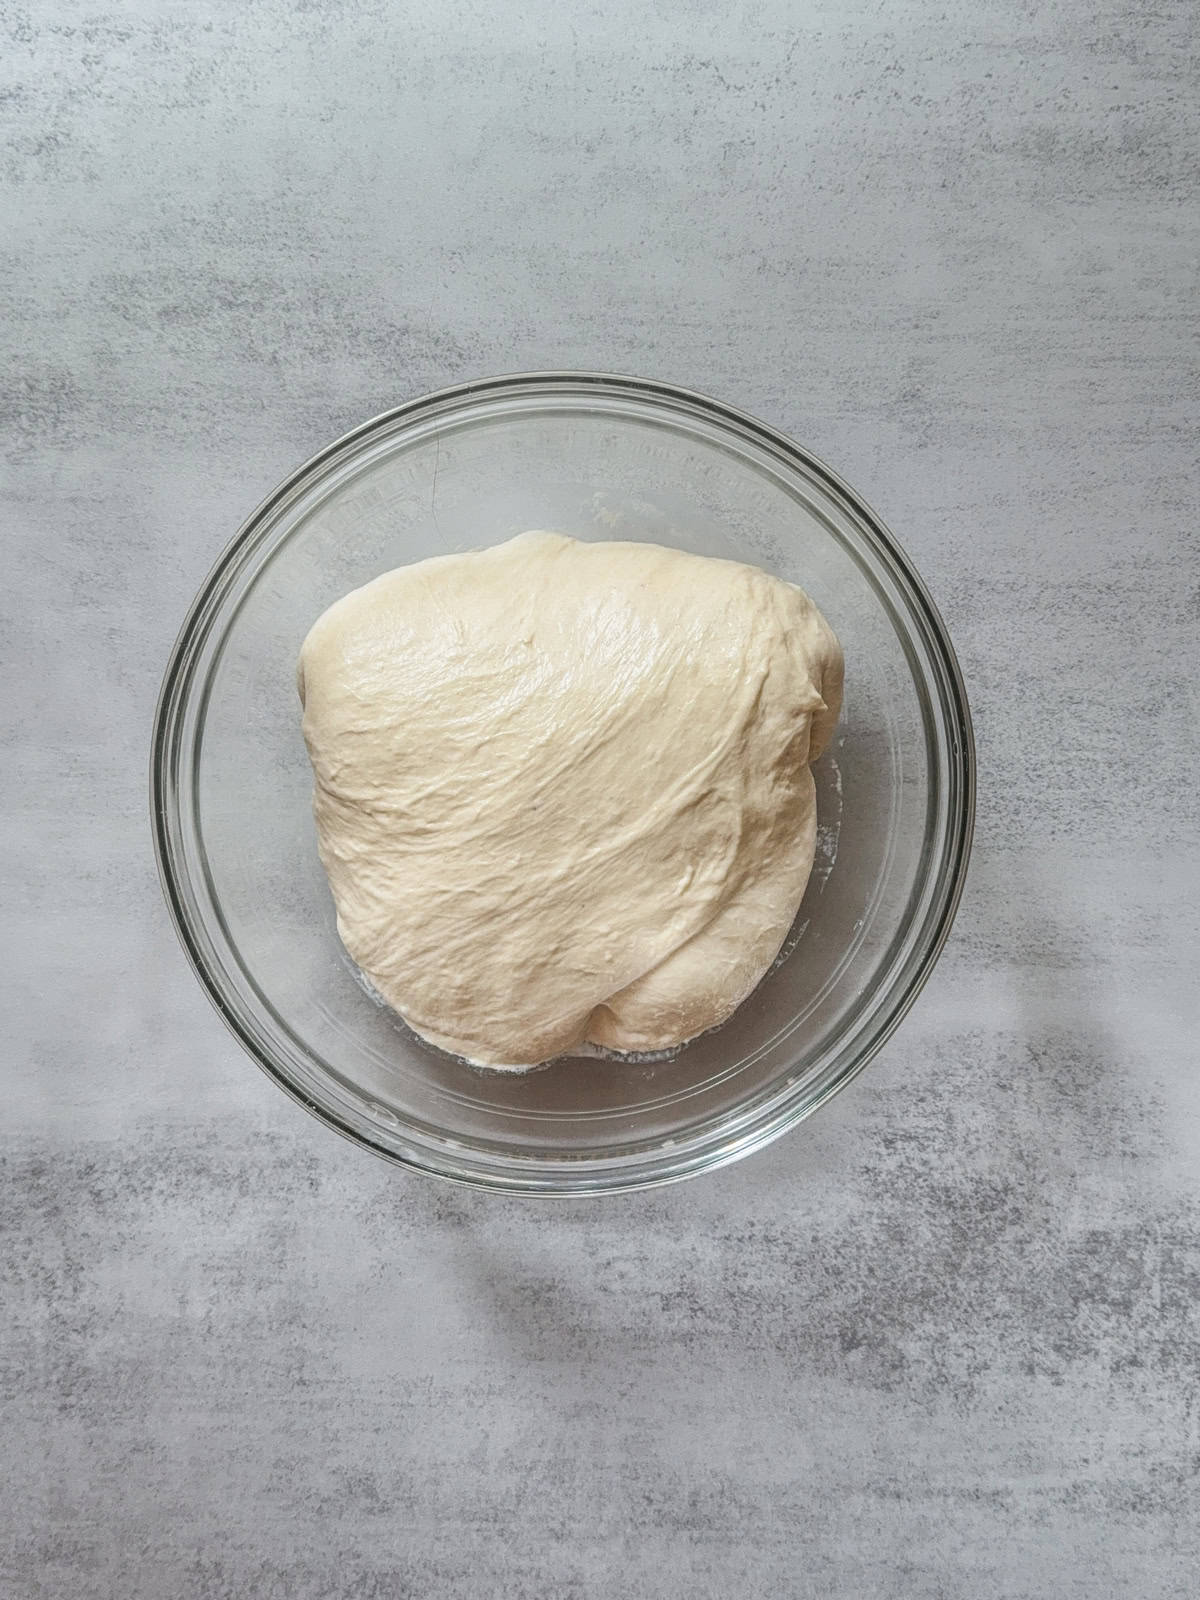
Measure water into a mixing bowl and add 100g of active starter (levain) at its peak. Then, add bread flour and salt, and you'll have a shaggy dough. Use one or both hands to mix the dough for about 3-5 minutes.
Once the active starter (levain) is added, bulk fermentation begins.
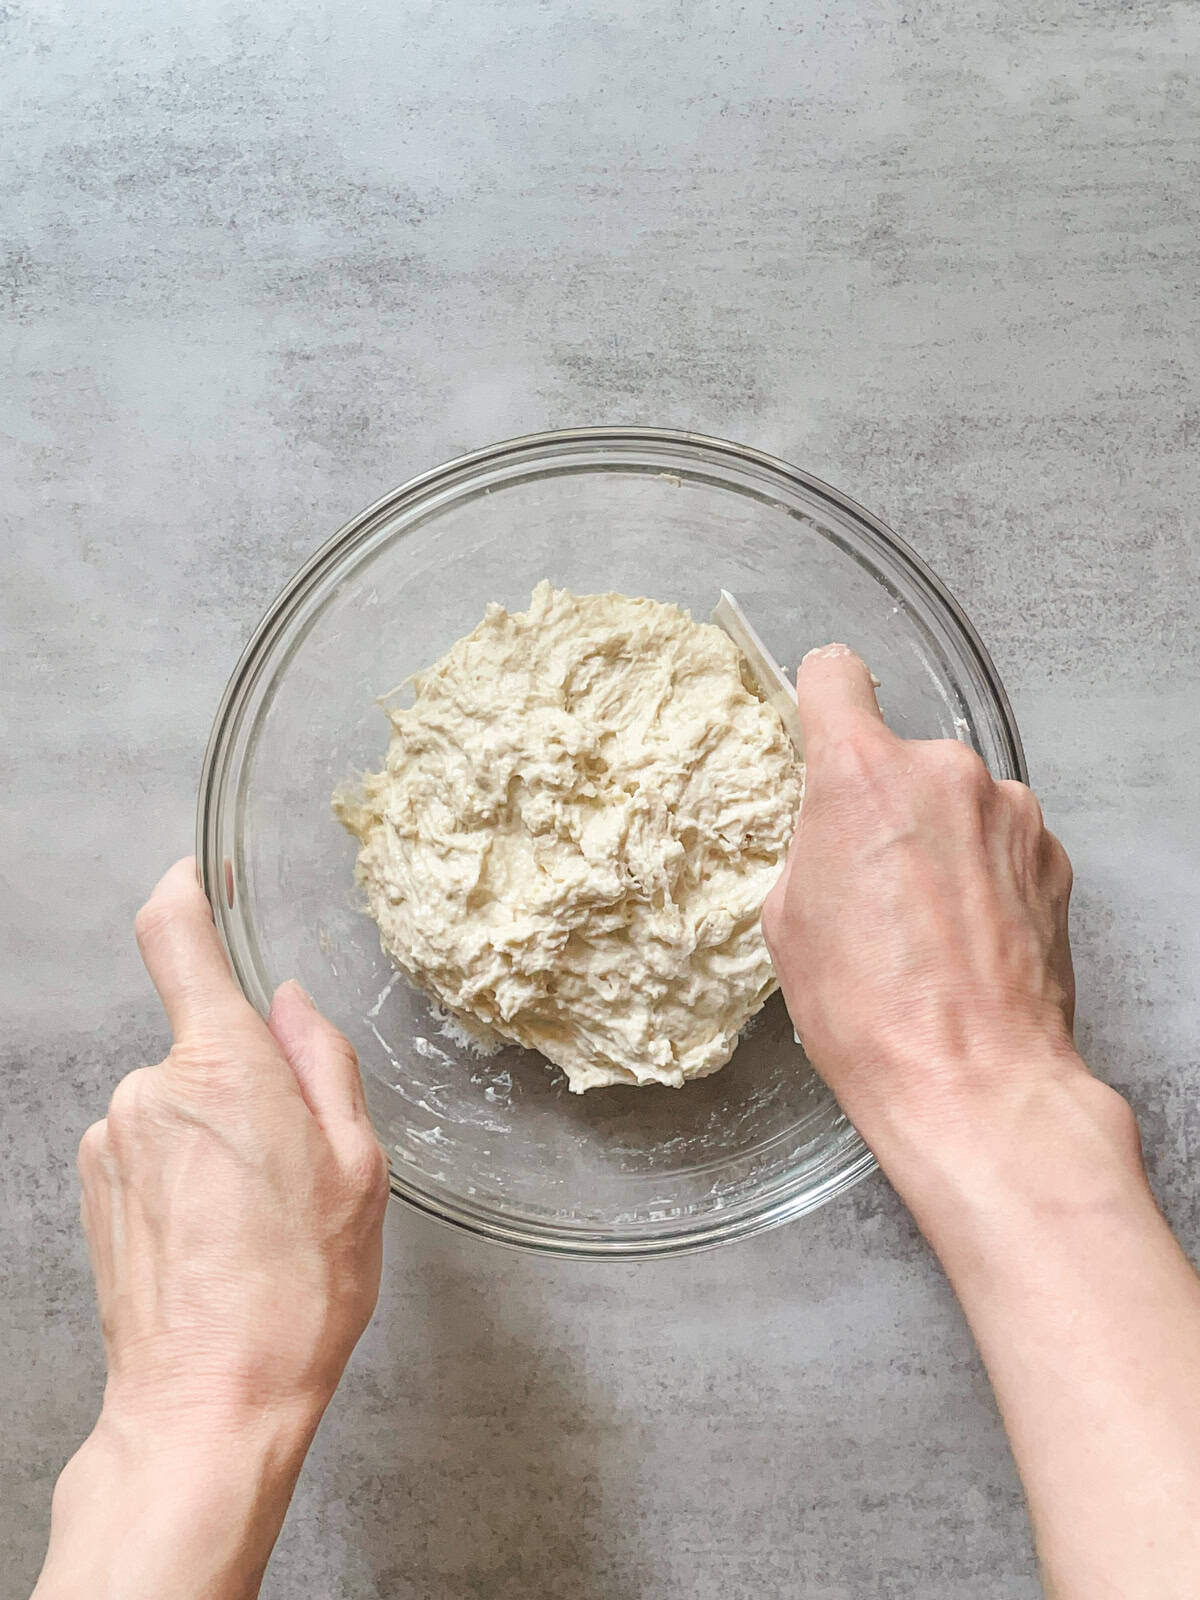
Use a plastic bowl scraper to scrape down the bowl.
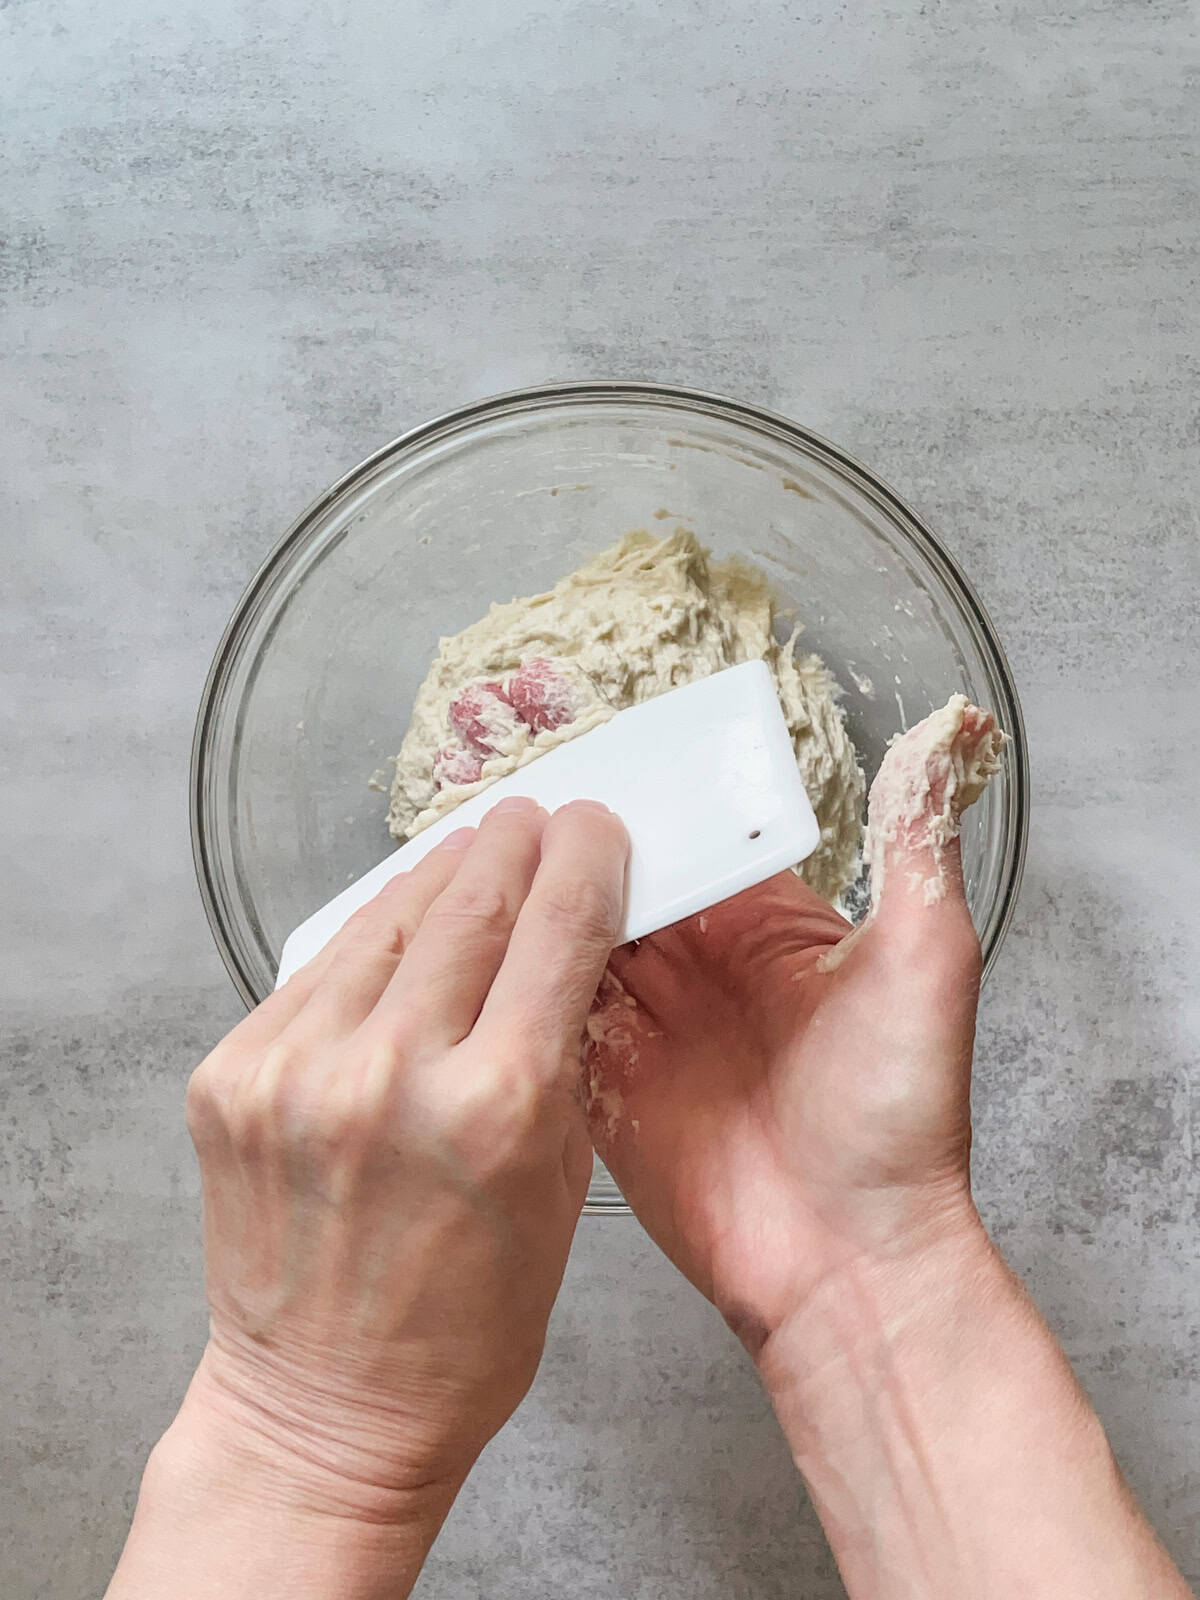
Then, clean your hands of the dough.
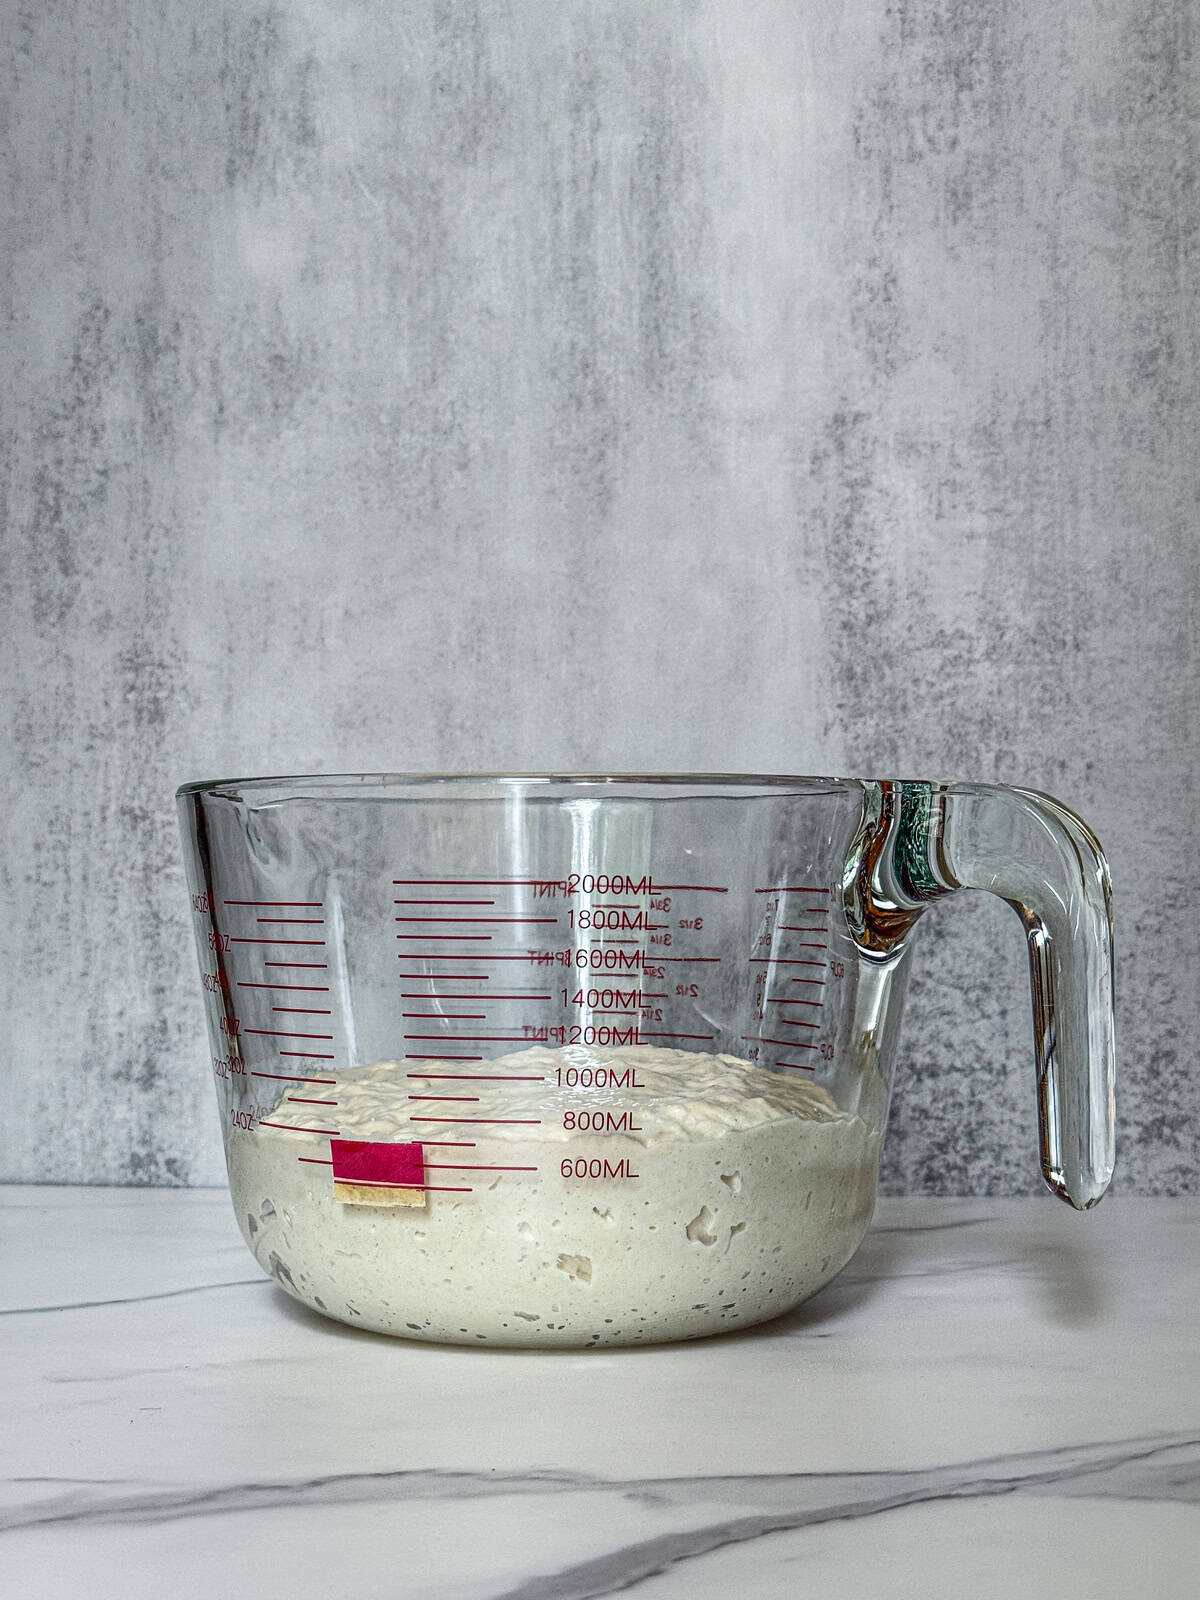
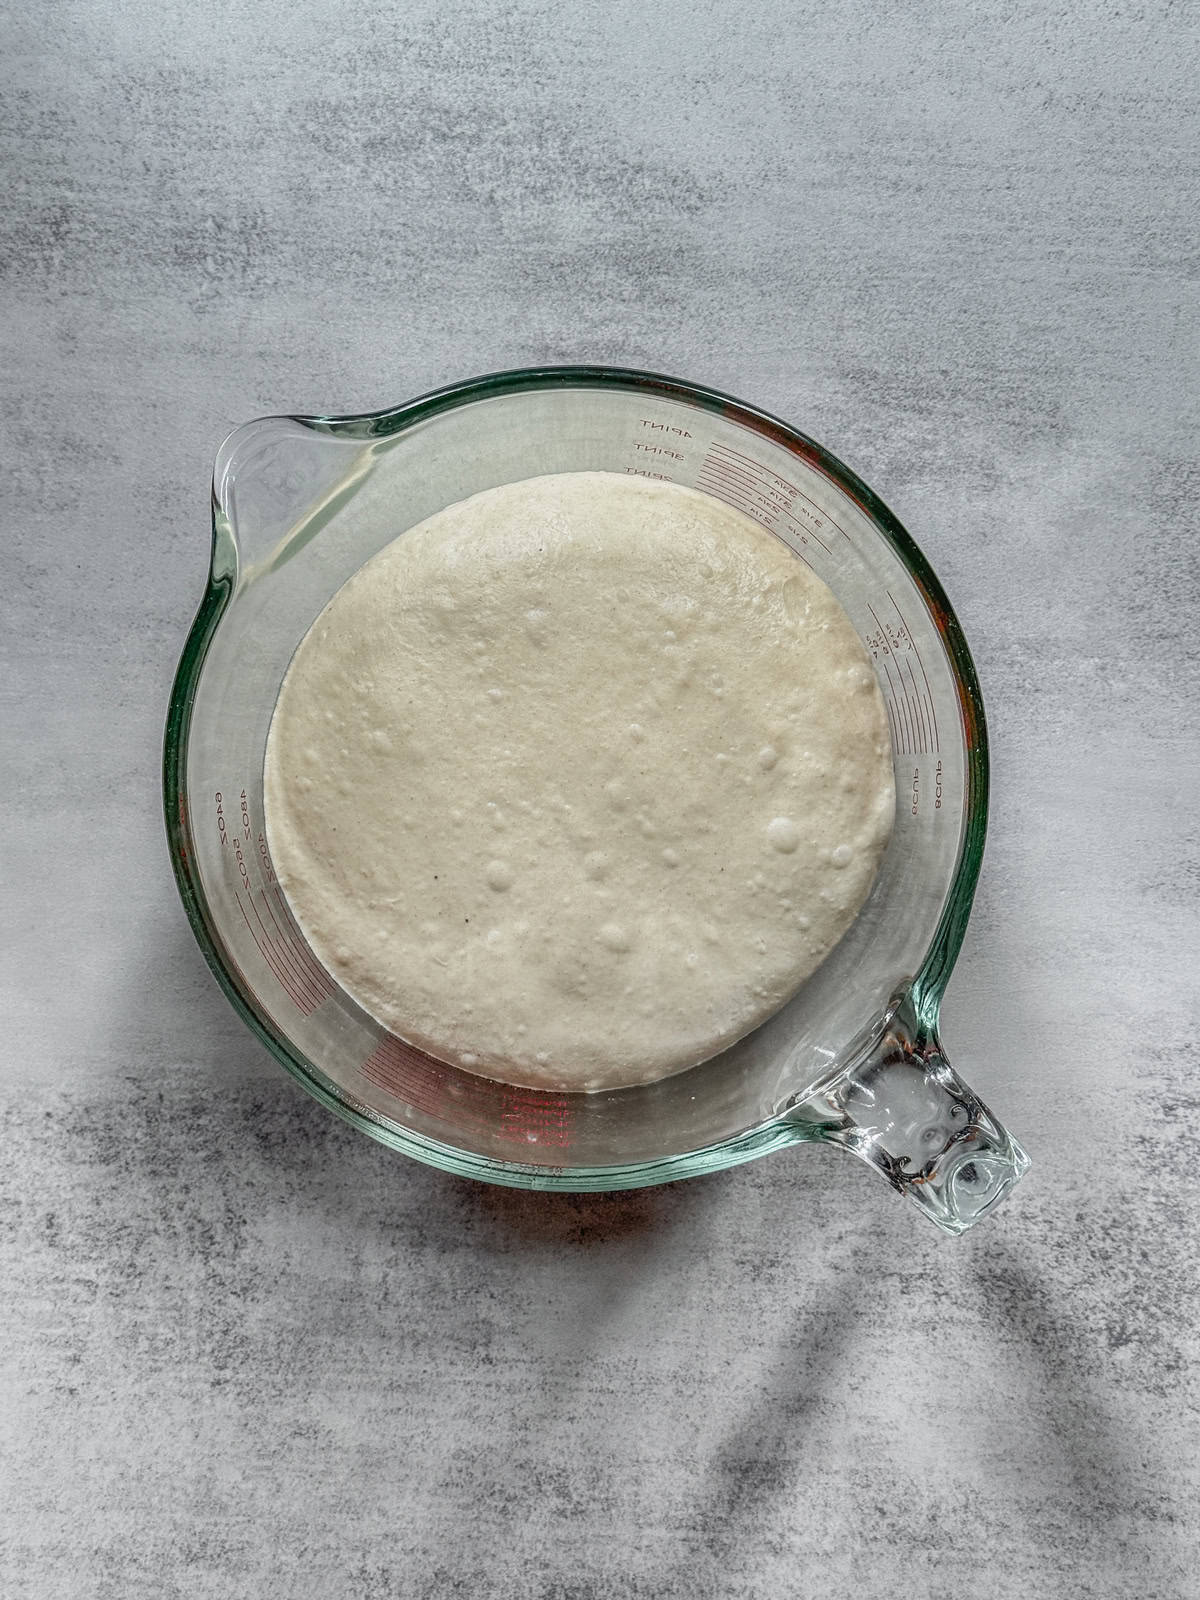
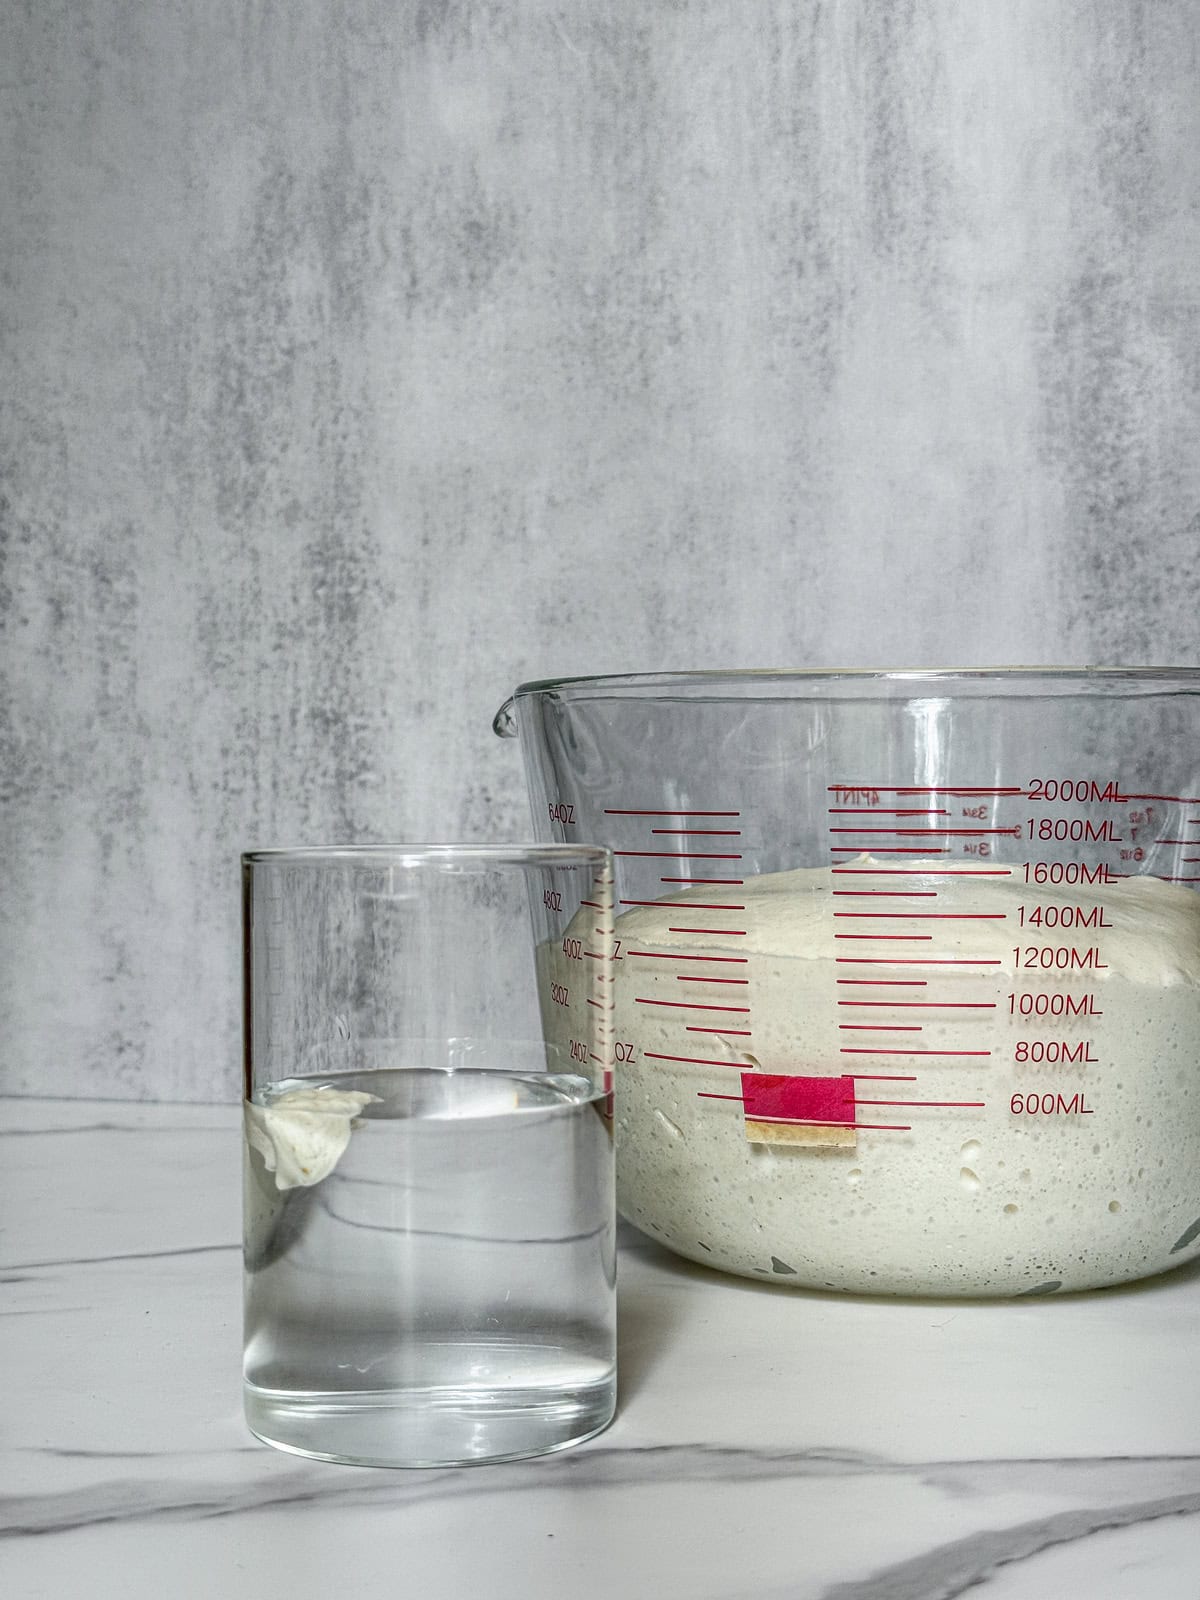
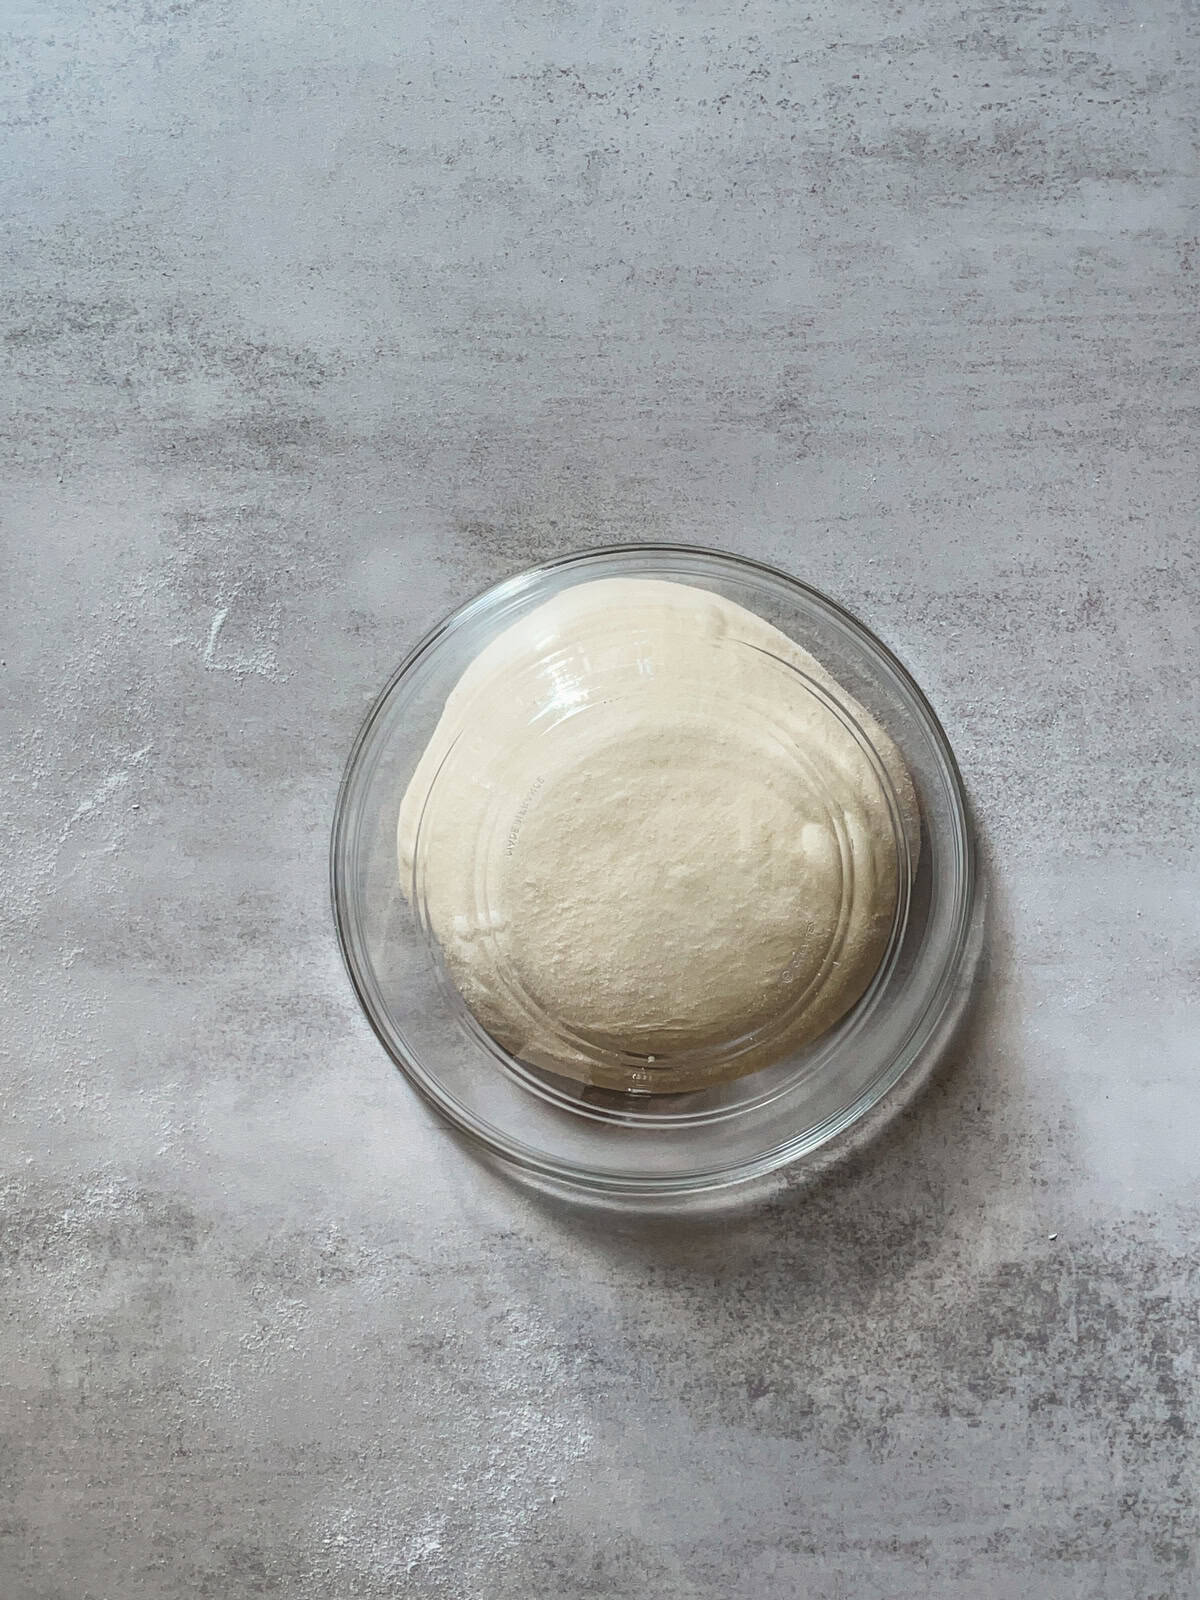
Transfer the dough from a mixing bowl to a 2L glass measuring cup or a straight-sided container.
If your container doesn't have volume measurement lines, use a marker or measuring washi tape placed vertically along the side.
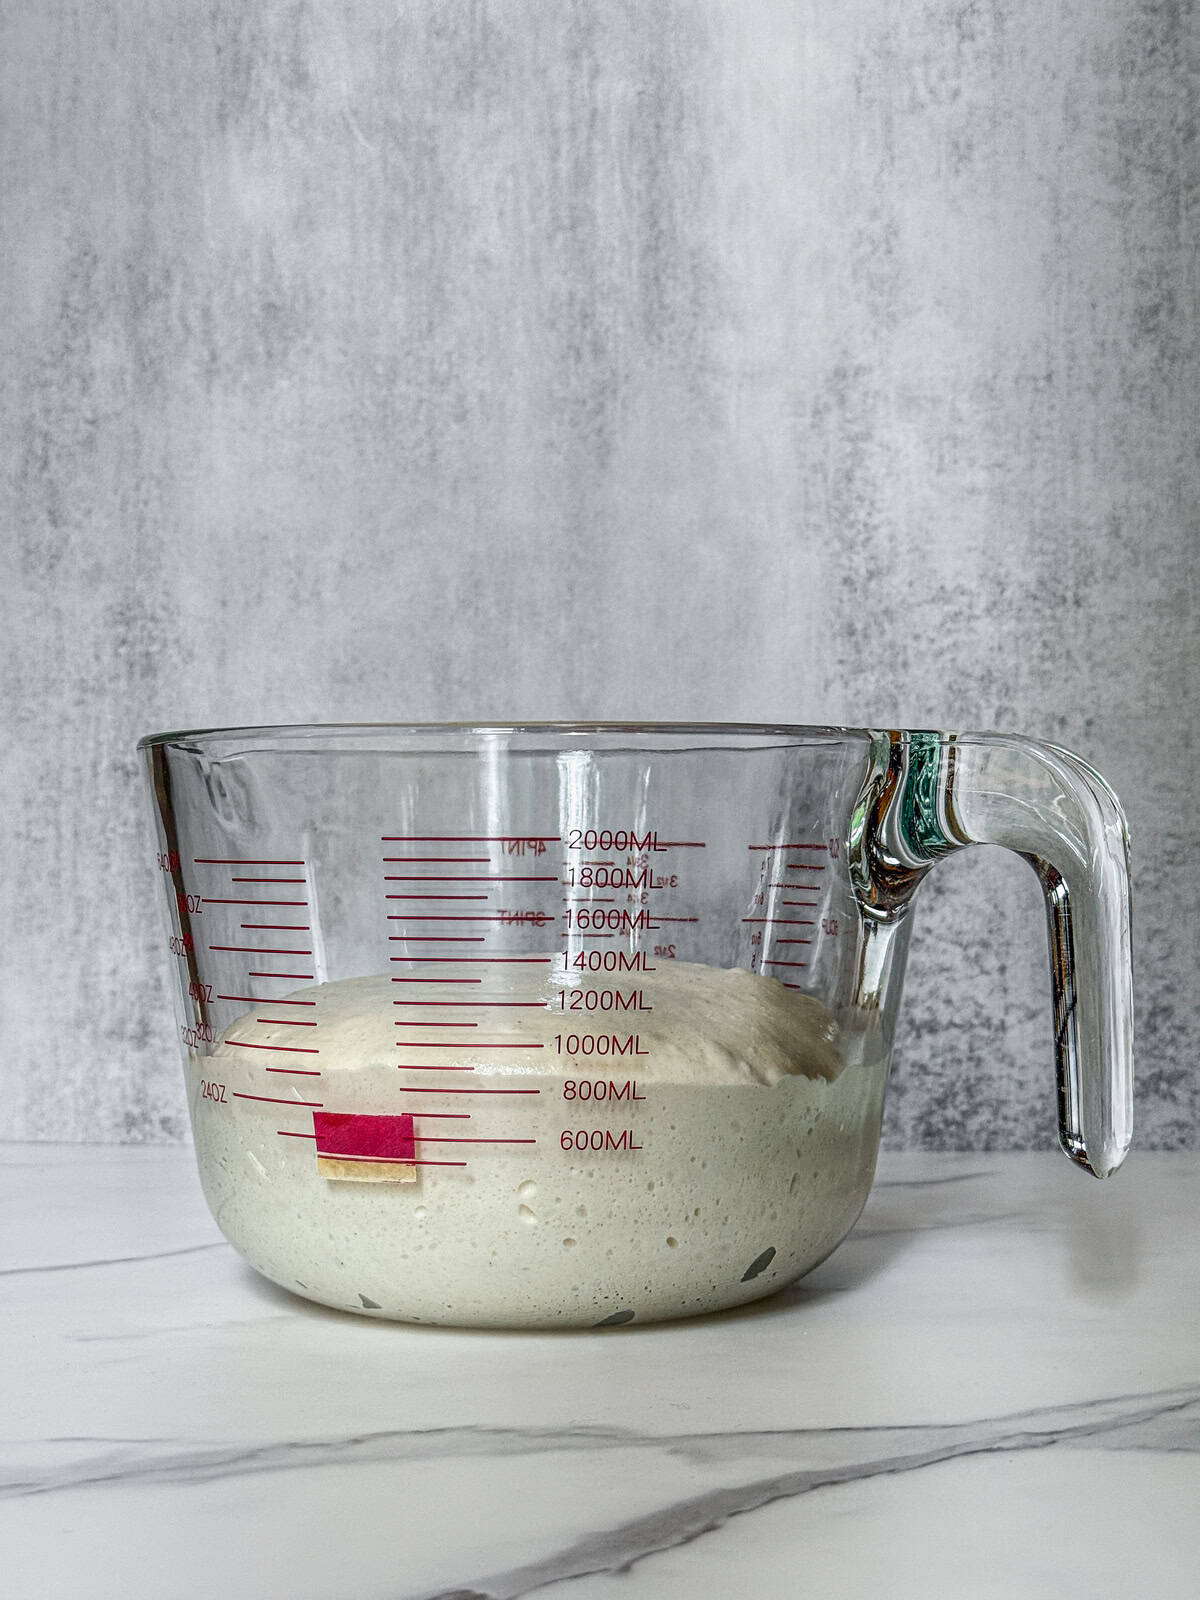
Note the starting level of the dough. You can write it down or place a piece of colored washi tape at the dough level on the outside of the container. This will help you track the progress of bulk fermentation.
For example, using a 2L glass measuring cup, the starting dough level is at the 700 mL mark.
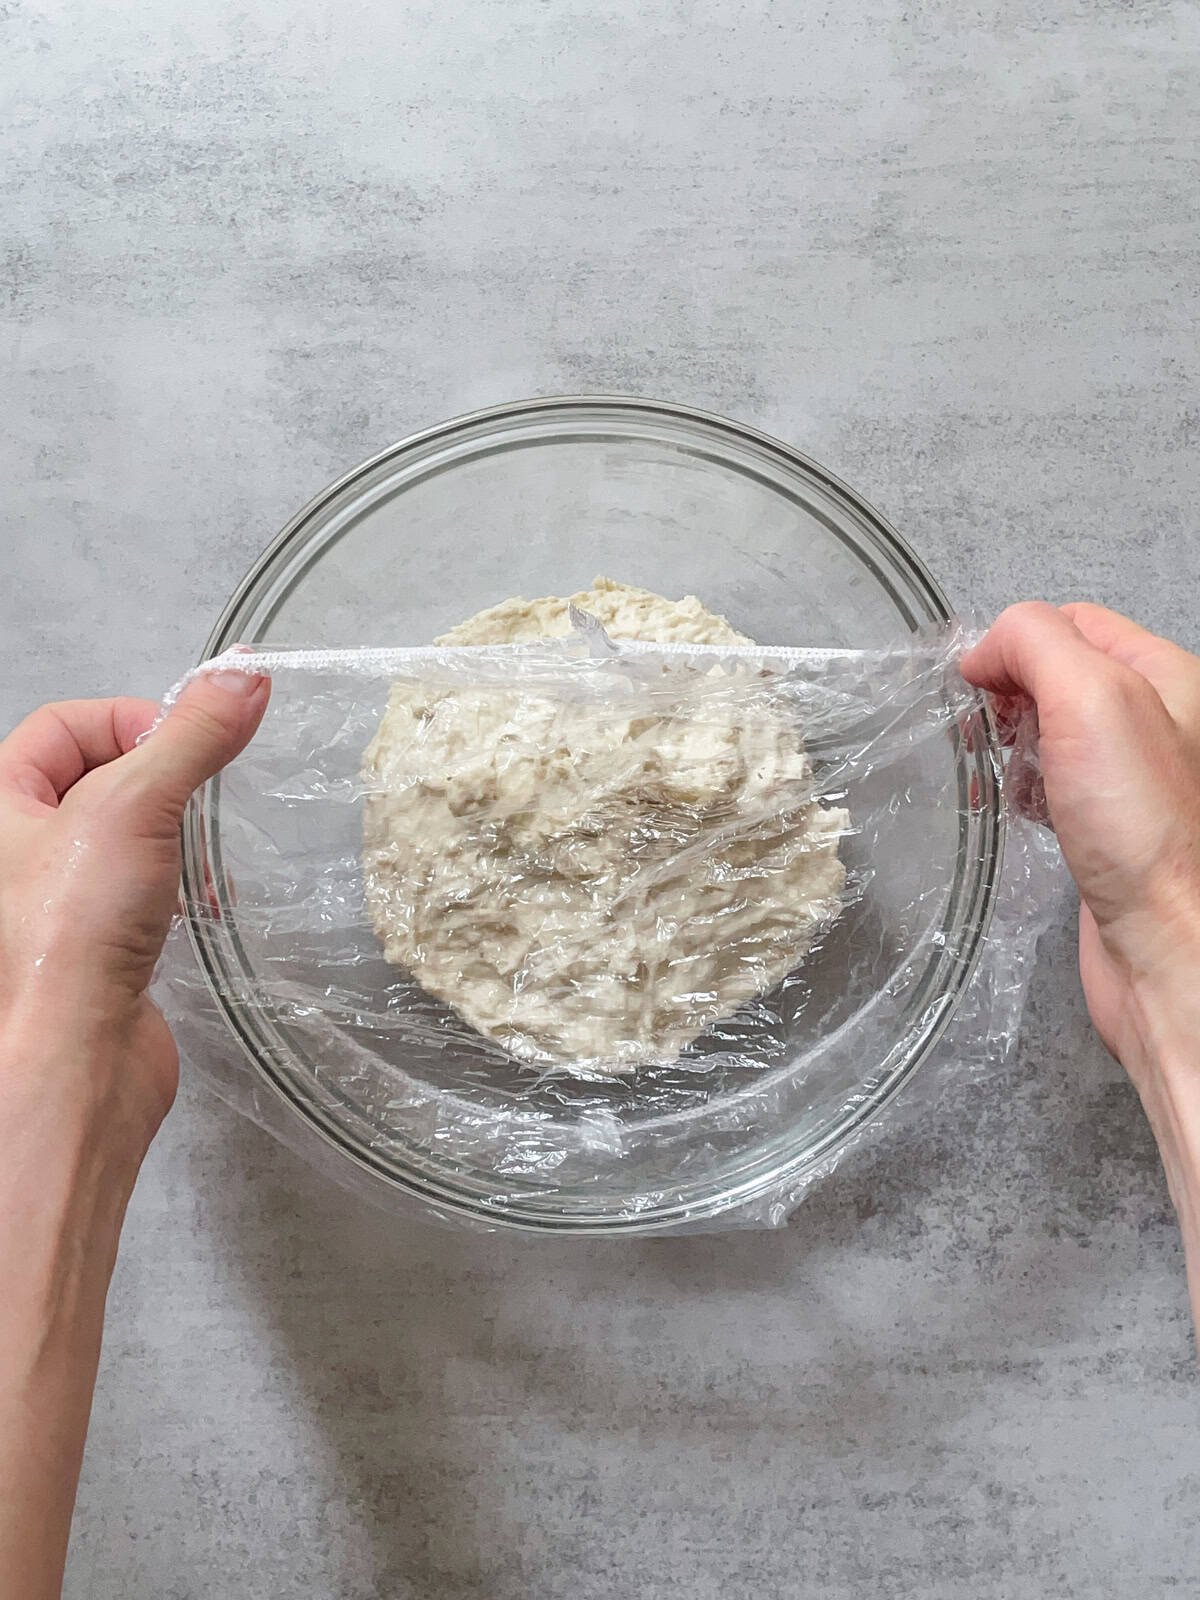
Wet your hands and carefully transfer the dough to a clean mixing bowl. Cover it with a plastic cap, wrap, or a damp kitchen towel, and let it rest at room temperature for 30 minutes.
Sourdough dough in a measuring cup with a marked starting volume.
Hands covering a bowl of sourdough dough with a plastic cap.
In the meantime, clean your measuring cup or container (you will need it again later).
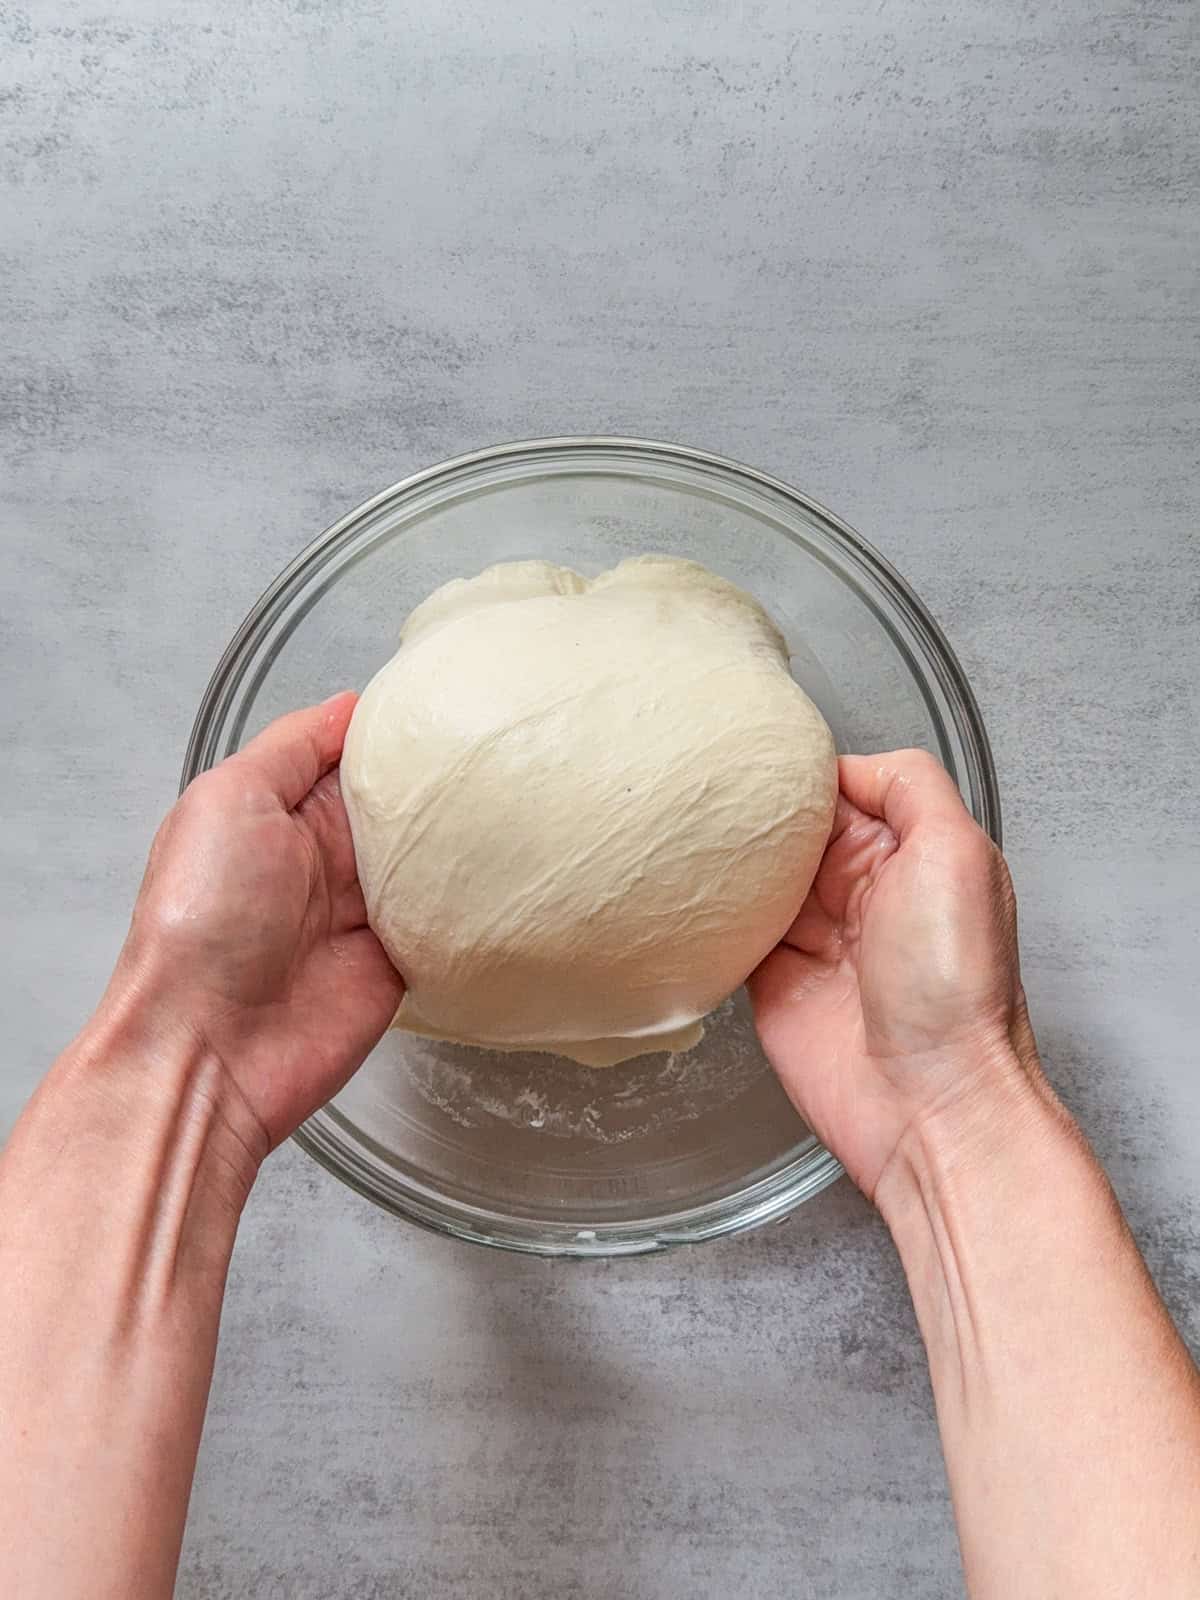
3. Stretch and fold sourdough - 12:30 PM
It is time for the first stretch and fold.
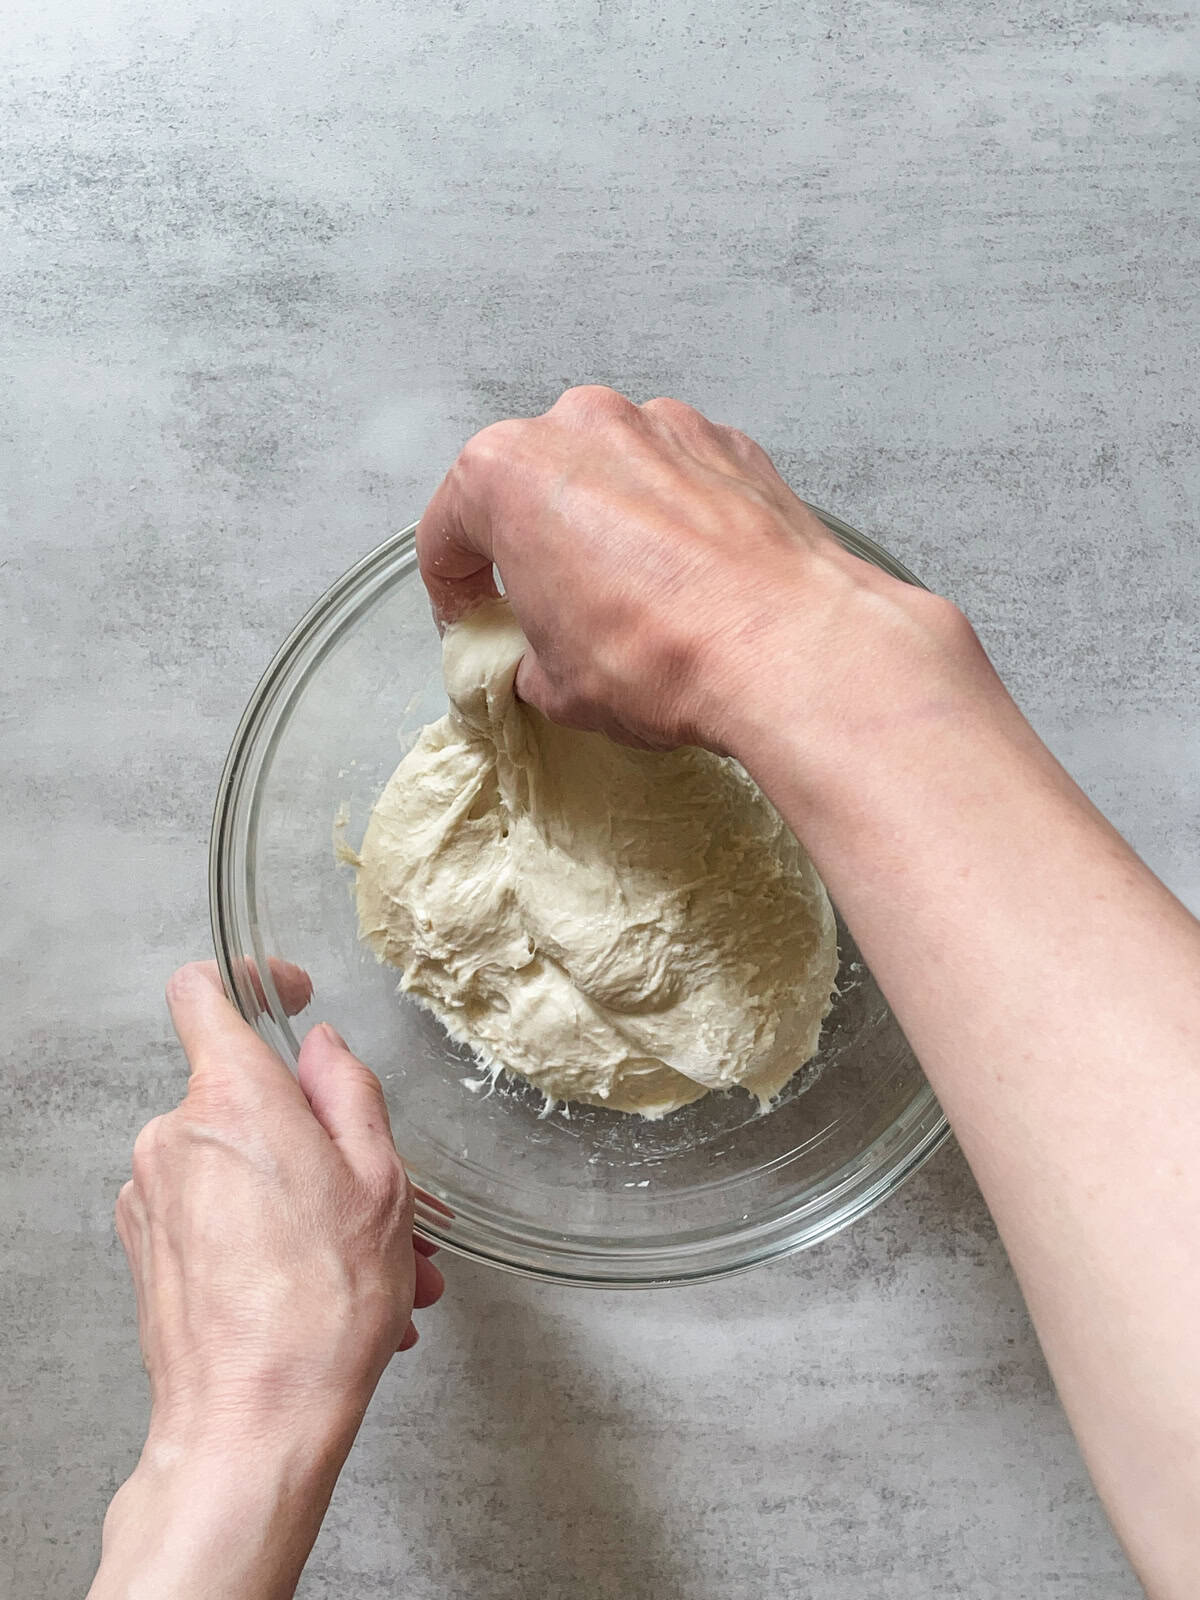
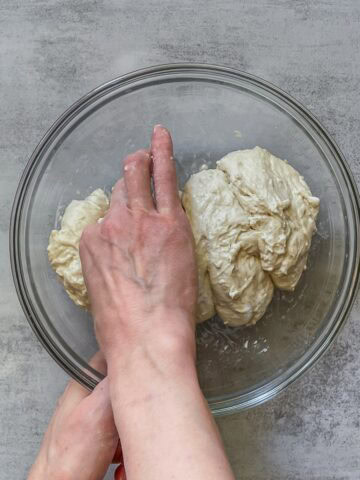
With wet hands, reach underneath the dough and pull it upward.
Then fold it over.
After stretching and folding one side, turn the bowl 90 degrees and repeat the stretch and folds. Turn the bowl 90 degrees again and repeat this process a total of four times.
You want to do four stretch and folds in all four directions. Think of a compass: fold the top (North) to the bottom (South), then fold the right (East) to the left (West), the bottom (South) to the top (North), and the left (West) to the right (East).
If you imagine a clock on the bowl, the folds occur at 12, 3, 6, and 9 o'clock. Four folds in four directions make one full set. Cover the bowl and let it rest for 30 minutes.
For the second stretch and fold, repeat the stretch and folds in all four directions. After that, cover the bowl and let it sit for another 30 minutes.
Wet your hands again and reach underneath the dough, pulling it upward.
Then fold it over.
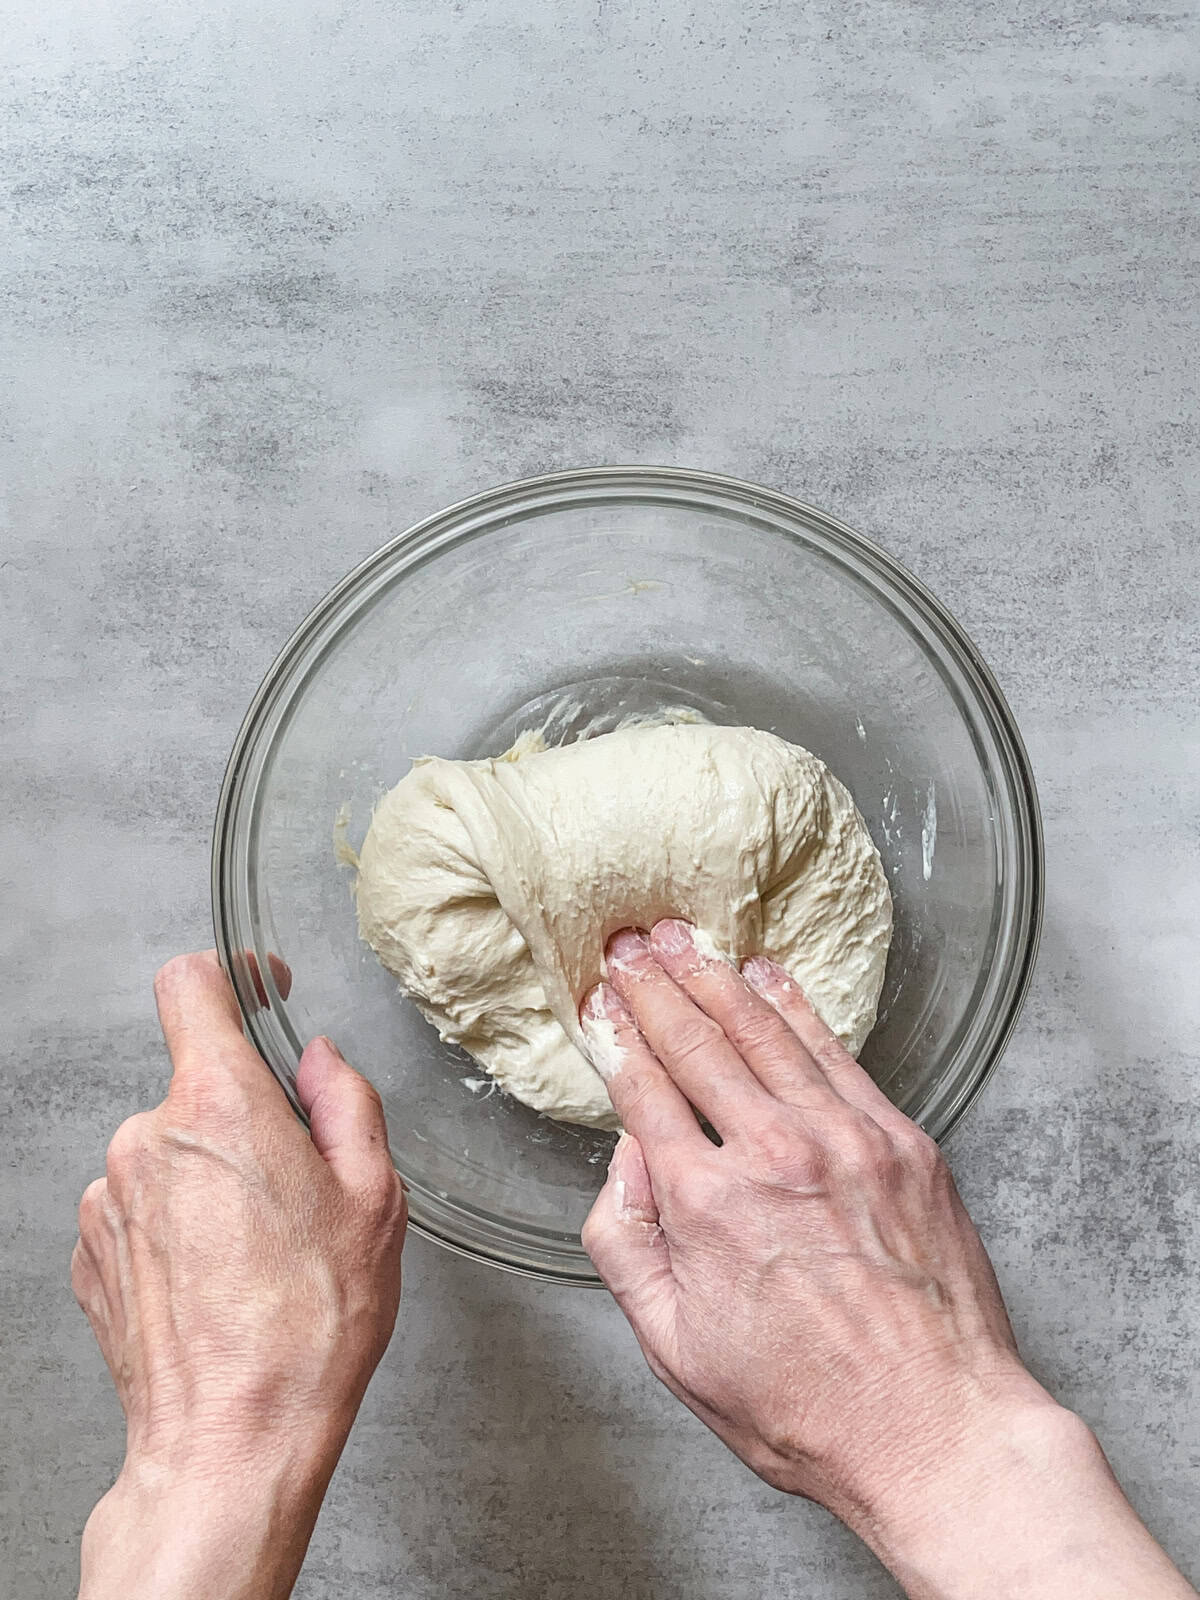
4. Coil fold sourdough - 1:30 PM
Next, you will do the first set of coil folds.
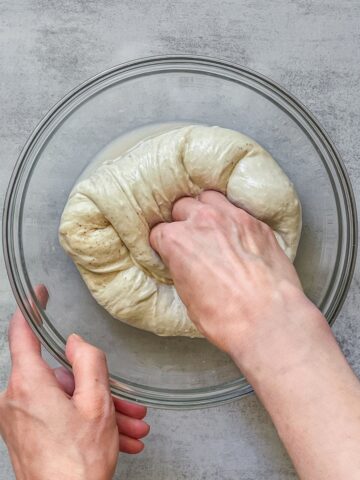
Wet both your hands to keep the dough from sticking. Slide your hands gently under the middle of the dough (cup your palms) and lift until the dough domes slightly.
Let the front edge fold under by itself. Guide it so that gravity and the dough's weight do the folding.
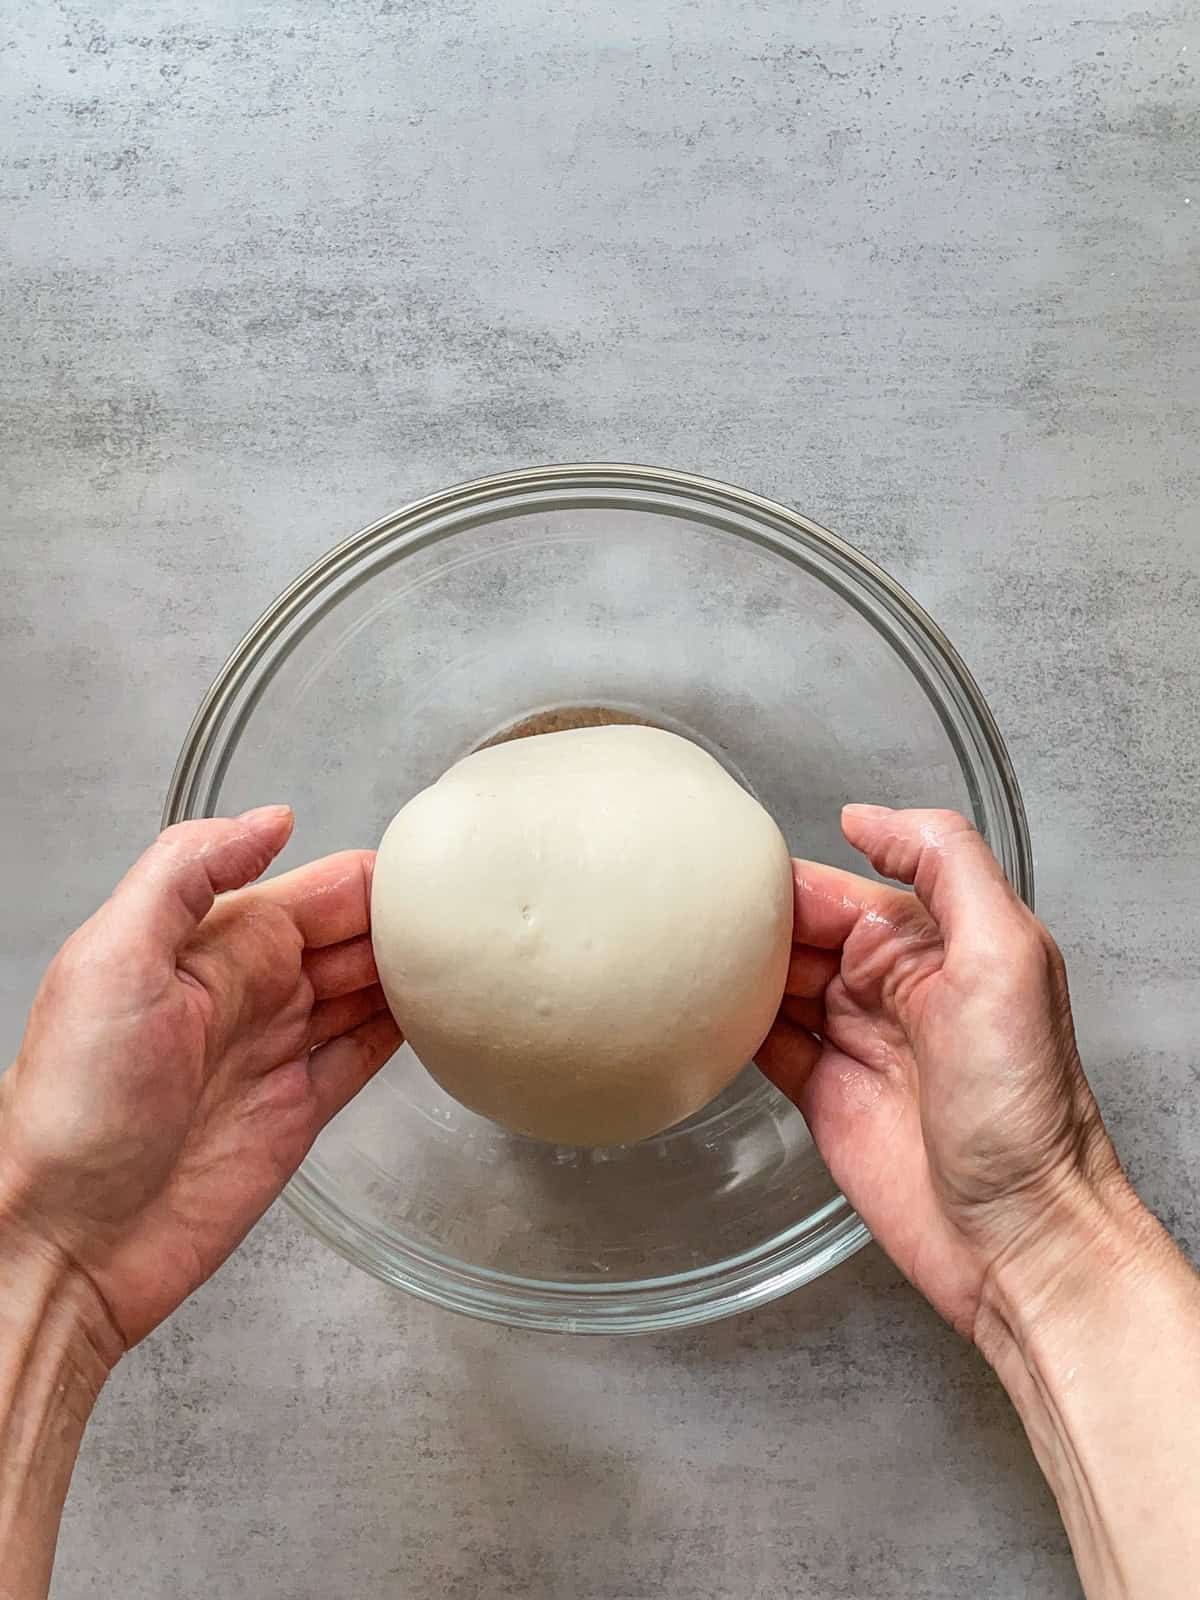
Turn the bowl 180° and repeat the same lift.
Let that side fold under itself.
Then, turn the bowl 90 degrees and repeat the fold. Finally, turn it another 180 degrees and fold again. If the dough sticks, re-wet your hands. You will do four folds in total. After that, cover the bowl and let it rest for 30 minutes.
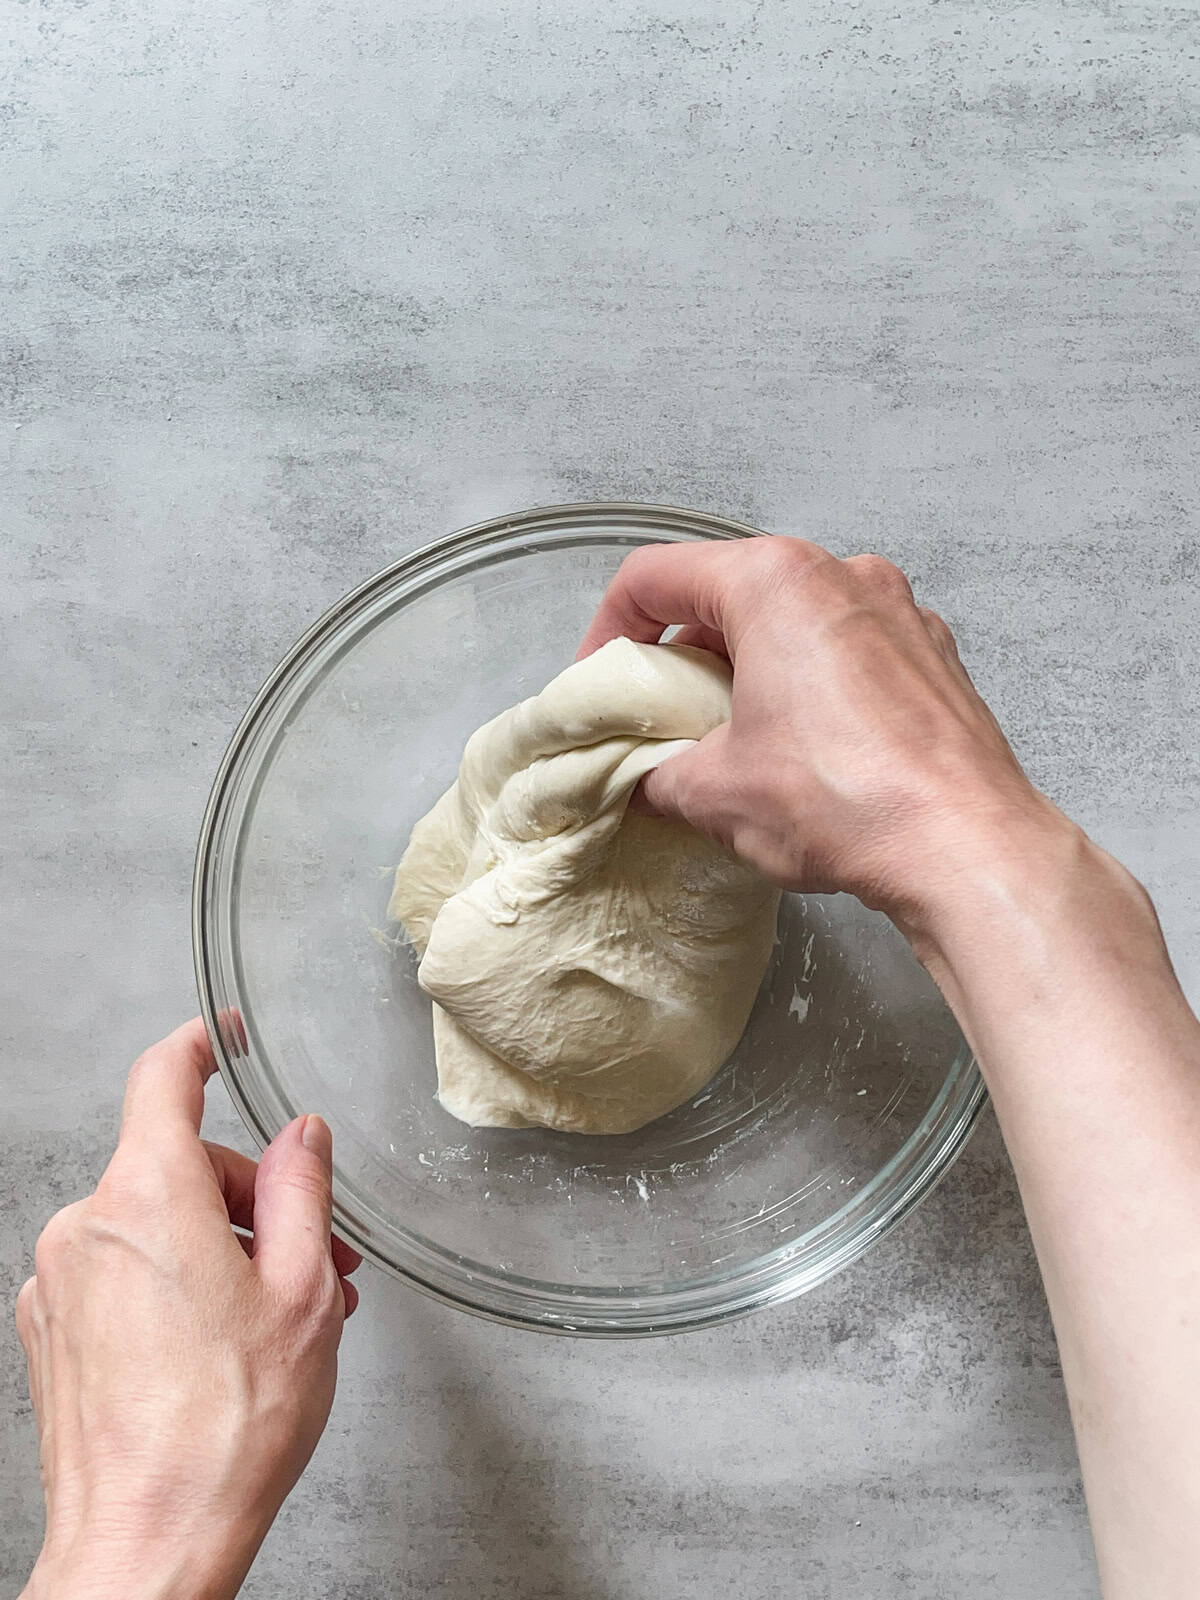
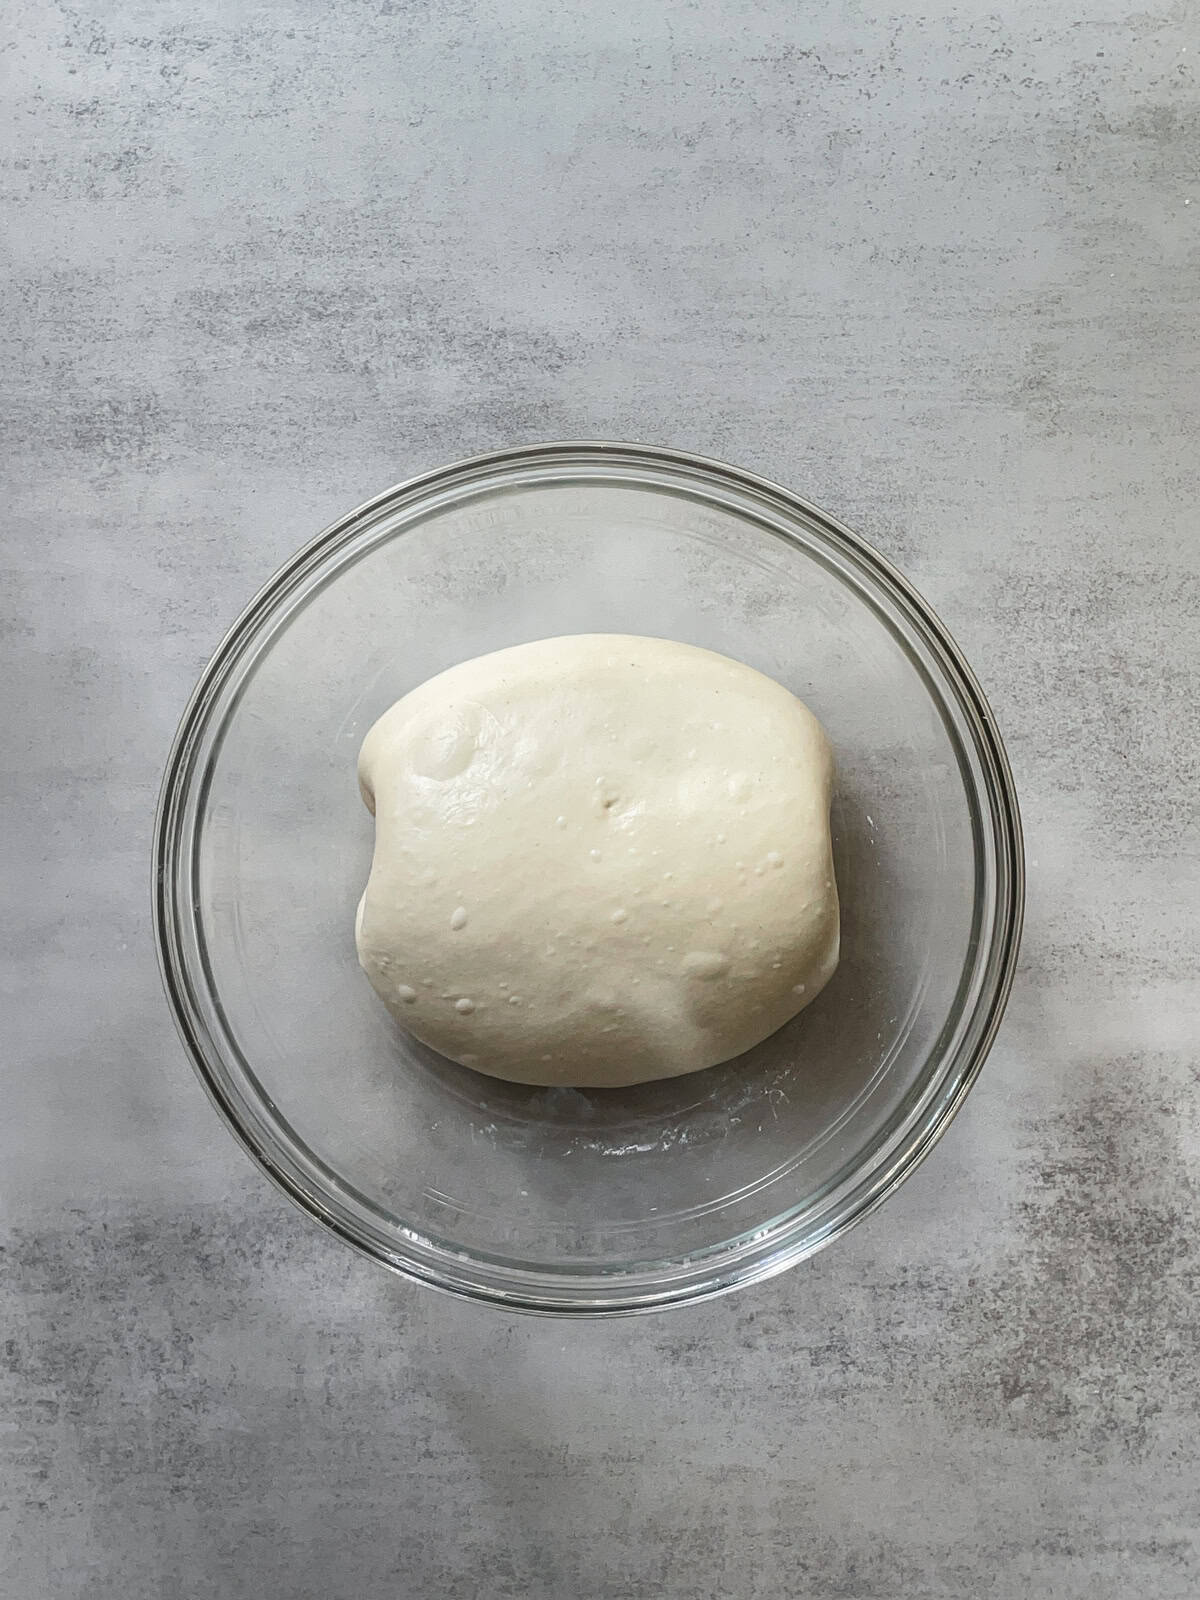
Do the second set of coil folds, then gently transfer the dough to a large measuring cup or a straight-sided container. Cover it and let it rest at room temperature.
After the final fold, allow the dough to rise for about 4 hours. (My kitchen is around 73°F / 23°C.)
Recommended reading
While the dough rises over the next few hours, check out a couple of blog posts:
5. Continue bulk fermentation
Wait until the dough rises 50-100% (100% means it has doubled in size). The percentage rise depends on your room temperature: the warmer it is, the faster the bulk fermentation and the shorter the rise time.
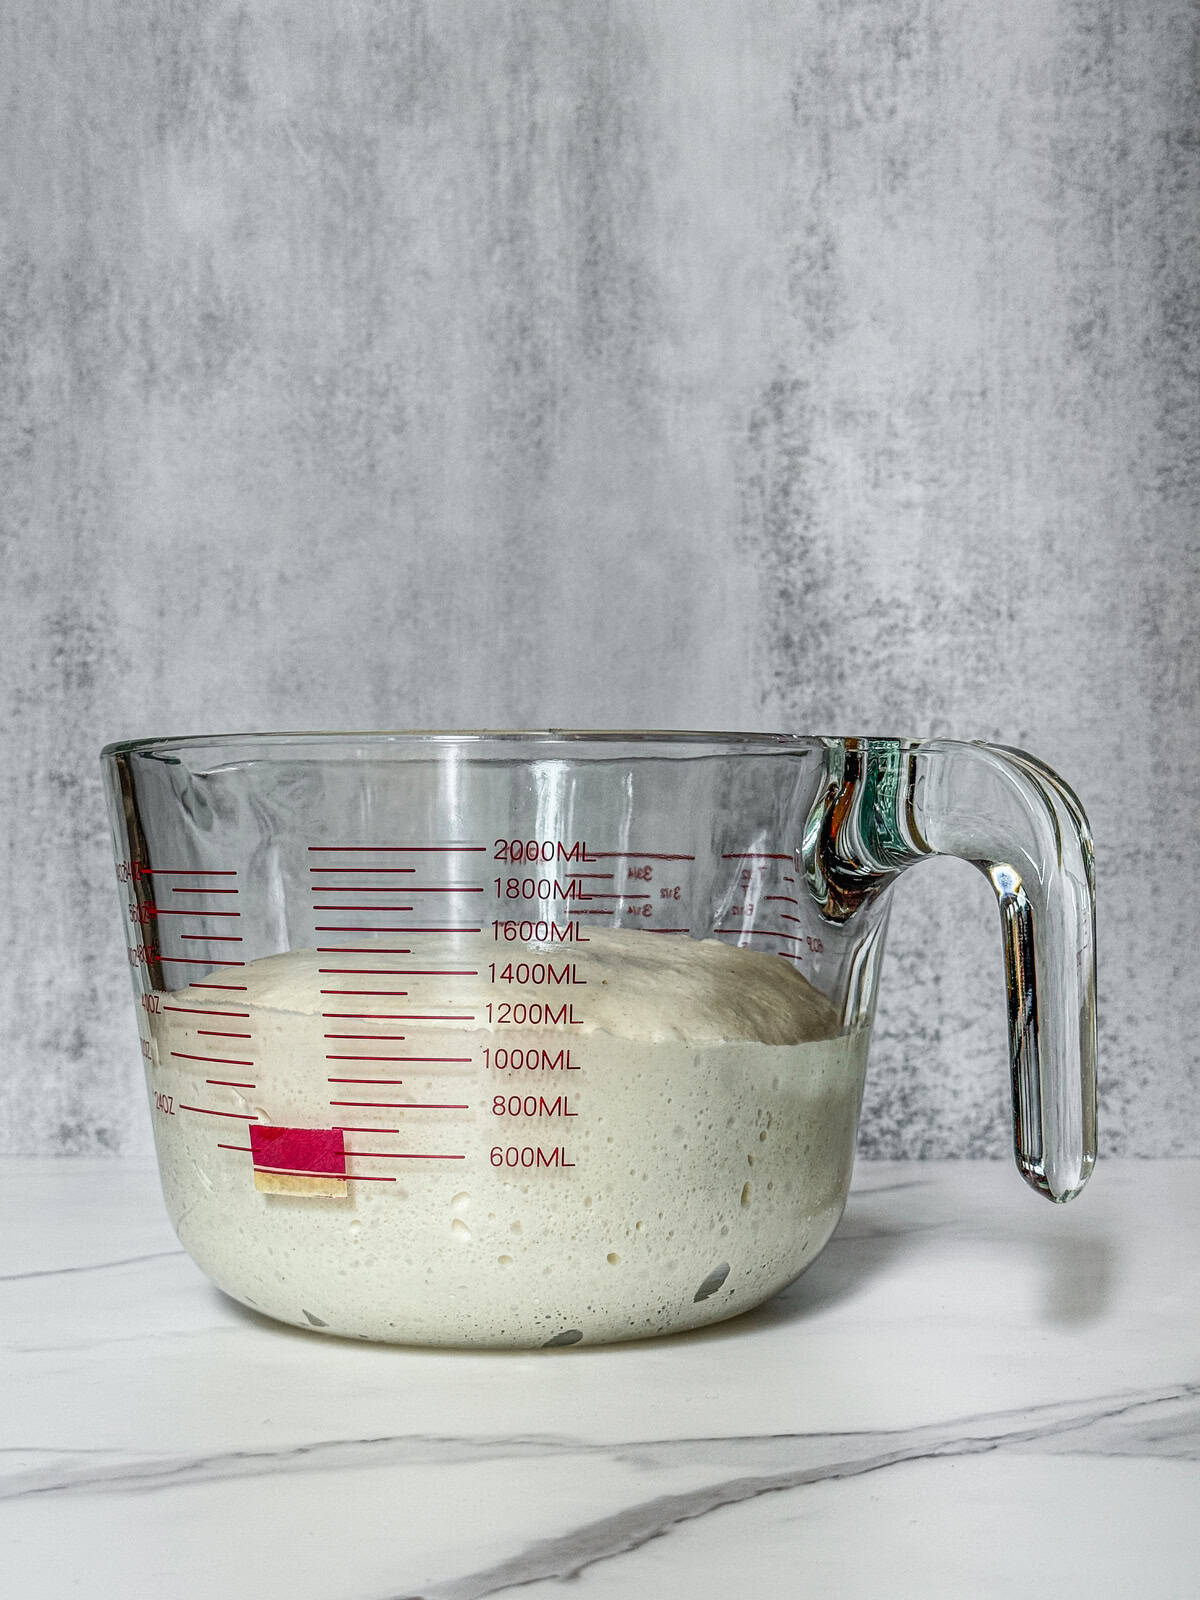
Dough in a measuring cup during mid-bulk fermentation, front view.
Dough in a measuring cup during mid-bulk fermentation, viewed from above.
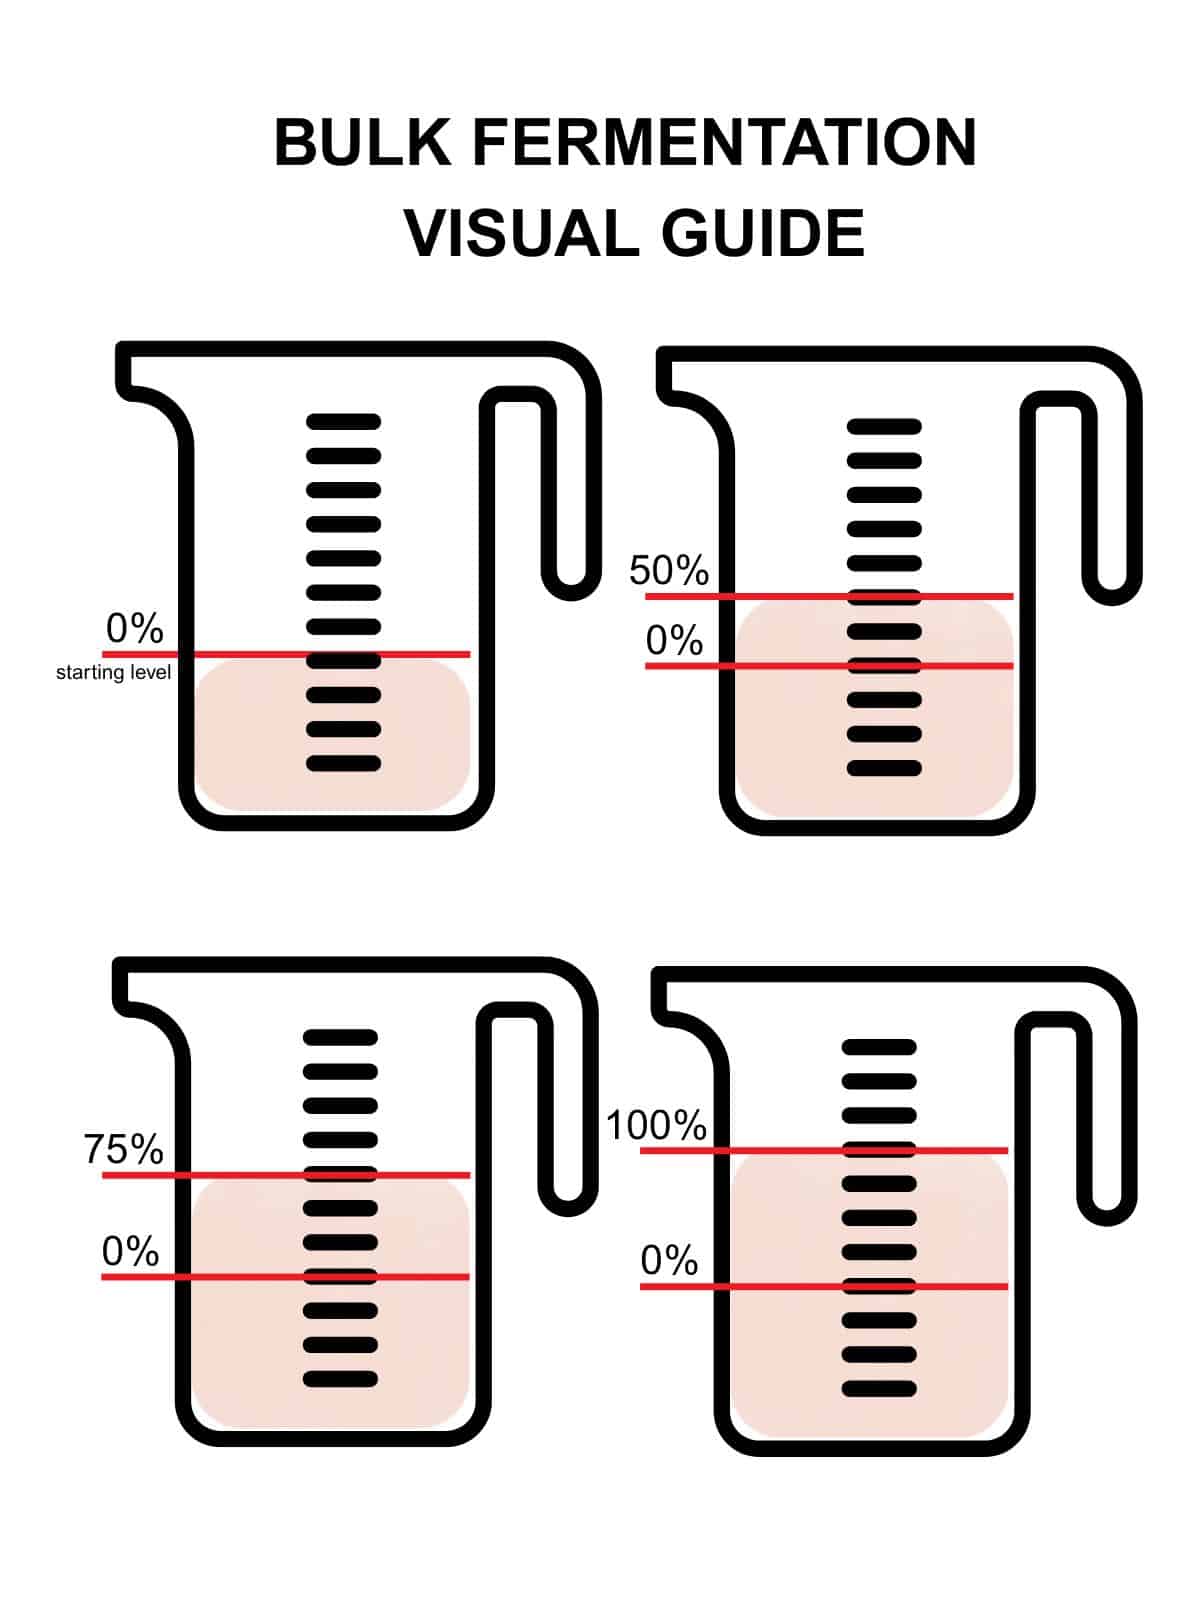
To track the dough rise, look at the starting point you marked on the container:
- 50% rise means the dough has increased by half its original height.
- 75% rise means it has grown by three-quarters of that height.
- 100% rise means the dough has doubled in height from the starting mark.
Use this visual guide to monitor progress throughout bulk fermentation.
How long should bulk fermentation take?
Bulk fermentation can take up to 10 hours from the time you mix the starter into the dough, depending on factors such as room temperature, humidity, flour type, and dough hydration.
At an ambient temperature of 73°F (23°C) in my kitchen, bulk fermentation typically lasts approximately 6 to 7 hours.
If your kitchen is warmer, for example, 80°F (27°C), the dough will ferment faster, and the process will take less time. If it is cooler, for example, 68°F (20°C), fermentation will slow down and take longer.
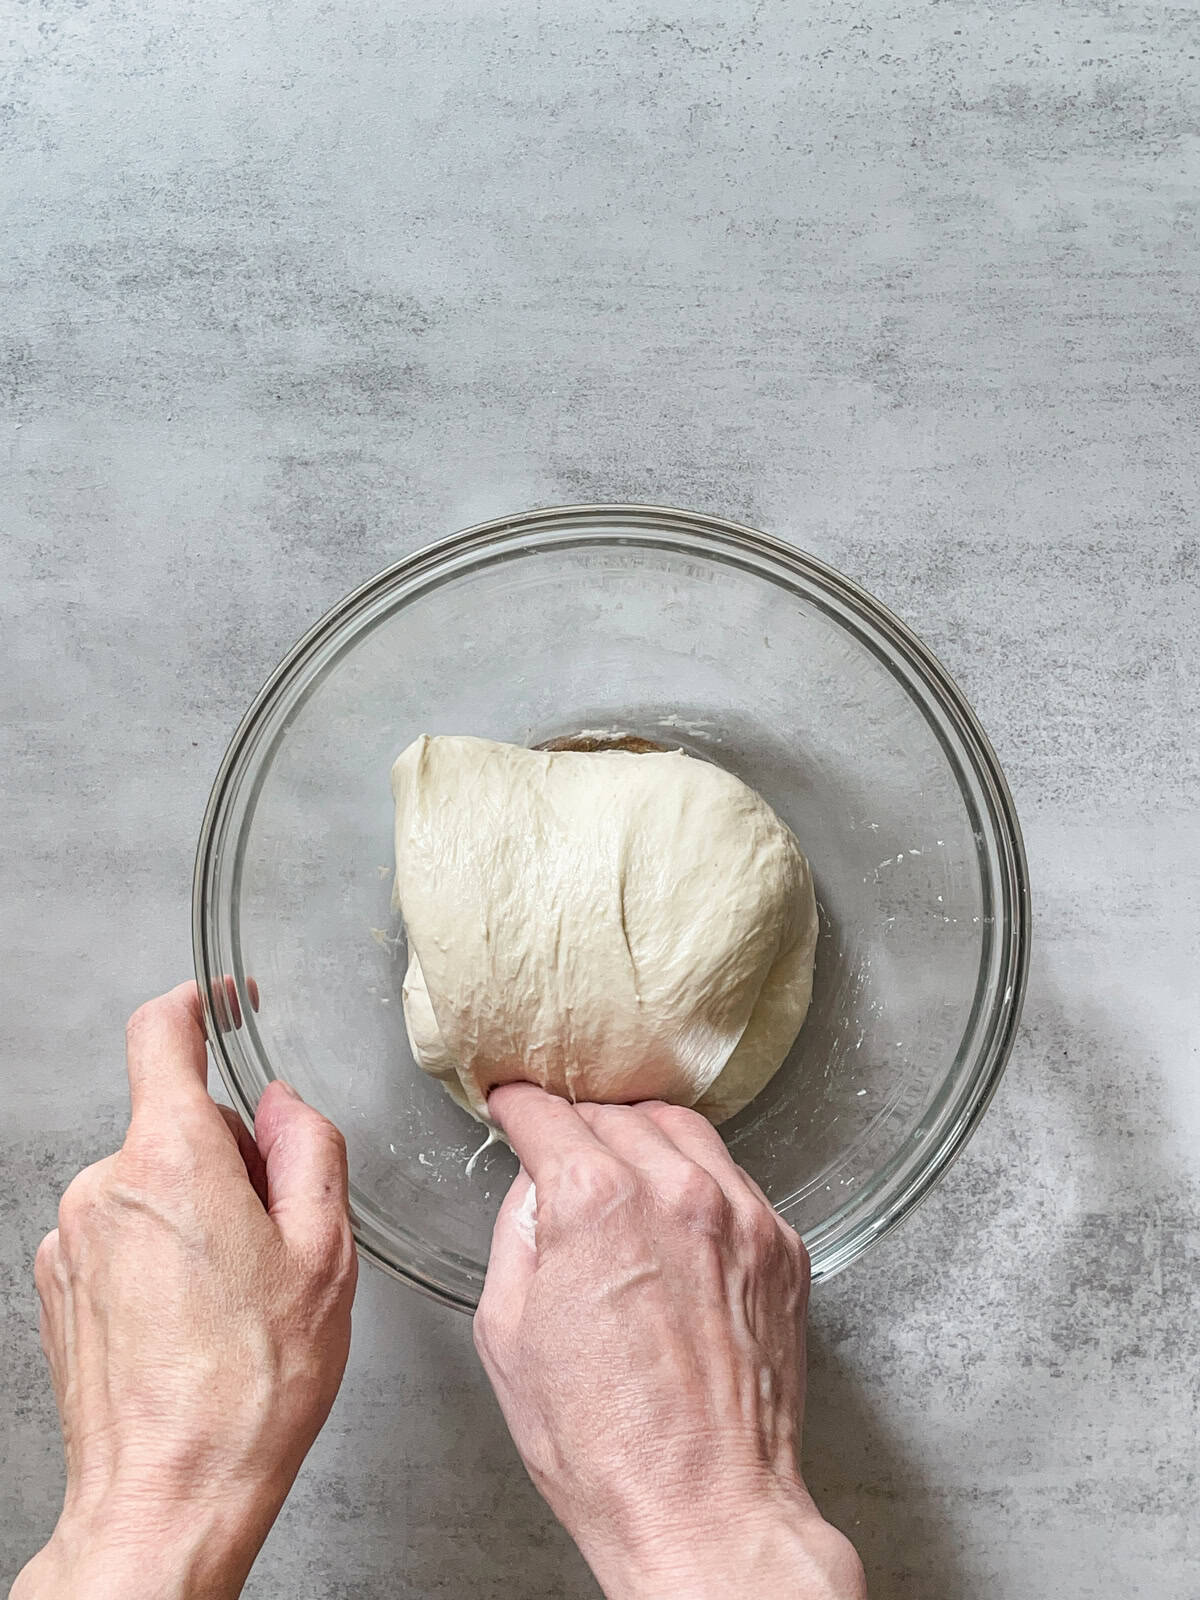
6. Finish bulk fermentation
Now comes the trickiest part: knowing when bulk fermentation is done. This is when you stop fermenting the dough in your container and transfer it to the work surface to pre-shape.
You will stop the rise based on your room temperature. At 73°F (23°C), I finish bulk fermentation once the dough has risen by 75%.
Using a 2L measuring cup, if the starting level is 700 mL (which represents 0% rise), then a 100% rise would bring the dough to the 1400 mL mark.
To calculate a 75% rise:
- Divide the starting level (700 mL) by 100, then multiply by the desired rise percentage (in my case, 75%):
700 ÷ 100 × 75 = 525 mL
So, I stop bulk fermentation when the dough has risen by 525 mL, reaching the 1225 mL mark (700 + 525 = 1225).
Since my measuring cup has 100 mL increments, I use visual judgment to assess the rise, aiming for a level between 1200 and 1300 mL.
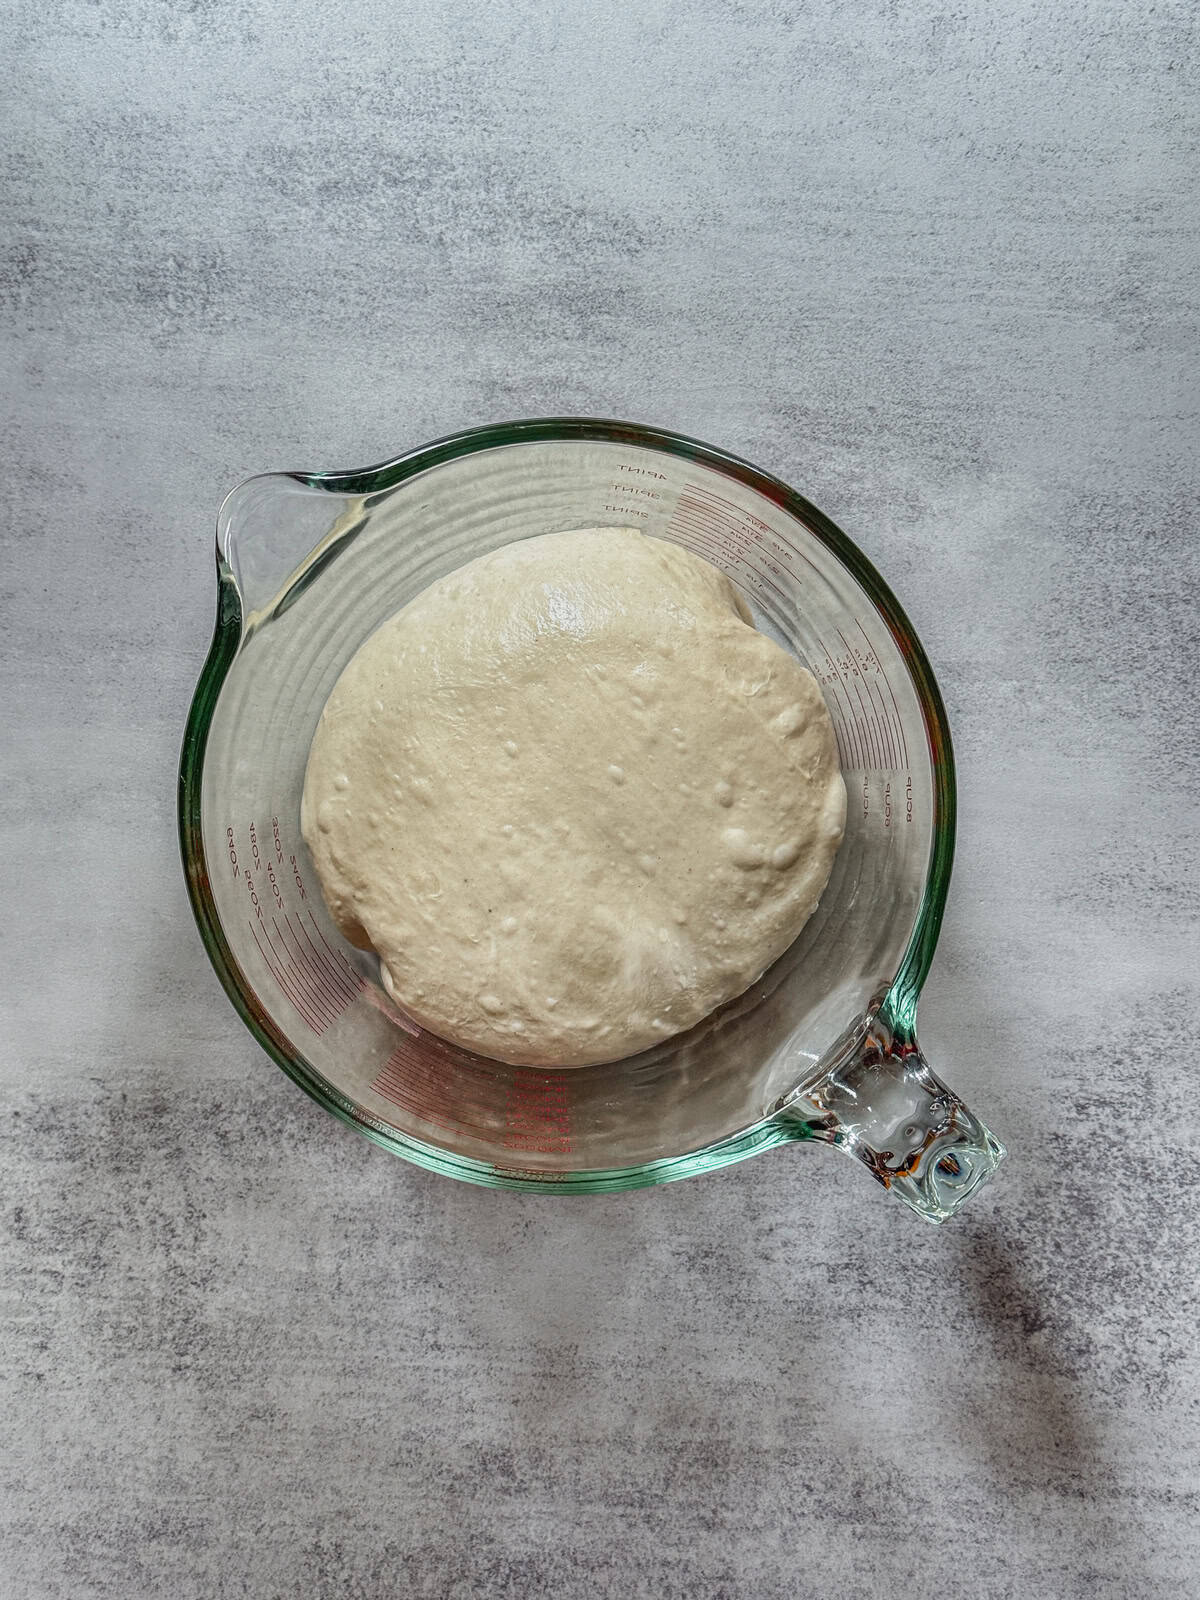
Dough in a measuring cup at the end of bulk fermentation, front view.
Dough in a measuring cup at the end of bulk fermentation, viewed from above.
Also, look for these signs:
- A slightly domed surface
- Large bubbles on top
- Smaller bubbles along the sides of the container
- Dough that pulls away easily from the sides and jiggles slightly when shaken
Once you see these signs, it is time for preshaping.
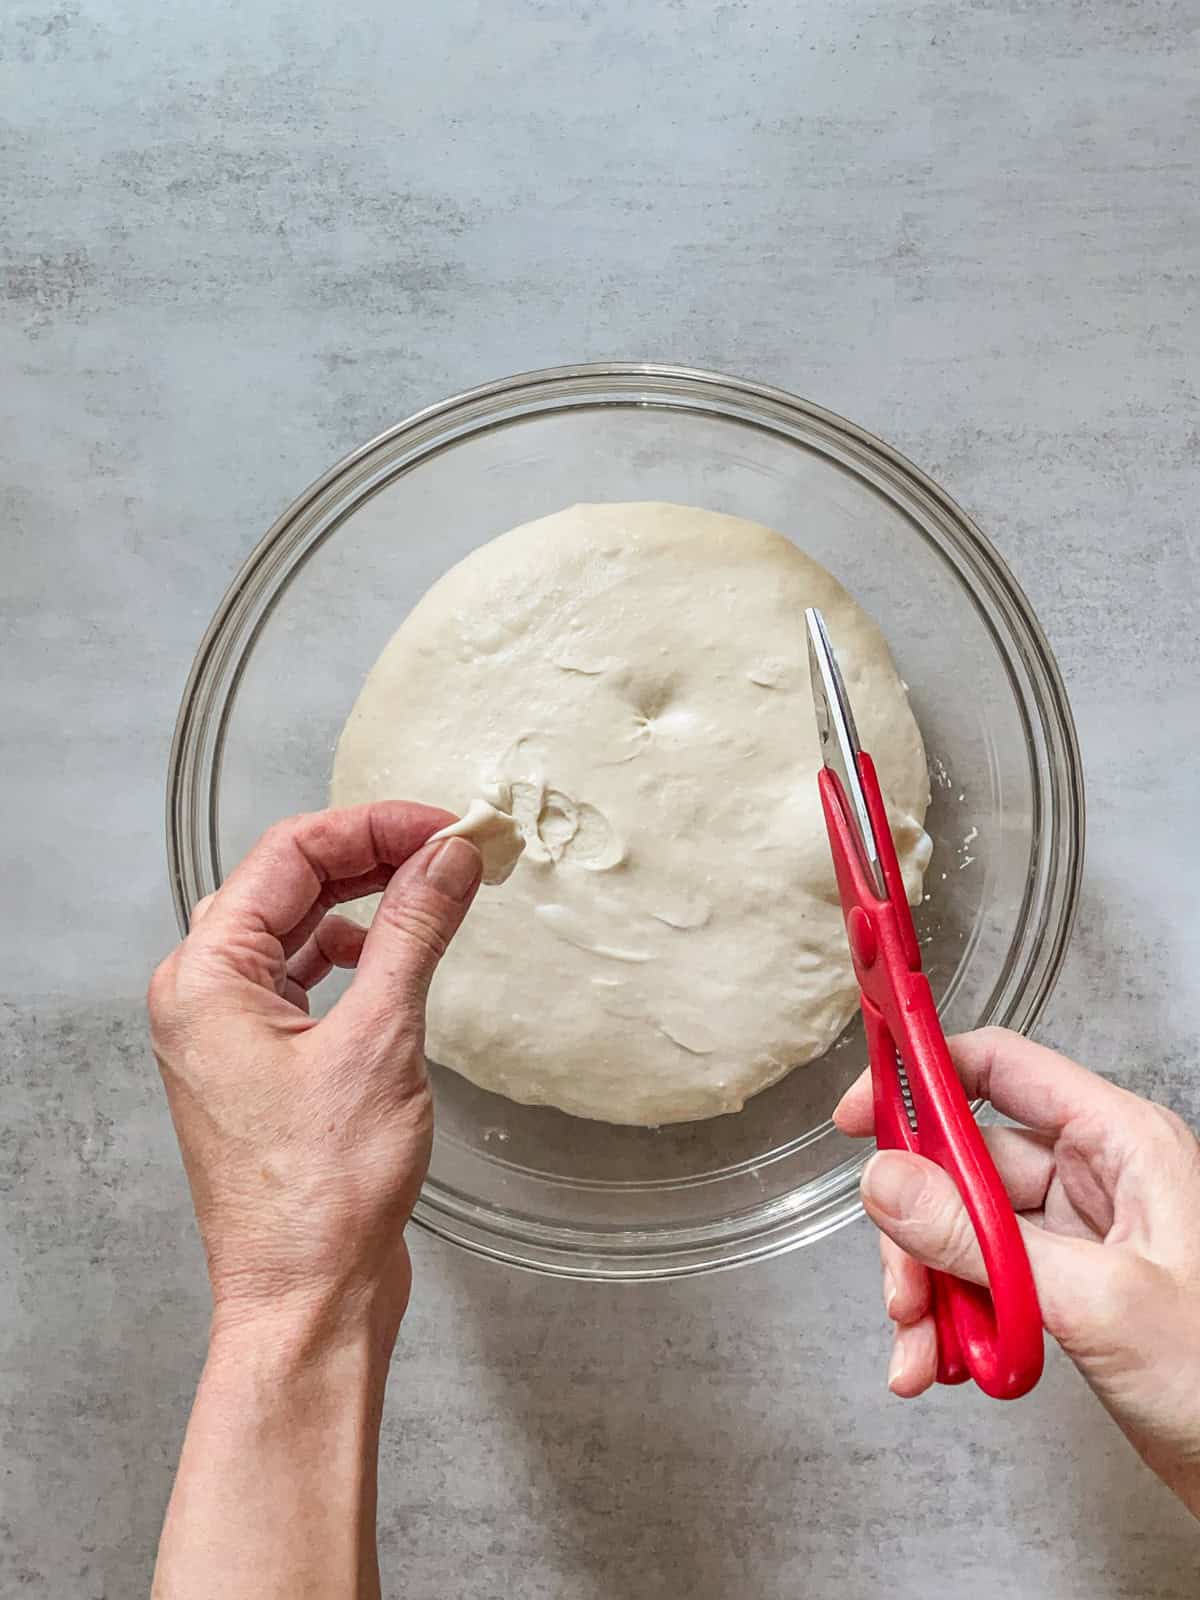
Another helpful method for deciding when to begin pre-shaping is the float test. While not 100% reliable (even for testing starter readiness), it is still a useful indicator for beginners in sourdough baking.
Here is how to do it:
- Fill a straight-sided glass with room-temperature water.
- Wet the tips of some medium-sized scissors.
- Wet your fingers and pinch off a small piece of dough.
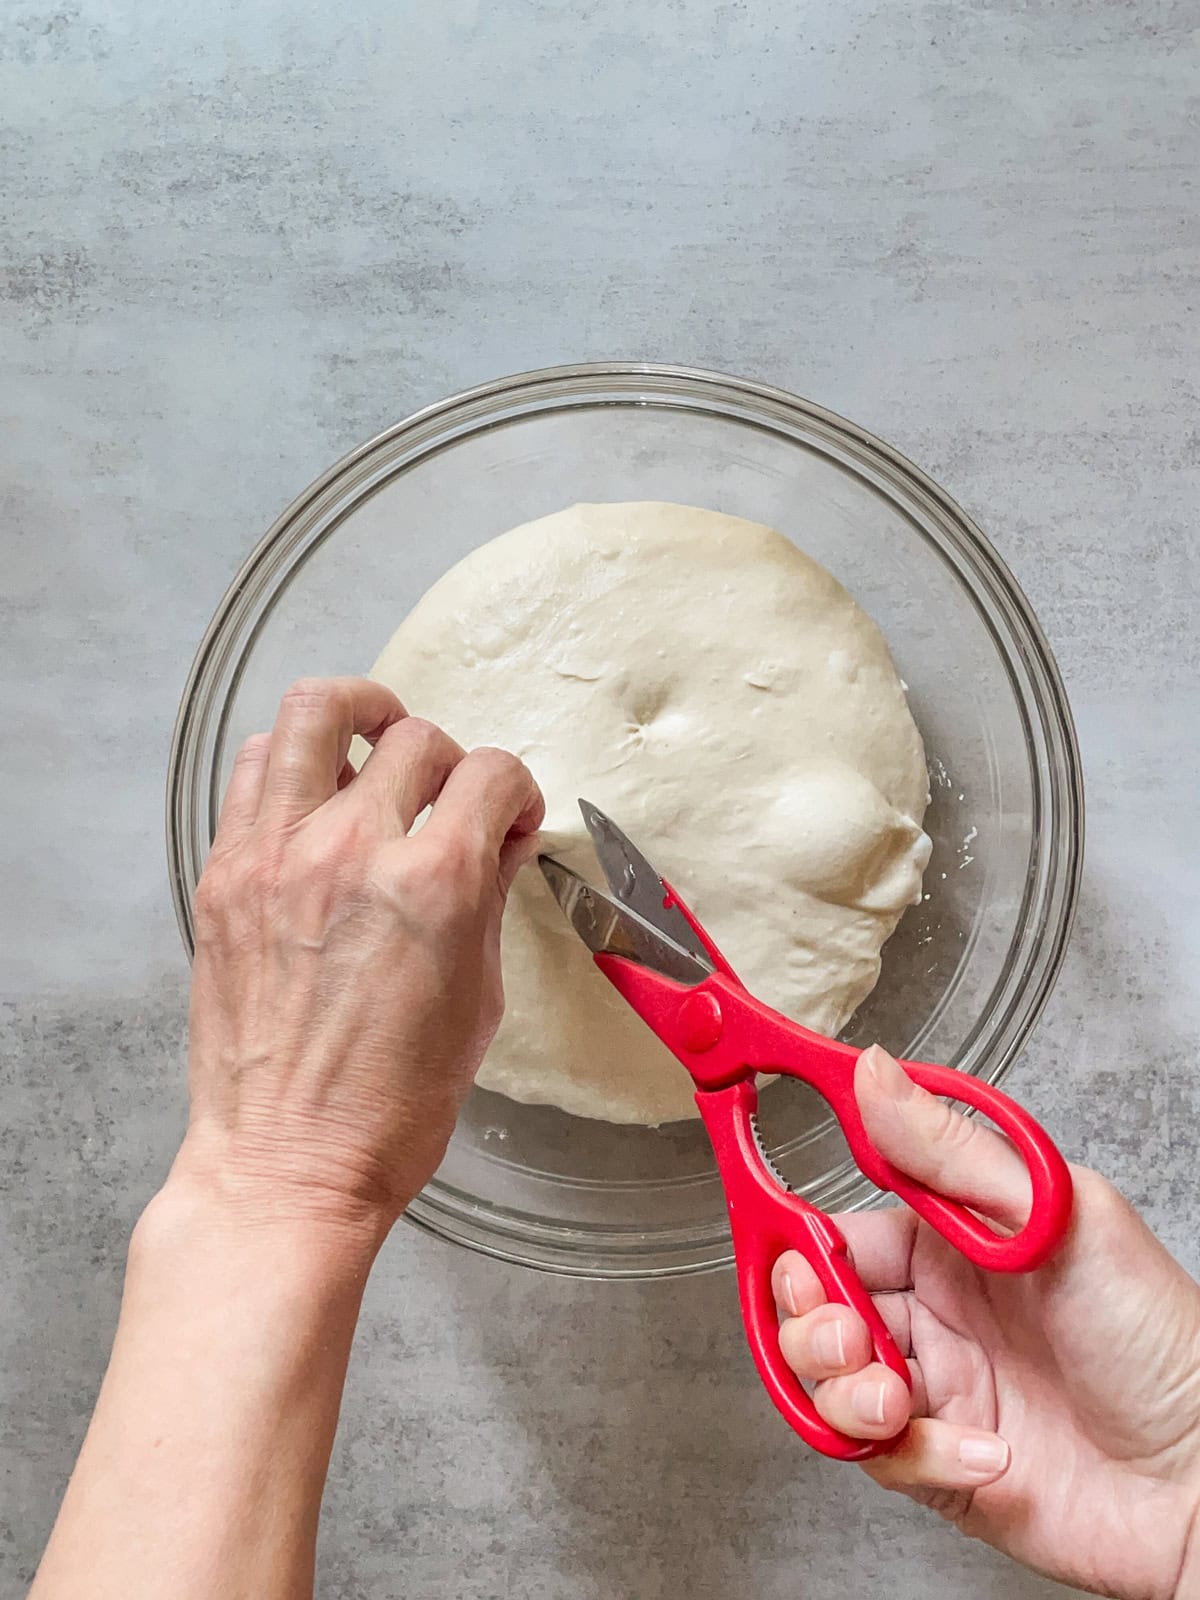
Use the scissors to snip the piece from the dough.
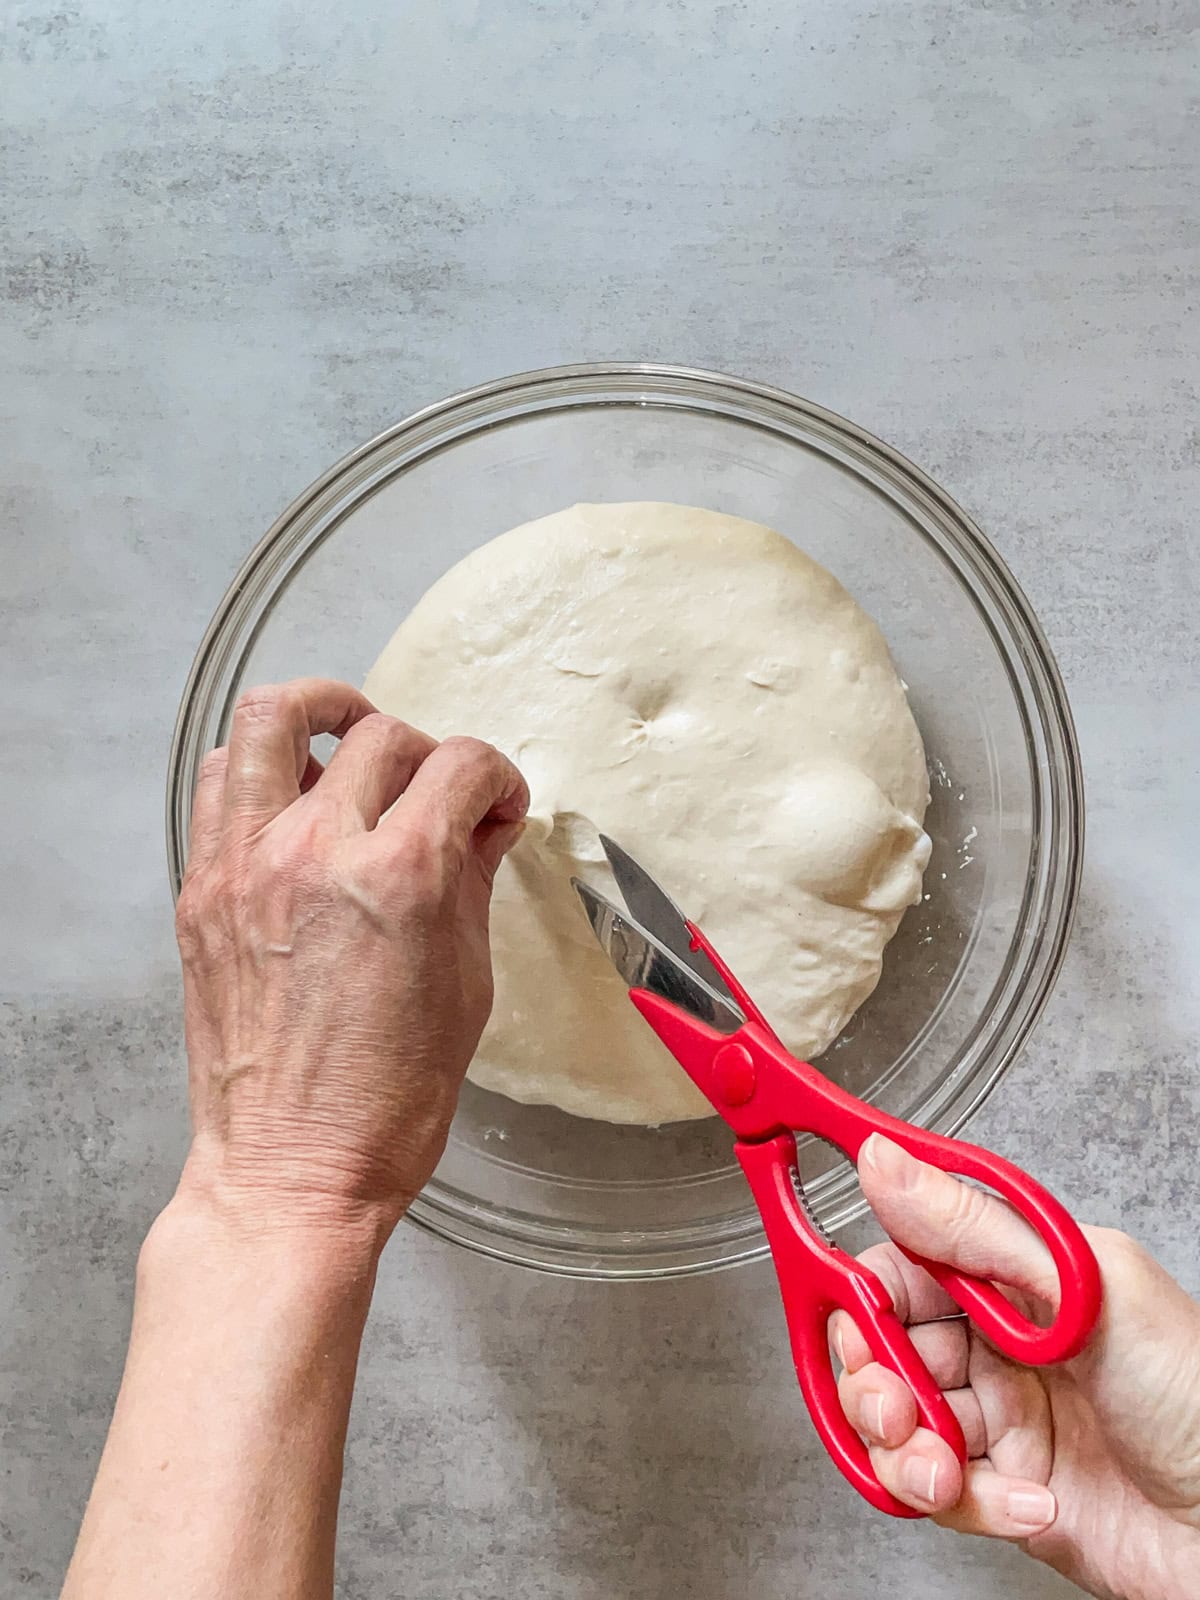
Then snip again.
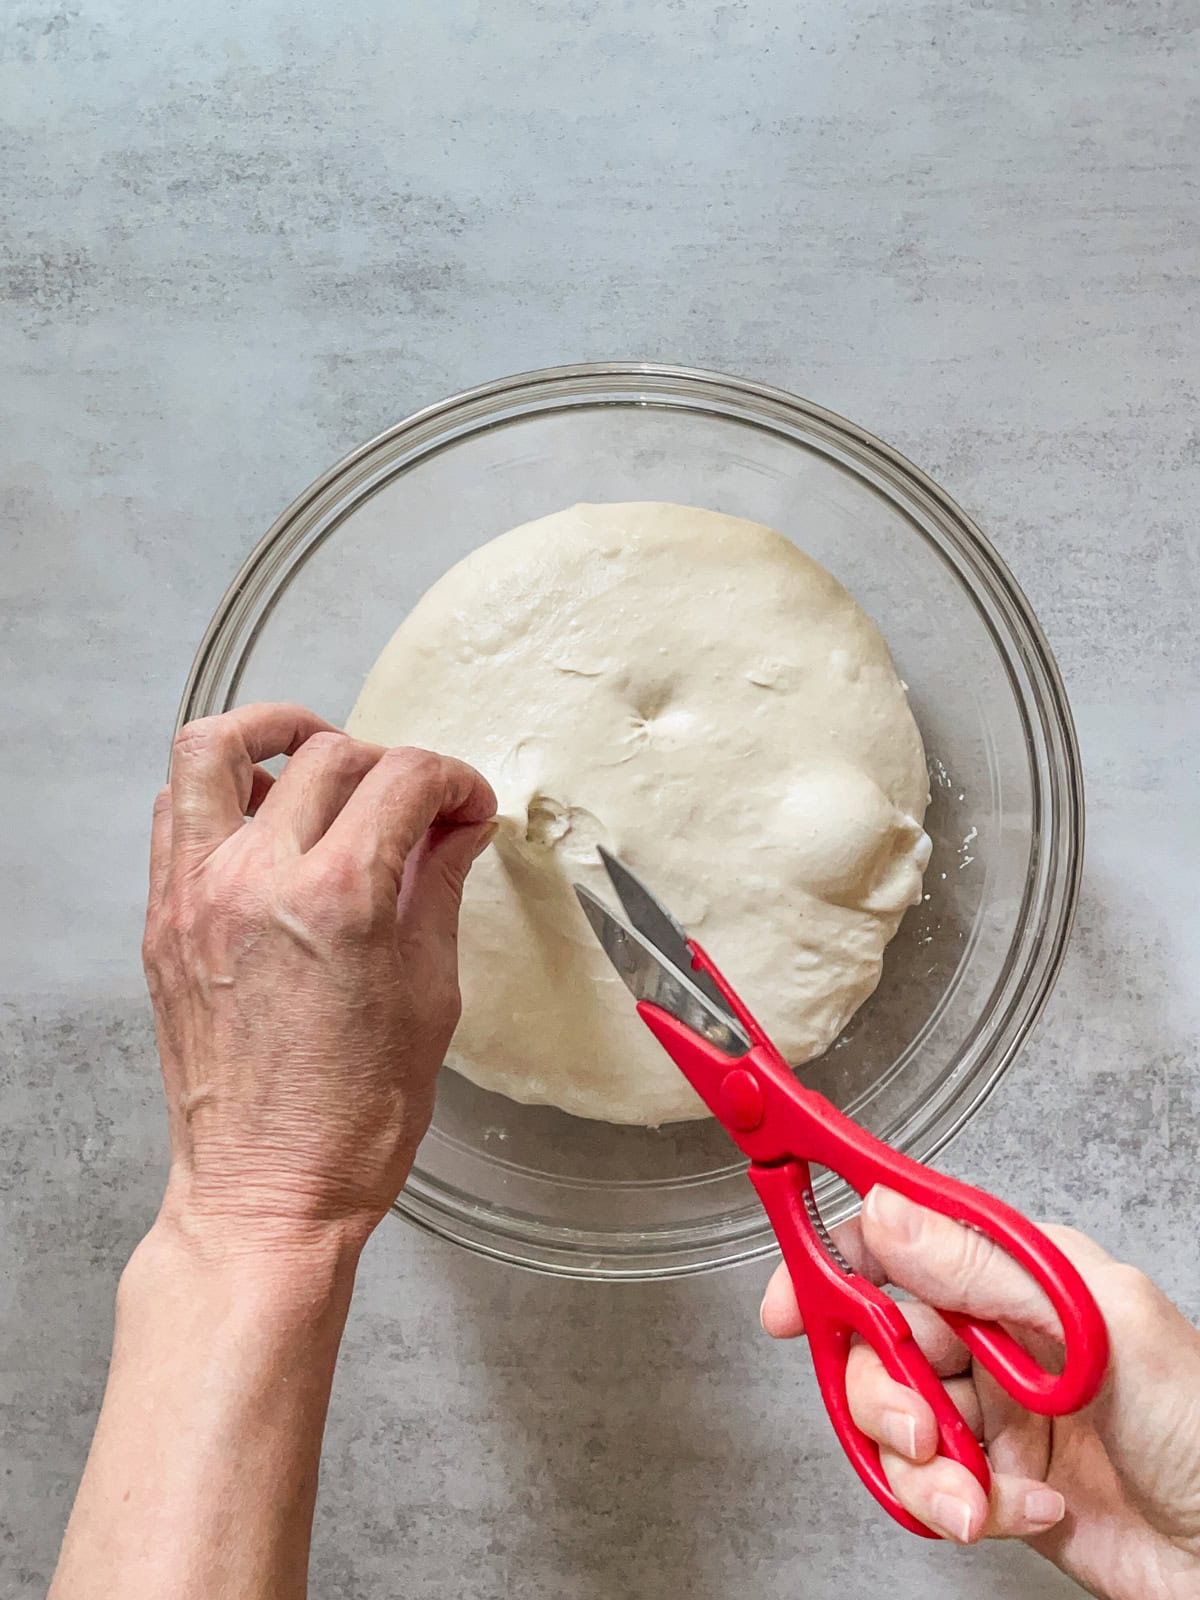
Then snip for the third time...
... to cut a small portion of the dough.
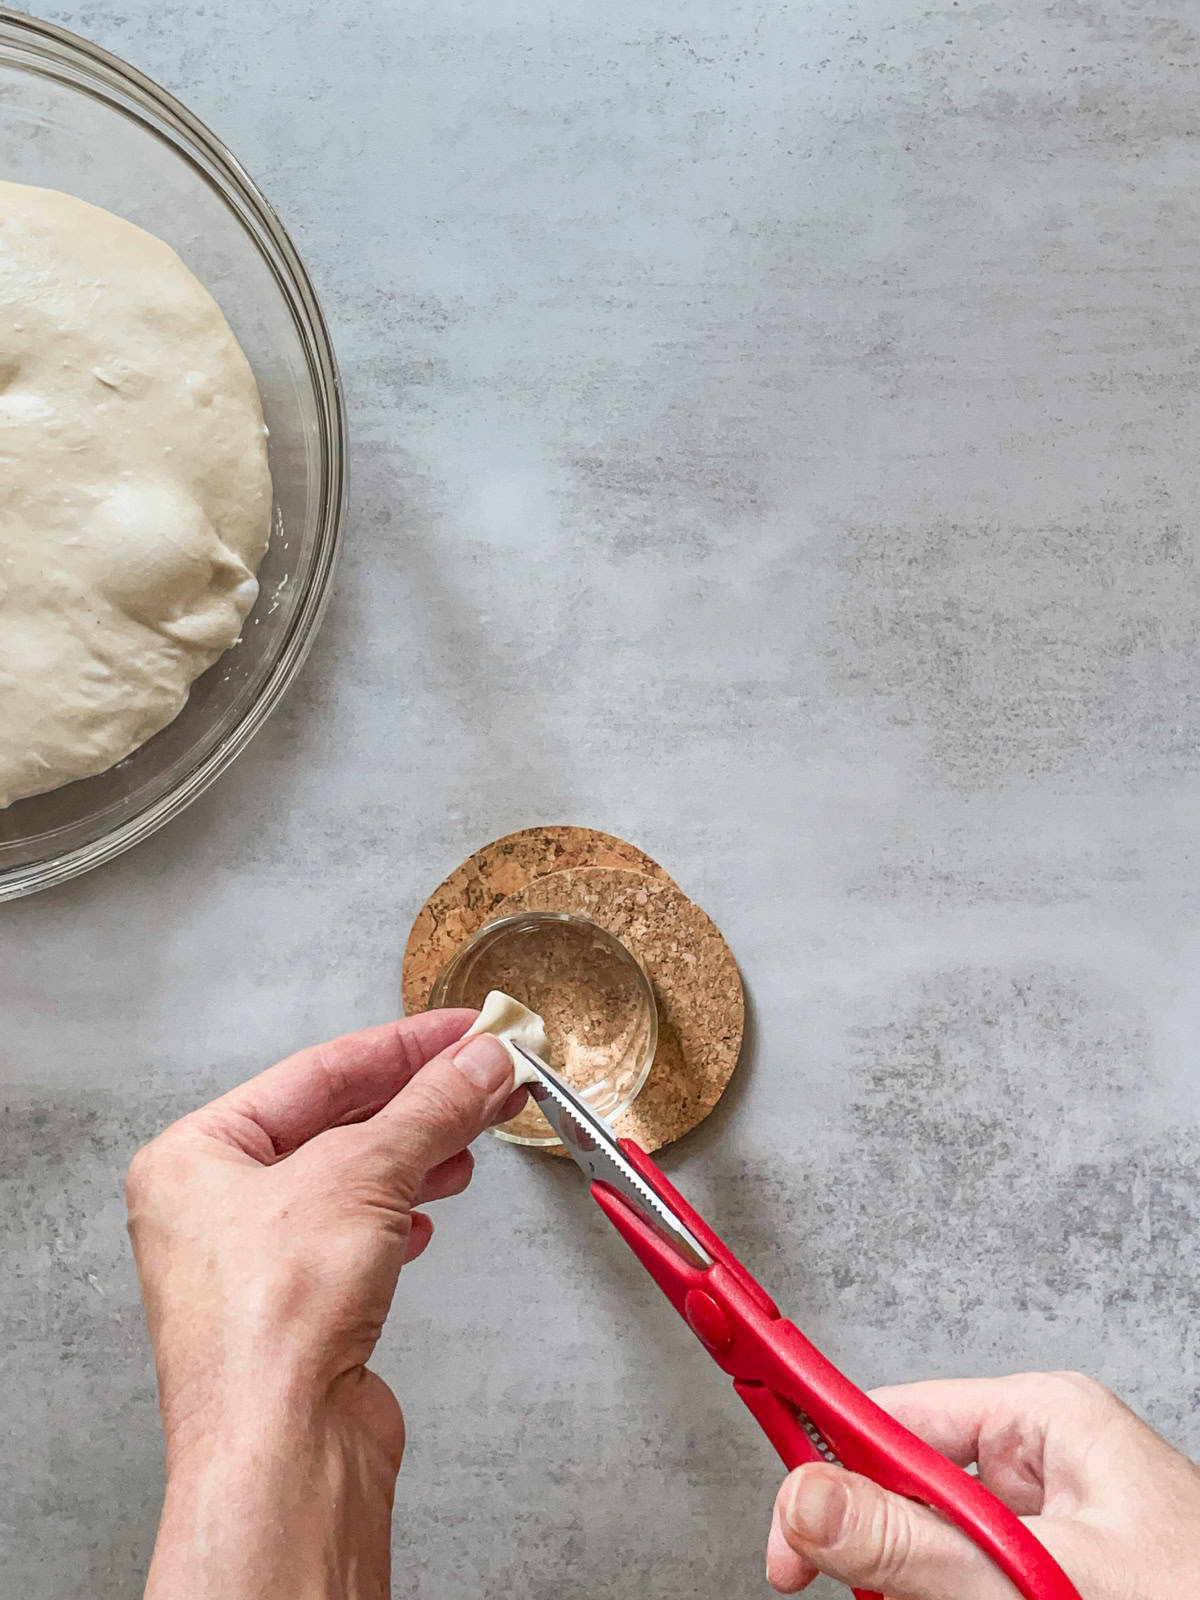
Now, snip the dough piece again to separate a small portion so it stays between your fingers...
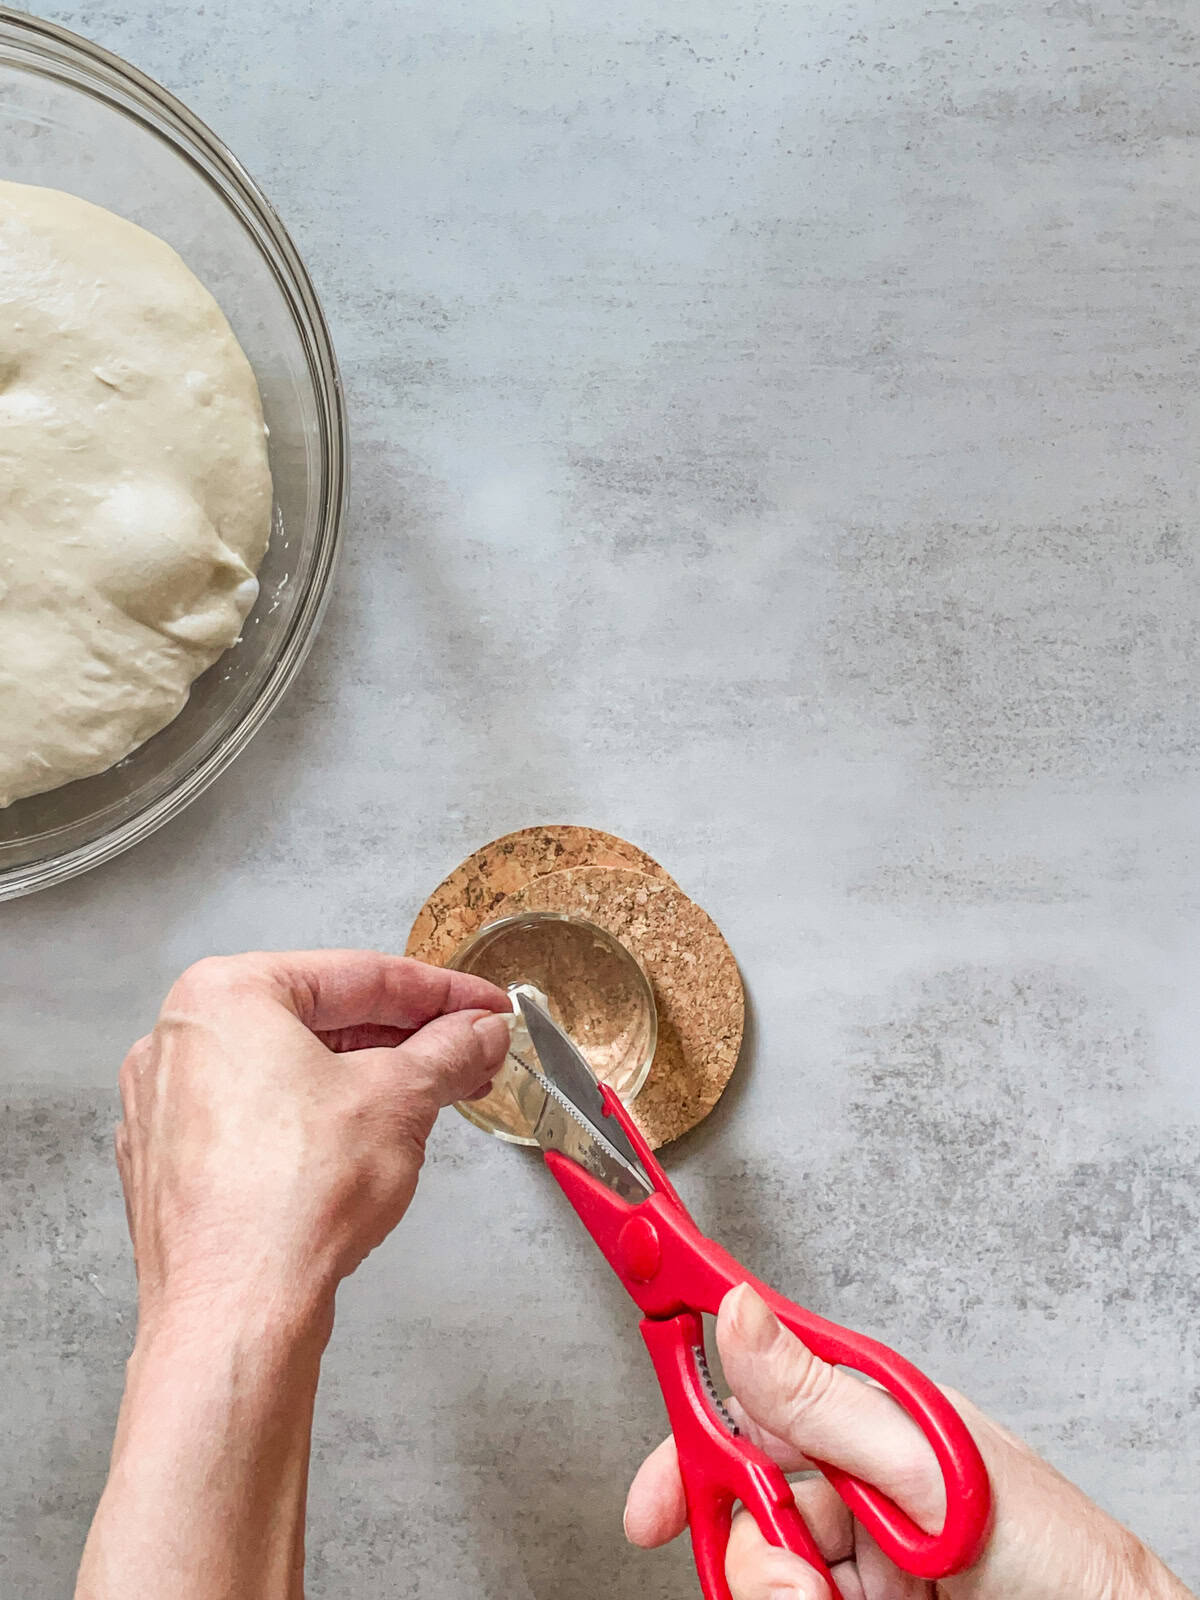
...while the larger piece drops into the water.
This is what a piece of dough looks like floating in water after fermenting in a 2L glass bowl.
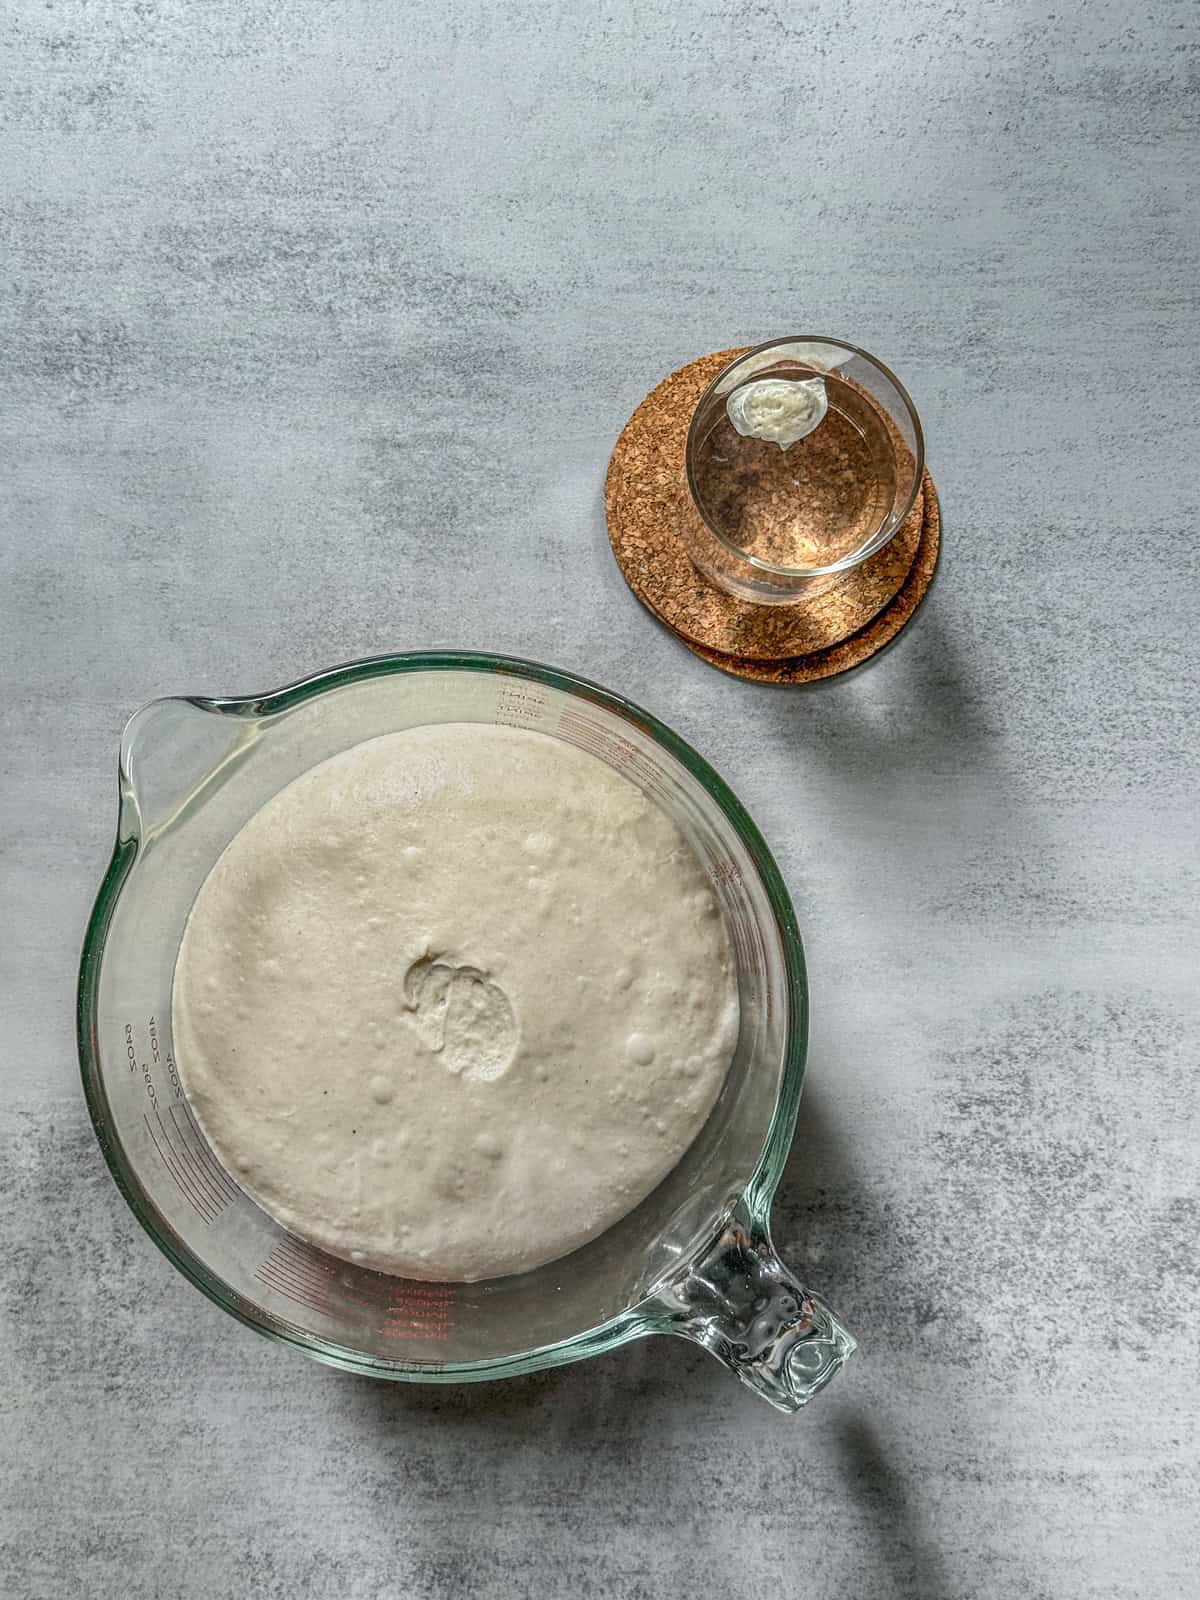
A piece of dough floating in a glass of water, next to a 2L measuring cup with dough, overhead view.
A piece of dough floating in a glass of water, next to a larger measuring cup with dough, viewed from the front.
The dough piece will have two cut sides: the "belly" (cut from the main dough) and the pinched edge.
- If the dough sinks, it is not ready, and you should let it bulk ferment longer.
- If it floats, check which side is up. If it is ready, the belly should be facing up.
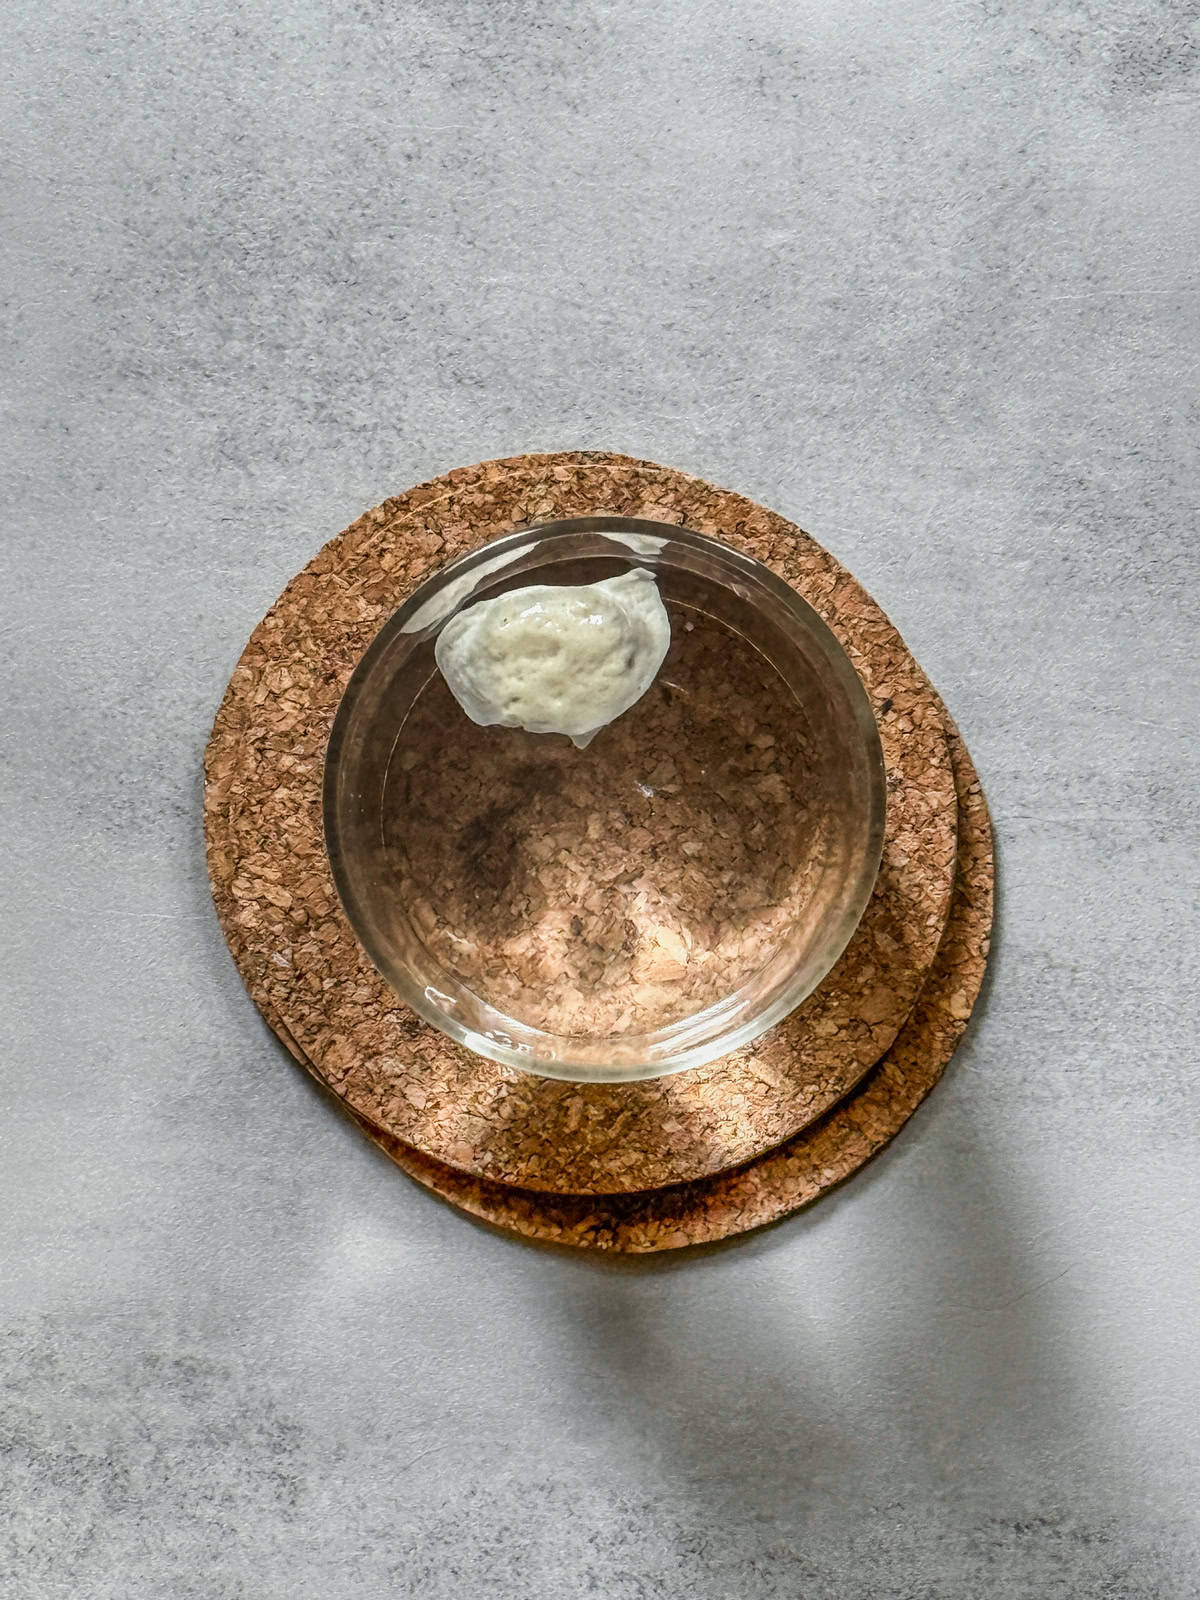
A piece of dough with the "belly" up, floating in a glass of water, overhead view.

A piece of dough floating in a glass of water, with another piece submerged (example).
Next, watch how long it floats.
- If it sinks after a few seconds, let the dough ferment for an additional 10 minutes and then repeat the test.
- If it floats for 1-2 minutes without sinking, it is time to pre-shape.
Ideally, the dough should float for a few more minutes.
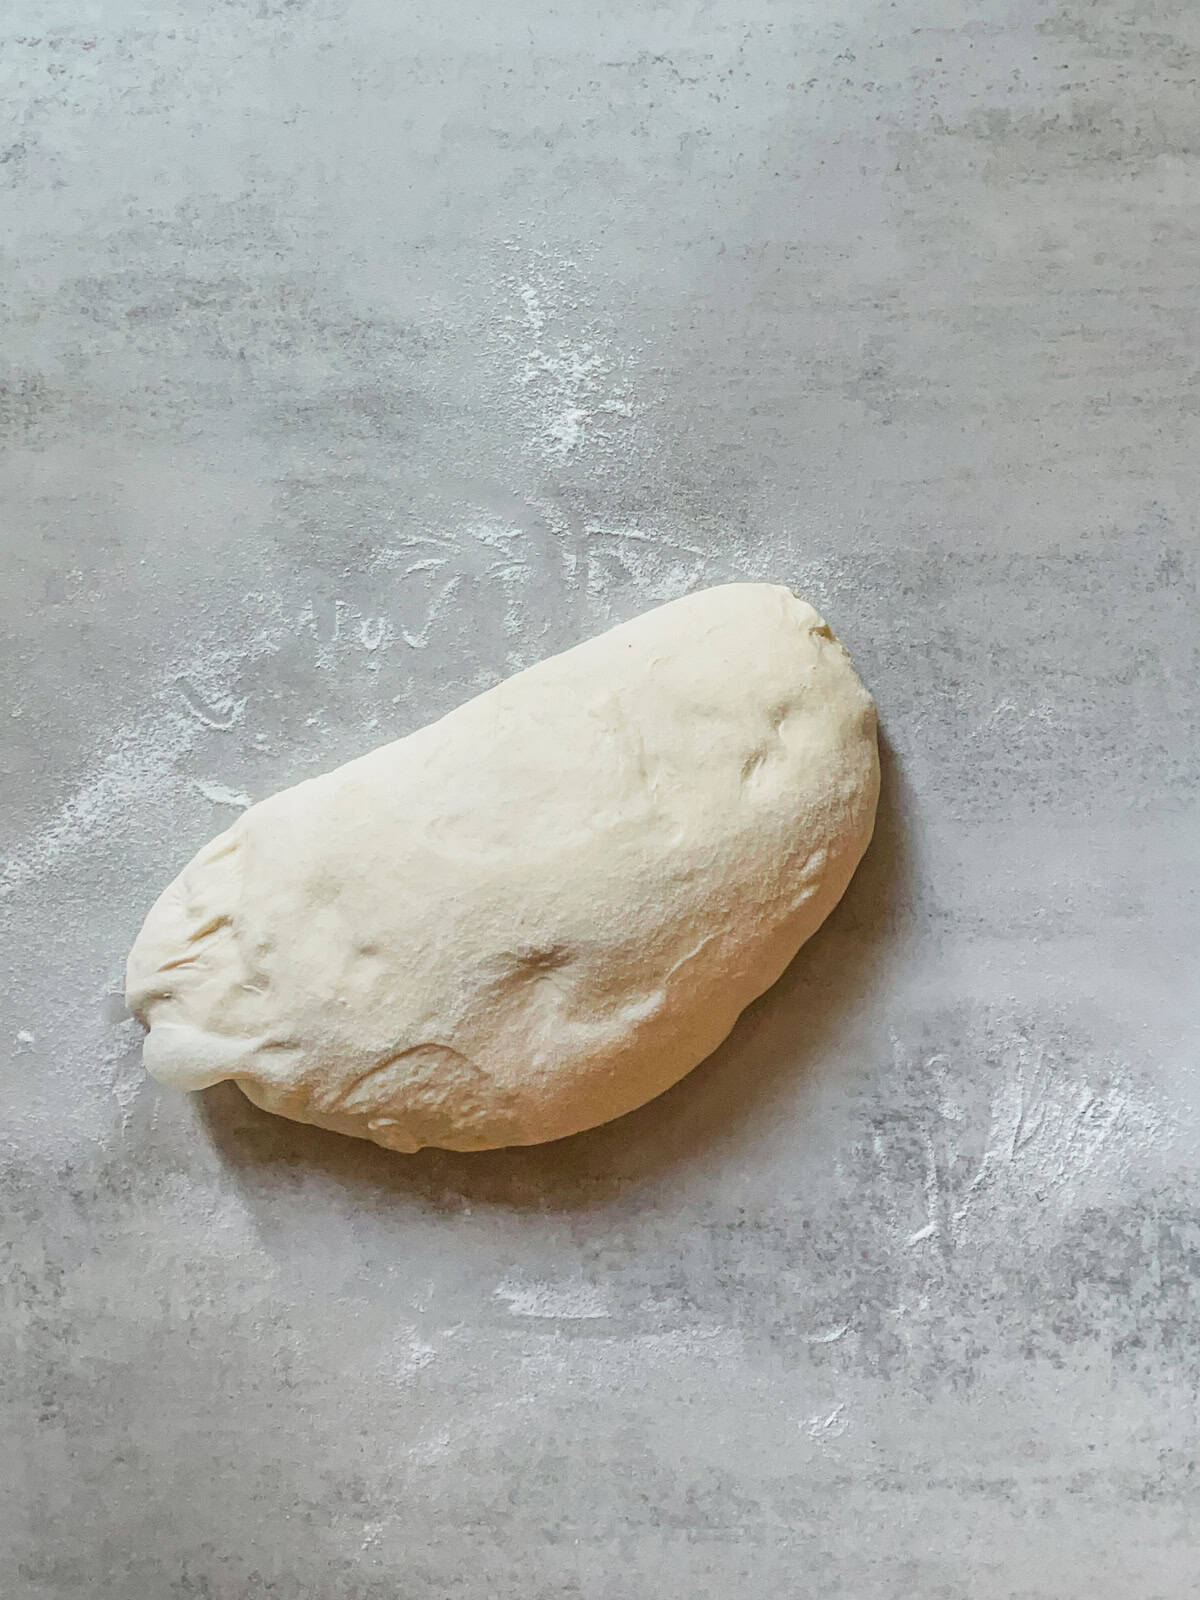
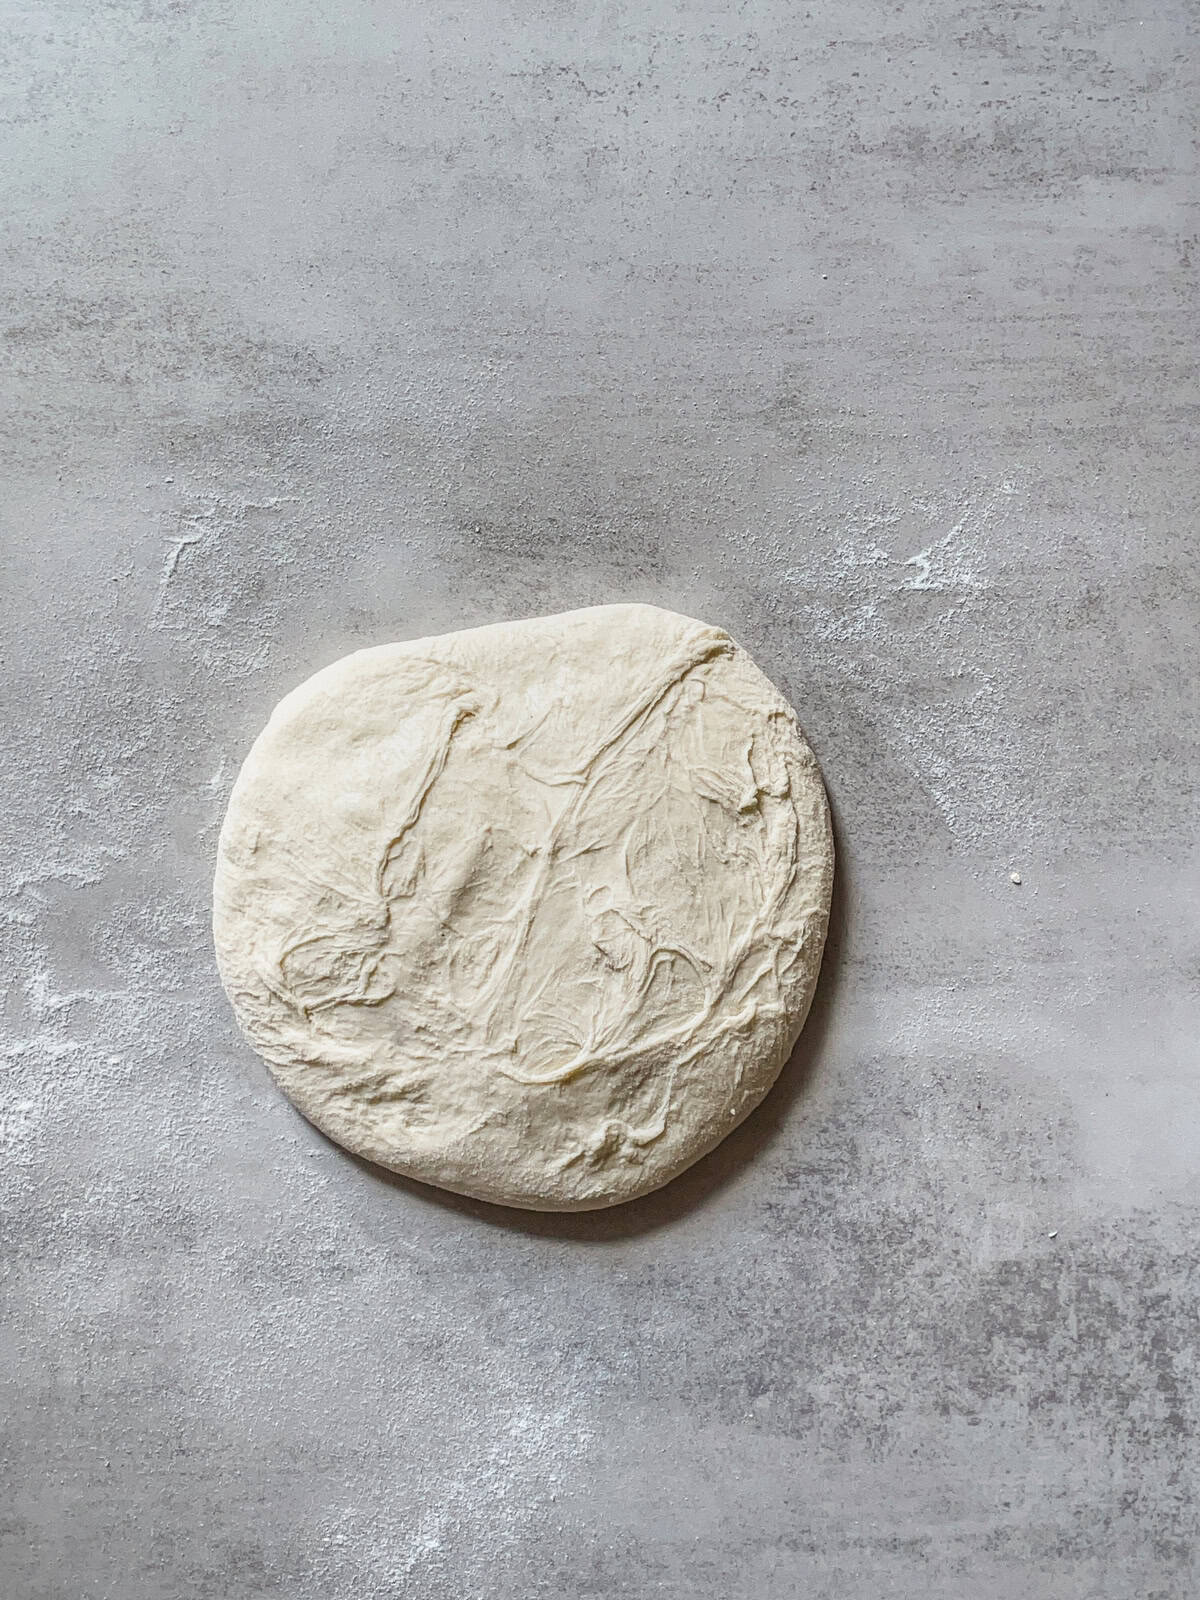
7. Pre-shape and bench rest - 5:45 PM
Now, the dough is ready for pre-shaping. Lightly flour your work surface with white rice flour. Flip your container upside down and let the dough slide out. If needed, you can use your hand to help.
Lightly flour your work surface with white rice flour. Flip your container upside down and let the dough slide out. If needed, you can use your hand to help.
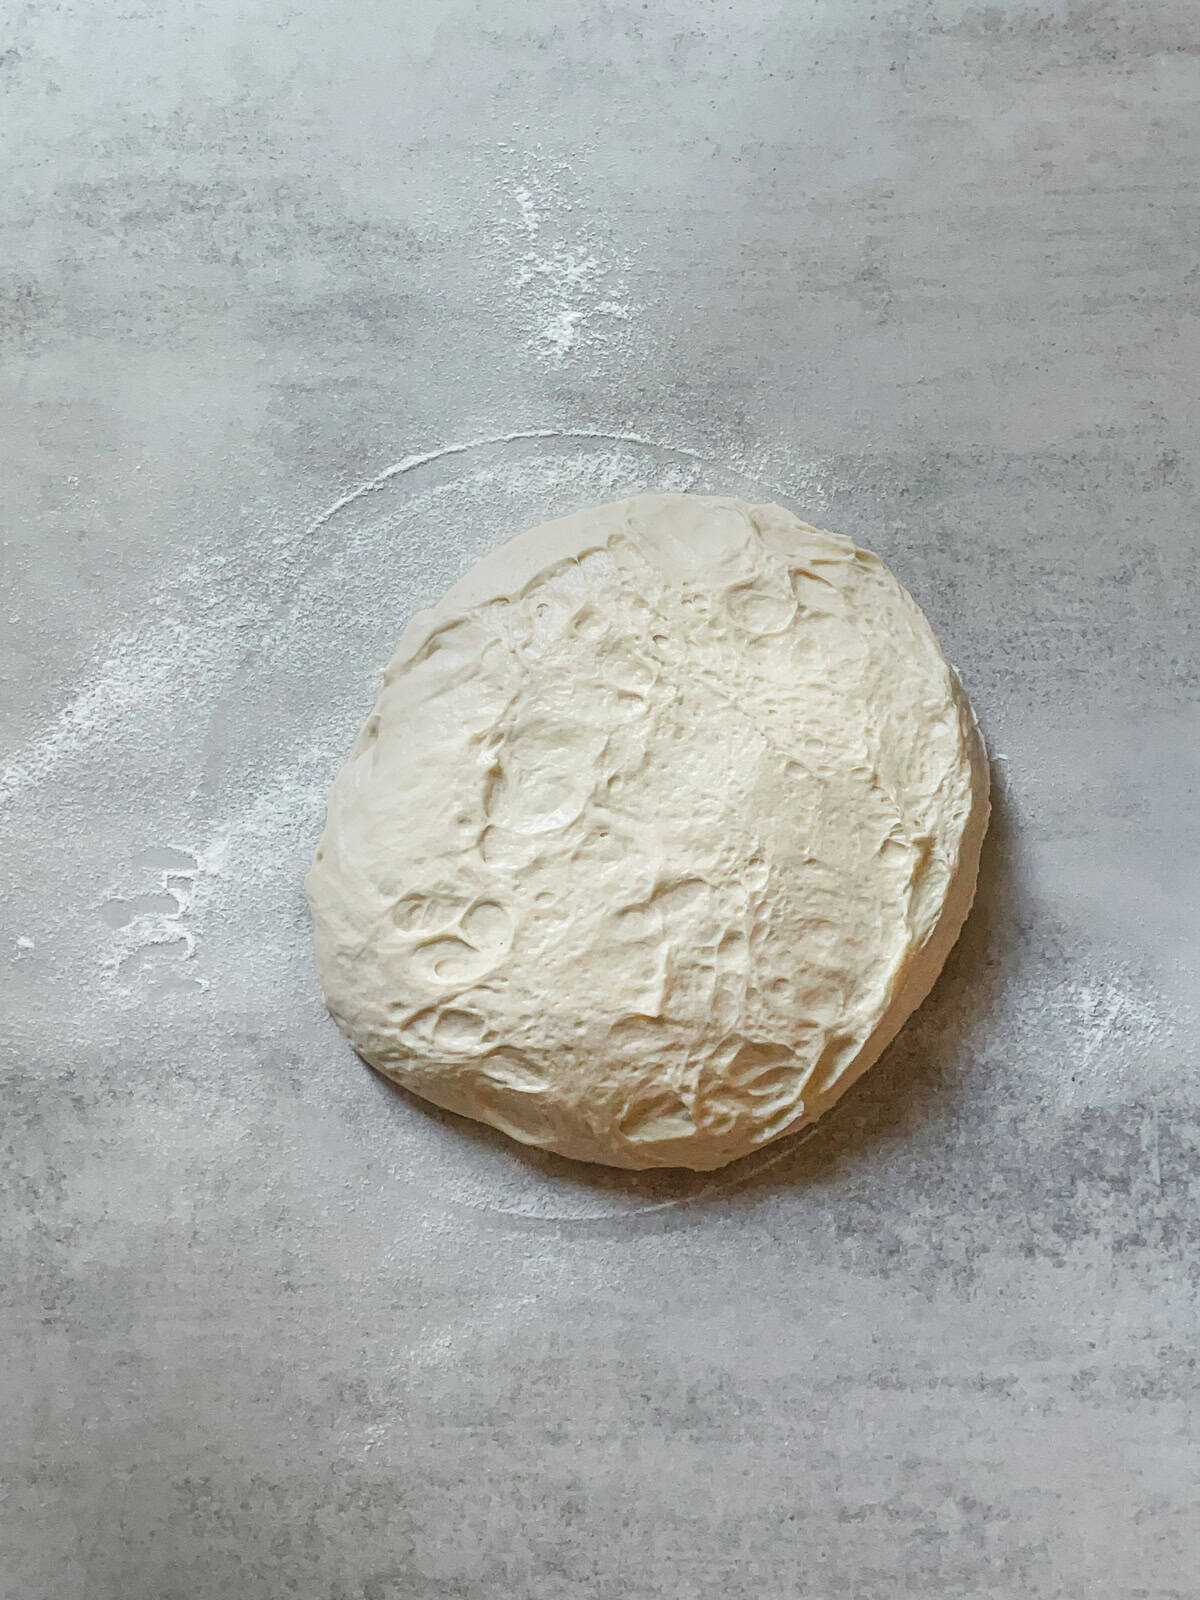
Fermented bread dough should be placed with the sticky side up on a table.
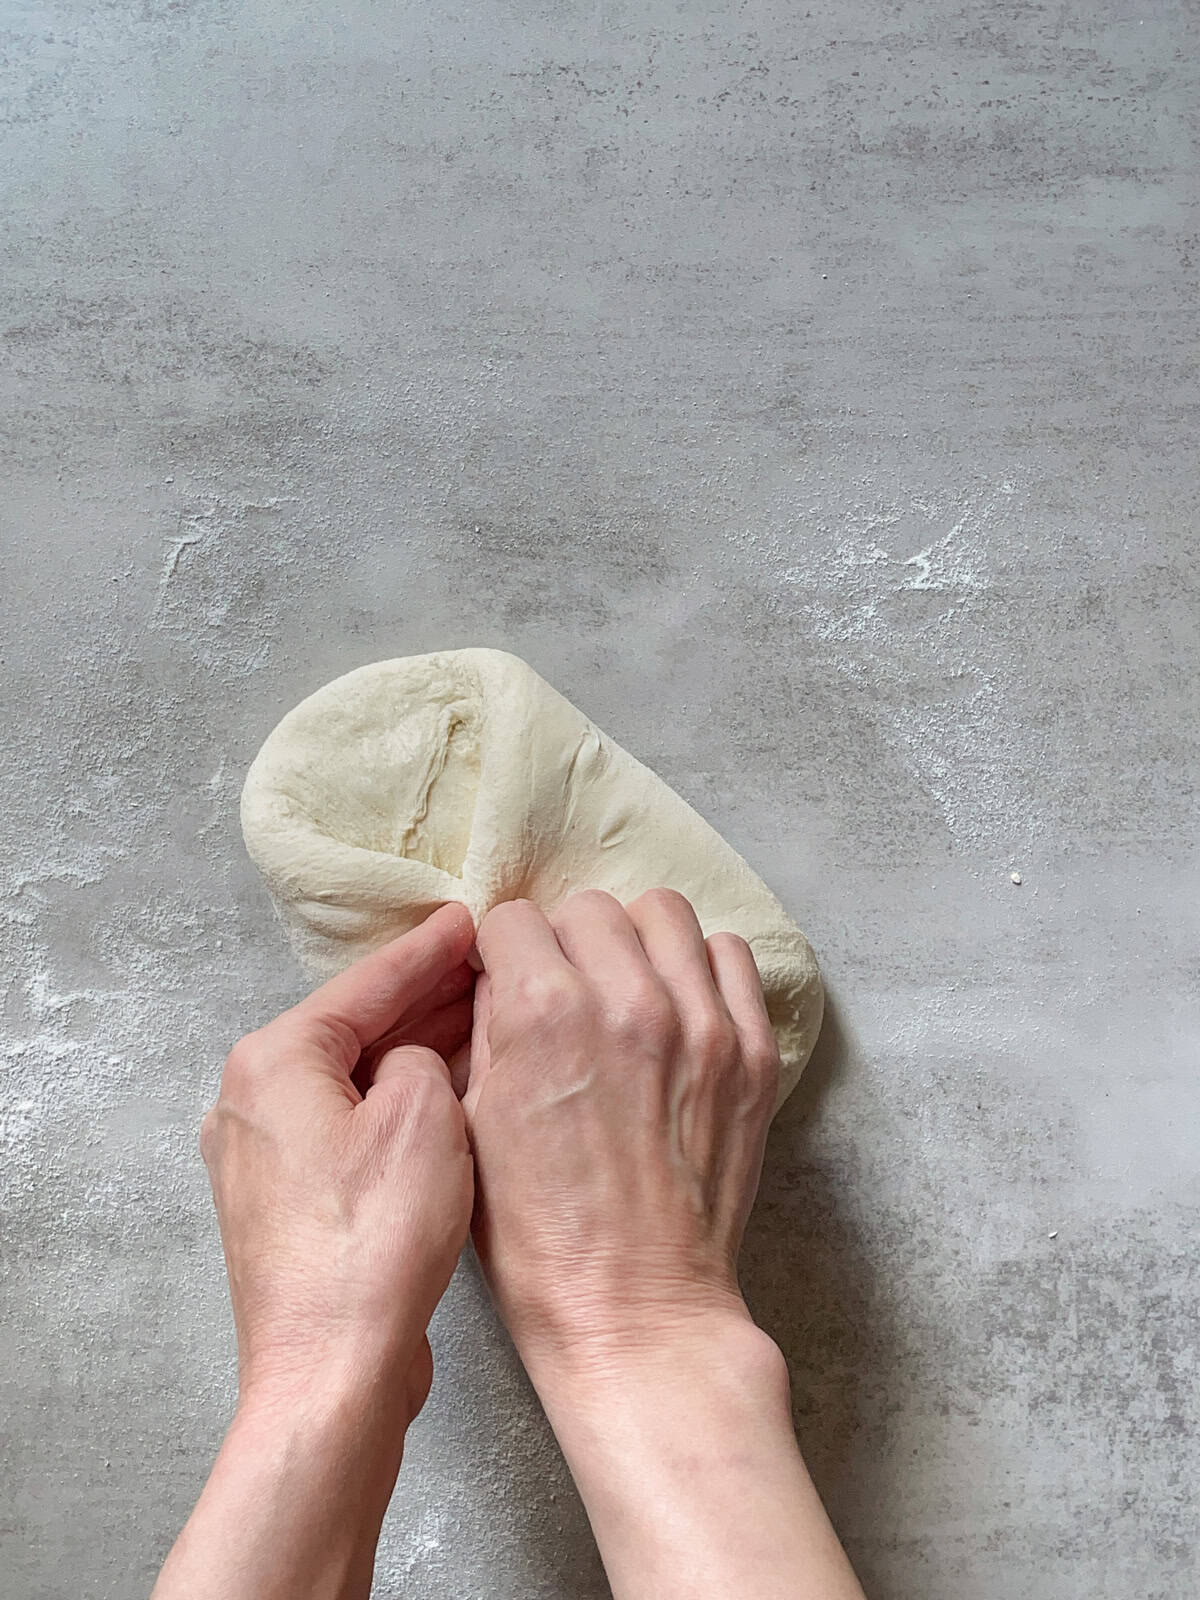
Take one half of the dough and fold it over the other half so the sticky side is on the inside.
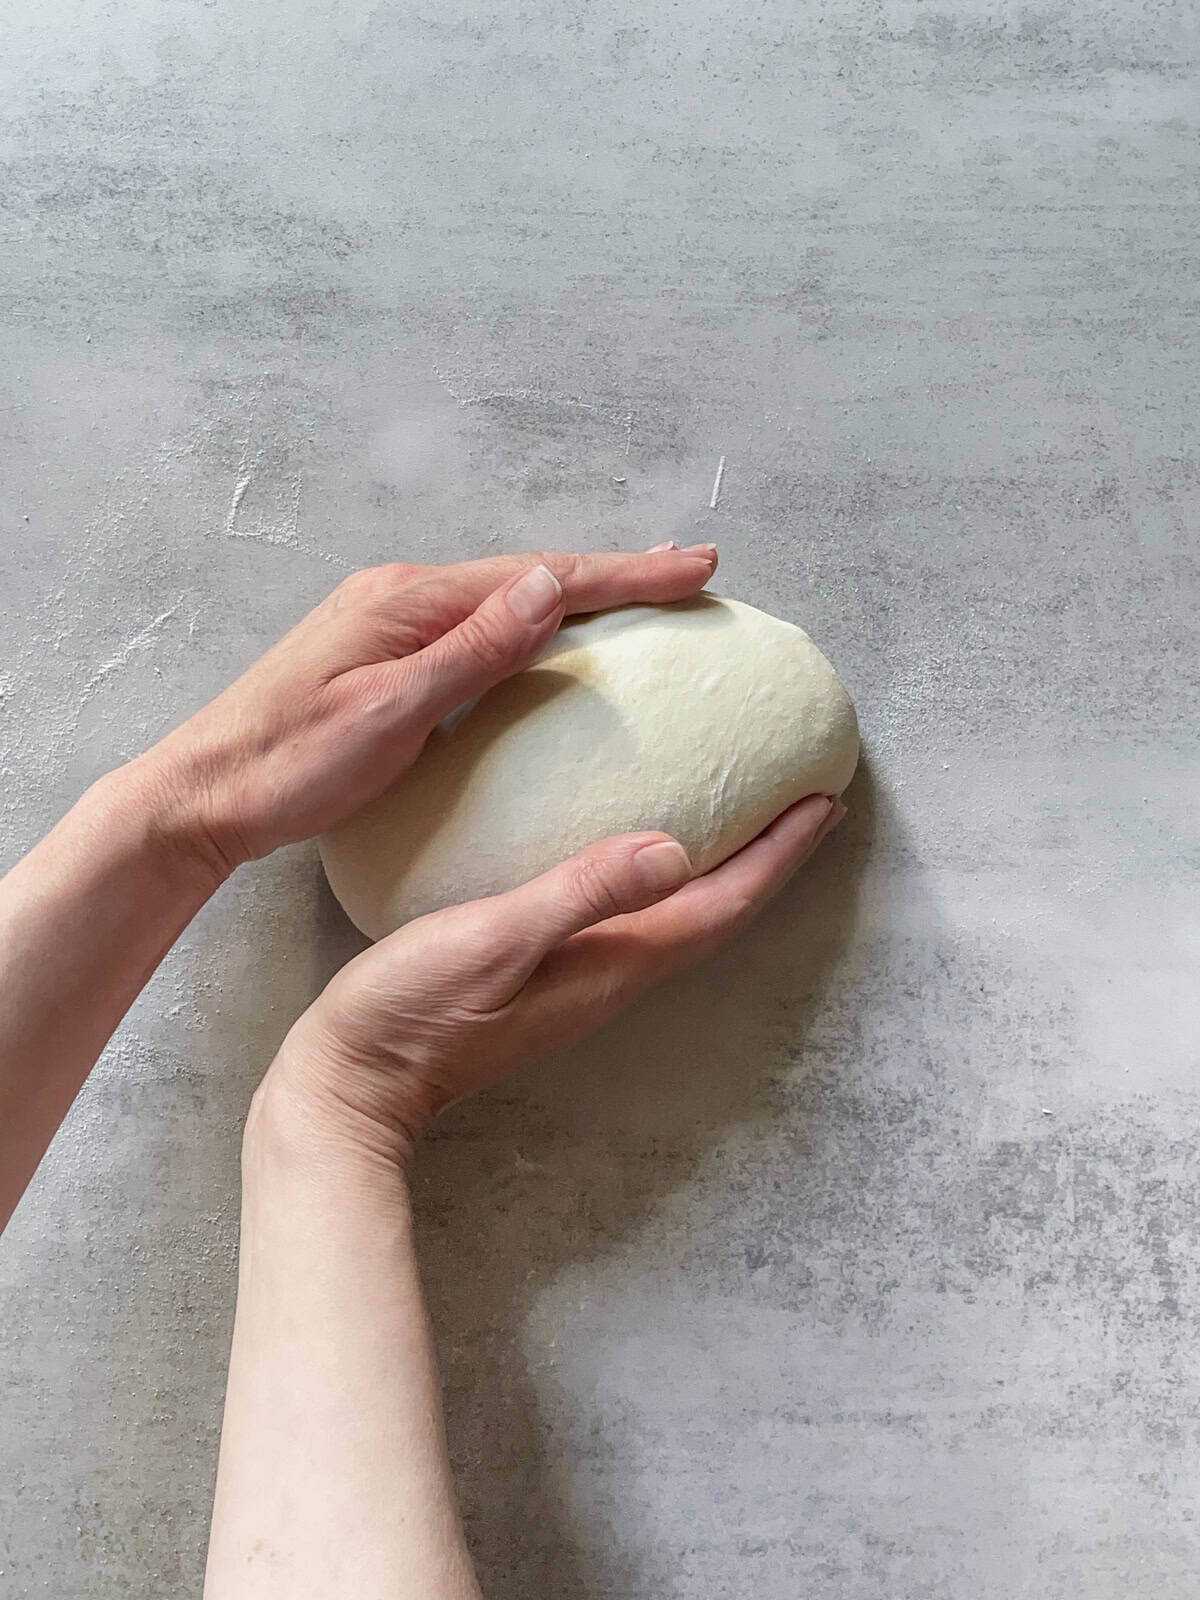
Use your hands to gently pull the dough away from you, creating tension on the surface.
Rotate the dough a quarter turn.
Gently push the dough back toward yourself, tucking the edges underneath.
The dough should be seam-side down.
Cover the dough with a bowl or a clean tea towel, or leave it uncovered, and let it rest for 15 minutes.
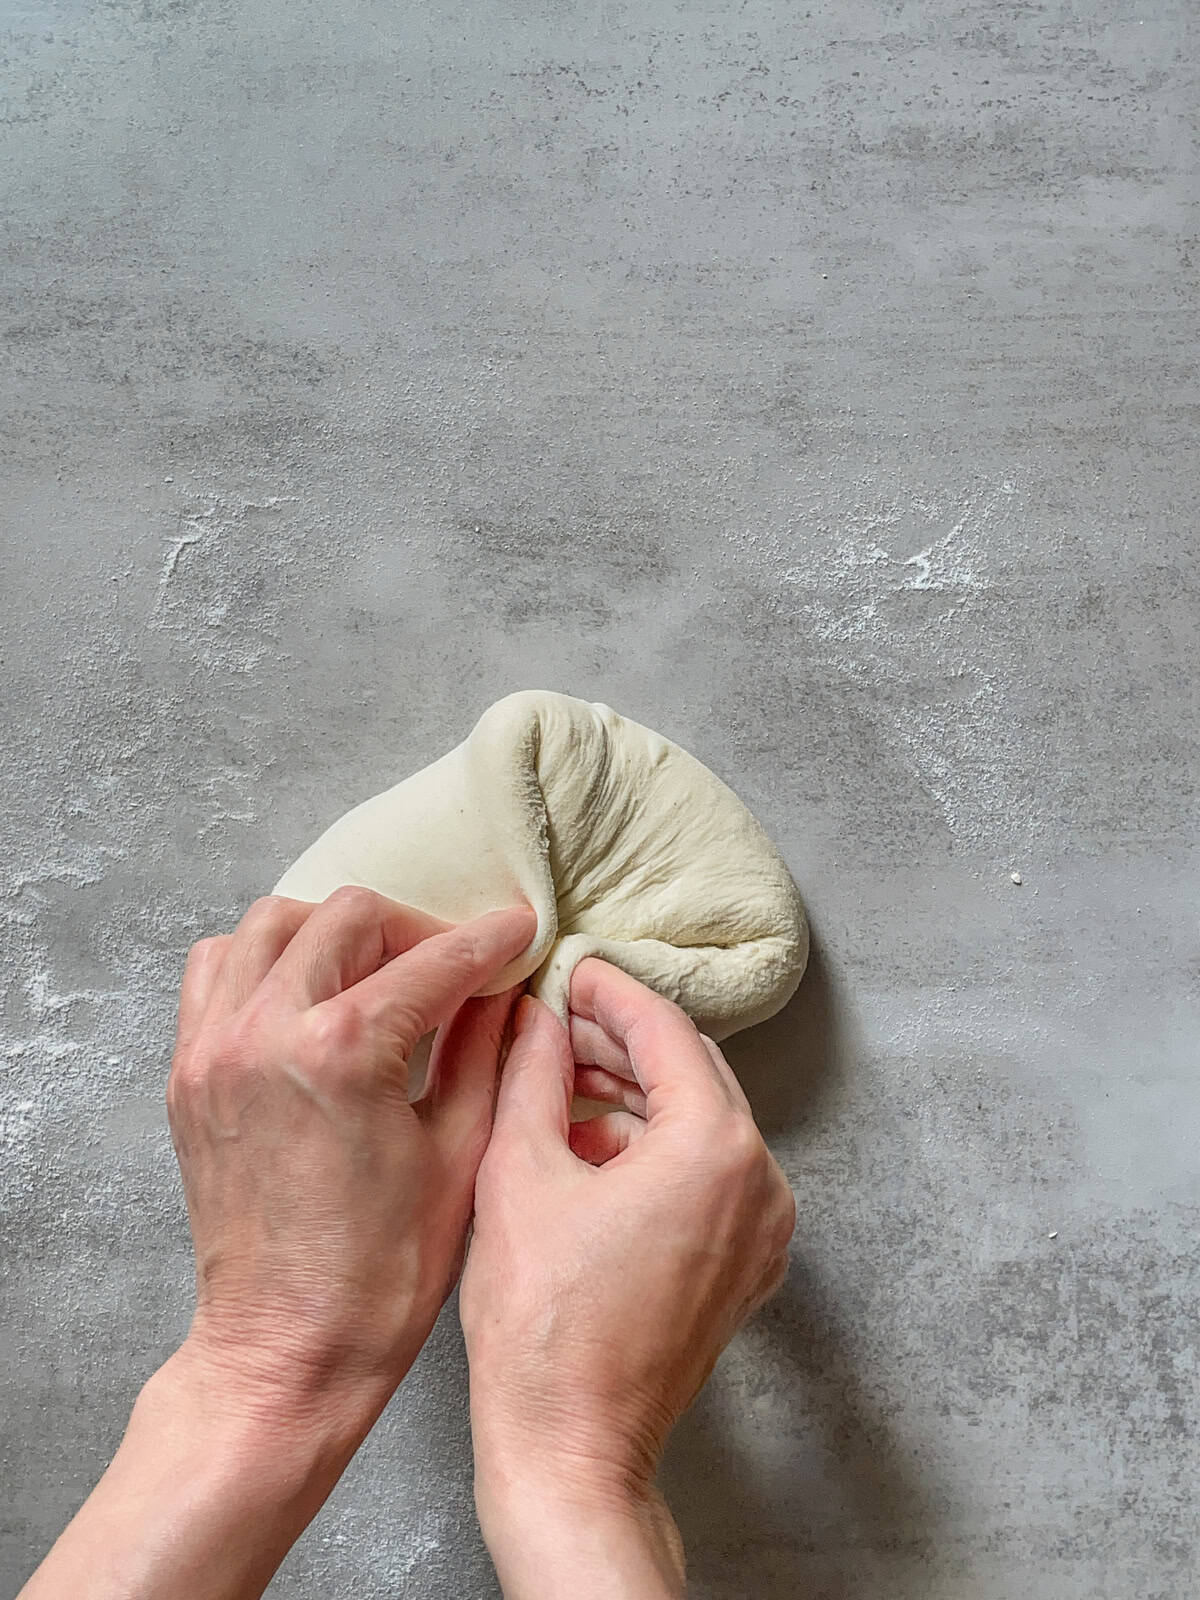
Alternatively, you can use the "gathering" technique to preshape the dough. To do this, flip the mixing bowl and let the dough release. Gently fold the four sides of the dough toward the middle, pressing them lightly so they stick together.
Then, grab the opposite "corners" of the dough and fold them into the center, pressing to make them stick. Repeat this process with the other "corners."
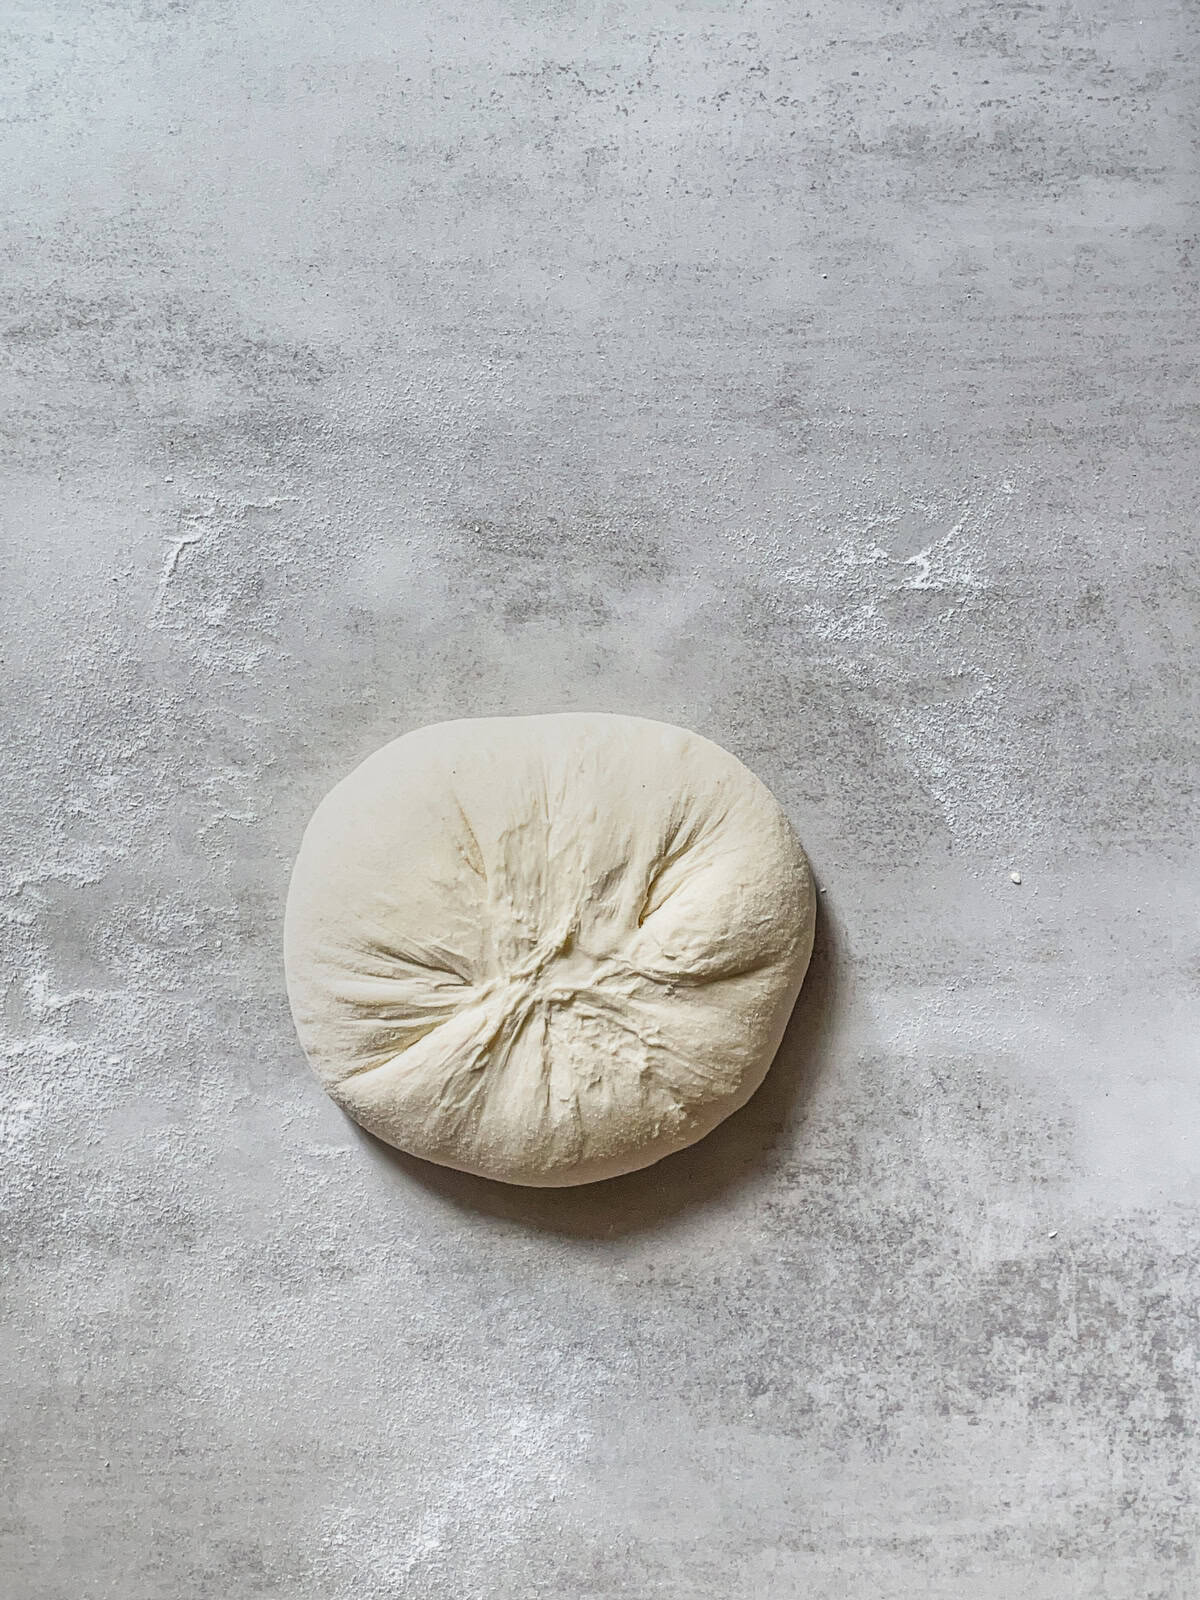
Now, the dough should be seam-side up, with the ball facing down. Gently flip it over and preshape it by cupping your hands around it and moving it toward you to create tension.
Cover the dough with a clean tea towel or leave it uncovered and let it rest for 15 minutes (this is called bench rest).
While it rests, prepare a medium-sized bowl, line it with a clean linen or cotton towel, and dust it with white rice flour.
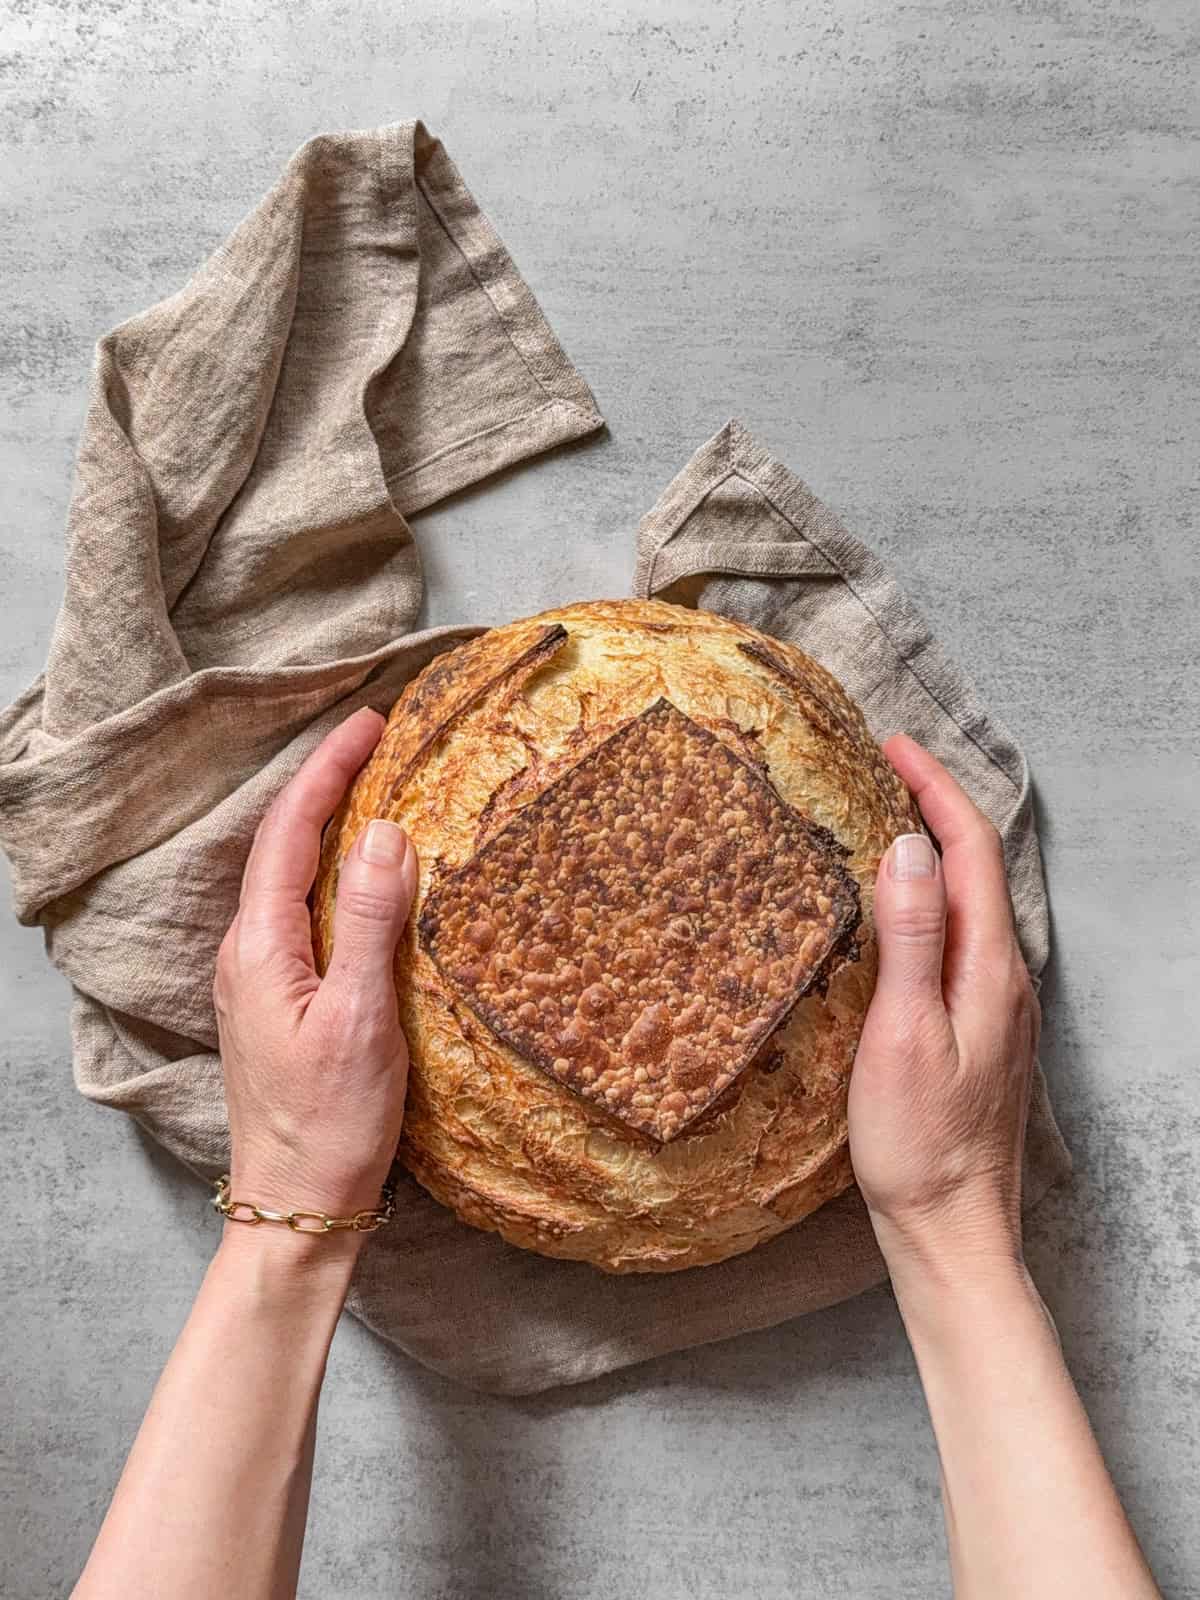
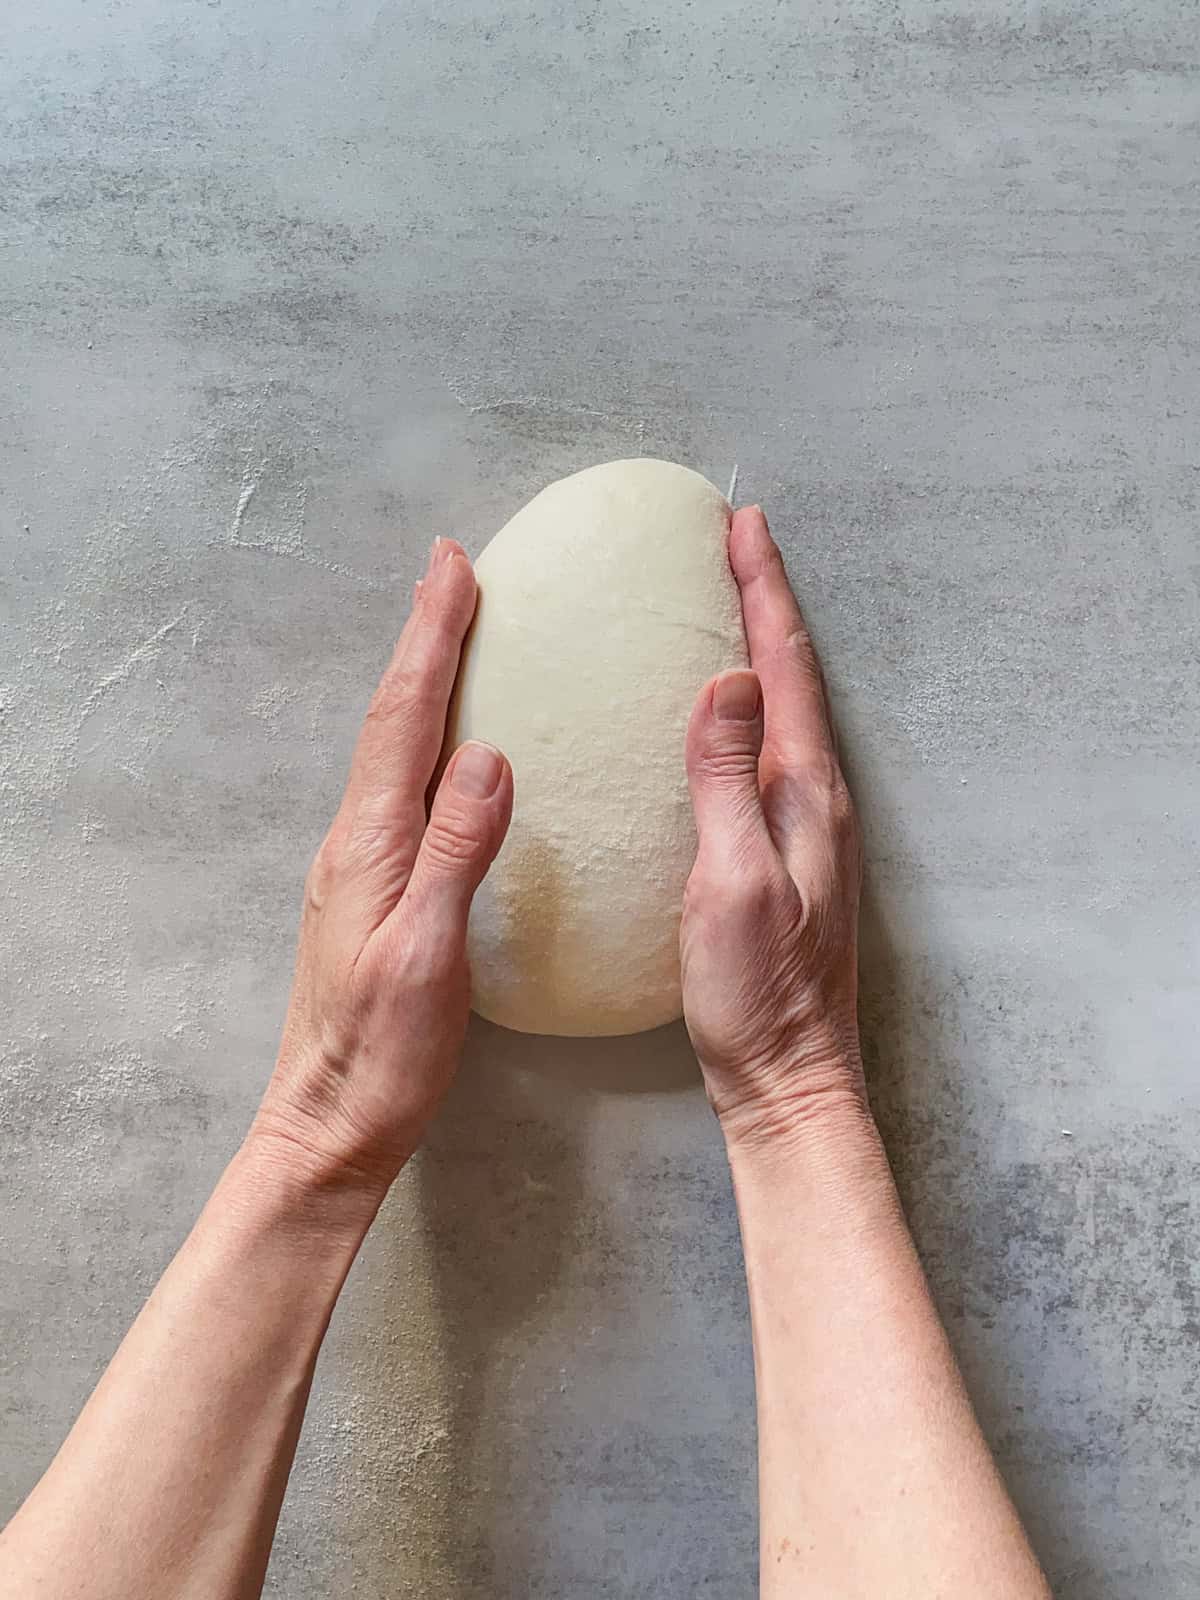
8. Shape the dough - 6:00 PM
After the dough rests, sprinkle some rice flour on your counter and on top of the dough. Use your hands or a bench scraper (if you have one) to flip the dough so the floured side is down and the sticky side is facing up.
Flatten the dough into a rough round or square shape.
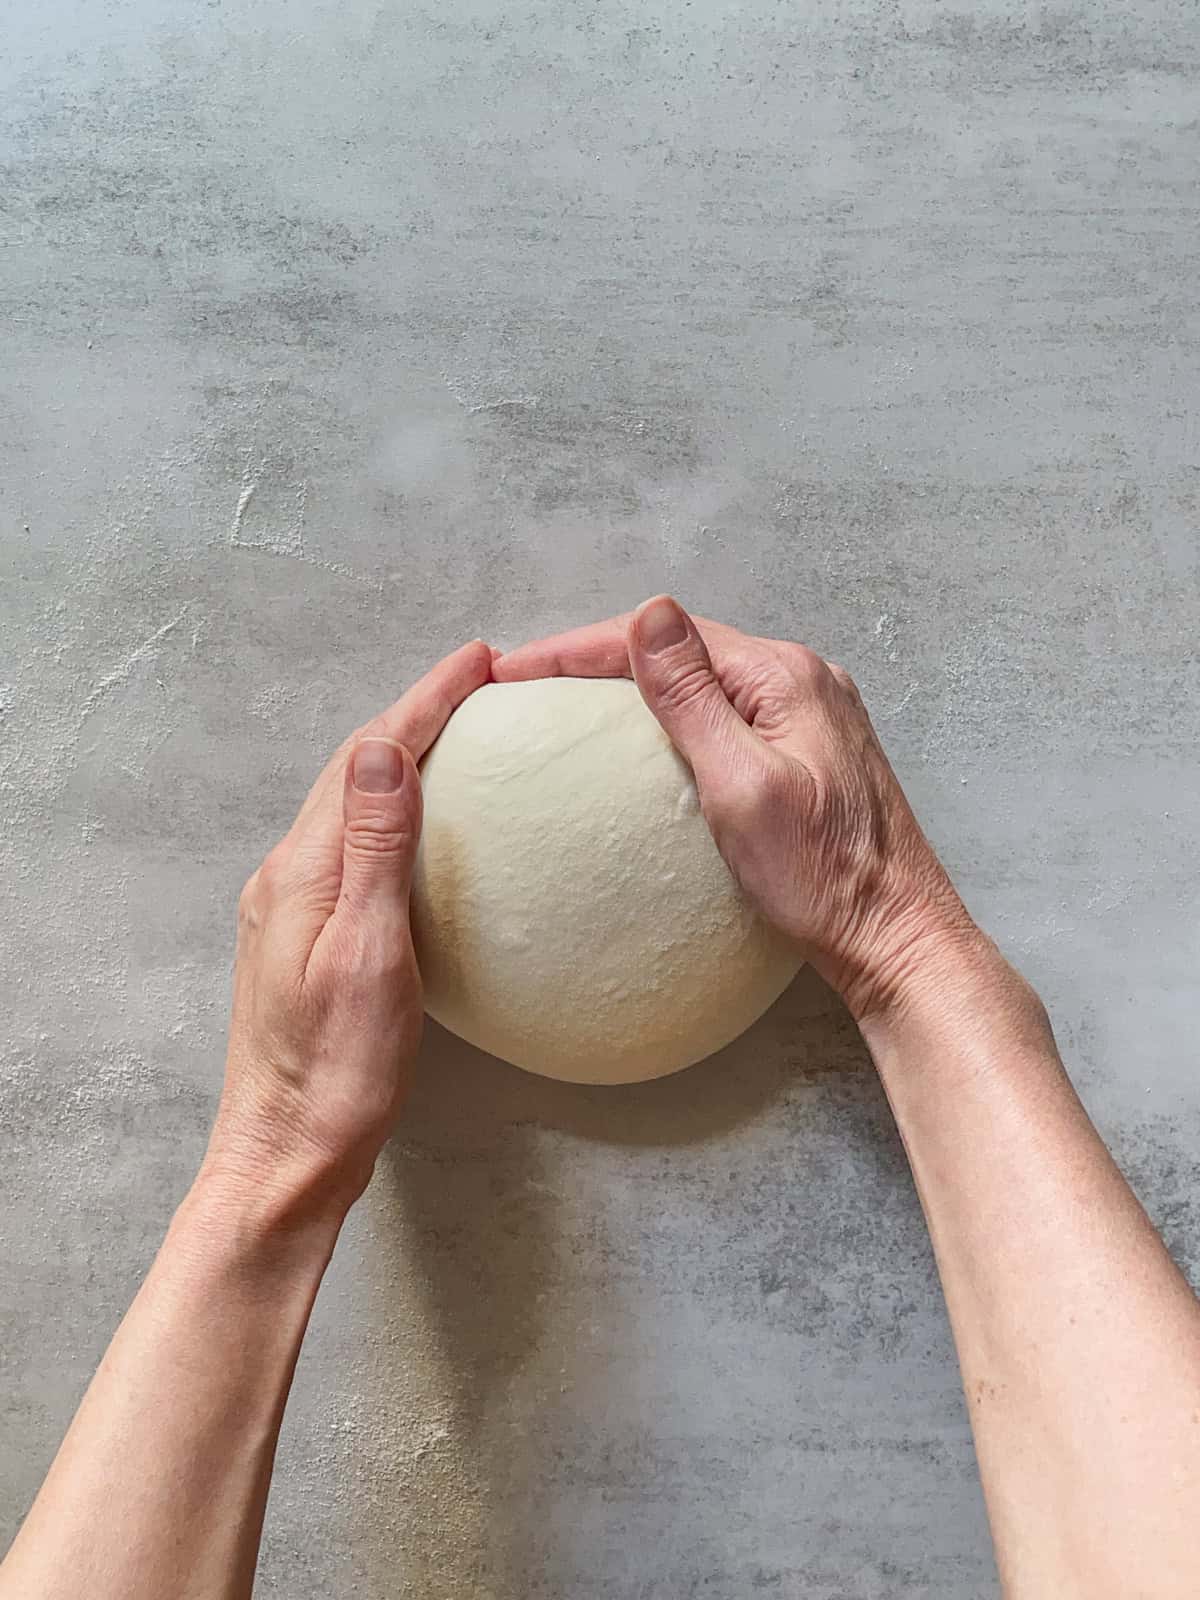
Gather the opposite edges of the dough and fold them toward the center.
Gather the other pair of opposite edges of the dough and fold them toward the center.
Continue folding the edges around the dough until a dough ball forms.
Watch a short video from @eds_bred on the "gathering" technique for a boule using high-hydration dough. It's okay that your dough has low hydration.
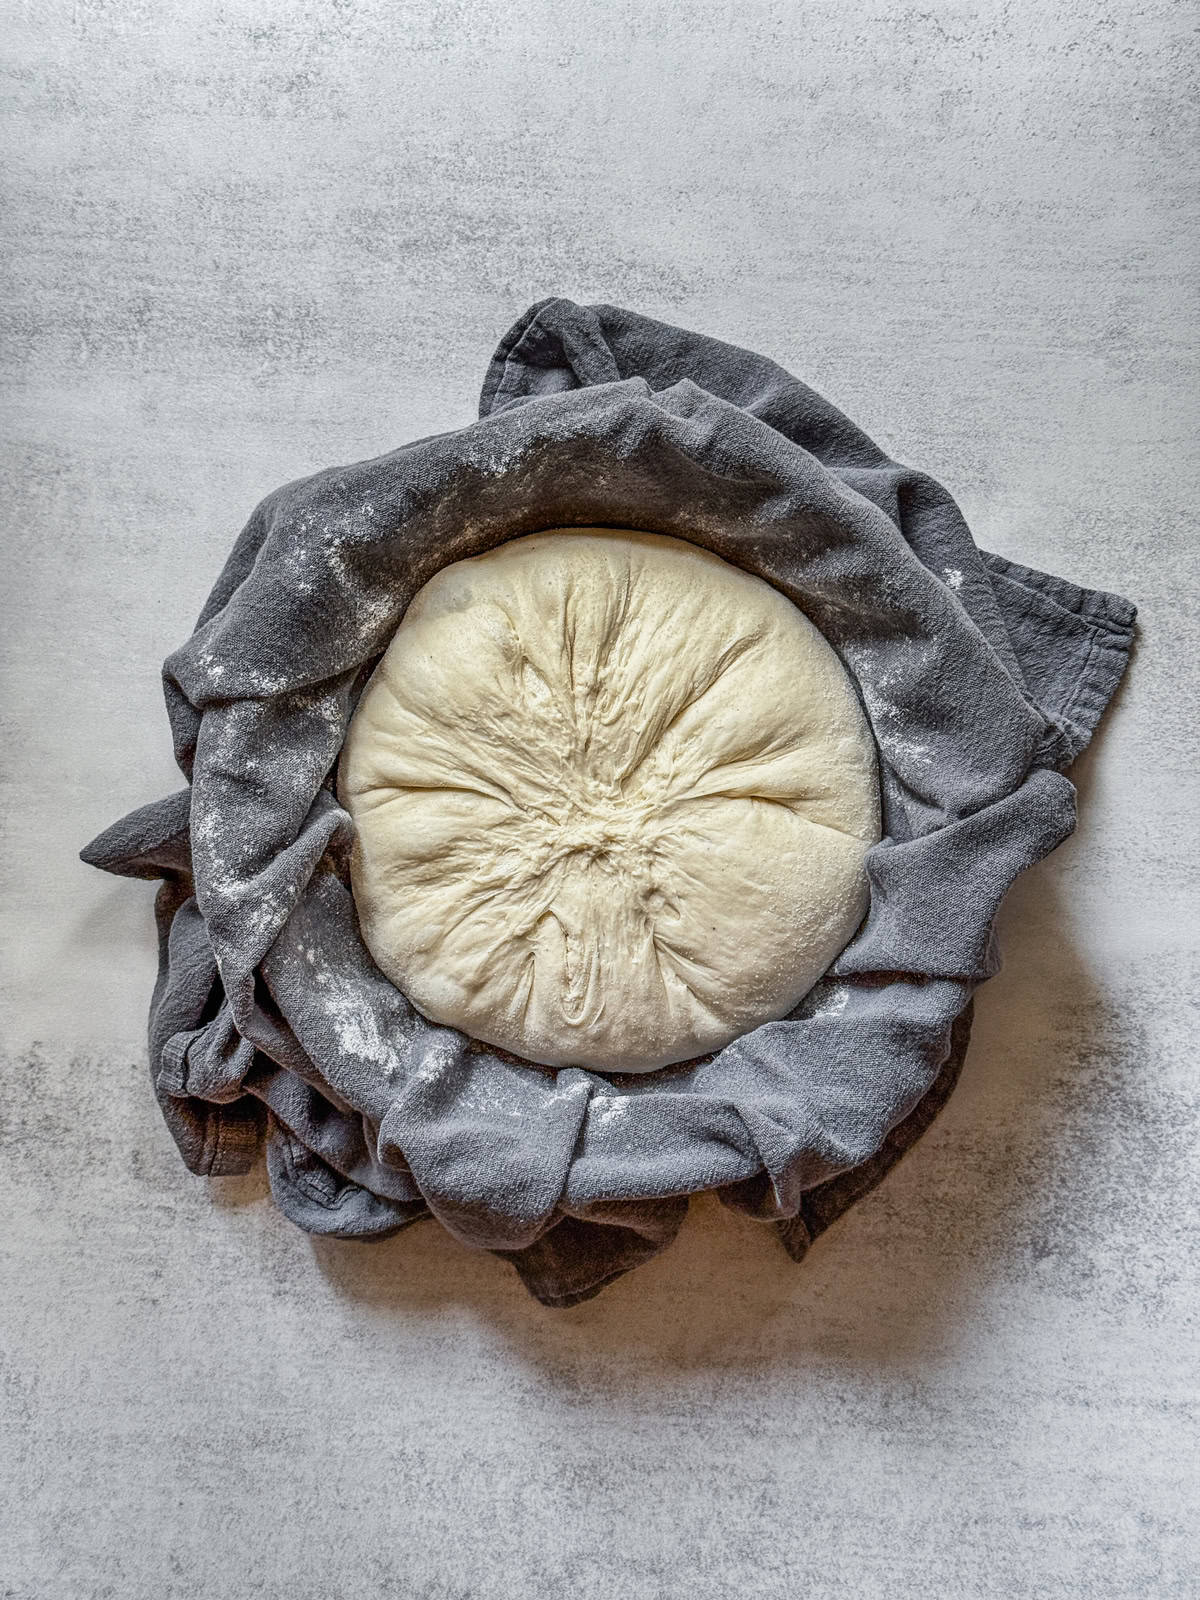
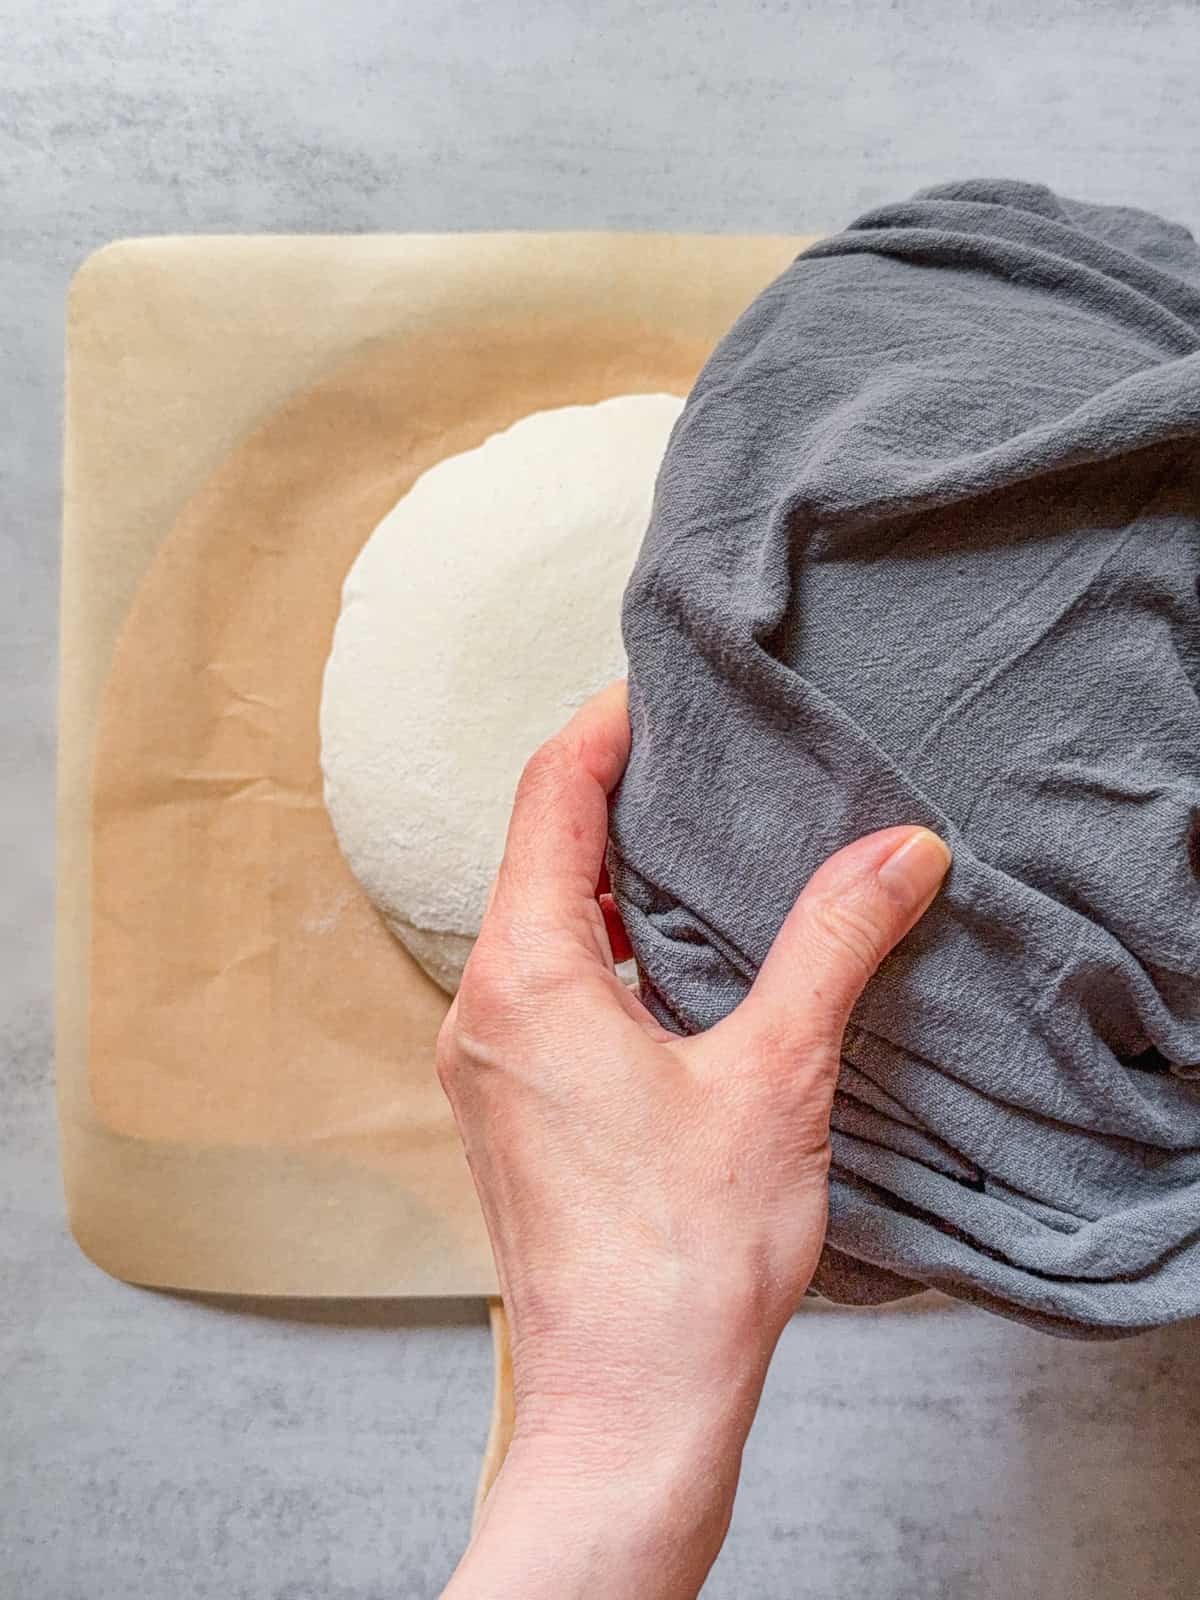
Sprinkle a bowl lined with a clean cotton towel with white rice flour, then place the dough seam-side up into the prepared bowl.
If the dough is loose, pinch the edges towards the center, overlapping them and pressing them together so they stick. Sprinkle the top of the dough with rice flour, cover it with the edges of the towel, and let it rest in the bowl for 30 minutes.
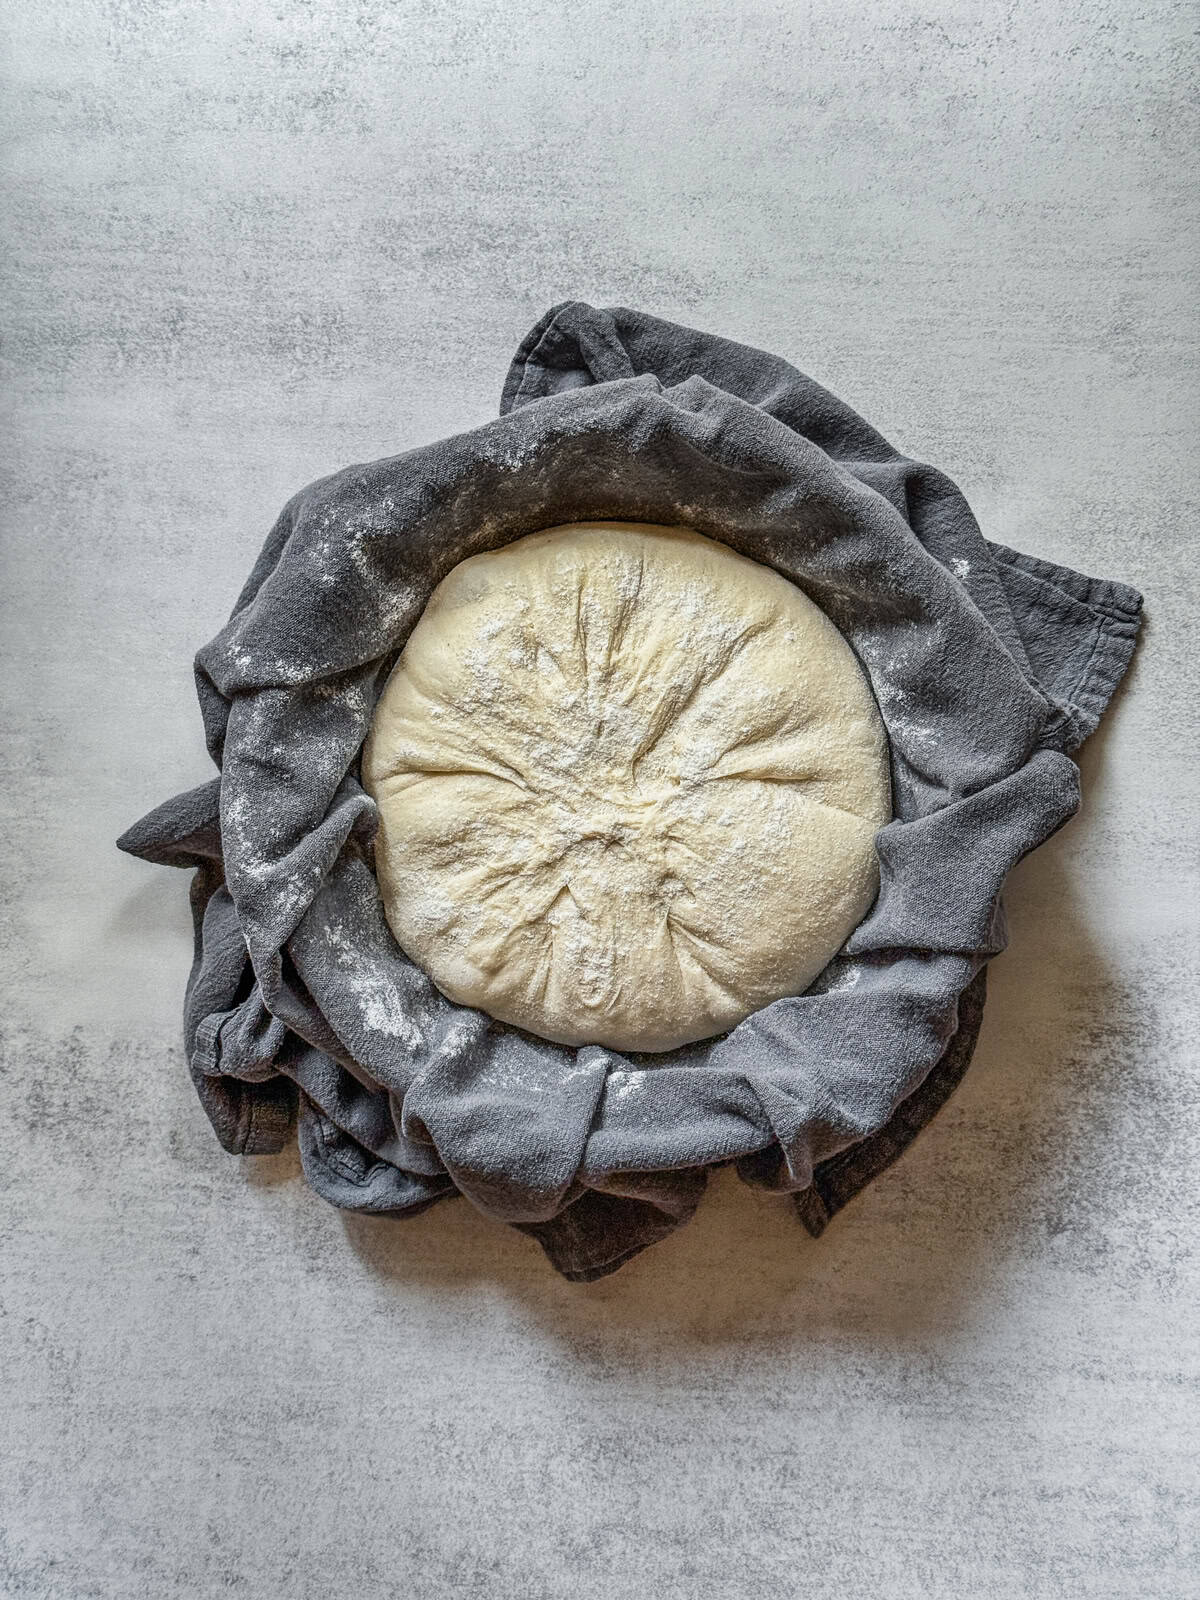
9. Cold retard - 6:30 PM-8 AM (next day)
Place the bowl with the dough in a plastic bag and refrigerate it at 39°F (4°C) for 12-16 hours or at least 8-10 hours. You can leave the dough in the fridge for 48 hours to develop a tangier flavor.
10. Preheat the oven - 8-8:30 AM
The following day, place the Dutch oven and its lid on the middle rack of the oven and preheat to 500°F (260°C) for at least 30 minutes.
11. Score the dough - 8:30 AM
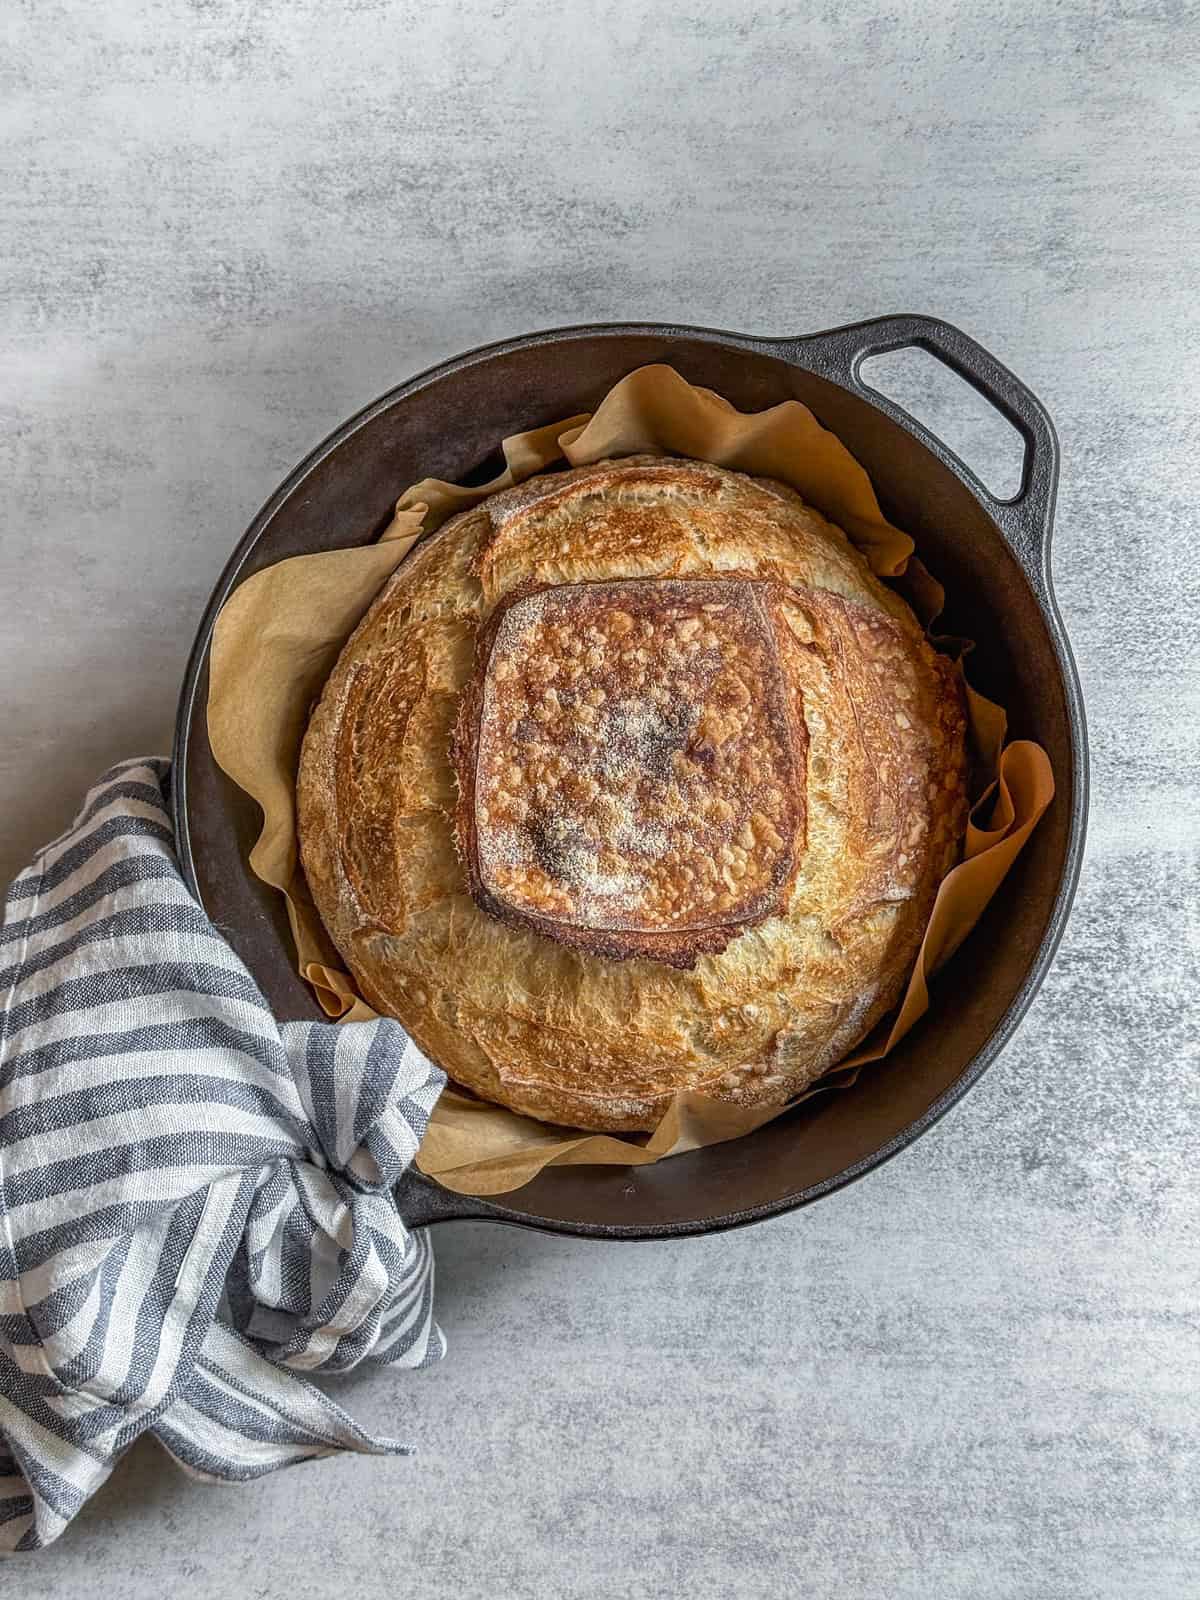
Cut a piece of parchment paper large enough to lift the loaf into the Dutch oven by the edges. Take the dough out of the fridge, and place the parchment paper on top of the bread. Then cover it with a large wooden cutting board and flip the loaf over.
Remove the bowl and towel to reveal the bottom of the bread, which should now be facing up.
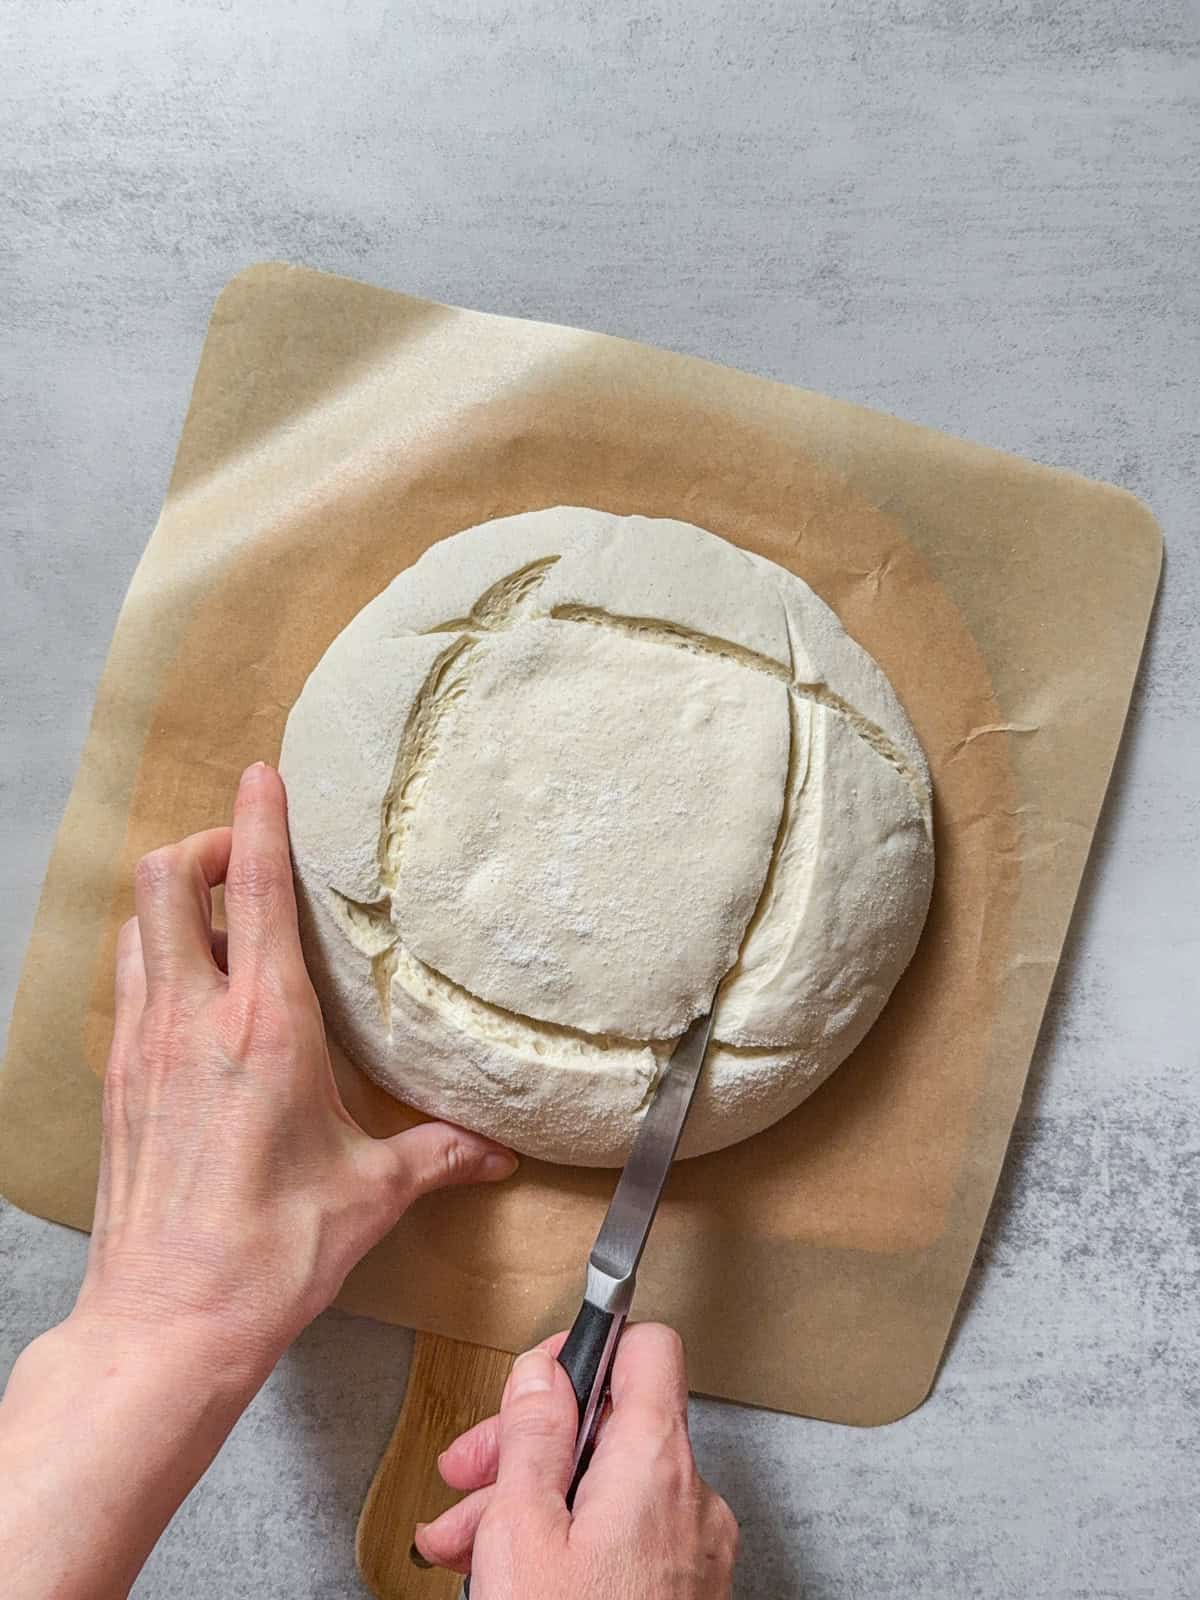
Using a sharp knife or bread lame, make four slashes in the dough to form a square.
You can also make three slashes in the dough, forming a triangle, or two slashes in an X shape across the top.
Alternatively, you can use kitchen scissors to make small snips across the top of the loaf for a rustic look.
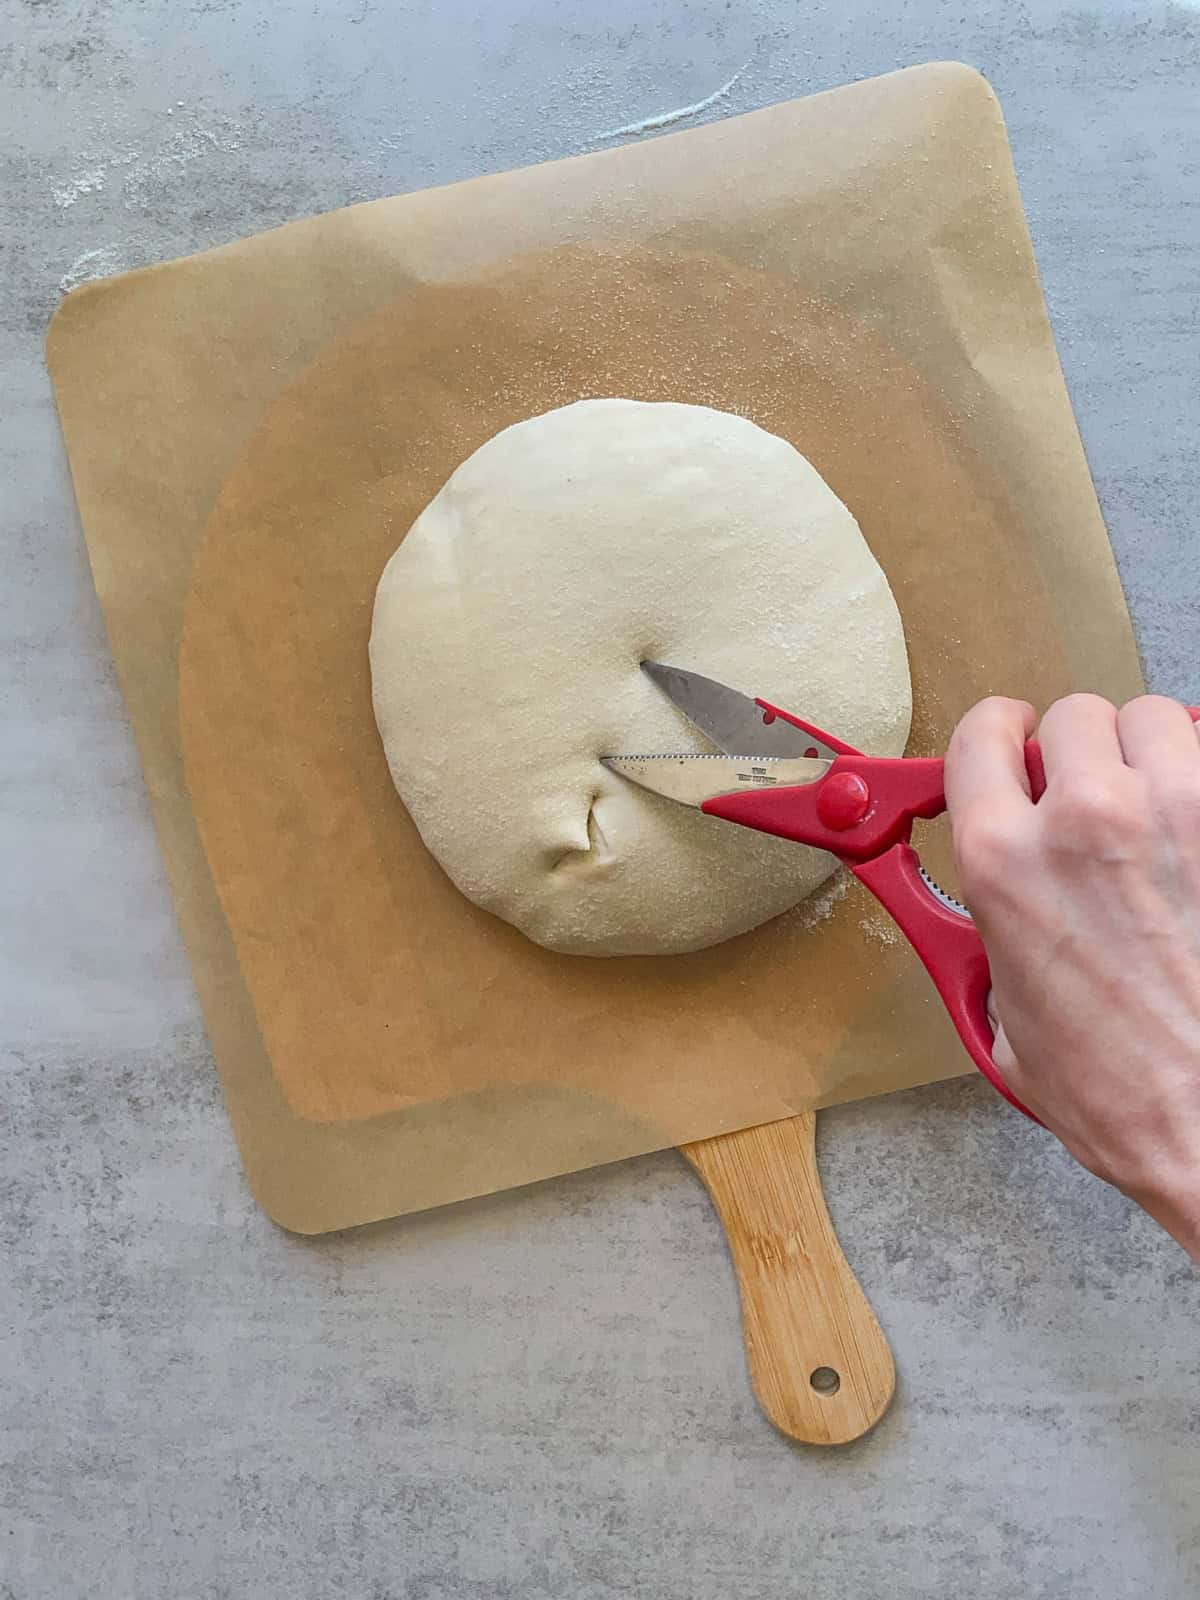
Snip along the center: Use sharp kitchen scissors to make small cuts down the loaf's central line.
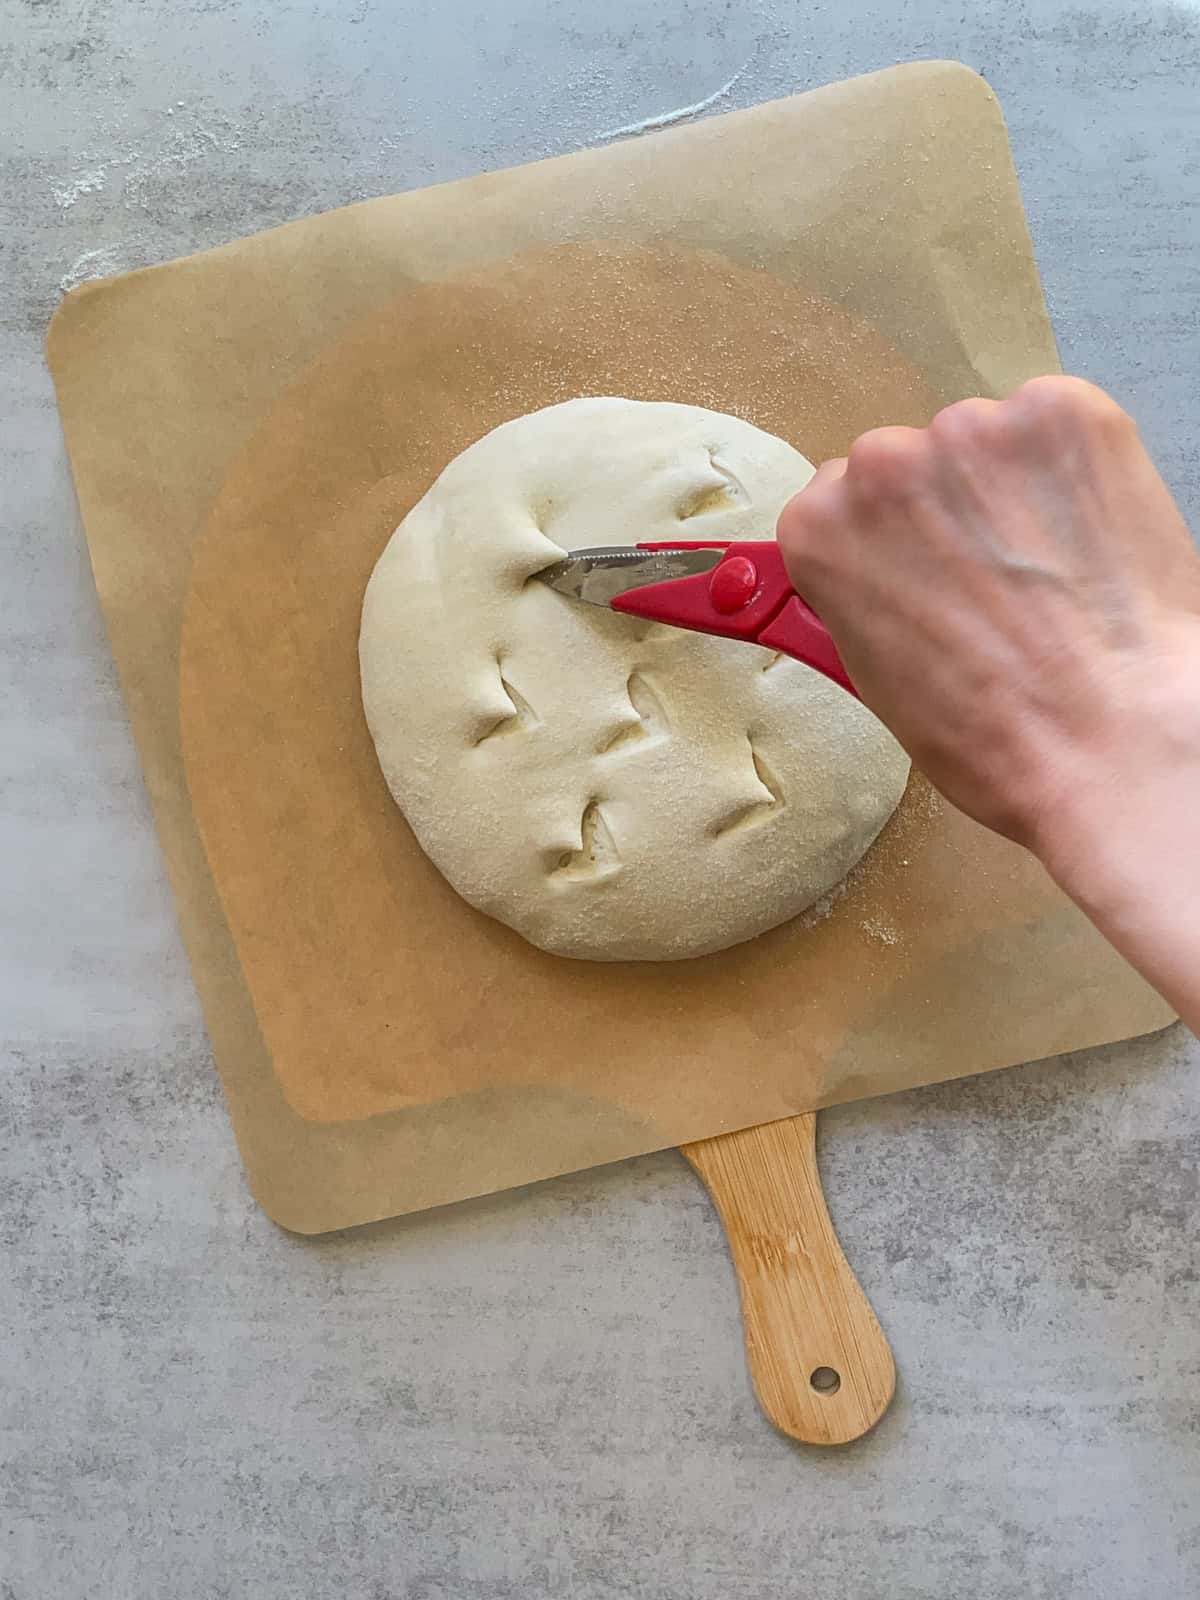
Add cuts above and below: Make a few extra snips off-center for a rustic look.
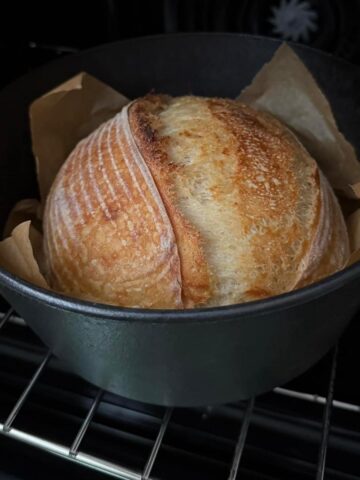
12. Bake the bread - 8:40 AM
Put on the oven mitts and carefully open the oven. Take the hot pot out and place it on a trivet. Close the oven door to retain the heat.
Grab the parchment paper from two opposite sides, stretch it slightly, and lower the bread and paper into the pot. Open the oven, remove the lid, and place it on the pot. Then, return the Dutch oven to the oven. Lower the temperature to 450°F (230°C) and bake with the lid on for 20 minutes.
After 20 minutes, put on the oven mitts, carefully open the oven, and remove the lid (watch out for the steam!). Close the oven and bake the bread for another 17-20 minutes. Check the bread's color. For a darker crust, bake for an additional 2-3 minutes.
Use oven mitts to remove the Dutch oven from the oven and place it on a trivet. At this point, check the bread's internal temperature with a probe thermometer, if you have one. It should be 205-210°F (96-99°C). I always aim for 207°F (97°C) and higher.
13. Cool the bread - 9:20 AM
With oven mitts on, carefully remove the bread from the pot and place it on a cooling rack. Allow the bread to cool for at least 2 hours before slicing.
Expert tips
- Follow the recipe closely before making any changes or experimenting.
- Make sure your sourdough starter is active and bubbly, and has reached sourdough peak before mixing the dough.
- Instead of following only the time in a recipe, look for the dough rise percentage and signs when bulk fermentation is finished to determine when to proceed to the next step.
- When you handle a hot Dutch oven or another pan, always wear good oven mitts to protect your hands.
Storing sourdough bread
How you store sourdough bread depends on how quickly you plan to eat it, and the method you choose will directly affect the crust and texture.
For 1-2 days of freshness, keep the loaf at room temperature, cut side down on a board, loosely covered with a kitchen towel. This helps maintain a crisp crust while preventing the crumb from drying out.
For up to 3-4 days, you can use a paper bag. It allows the bread to breathe, slowing moisture buildup while still preserving some crust texture.
For long-term storage, freezing sourdough bread is the best option. Slice or freeze the whole loaf in a freezer-safe bag for up to 1-2 months, then toast or reheat directly from frozen.
Should your dough double in size?
One of the trickiest parts of sourdough baking is knowing when bulk fermentation is done. It takes some experience, a bit of intuition, and lots of practice.
You have probably read numerous times that your dough should double in size. But waiting for a full 100% rise is not the best approach.
By the time it doubles, your dough has spent most of its "energy," leaving little behind for the final expansion in the oven. This means you will get little to no oven spring.
Pushing bulk fermentation that far may break down the gluten structure. Even more, if you plan to cold proof the dough, remember that fermentation will continue in the refrigerator. This combination often leads to overproofing, resulting in a flat-looking loaf.
Bulk fermentation depends on the dough temperature. So, the key to getting it right is checking the dough temperature as the bread dough ferments.
Many factors affect bulk fermentation, including the health of the sourdough starter, the type of flour used, the amount of water added, as well as room temperature and humidity.
Changing just one of these factors, for example, flour, can make a significant difference. With some brands of bread flour, you may let the dough double in size; with others, it may be ready after it rises by 75%.
The sweet spot is usually between 75% and 80%, though sometimes, 50% might be enough. In some cases, bulk fermentation can even exceed 100% rise. The only way to know is through testing.
Still, if you wait for the dough to double in size, you will bake a decent sourdough loaf. It might be a little overproofed, but that is part of the learning process.
Common beginner sourdough mistakes
Most sourdough struggles don't come from the recipe itself, but from small technique and other issues that affect fermentation, structure, and overall dough behavior.
Once you understand these common mistakes, your results will improve dramatically, even without changing your ingredients.
Mistake #1: Using volume measurements
Sourdough is precise. Measuring water and flour with cups instead of a scale often leads to miscalculation of hydration. Even small inconsistencies can make the dough feel too wet or too stiff. A digital scale is one of the most important tools for consistent results.
Mistake #2: Baking with an inactive starter
One of the biggest beginner mistakes is using a starter that isn't fully active. If your starter isn't reliably doubling after feeds, it won't have the strength to properly ferment and rise your dough (read my guide on knowing when your sourdough starter is ready for baking).
The result is a slow rise, dense crumb, and poor oven spring. Always bake when your starter is at peak activity, not just "fed recently."
Mistake #3: Using cold water
Cold water can significantly slow bulk fermentation, especially in cooler kitchens. This often leads to underproofed dough. As a beginner, opt for slightly warm or room-temperature water.
Later, once you understand the desired dough temperature, you can adjust your water more precisely, even using cold or ice-cold water when making sourdough in a stand mixer.
Mistake #4: Skipping folds
During bulk fermentation, sourdough needs strength-building through folds (like stretch and folds and coil folds). Skipping this step is possible when making an unloaf sourdough bread recipe, but as a beginner, learn proper techniques first. Folds help align gluten and trap gas, resulting in better rise and texture.
Mistake #5: Following time instead of reading the dough
Many beginners rely on recipe timelines instead of reading the dough itself. Bulk fermentation is influenced by temperature, starter strength, and flour type, so timing alone is unreliable. Look for rise, bubbles, and elasticity rather than the clock (see my guide on knowing when bulk fermentation is finished).
Mistake #6: Overproofing overnight
While some beginner recipes suggest overnight bulk fermentation, I highly recommend learning it on the counter during the day. You will learn how the dough behaves in real time, such as how it rises, develops bubbles, and changes texture, making it much easier to recognize proper fermentation and avoid over- or underproofing.
Mistake #7: Using too much flour while shaping
It is tempting to add extra flour when shaping sticky dough, but too much prevents proper sealing. This leads to weak tension and poor oven spring. Light flouring is enough. Your dough should still slightly grip the surface.
Mistake #8: Cutting bread too soon
One of the most overlooked mistakes is slicing into sourdough while it is still hot. The interior is still setting after baking, and cutting too early results in a gummy, under-set crumb. Let the loaf cool completely (at least 2 hours) before slicing (see my guide to choosing the best bread knife and slicing sourdough bread).
Mistake #9: Changing multiple variables
When results aren't perfect, beginners often change everything at once, such as starter, hydration, flour, and technique. This makes it impossible to identify what actually caused the issue. Sourdough improves best when you adjust one variable at a time.
Mistake #10: Making inclusion loaves
Making flavored sourdough bread, such as cranberry walnut sourdough or lemon blueberry sourdough, is tempting, but learning to make plain sourdough bread is the first step.
It helps you understand the core fermentation process and dough strength without the added variables of inclusions, making it much easier to troubleshoot and build consistency.
Mistake #11: Comparing results to Instagram loaves
Social media creates unrealistic expectations. Instagram sourdough often shows highly stylized loaves made by experienced bakers. Comparing your early attempts to these results often becomes discouraging. Focus instead on consistency, fermentation understanding, and gradual improvement.
Troubleshooting sourdough bread
When sourdough doesn't turn out as expected, the issue usually comes down to fermentation, dough strength, or baking technique. This quick troubleshooting table helps you identify the most likely cause so you can adjust your next bake.
| Problem | Most Likely Cause |
| Dense loaf | Under-fermentation (not enough rise) |
| Flat loaf | Over-fermentation (dough that lost structure before baking) |
| Sticky dough | Too much water or weak gluten development |
| Gummy crumb | Underbaking or cutting too early |
| Pale crust | Underbaked or insufficient oven temperature/steam |
| Burst side | Weak or shallow scoring |
FAQ
Why didn't my sourdough rise? A lack of rise usually comes down to starter strength or bulk fermentation. If your starter wasn't at peak activity, or the dough didn't ferment long enough, it won't build enough gas to rise properly. Cold kitchen and underproofing are the most common causes.
Why is my dough sticky? Sticky dough is usually a sign of high hydration or underdeveloped gluten. It can also happen with the wrong choice of flour (all-purpose flour absorbs less water than bread flour). Some stickiness is normal, but the dough should become more elastic as bulk fermentation progresses.
Why did my loaf spread sideways? Sideways spreading usually happens when the dough lacks strength or is overproofed. Weak gluten structure, insufficient folding, or poor shaping can all contribute. Overhandling during shaping or adding too much flour can also reduce tension, causing the loaf to spread instead of rise.
Why is my crumb gummy? A gummy crumb often means the bread is underbaked or cut too soon after baking. It can also result from underfermentation, where the dough didn't fully develop structure before baking. Make sure to check the bread's internal temperature (the center of the loaf should typically reach about 96-99°C (205-210°F) and fully cool it before slicing.
Can I refrigerate longer than overnight? Yes, but with caution. Longer cold proofing is possible, but the dough can become overproofed. If extending beyond 12 hours, shorten the bulk fermentation and monitor how the dough behaves in the fridge.
Can I make this sourdough bread without a Dutch oven? Yes. A Dutch oven traps steam, helping the bread rise and form a crust. You can use a lidded roasting pan, or a baking stone/steel with a metal tray of water on the rack below for steam. See Dutch oven alternatives.
Should I weigh the dough to know when bulk fermentation is done? No. Bulk fermentation is judged by volume, not weight. The dough's weight barely changes as it ferments. Track how much it rises using a marked, straight-sided container rather than a scale.
Can I bake at a different time than the 8 AM schedule? Yes. The schedule is a flexible guide, not a rule. The cold proof can run anywhere from about 8 hours to 36+ hours and longer, so you can shift mixing and baking to fit your day. Watch the dough's cues rather than the clock.
Can I use all-purpose flour instead of bread flour? You can, but bread flour's higher protein gives more strength and is easier for beginners to handle. With all-purpose flour, the dough will feel slacker, so reduce the water slightly (try 65% hydration).
A little reminder from me before you go
As a beginner, you do not have all the knowledge or experience to bake perfect sourdough bread right away, and that is completely okay.
You will improve with every loaf you bake. It takes time, but you have already taken the most important step: starting.
Keep baking with this recipe, or take your sourdough skills to the next level by mastering the process from A to Z. When you are ready, my Master Sourdough Bread recipe is waiting for you.
Remember, sourdough isn't about fancy ingredients but about understanding the technique and method. One key area to fine-tune is bulk fermentation, but how do you know when it is right?
Next time, use the float test to check when your dough seems ready. If it passes, move on to pre-shaping and shaping, then cold proof and bake. After baking, slice the bread and check the crumb.
If your bread looks underproofed, revisit the end of bulk fermentation next time and test again with the float test. Once it is positive, continue with pre-shaping and shaping, then allow a short rest in the banneton (proofing basket) at room temperature before cold proofing and baking.
If it is still not quite there, adjust again by adding another 10-15 minutes of fermentation in the banneton next time. Keep fine-tuning bulk fermentation until your loaf is perfectly proofed.
As long as you maintain consistent baking conditions, such as using the same recipe, starter, and kitchen temperature, your adjustments will become reliable, and your results will steadily improve.
What's next?
Think about how you want to begin or continue your sourdough journey: guided or self-taught.
Want me to walk you through your first bake? Join the free email series: short, friendly lessons that take you from starter to sliced loaf, one step at a time.
Prefer to learn at your own pace? Browse my Sourdough Bread Baking Guide. And if you ever get stuck, leave a comment. I answer everyone.
PrintRecipe
Beginner's Sourdough Bread

Discover a beginner's sourdough bread recipe with easy, step-by-step instructions and photos. Learn how to bake your first perfect loaf of sourdough bread with helpful tips and tricks.
- Prep Time: 21 hours
- Cook Time: 40 minutes
- Total Time: 21 hours, 40 minutes
- Yield: 1 loaf 1x
- Method: Baking
- Cuisine: American
Ingredients
For the levain (an active starter):
- 35 g sourdough starter
- 35 g bread flour
- 35 g water
For the bread dough:
- 500 g bread flour
- 340 g water
- 100 g levain (at peak)
- 10 g sea salt
10 g white rice flour (for dusting)
Instructions
- Make a levain (an active starter): Feed the "mother" starter in the morning at a 1:1:1 ratio (35g starter, 35g flour, and 35g water), and wait 4-6 hours for it to peak.
- Mix the dough: In a mixing bowl, mix water, levain (active starter), bread flour, and salt by hand for 3-5 minutes. Bulk fermentation begins once the starter is added.
- Mark the container: Transfer the dough from the mixing bowl to a large measuring cup or a straight-sided container. If your container doesn't have measurement lines, use a marker or measuring washi tape to mark the starting level of the dough. Wet your hands and carefully transfer the dough back to the mixing bowl. Cover the bowl with plastic wrap or a damp kitchen towel, and let the dough rest at room temperature for 30 minutes. Meanwhile, clean the measuring container.
- Stretch and fold sourdough: With wet hands, reach underneath the dough and pull it upwards, then fold it on top. Turn the bowl 90 degrees and repeat the process. Do this in all four directions (like a compass or a clock) for a total of four folds. Cover and rest for 30 minutes. Then, wet your hand again, and repeat the stretch and fold in all four directions. After that, cover the bowl and let it sit for another 30 minutes.
- Coil fold sourdough: Wet your hands and lift the dough from the middle, letting the ends fold under. Turn the bowl 180 degrees and repeat the same fold. Then, turn the bowl 90 degrees and repeat the fold. Finally, turn it another 180 degrees and fold again. You will do four folds in total. Cover the bowl and let it rest for 30 minutes. Repeat the set of coil folds one more time, then gently transfer the dough to a large measuring cup or a straight-sided container. Cover it and let it rest at room temperature.
- Continue bulk fermentation: Allow the dough to rise until it increases 50-100% (100% means it has doubled in size in the bowl). The percentage rise depends on your room temperature: the warmer it is, the faster the bulk fermentation and the shorter the rise time. To track the dough rise, look at the starting point you marked on the container:
-
- 50% rise means the dough has increased by half its original height.
-
- 75% rise means it has grown by three-quarters of that height.
-
- 100% rise means the dough has doubled in height from the starting mark.
-
- Finish bulk fermentation: Look for a slightly domed top, large bubbles on the surface, smaller bubbles on the sides of the container, dough that easily pulls away from the sides, and jiggles when shaken. Once you see these signs, it is time for preshaping.
- Preshape the dough into a round. Fold the four sides of the dough toward the center, pressing them together. Then, fold the opposite corners into the middle, pressing to seal. Flip the dough seam-side up, and shape it by cupping your hands around it and moving it toward you. Then let it rest uncovered for 15 minutes.
- Shape the dough: Lightly flour your work surface with rice flour. Turn the dough out onto the table and shape it into a boule. Prepare a bowl lined with a cotton tea towel. Generously dust it with rice flour. Place the shaped dough into the prepared bowl, seam side up. Cover the dough with the edges of the towel and let it rest in the bowl for 30 minutes.
- Proof the dough: Place the bowl with the dough into a plastic bag and refrigerate for 12-16 hours, or up to 48 hours. The longer the cold proof, the more pronounced the sourdough flavor will be.
- Score the dough: Remove the dough from the fridge. Flip it out of the bowl onto a piece of parchment paper. Use a pastry brush to remove any excess flour. Using a sharp knife (or a bread lame if you have one), make three slashes in the dough, forming a triangle, a square, or two slashes in an X shape across the top. Alternatively, you can use kitchen scissors to make small snips across the top of the loaf.
- Bake the bread: Place your Dutch oven into the oven and preheat to 500°F (260°C) for 30 minutes. With the oven mitts on, transfer the dough to the Dutch oven, cover with the lid, and place it on the middle rack of the oven. Lower the temperature to 450°F (232°C) and bake for 20 minutes. After 20 minutes, use the oven mitts to remove the lid and continue baking for an additional 17-20 minutes, or until the crust reaches your desired color.
- Cool the bread: Let the bread cool on a wire rack for at least 2 hours before slicing it.
Notes
- Storage and Freezing: Store sourdough bread for 3-5 days. Freeze individual slices for up to 1-2 weeks, a whole loaf for 1-2 months.
- Safety Tips: Always use oven mitts or silicone gloves to handle hot pans.
- Check for Doneness: Your bread is fully baked when the internal temperature reaches 205-210°F (96-99°C). I usually aim for 207°F (97°C) or higher. Use a digital probe thermometer to check.
- Want to create a custom formula for your loaf? Try my sourdough calculator.
- Need help getting started? Check out my beginner's sourdough bread guide to learn sourdough basics first.
- Note: Nutritional information does not include the white rice flour used for dusting.
Nutrition
- Calories: 2002
- Sugar: 1.5g
- Sodium: 3923mg
- Fat: 5.4g
- Saturated Fat: 0.9g
- Carbohydrates: 419.7g
- Fiber: 14.9g
- Protein: 56.8g
- Cholesterol: 0mg
Lu Cobb says
I googled step-by-step, sourdough starter and got your post. It is very very helpful. I have my first batch of sourdough in the refrigerator waiting overnight to cook it in the morning. I really appreciate the details and explanations. So, so helpful. Looking forward to success with this batch or the next. 😘
Irina Totterman says
I’m so glad you found it helpful! Wishing you the best with your bakes!!
Honor says
Is it useful to weigh the dough at the beginning of bulk fermentation and then weigh again when you think it’s ready? Should the weight roughly double as well as the volume?
Irina Totterman says
Hello Honor, No, weighing the dough at the beginning and end of bulk fermentation will not help determine when bulk fermentation is complete. What you're measuring is the dough's weight, but the end of bulk fermentation is determined by the increase in the dough's volume, not its weight. The goal is to monitor how much the dough has expanded during fermentation and end the bulk fermentation when it has reached the desired increase in volume.
MRW says
I tried, unsuccessfully, to make sour dough bread. I was about to give up when I found this recipe. I’m so glad I did! I was able to start fresh and made a delicious loaf of bread that my family enjoyed! Thank you for all the details and explanations. I feel more confident now!
Irina Totterman says
I’m happy to hear that, Michelle! What’s next? Try my Master Sourdough Bread Recipe
Dalia Wells says
I can't seem to make the sourdough starter. It never works for me can you send me an easy recipe. Also where can I buy your book to make sourdough stater? Thanks Dalia
Taylor Swift says
Hey there!!! I can send you my special recipes, leave me your email!!
Irina Totterman says
Hello Taylor, You can always contact me at [email protected]. Feeling curious! 🙂
Irina Totterman says
Hello Dalia, Here’s my go-to sourdough starter recipe. Just follow the steps, and you’ll have a healthy, bubbly starter in no time. I don’t have a book dedicated to creating a starter yet, but this recipe will guide you every step of the way.
Laura Hood says
I followed the Beginner's Loaf recipe to the T and the instructions and photos are great. I learned a lot! My loaf is beautiful and tasty, however I was very disappointed that it stuck terribly to the parchment paper! Any tips for this trouble? Thank you!
Irina Totterman says
Hi Laura, I’m so glad to hear you enjoyed the Beginner’s Loaf recipe and that your bread turned out beautifully. That makes me so happy! As for the sticking, it often comes down to the quality of parchment paper. It’s best to use parchment paper that can withstand at least 450°F (230°C). After doing some research, I found that not all parchment papers can handle that heat, even when the box says “oven-safe.” I personally use the If You Care brand, which performs really well at high temperatures and doesn’t stick. If you’re in the U.S., you can usually find it in most grocery stores or online.
Joyce says
I just made the starter. What I don’t know is when can I make bread. I need a basic recipe. Am I using part of the starter and feeding the rest of the starter for another time?
Irina Totterman says
Hi Joyce, Congratulations on making your starter! What’s next? I’d suggest spending a bit of time learning the sourdough basics before baking your first loaf. Trust me, troubleshooting sourdough issues takes time and can sometimes feel discouraging. To get started with the basics, head here: https://sourdoughtalk.com/beginners-sourdough-guide/. To know that your starter is ready for baking, check this article: https://sourdoughtalk.com/how-to-tell-if-sourdough-starter-is-ready/. And here is my foolproof Beginner's Sourdough Bread recipe: https://sourdoughtalk.com/beginners-sourdough-bread-recipe/. Happy baking!
Kimberly D says
THANK YOU! I Started my starter a month and a half ago and this weekend tried my first loaf using your instructions here. It turned out perfectly! I had a few adjustments as my starter took a little longer and the bulk fermentation took until 10:30 last night, but it taste wonderful!
Holley Scholtes says
I can't get the recipe to print. Looks like it's an issue with the site. Can you see if you can fix it?
Irina Totterman says
Thanks for letting me know. It's fixed.
Michelle says
Hi! I’m excited to try this recipe! However, I won’t be able to bake it at 8am. It would have to be at 5am or much later at 3pm. Is there flexibility with the times to bake or is the 8am timing a nonnegotiable?
Irina Totterman says
Hello Michelle, I recommend cold proofing in the fridge for at least 8 hours and up to 24–36 hours. Yes, it can go even longer, but as a beginner, you’ll learn how to use that with practice. In your case, 3 PM is perfectly fine. Why? Because beginners tend to underproof sourdough, and I believe you’ll benefit from the slightly extended proofing time before baking.
Michelle says
I did it and it came out beautifully and was so tasty! Thank you for the detailed recipe and the quick response to my question. I think I am now obsessed with sourdough, haha!
Irina Totterman says
Congratulations, Michelle!!! I am so happy to hear that! What's next? Practice now and try my Master Sourdough Bread recipe. Good luck!
Lucy George says
My dear!
This is a most comprehensive and detailed instruction I have every read about sourdough baking.!! Bravo!!!! I will share with those who are eager to learn. My friends want me to give a lesson. I told them that it's a process you just have to practice often to get the hang of it. There are so many YouTube videos out there to choose from to get the hang of how to start. I found your article so helpful because you got to the nitty gritty of each step. Something I needed to see!
I began my journey of learning how to bake sourdough recipies about 2 years ago by watching so many tutorials that resulted in failure most of the time because I missed an important step. It does take many attempts to get it down right and get the feel for your work environment. Summer is different than winter baking. I finally got the hang of using my starter when we are both ready. I will refer to this often and thank you for putting it all together so well!
Irina Totterman says
Hello Lucy, Thank you so much for your kind words! I’m thrilled to hear this guide is helpful for you. You’re absolutely right that sourdough is all about practice, patience, and learning from each bake. Keep baking and enjoy every loaf!
Caren P. says
Hello 👋 Good day to you Ms. Irina, I'm so interested in sourdough bread baking. I was reading various blogs, and I got dive into your blog, just reading the comments, until I was got into deeper inspiration to your reply to the comments. Now, I found your page, and feel your concern to a person like me, that so much interested to learn. I felt I'm in the right path, I thank you so much, there is a person like you that not selfish to share your knowledge. I will now first read and read your guide, your step by step teaching. I hope, I will learn and succeed. I am now need to learn first, how to do the starter, the very important ingredient for a Sourdough 🥖bread. Thank you Ms. Irina. GOD bless you more because you're the answer for my sourdough study.
Irina Totterman says
Thank you, Caren, for your kind words. Good luck and happy baking!
Norman says
All of the recipes call for a Dutch oven. Is there a bake suggestion on a pizza stone or a tray with or without a pan at the bottom of the oven for adding water for steam?
Irina Totterman says
Hello Norman, Yes, you can bake sourdough without a Dutch oven using different setups. Happy baking!
John says
Thank you for all the information, I'm a newbie and have produced some terrible loaves. They look good but very heavy and very chewy. I'm going to follow your starter loave tomorrow exactly as you have it and see how it goes. I have made some good bread with commercial yeast but I want to perfect the sourdough bread. Again thanks for the good information.
Irina Totterman says
Hello John, You’re so welcome! Heavy, chewy loaves are very common when you’re new to sourdough. You already know how to make good bread (commercial yeast proves that!), so sourdough will click soon. Let me know how tomorrow’s loaf turns out. Happy baking!
Moonje says
Too sticky for me to handle.
Irina Totterman says
Hello, if the dough at 68% hydration feels too sticky, you can reduce the amount of water to achieve a 65% hydration instead.
Jules says
Your instructions have allowed me to start my sourdough journey a few months ago with edible bread 🙂 I have moved on to inclusions, higher hydration, etc. but you gave me an excellent foundation and I greatly appreciate it.
Irina Totterman says
Hello Jules, Thank you so much! I’m thrilled to hear my instructions helped you start your sourdough journey and even more that you’re experimenting and taking it further.
Cheryl says
I have followed this recipe three times now and have made excellent sourdough bread. Thank you very much, Irina. Following this exact recipe, I decided to add some grated butter to the folds to make a butter croissant loaf and it came out absolutely deliciously wonderful. Her timing was not exactly my timing because of temperatures in the house. But if you follow her recipe and instruction, you can't go wrong.
Irina Totterman says
Thank you very much, Cheryl! I’m happy your bread turned out great!
Laura Krainbill says
I'm stuck. I've made your beginner bread twice now. I came here after building a starter I made over a year ago from another site that seemed to have peetered out. The doughs just weren't rising. I fed my starter 2x/day using 1:5:5 like you said ( I added 5g of rye flour to the flour mix) and by week 2 or three I was getting at least 75% rise. So I started baking bread. I chose your beginner recipe and I've made it twice now. Once in a 69 degree kitchen, once in a 72 degree kitchen. Once I let bulk ferment go 5 1/5 hours, yesterday I let it go 7 1/2 hours at 72 degree kitchen. Neither time did the dough show any rise. Not in the ferment jar or the aliquot jar. Small bubbles on the sides and 2-3 large bubbles on top. YEsterdays fermented dough jigged in the jar. Next day on both breads I baked after 15 hours in the fridge in a dutch oven at the 500/450 degrees. I baked till 207-210 degrees. Both times the entire center of my bread was mostly all air bubbles. I wish I could attach pics to this. Both loaves were 7 inches round and 3 inches high. I followed your forming directions exactly to produce a round loaf in a 10 inch boulle. What's wrong? Seems my air bubbles aren't doing what you say they should and they're not showing up at the right time!. I would love to learn this process and appreciate any help you can give me.
Irina Totterman says
Hello Laura, Your dough is underfermented because the starter isn’t quite strong enough and the temperature is a bit low. Even though it rises about 75%, it’s not producing enough gas to lift the dough evenly. Yeasts in your starter are much more active around 78–80°F, so storing or fermenting at cooler temps slows bulk fermentation and limits rise. That’s why you see jiggle and large holes instead of a balanced crumb. What should you do next? Take a short break from baking and focus on strengthening your starter. Feed it at 1:3:3 twice a day, keep it warmer if possible (75-78°F), and watch the timing. You want it to peak predictably and double within 4–6 hours. Do this for a couple of days in a row.
When you go back to baking, don’t watch the clock as much as the dough. At your temperature, bulk may take 8–10+ hours. You’re looking for a smoother, slightly domed surface, more visible bubbles throughout, and a dough that feels lighter and aerated, not just jiggly. One small but important detail: those big bubbles on top early on can be misleading. They often come from initial fermentation, not full dough development. You want many small bubbles throughout, not just a few large ones.
Once again, the health of your sourdough starter is the most important part of the whole process.
Laura says
I've been building my starter with a 1:5:5 2x/day with 5g rye flour as part of the flour for two weeks before baking. I got it to the point where it was peaking at 6 hours before I started the beginner's recipe. Someone said I could put the ferment jar in an insulated bag sitting on a seed starter mat set to low to shorten the time of the bulk ferment. Do you think I can try that? Also: With your beginner recipe, I feed my starter 1:1:1 at 2am. I start baking at 8am. Usually begin bulk ferment about 11-12noon. To wait 10 hours from then puts me at almost a 20 hour baking day. Can you give me a better suggestion for a schedule that gives me more sleep?? 🙂 BTW: Seems spring is here. My house is up to 72 degrees now. I'm like Kristi. I don't want to quit trying this. Thank you for your help!
Irina Totterman says
Hi Laura, Yes, you can use a heating mat to warm the dough and speed up bulk fermentation, but it’s important to watch the dough closely. I’m not against using one, but it can make it harder to build consistency and truly learn how your dough behaves. One day your dough might be at 76°F, the next at 80°F, and those small differences are important for beginners. Also, it’s hard to know how evenly the dough warms... sometimes the bottom can be warmer than the top. Personally, I use a Brod & Taylor proofing box because it keeps the temperature more stable and predictable.
As for your second question, yes, you absolutely need to sleep! You need to learn your starter. You want to understand how long it takes to peak at different feeding ratios. If your kitchen temperature stays consistent, you can test during the day: feed at 1:1:1, note the time to peak, then try 1:2:2, and so on. If temperatures change overnight, do the same tests in the evening—feed at 9 PM and track how long it takes. Over time, you’ll start to see patterns. For example, you might learn that a 1:4:4 feeding peaks in about 10 hours. That means you can feed your starter at 9 PM and have it ready at 8 AM without stress.
One more thing: if you start mixing at 8 AM, that’s when fermentation really begins. Even if you do a short autolyse, once you add the starter (say at 8:30 AM), bulk fermentation has started.
I’d also recommend looking into sourdough schedules. They really help you plan your baking around your day (and your sleep!).
Phathiwe Keti says
Hi Irina
I’m writing from South Africa. I’m new to sourdough baking and this is my second attempt. The first time my loaf was dense and I concluded that it was due to under proofing of the starter. After reading over and over I thought I would give it another try. Fast forward, I have just completed bulk fermentation and my dough is so sticky that it’s hard to shape. Is it over proofing? I don’t have a thermometer and I went by the visual signs. I’m about to put it in the fridge, and it’s 13.30 now. When I bake it in the morning it would have cold proofed for over 16 hours. I’m dreading the results.
Irina Totterman says
Hello Phathiwe, If you are trying this Beginner's Sourdough bread recipe, sticky dough at 68% hydration is possible. One reason could be that the gluten isn’t fully developed and built yet, and another could be overproofing. Go ahead and bake the loaf anyway (Long cold proofing (16+ hours) is fine). Post a crumb shot on the Facebook group (I'm there every day): https://www.facebook.com/groups/791117006817468. I’ll see it and suggest what to improve.
P.S. About “I concluded that it was due to under proofing of the starter.” There’s no such thing as an underproofed starter. Did you mean it was used before it reached its peak?
Kristi says
I just finished my second loaf using this recipe, and I’m honestly so proud of how it turned out! I’ll be real—the instructions took me many reads to fully understand (definitely not a quick or easy first pass 😅), but once it clicked, everything came together beautifully. Both loaves had that perfect crispy crust and soft, airy inside. There’s something incredibly satisfying about sticking with it and seeing such a rewarding result. If you’re willing to slow down and really work through the process, this recipe absolutely delivers. Thank you for helping me bake my first successful sourdough loaves!
Irina Totterman says
Kristi, That’s wonderful to hear! I’m so thrilled your hard work paid off and that you got that perfect crust and airy crumb. Huge congratulations on your first successful loaves, and thank you for sharing your experience!
Jane Motsinger says
Irina,
I just completed my very first loaf of home baked sourdough bread, following your beautiful instructions step by step. My loaf turned out fabulously! Beautiful to look at, and If I didn't know better Iwould think a pastry chef in a restauant made it. It is absolutely delicious! Thank you so much for your easy to follow instructions and the pictures that really helped. I have confidence to keep baking! It was a spiritual experience for me to surrender control of my time to the dough's pace. It was a beautiful day!
Irina Totterman says
Thank you for making the recipe and your kind words, Jane!
Shelly says
Thanks for such detail! I’m reading that when you cold proof overnight you put the bread in the banneton and then place them in a plastic bag. On all the sites I’ve been reading regarding sourdough I’ve not come across the plastic bag. Can I ask why you do this and is the bag sealed or left open? Thanks.
Victor Cavacas says
Today is my Day 4 and feed once, but 6 hours later grow almost triple (32 oz glass container. Should I stop the feed today and try twice feed tomorrow, or get bigger container. Thanks Vic
Irina Totterman says
Hello Victor, All of this means your sourdough starter is doing a good job. Feed it twice a day at a 1:2:2 ratio and observe how it behaves. If it doubles or triples in less than 12 hours after feeding, switch to a 1:3:3 ratio. Please check out these feeding guides: https://sourdoughtalk.com/feeding-sourdough-starter-guide/and https://sourdoughtalk.com/sourdough-starter-feeding-ratios-guide/.
Patricia says
This recipe has become my go-to. I've baked plenty of sourdough loaves with it, and it hasn't let me down. Even when my starter was still new, the bread turned out better than I expected. If you're new to sourdough, don't rush it. Weigh your ingredients, give the dough enough time to ferment, and resist the urge to cut corners. The results are worth the patience.
Irina Totterman says
Hello Patricia, Thank you for sharing your experience. I'm so glad this recipe has become your go-to. Your advice about using a scale, being patient, and trusting the fermentation process is spot on. Happy baking!
Victor Cavacas says
We have two Dutch ovens can we bake both at same time, or you recommend one at time. Thanks Ana +Vic
Ana - Victor says
Hello, Irina. Please accept our apologies for both times we wrote never salute you. Ana + Victor
Irina Totterman says
Hello Ana and Victor! No apology needed at all. I'm just happy you're here. Thank you for taking the time to comment, and happy baking!
Mel G says
Hi! My question is that if I have been feeding and growing my starter with regular AP flour, should I still feed it with bread flour before baking? Thanks!
Irina Totterman says
Hello Mel, Not necessarily. If your starter is healthy, active, and reliably doubles after feeding, there's no need to switch to bread flour before baking. An AP flour starter makes excellent sourdough. Just use the flour that works best for your baking routine and recipe.