
Quick Summary: This master sourdough recipe yields 788g of dough (batard or boule) from 400g bread flour at 75% hydration. It uses a levain, the Rubaud method for strength, and an aliquot jar to track bulk fermentation by dough temperature and percentage rise.
Plan on 2 to 3 days: build the levain, mix and bulk ferment (about 7.5 hours at 73°F), shape, cold-proof overnight, and bake in a preheated Dutch oven. It is built for bakers comfortable with starters, shaping, and fermentation.
You don't need to be an expert to follow it, but I highly recommend learning the basics of sourdough starters and bread-baking techniques first. If you already know sourdough terms and methods, you are all set. You can click the links throughout the post for a quick refresher.
New to sourdough? Start with my Beginner's Sourdough Bread recipe, or better yet, my Beginner's Sourdough Guide.
Homemade sourdough bread recipe
This homemade sourdough bread recipe is clearly explained with detailed instructions and step-by-step photos.
It follows Tom Cucuzza's bulk fermentation method using an aliquot jar. I like to keep things simple by using the same mixing bowl for the entire process, rather than switching between a straight-sided container and a bowl for folding the dough.
How this sourdough recipe stands out
My best sourdough bread recipe is for those who are ready to move beyond trial and error and truly master sourdough baking. Here is what makes it unique:
- Foolproof and well-tested: This recipe is thoroughly tested with consistent results for sourdough bakers who understand bulk fermentation, shaping, and proofing.
- Detailed, step-by-step guidance: Each step is clearly explained with detailed instructions and step-by-step photos.
- Assumes a strong starter: This recipe is designed for those with a healthy, active sourdough starter.
- Focused on dough management: Unlike basic recipes, this one considers room temperature, dough temperature, percentage rise, and overall fermentation control.
- Advanced yet approachable: While this recipe is ideal for those familiar with sourdough terms and techniques, helpful links throughout the post allow bakers to learn as needed.
Ingredients
This recipe makes one loaf of bread using 400g of flour. You will need a digital scale to measure the ingredients accurately.
- Flour: Use unbleached bread flour with a high protein content. This recipe uses King Arthur bread flour (12.7% protein).
- Water: Use unchlorinated tap, filtered, or spring water.
- Sourdough Starter: Use a 100% hydration sourdough starter at peak.
- Salt: Fine sea salt is best, but avoid iodized table salt. I use Redmond Ancient Fine Sea Salt.
- White Rice Flour: A little is needed to dust the work surface and banneton.
Make sure all bread ingredients are at room temperature. The right ingredients make a big difference in baking great bread.
Final bread formula
| Ingredient | Baker's Percentage | Weight |
|---|---|---|
| King Arthur bread flour | 100% | 400g |
| Water | 75% | 300g |
| Levain/Active starter, 100% hydration | 20% | 80g |
| Salt | 2% | 8g |
- Total dough weight is 788g. If you want to adjust the bread formula for your own loaf, see my guide to baker's percentages and use my sourdough calculator.
- My kitchen temperature is 73°F (23°C), with a humidity level of 40%
- Bulk fermentation: 6 hours 30 minutes to 7 hours 30 minutes with a 75-80% increase in dough size
- Proofing time: 14 hours cold-proof in the fridge
- Baking in a conventional oven: 450°F (232°C) with the lid on for 20 minutes; without the lid, 17-20 minutes.
Tools & Equipment
- Kitchen scale helps with accurate measurements for consistent results.
- Probe thermometer is used to measure dough temperature and the internal temperature of baked bread for doneness.
- Large mixing bowl provides ample space for mixing and rising dough.
- Danish dough whisk is ideal for mixing water with levain. Some bakers also use it to mix dough instead of using their hands.
- Bowl scraper is perfect for scraping dough from the sides of a bowl.
- An aliquot jar is used for tracking the rise of dough. I use this 2.7-oz. plastic container.
- Bench scraper helps preshape the dough and clean your work surface.
- Banneton or its alternative is used to support the dough during the final rise. I recommend a 10-inch (25 cm) banneton. Choose between a rattan proofing basket and a higher-quality wood pulp banneton.
- Damp linen or a cotton towel covers the dough to prevent drying out. I often use one of these flour sack towels, plastic wrap, a plastic shower cap, or a reusable bowl cover.
- Parchment paper helps transfer dough to the oven and avoids sticking.
- Bread lame is used for scoring dough, and with so many options on the market, this bread lame is one of my favorites.
- Dutch oven or roasting pan creates steam during baking. For this recipe, choose a 5-quart Dutch oven or a 3-pound capacity Granite Ware round roaster.
- Long oven mitts or gloves protect hands when handling hot baking equipment. These silicone gloves are my favorite.
Sample baking schedule
Sourdough bread takes 2 to 3 days to make, depending on whether the levain is built overnight or the same day as mixing the dough.
This baking schedule was created in my kitchen, which is 73°F (23°C). If your kitchen is warmer, the process will take less time; if it is cooler, it will take longer.
You will need to adjust the timing to create your own baking schedule. So, use this schedule as a general guide.
| Day 1 | |
| 8:00 AM | Build levain/active starter |
| 12:00 PM | Fermentolyse (mix starter, water, and flour), rest for 30 minutes |
| 12:30 PM | Add salt with the remaining water and mix; rest for 30 minutes |
| 1:00 PM | Stretch and folds #1, rest for 30 minutes |
| 1:30 PM | Stretch and folds #2, rest for 30 minutes |
| 2:00 PM | Coil folds #1, rest for 30 minutes |
| 2:30 PM | Coil folds #2, rest for 30 minutes |
| 6:30-7:00 PM | Pre-shaping and bench rest for 15 minutes |
| 7:15 PM | Final shaping |
| 7:30 PM | Cold-proof in the fridge overnight |
| Day 2 | |
| 8:00 AM | Preheat the oven |
| 8:30 AM | Prepare the dough and score |
| 8:40 AM | Bake |
| 9:20 AM | Cool on a rack for 2 hours |
How to make homemade sourdough bread step-by-step
First, download my free Sourdough Baking Log to record every step and dial in your process bake after bake. Start by making the levain, then mix the dough and monitor bulk fermentation. Preshape and shape the dough, then cold-proof it in the fridge overnight. Bake the next day.
1. Make levain
The words levain, active starter, and preferment are often used interchangeably. In this recipe, I will use the term levain to refer to the offspring of the "mother" starter.
You can make levain overnight or in the morning using different feeding ratios. If making it overnight, you need to know how long it takes your starter to peak at a given feeding ratio. This way, you won't have to wake up in the middle of the night to start mixing the dough.
If you are making the levain on the same day as the dough, I recommend a 1:1:1 levain build. Here is what you will need:
| Ingredient | Feeding Ratio | Weight |
|---|---|---|
| "Mother" starter, 100% hydration | 1 part | 30g |
| King Arthur bread flour | 1 part | 30g |
| Water | 1 part | 30g |
Making the levain (8 AM start)
Take 30g of starter (either fed last night or straight from the fridge) and place it in a clean jar.
Add 30g of room-temperature water and mix well. Then stir in 30g of bread flour until the mixture resembles pancake batter.
Loosely cover the jar and let it sit in a warm spot (75-76°F or 24°C). It will take 4-6 hours to peak. If your kitchen is cooler, try one of the methods to keep your starter warm.
Making the levain (10 PM Start)
If you prefer, make the levain the night before. In my kitchen (69°F (21°C) at night), my starter peaks in 10 hours using a 1:6:6 feeding ratio.
The evening before mixing the dough, gather these ingredients:
| Ingredient | Feeding Ratio | Weight |
|---|---|---|
| "Mother" starter, 100% hydration | 1 part | 7g |
| King Arthur bread flour | 6 parts | 42g |
| Water | 6 parts | 42g |
Take 7g of starter (fed in the morning or straight from the fridge) and place it in a clean jar.
Add 42g of room-temperature water and mix well. Then, stir in 42g of bread flour until the mixture resembles pancake batter.
Loosely cover the jar and let it sit on the counter. At 69°F (21°C), it will reach its peak in approximately 10 hours.
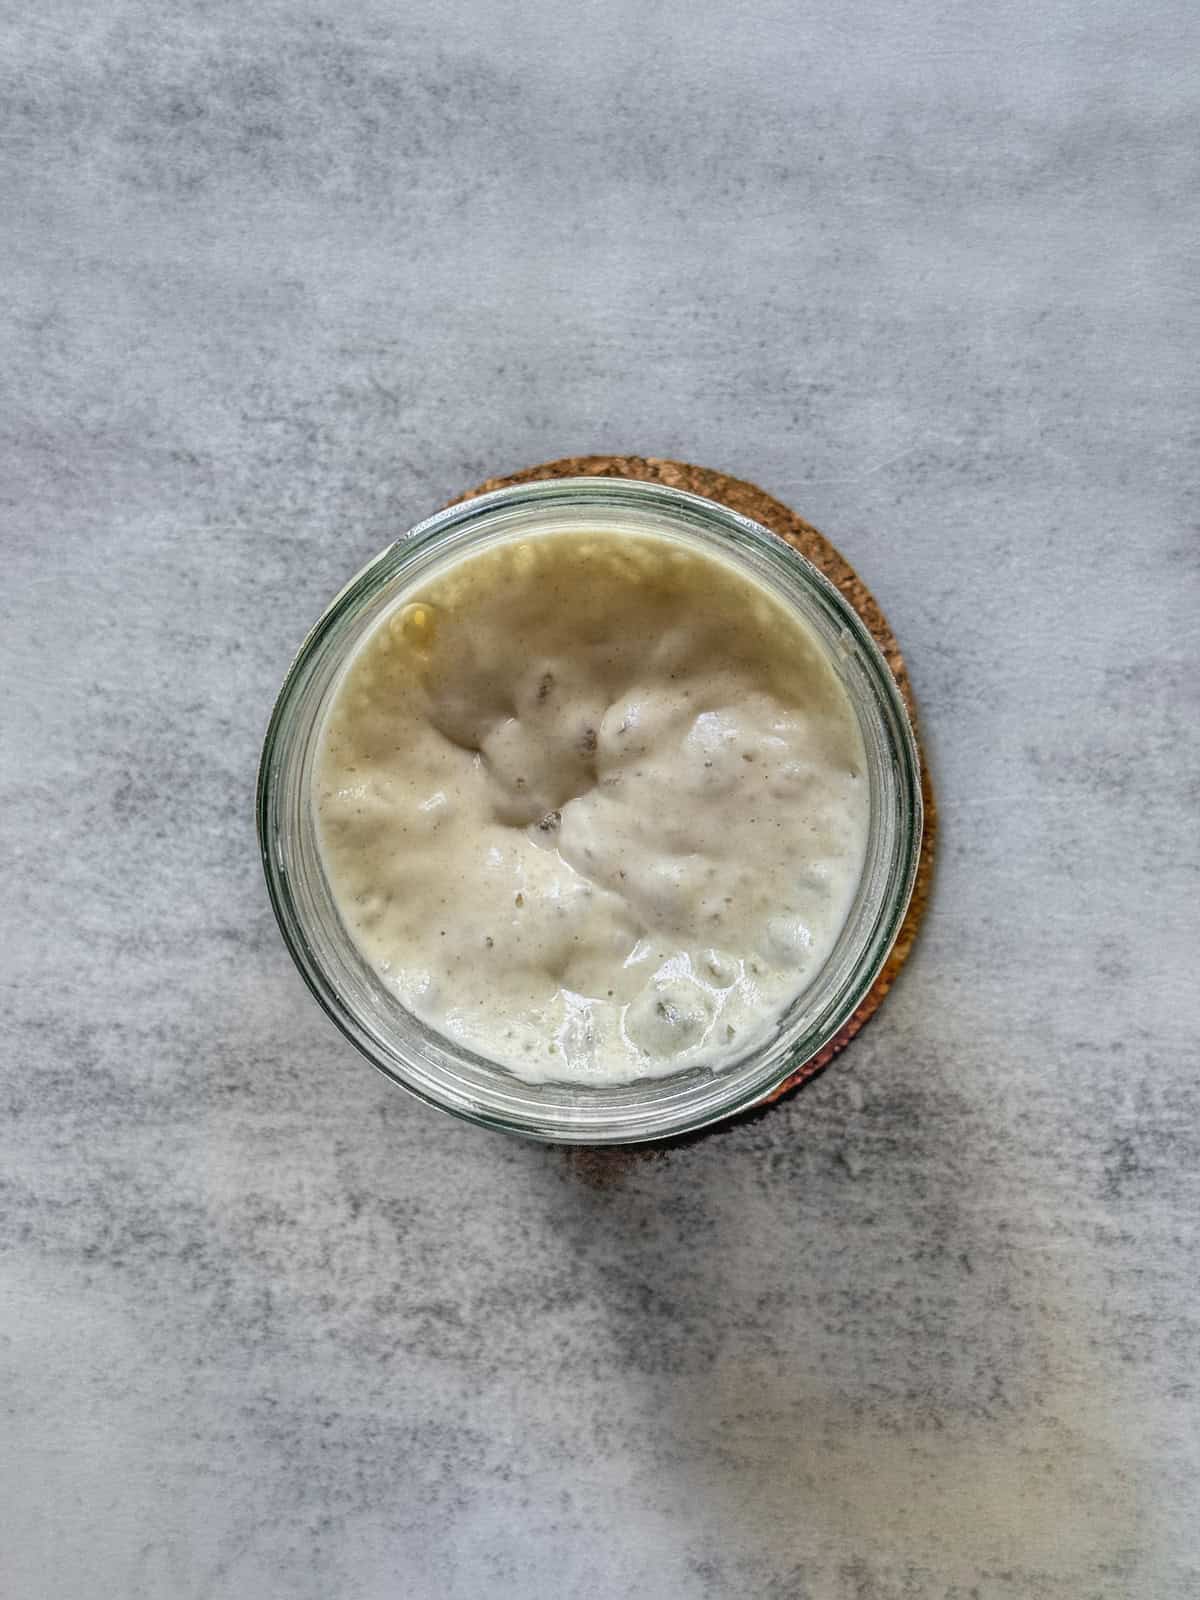
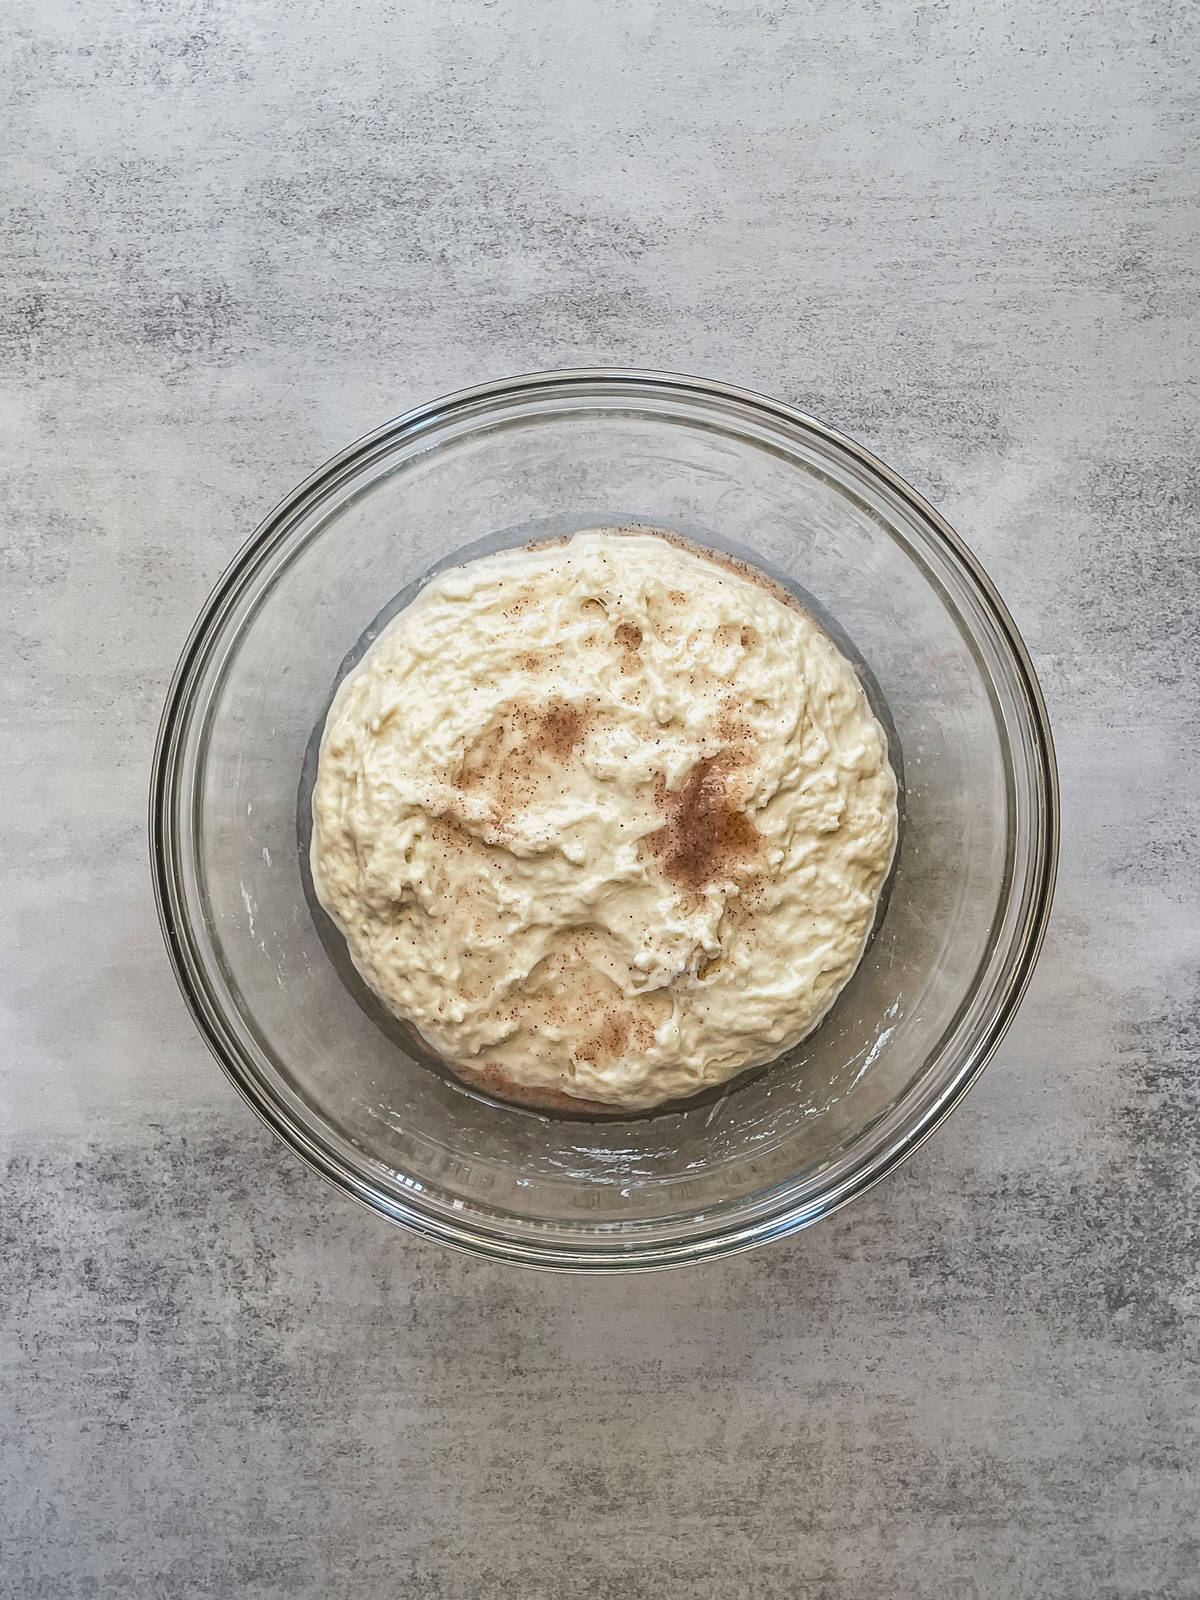
Here is what the levain (active starter) looks like at its peak. Learn more about the peak of the sourdough starter.
2. Fermentolyse
This sourdough bread recipe was made in a kitchen at 73°F (23°C) and 40% humidity.
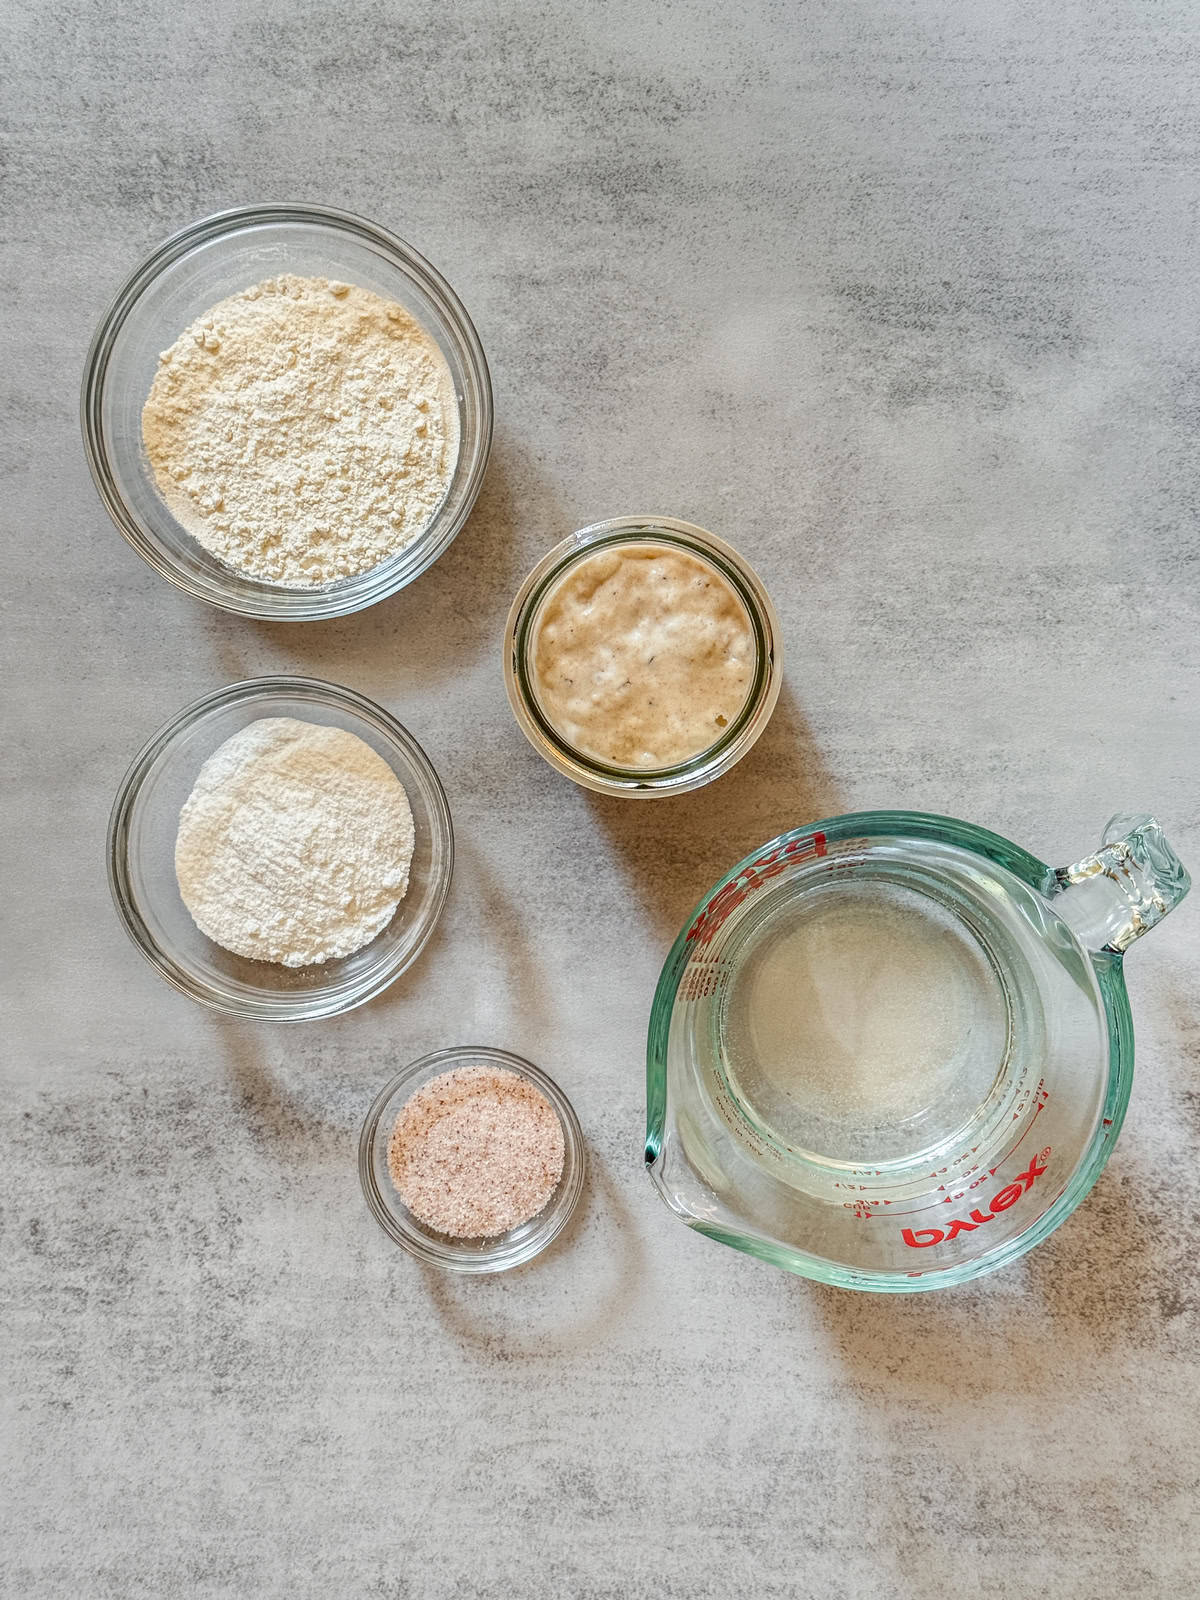
To begin the fermentolyse, gather a large mixing bowl, a smaller bowl filled with room-temperature water (for wetting your hands), and the ingredients listed below.
| Ingredients | Weight |
|---|---|
| King Arthur bread flour | 400g |
| Water | 285g |
| Levain/Active starter at peak | 80g |
Here is how to start fermentolyse.
Remember: once you add the levain, the bulk fermentation begins. Write down the time.

Measure 285g of water into the large bowl and set aside 15g for the next step. Add 80g of levain at peak. Use a Danish dough whisk to mix.

Add bread flour. Use your hand to mix the dough for 2-3 minutes, until it looks shaggy and no dry flour remains.

Cover the bowl with a clean tea towel or a plastic cap and let it rest at room temperature for 30 minutes.

Stretch some dough to check for the windowpane test.
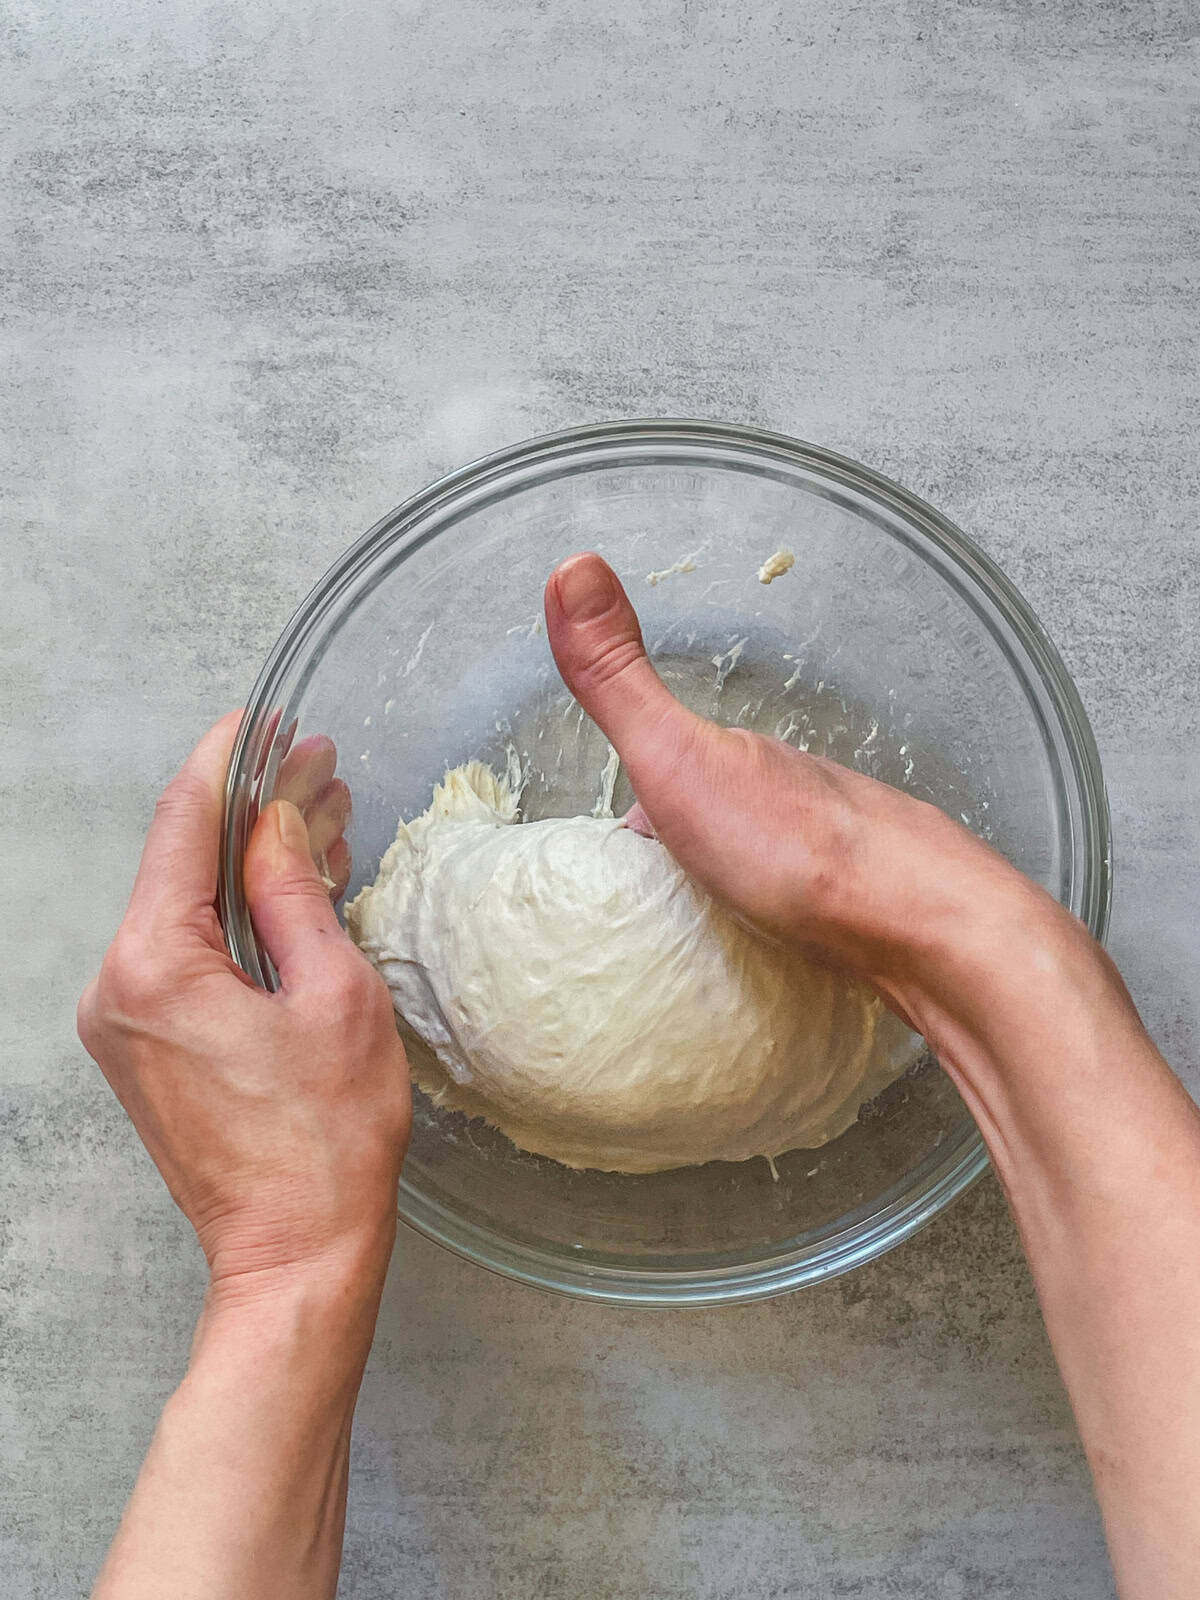
3. Mix in the salt
| Ingredients | Weight |
|---|---|
| Water | 15g |
| Sea salt | 8g |
Here is how to add salt to sourdough, step by step.
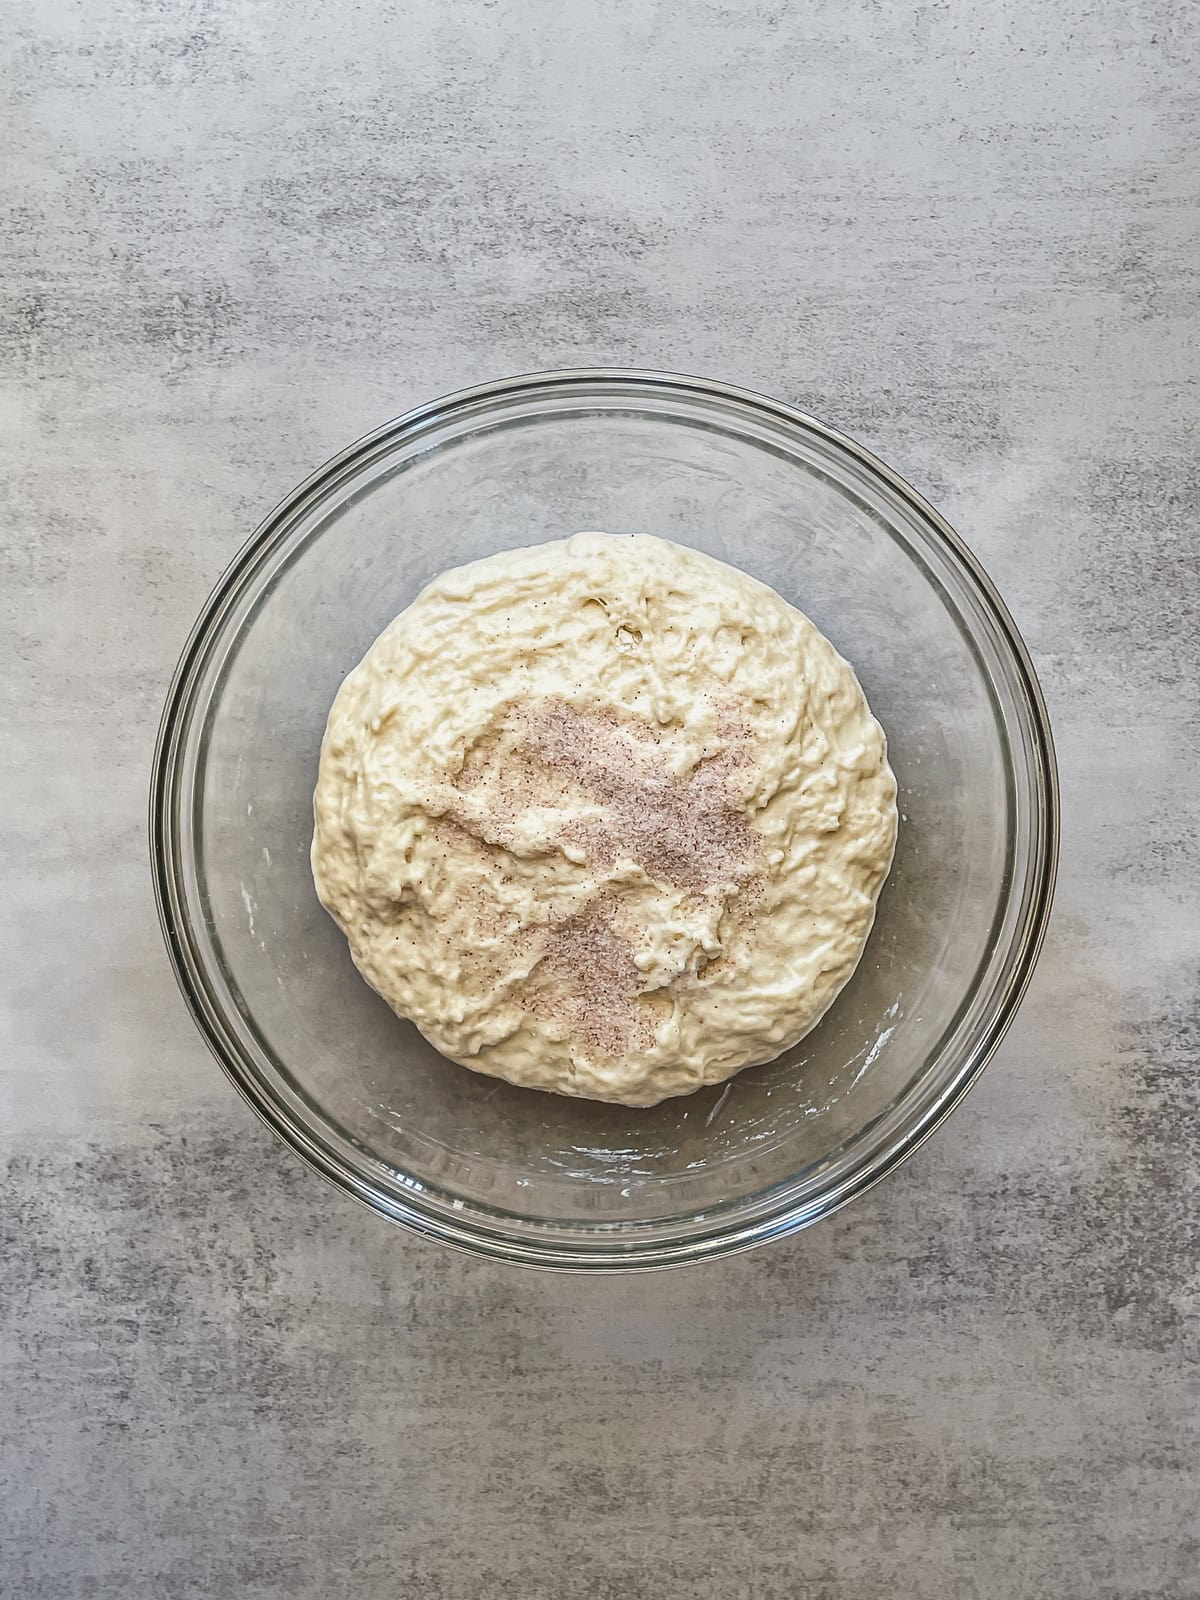
Sprinkle the salt over the dough.
Then, pour in 15g of water (this is the water you saved from the fermentolyse step).
Use the pinch and fold method to mix the dough. This should take about 3-4 minutes.

Use one hand to pinch and fold the dough.
Occasionally, squeeze the dough through your fingers, mixing until the salt and water are thoroughly combined.
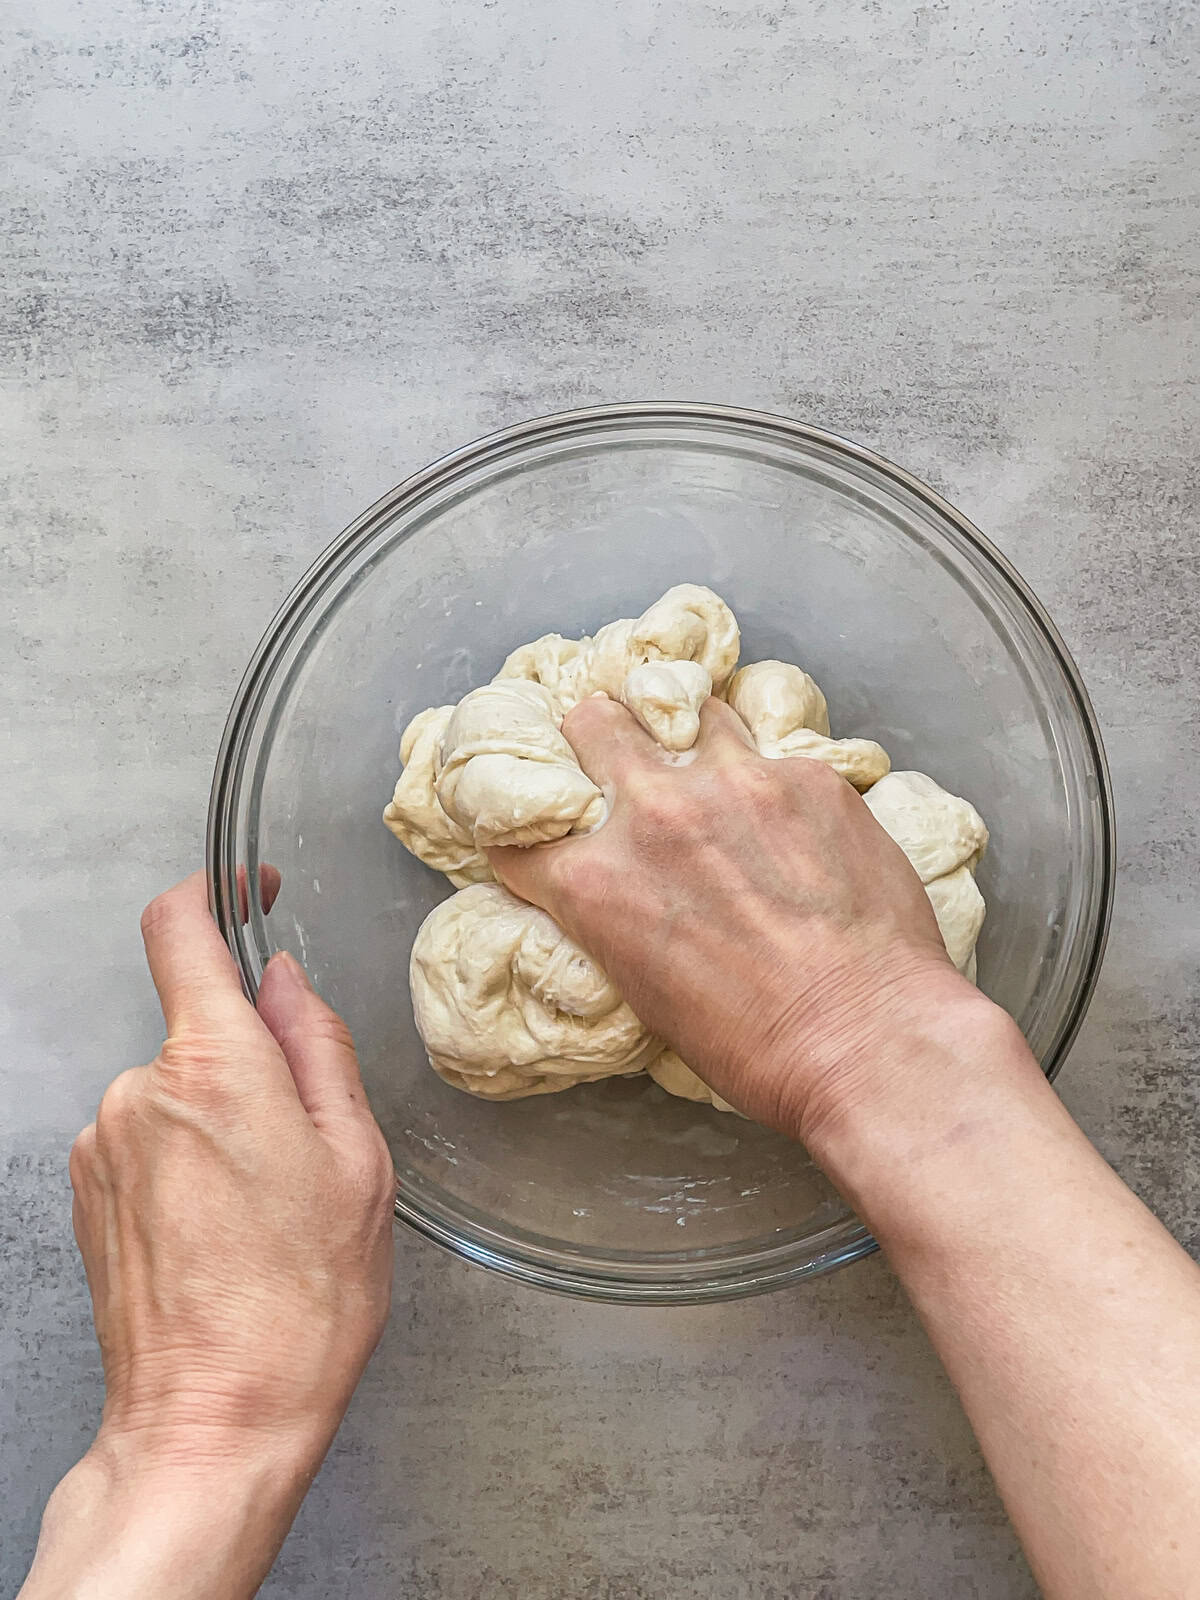
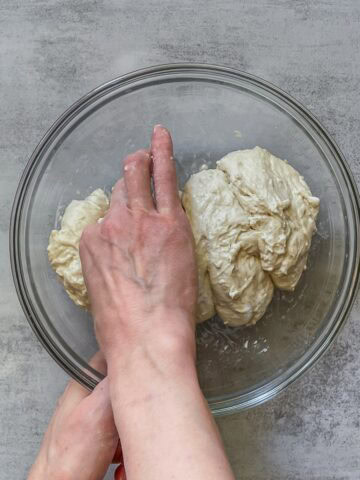
Next, use the Rubaud method to strengthen the dough. For other options, see my full guide to mixing sourdough by hand.
Mix the dough using this technique for 2-3 minutes, then let it rest for another 2-3 minutes. Repeat this process a couple more times. Here are step-by-step pictures of the Rubaud method in action.
Keep your fingers together and slide them under the dough about three-quarters of the way down.
Lift the dough straight up in one motion.
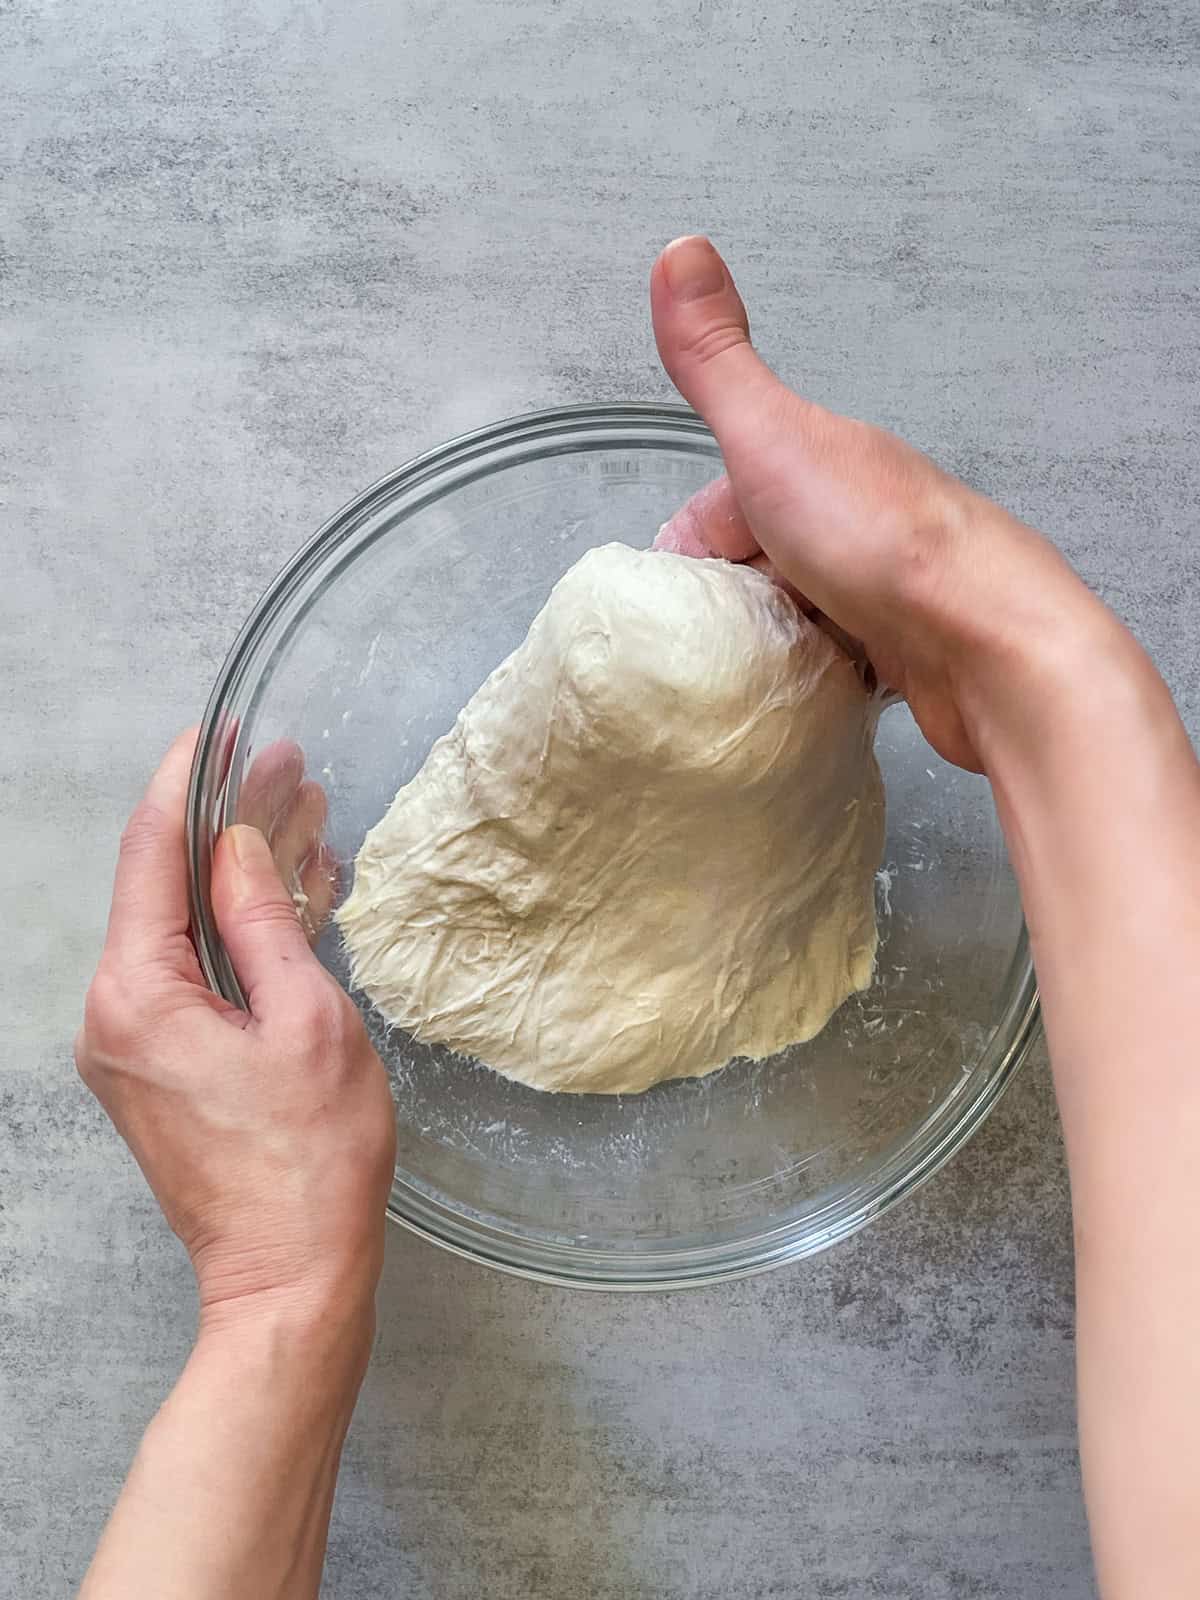
Pull it slightly outward.
Let the dough drop back into the bowl, and move your hand in a circular motion as you repeat.
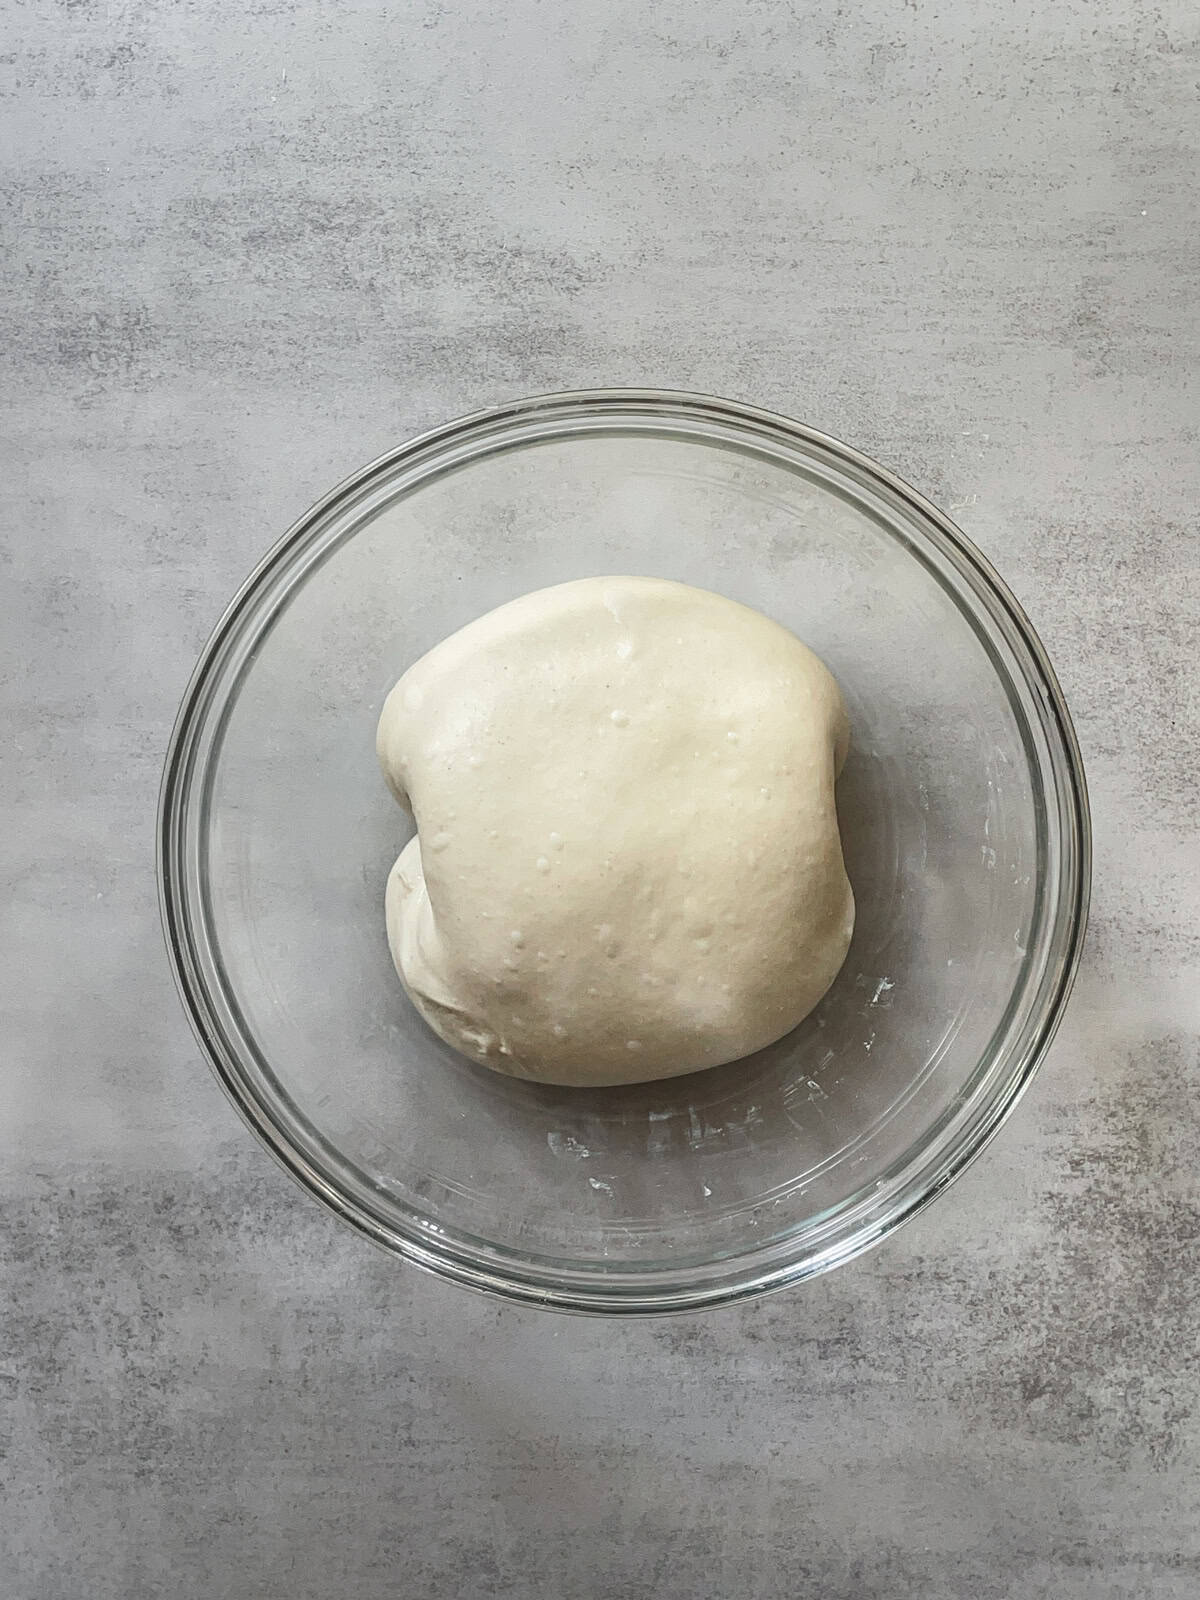
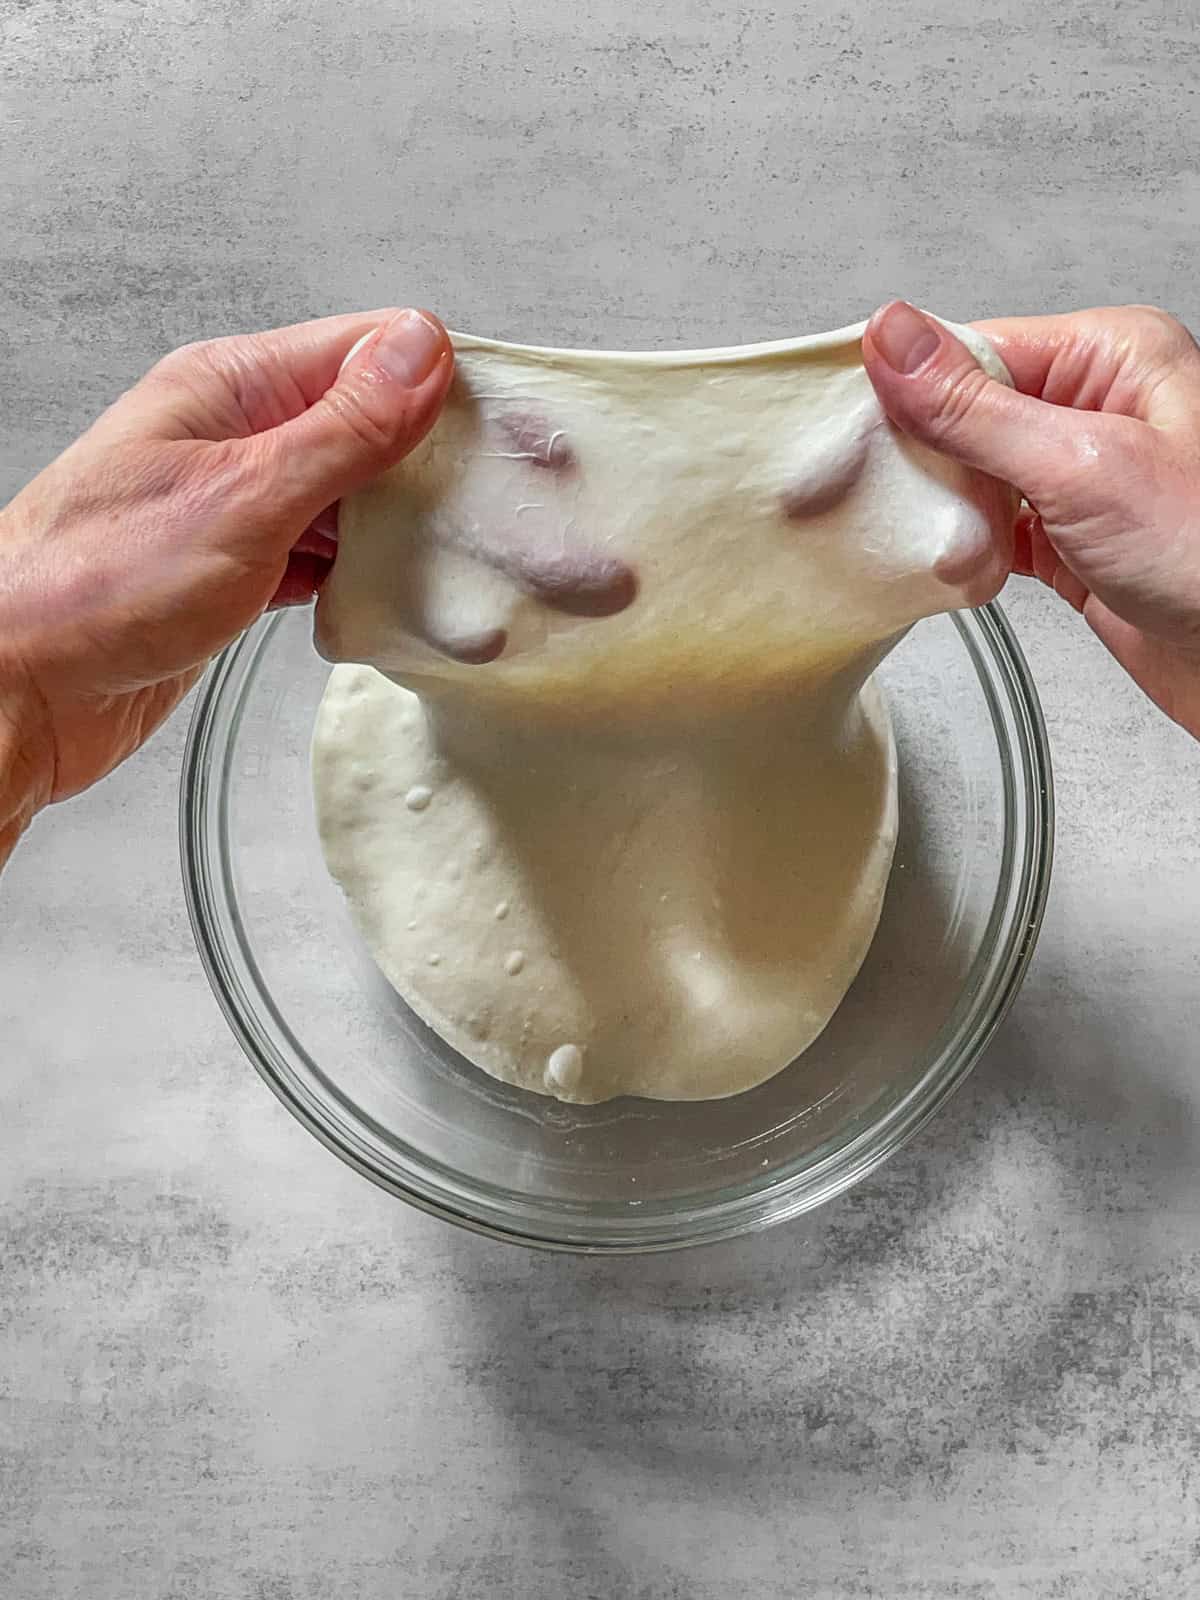
Use your other hand to rotate the bowl as you scoop and lift, helping the dough mix evenly. Once mixing is complete, check the dough for a windowpane to see if it is ready.
4. Set up an aliquot jar
After mixing, set up a jar for your aliquot sample to track bulk fermentation. Read more about how to use an aliquot jar method in my dedicated blog post.

Place an aliquot jar on the scale and tare it to zero. Take a piece of dough, place it in the container, and weigh 36g (in my case, your amount may vary). Close the jar and set it next to the main dough.
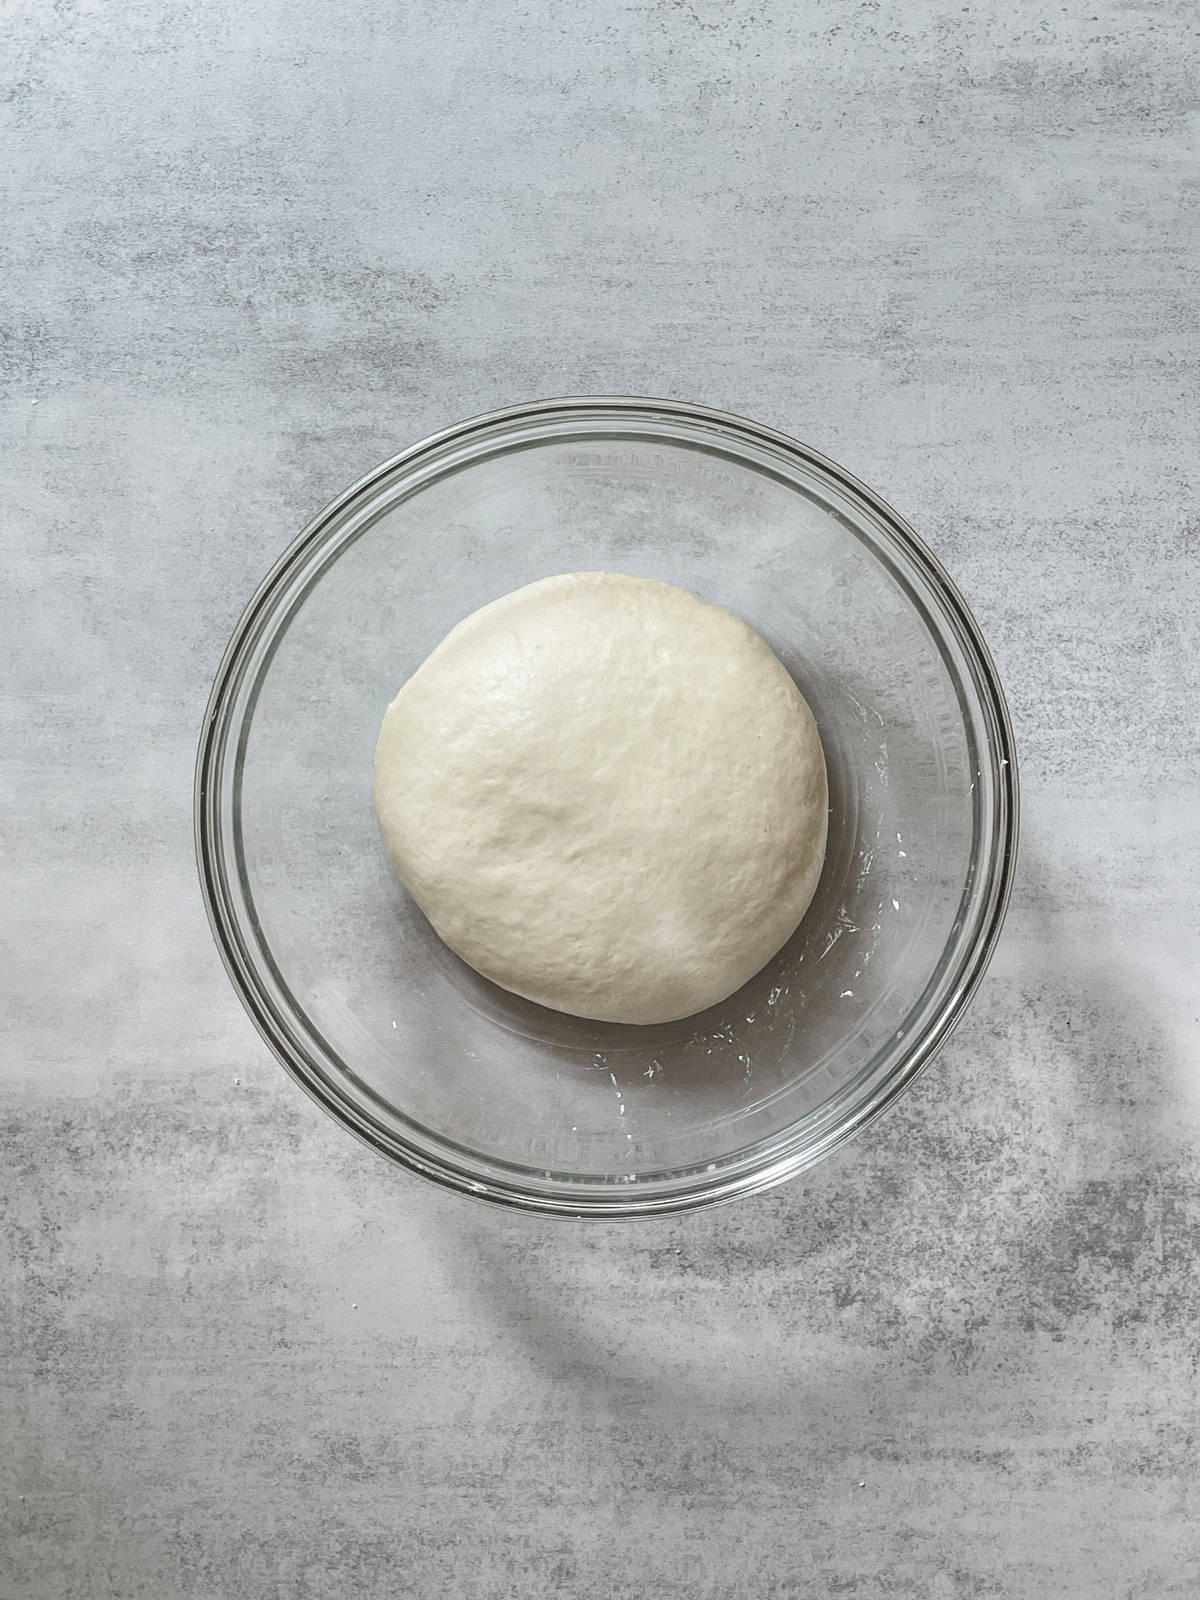
Shape the dough into a ball with your hand, cover the bowl, and let it rest at room temperature for 30 minutes.
5. Stretch and folds and coil folds
Now it is time to decide whether to continue with just coil folds or a mix of stretch and coil folds.
Here is how to choose:
- If you have mixed the dough well and used the Rubaud method to build strength, you can proceed with about two to four sets of coil folds.
- If you were short on time and didn't develop enough gluten during mixing, start with two sets of stretch and folds, then follow with two sets of coil folds.
Here is how to perform two sets of stretch and folds, followed by two sets of coil folds.
Step 1: First set of stretch and folds
After 30 minutes, it is time for the first set of stretch and folds.

Wet your hand, lift one side of the dough, and stretch it upward until you feel gentle resistance.

Fold the stretched dough over the top.
After you stretch and fold one side, turn the bowl 90 degrees and repeat the process. Turn the bowl 90 degrees again, then repeat the process four times in total.
You want to do four stretch and folds in all four directions. Think of a compass: fold the top (North) to the bottom (South), then fold the right (East) to the left (West), the bottom (South) to the top (North), and the left (West) to the right (East).
Or, imagine a clock on the bowl: folds happen at 12, 3, 6, and 9 o'clock. Four folds in four directions make one full set.
Check the dough temperature with a probe thermometer and record it.
Cover the bowl and let it rest for 30 minutes.
Step 2: Second set of stretch and folds
After 30 minutes, wet your hand again and perform the second set of stretch and folds in all four directions (like in Step 1).
Check the dough temperature with a probe thermometer and record it.
Cover the bowl and let it rest for another 30 minutes.
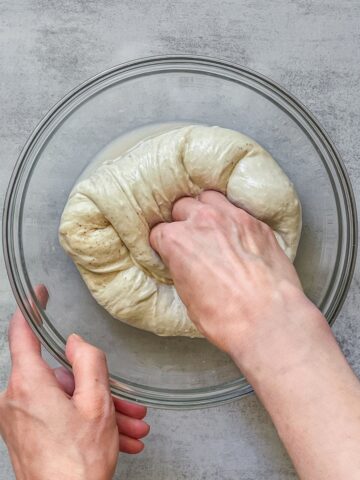
Step 3: First set of coil folds
Now is the time for the first set of coil folds.
Wet your hands so the dough doesn't stick. Gently slide your hands under the middle of the dough and lift it.
Finish folding, letting the ends tuck under naturally.
Turn the bowl 180 degrees and repeat the same fold. Then, turn the bowl 90 degrees and repeat. Finally, turn it another 180 degrees and fold again. You will do this four times in total.
Check the dough temperature with a probe thermometer and record it.
After that, cover the bowl and let it rest for 30 minutes.
Step 4: Second set of coil folds
After 30 minutes, perform the second set of coil folds (same as Step 3).
Check the dough temperature with a probe thermometer and record it.
Cover the bowl again and let it rest at room temperature.
Now, check your notes for the dough temperature and use Tom Cucuzza's bulk fermentation chart to determine the target dough percentage rise.
Remember, the target rise can change depending on the dough temperature. After checking the dough temperature, always refer to the bulk fermentation chart for guidance.
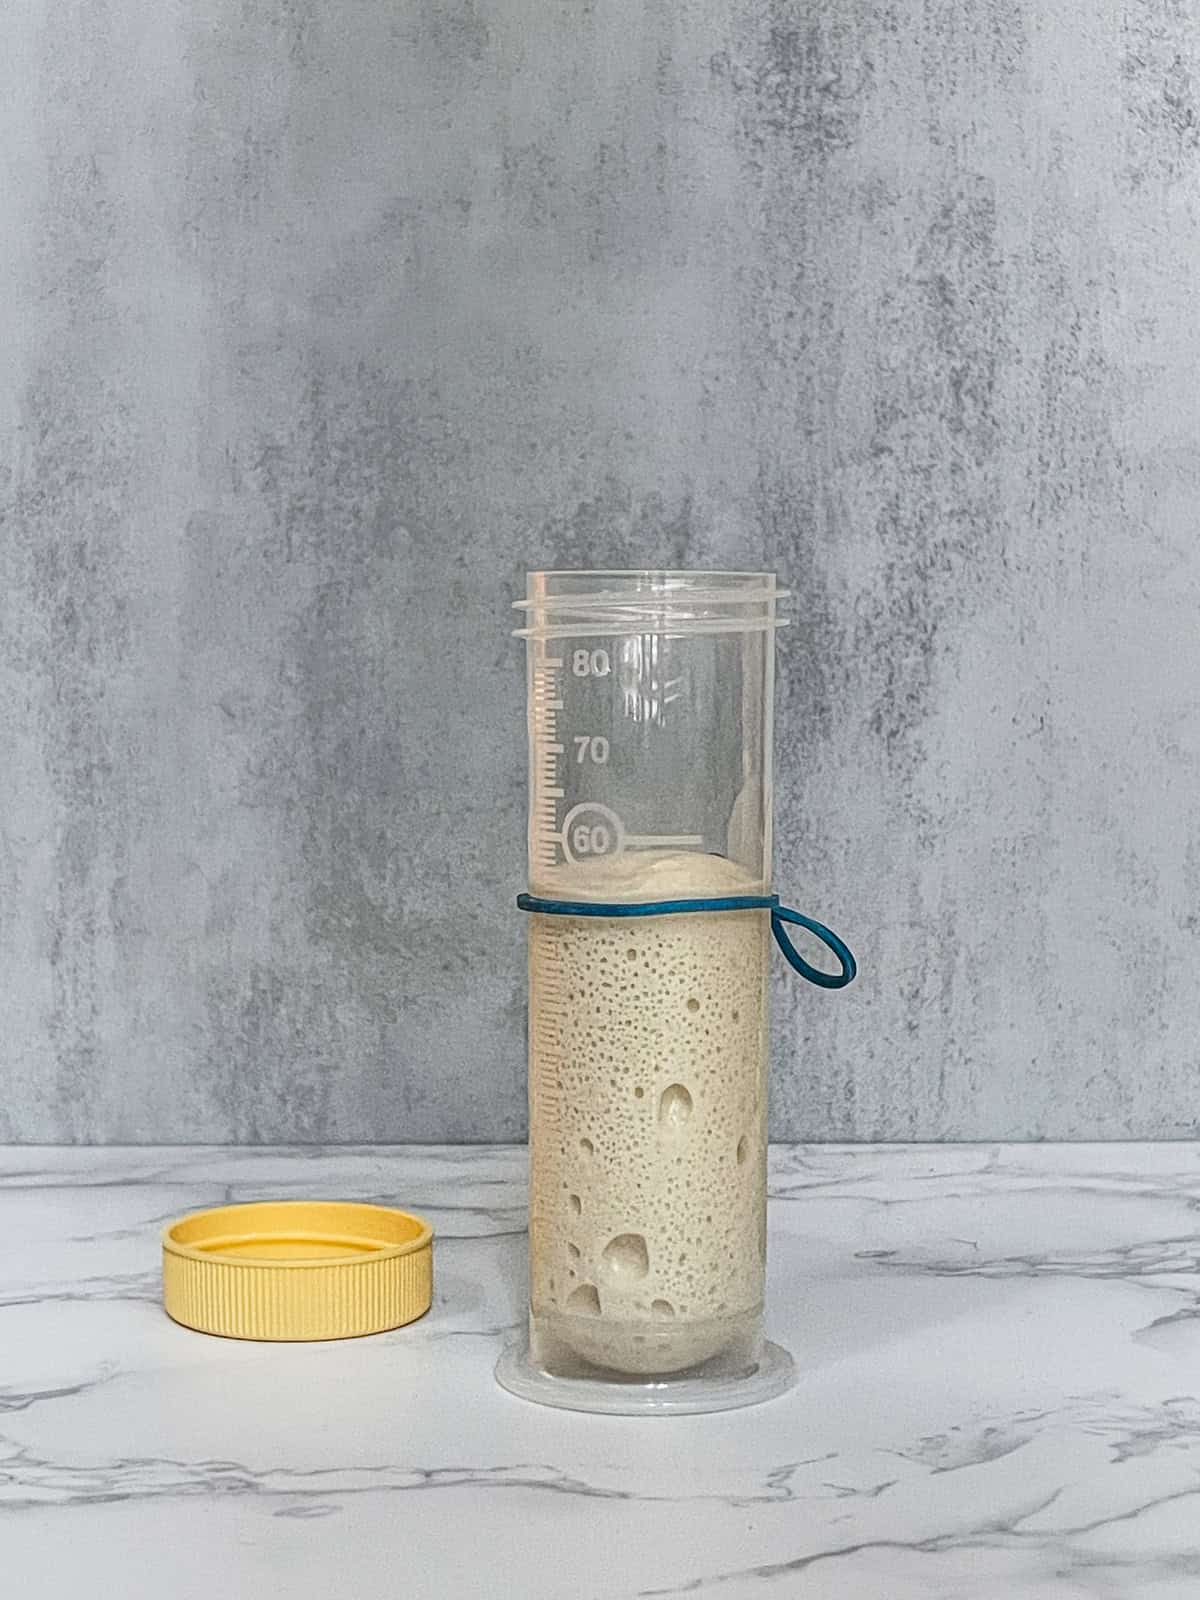
Place a rubber band at the mark showing your target dough rise (the photo is just an example).
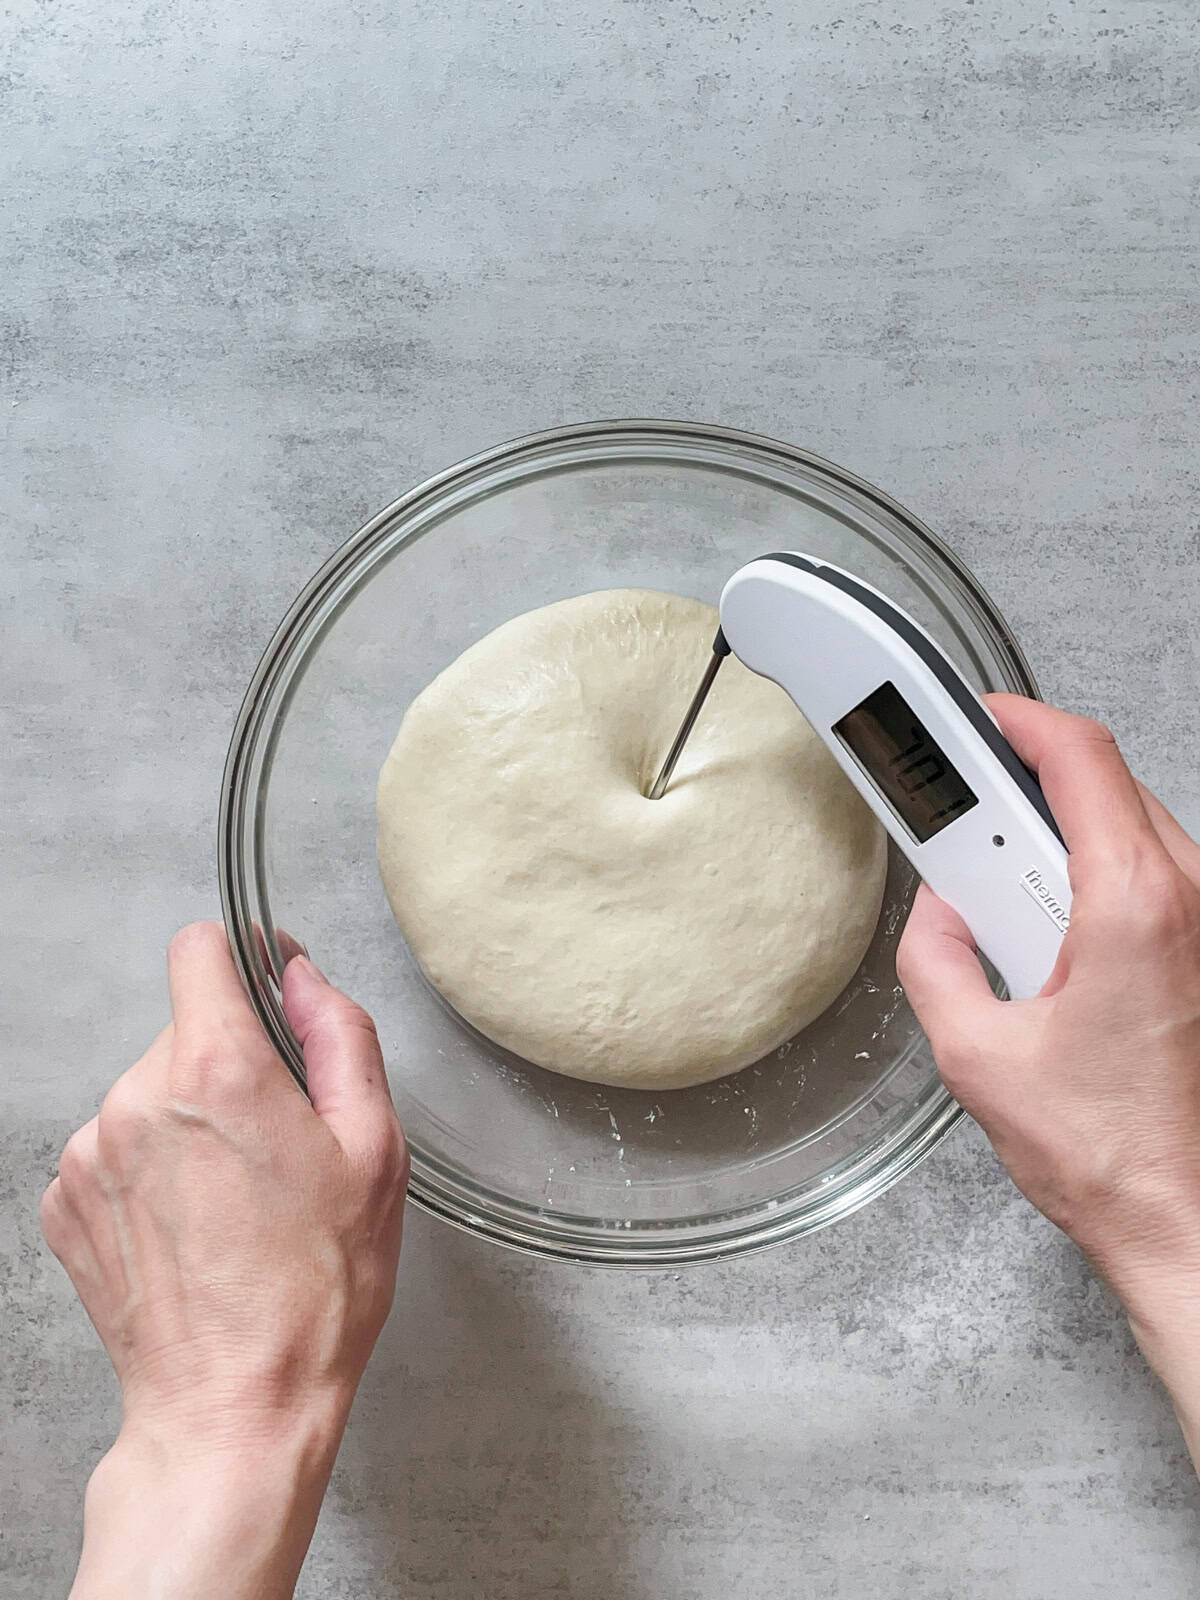
Check the dough temperature every 30-40 minutes and record it.
While the dough is rising, take some time to review the following:
- Bulk Fermentation Guide
- Aliquot Jar Method
- Dough Temperature and Percentage Rise
- When to Finish Bulk Fermentation
6. Final bulk fermentation
Now comes the challenging part: determine when bulk fermentation is done. This is when you stop fermenting the dough in the bowl and start preshaping.
Don't wait for the dough to double, or it could become over-proofed.
Instead, track the dough temperature every 30-40 minutes during the bulk fermentation and refer to Tom Cucuzza's chart to check the percentage rise.
Monitor the dough rise in the aliquot jar to determine when to stop bulk fermentation.
When the dough reaches the rubber-band marking your target rise, it is time to preshape.
You can also use visual clues to determine when the dough is ready. Look for a slightly domed top, large bubbles on the surface, smaller bubbles on the sides of a glass bowl, dough that pulls away easily from the sides, or dough that jiggles when you shake the bowl.
The dough must pass the windowpane test and, most likely, the float test. At 73°F (23°C), bulk fermentation usually lasts about 6-7 hours.
Note: When working with King Arthur Bread Flour, I have been able to extend bulk fermentation to a 90% rise and a total of 7.5 hours. Still experimenting.
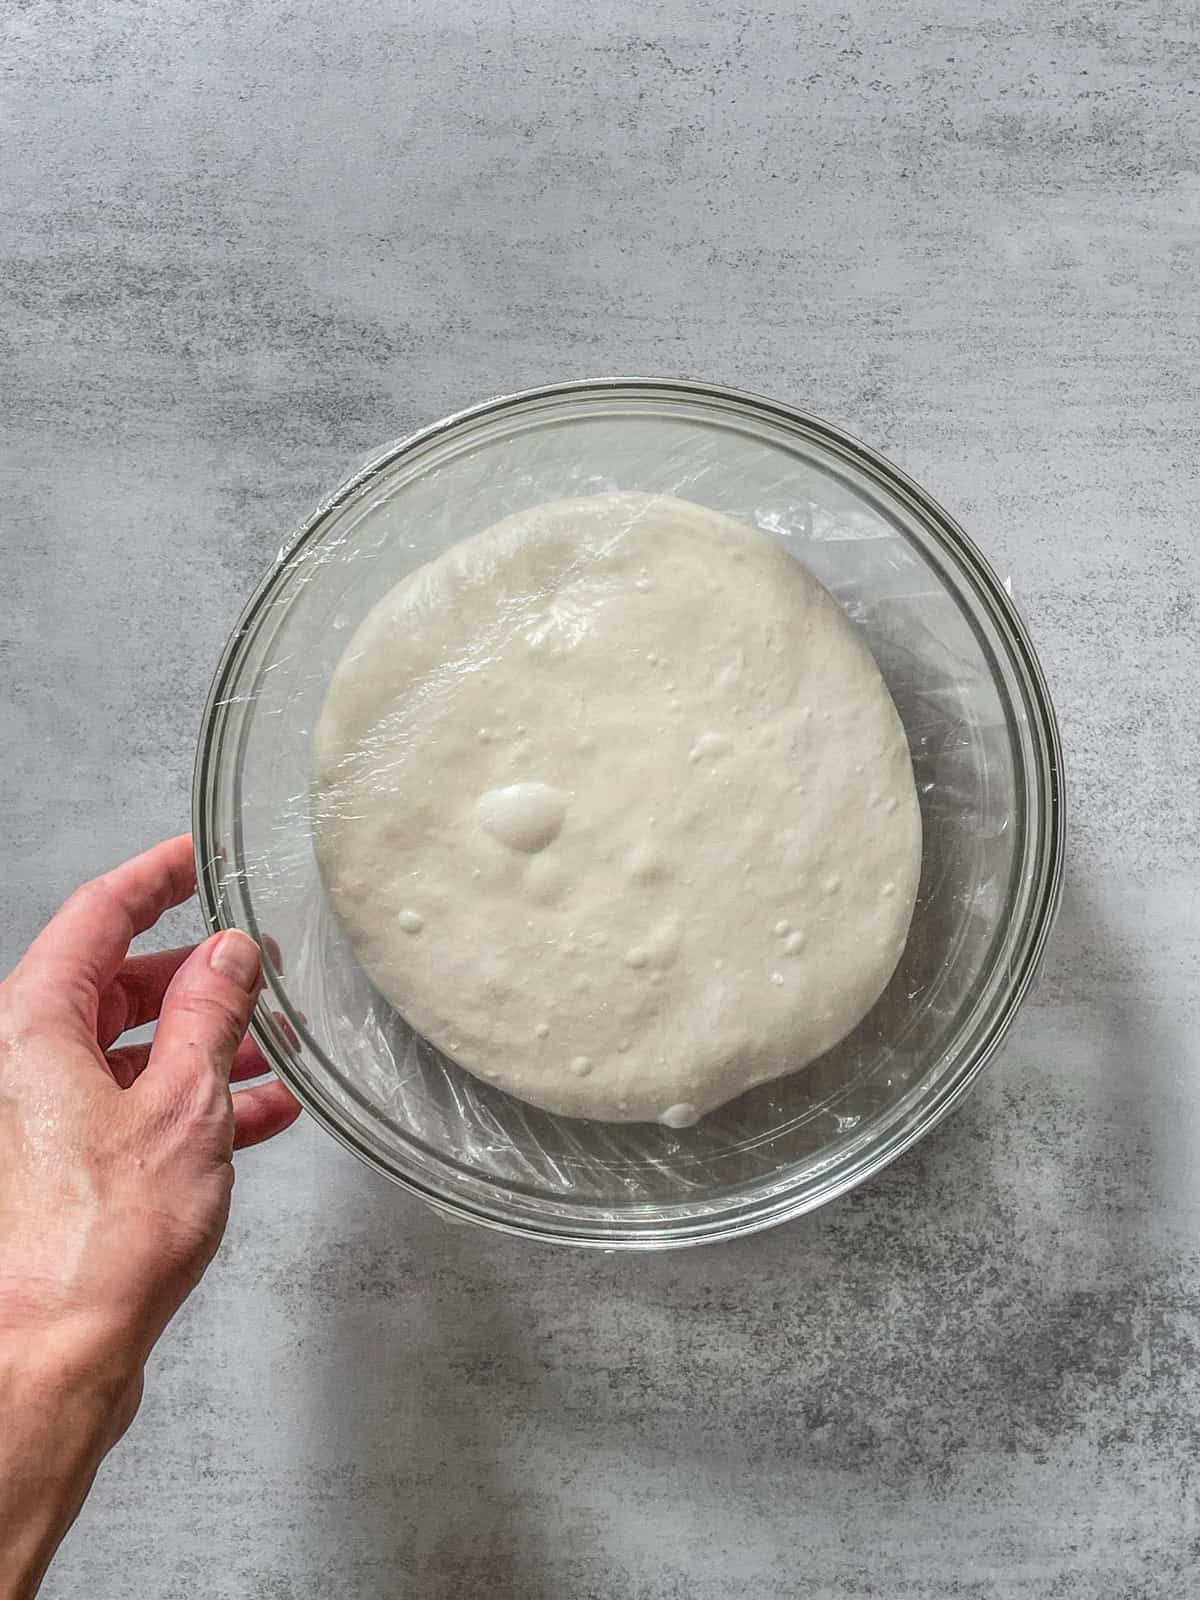
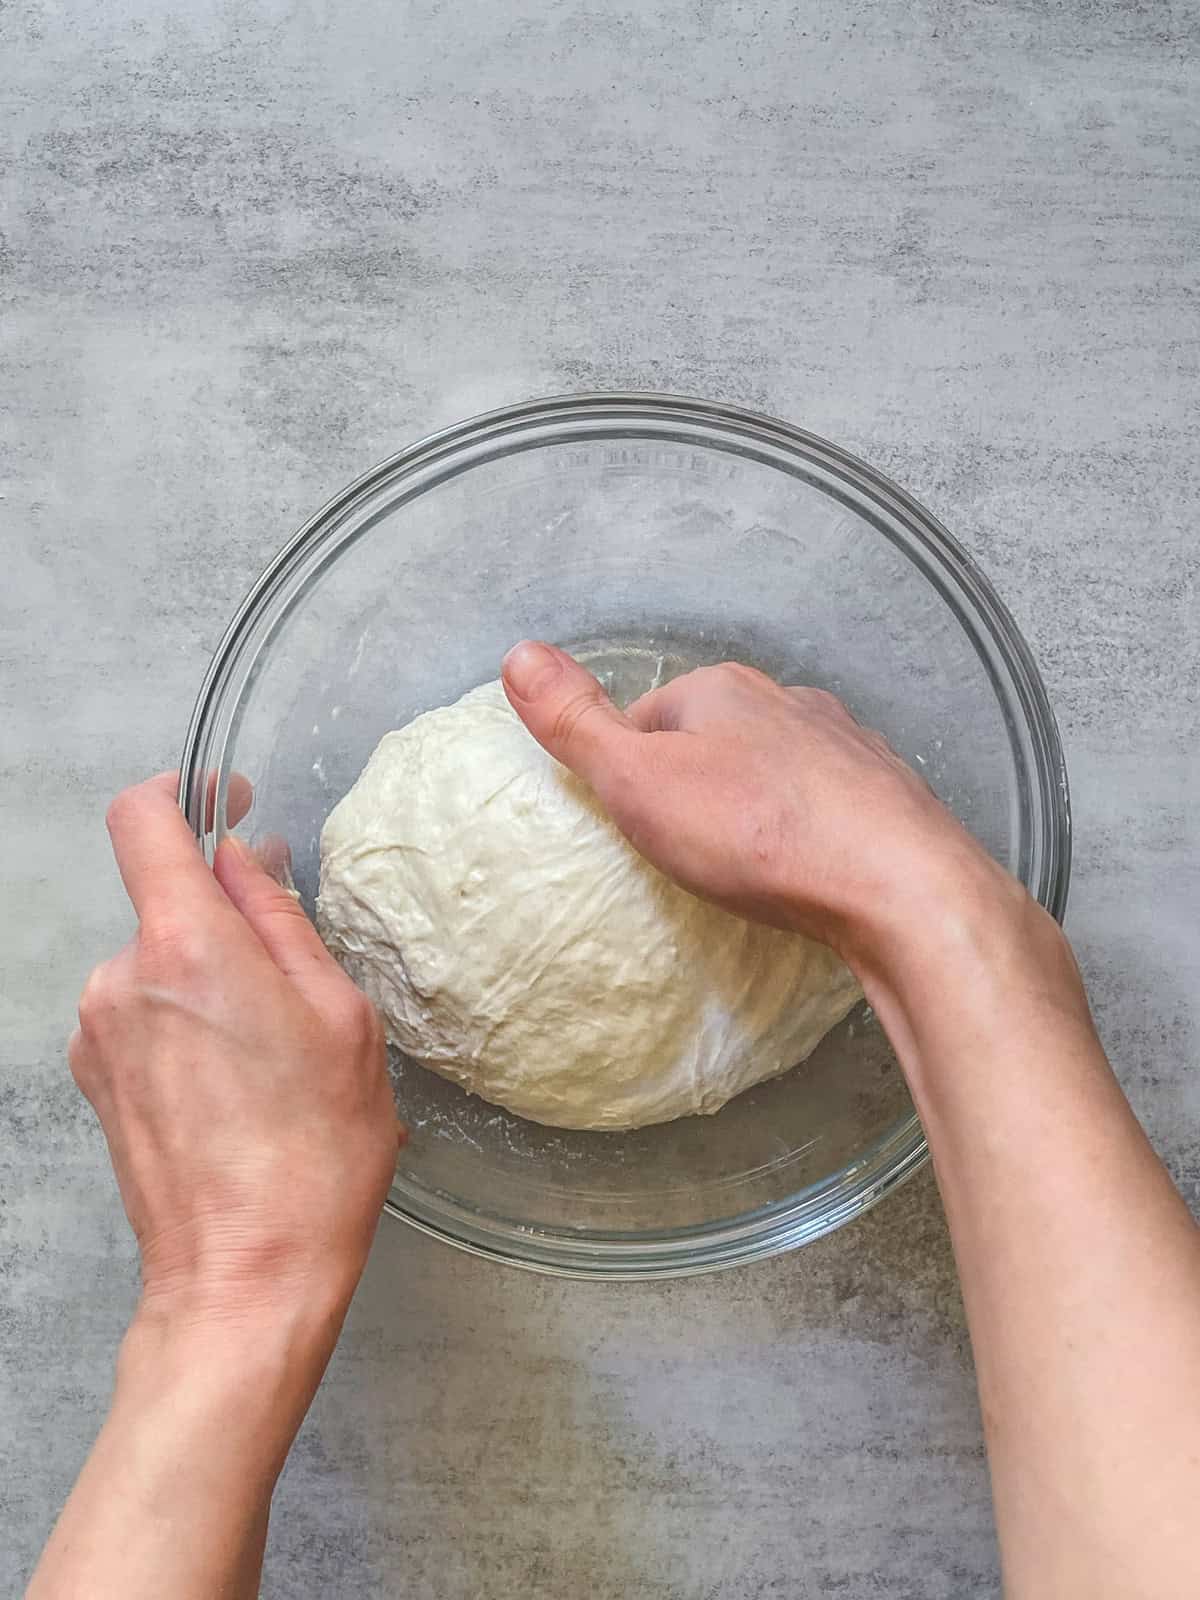
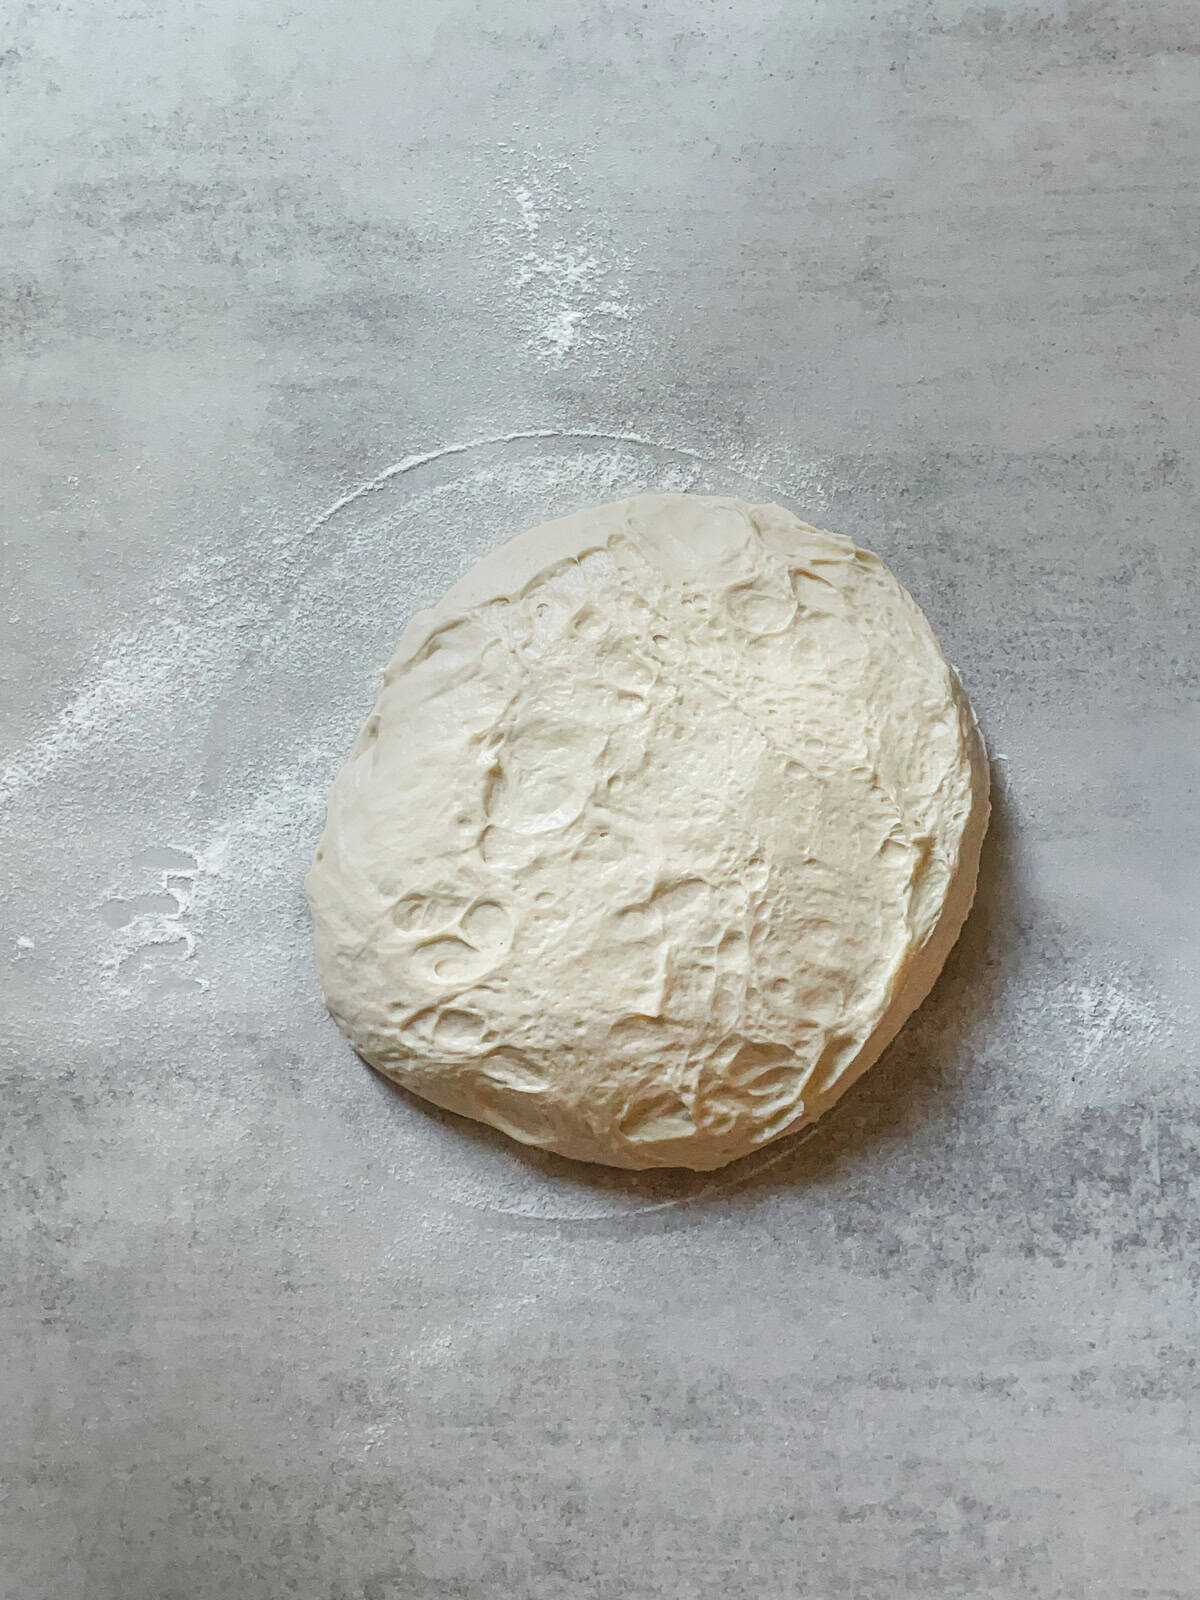
This is what the dough looks like at the end of bulk fermentation.
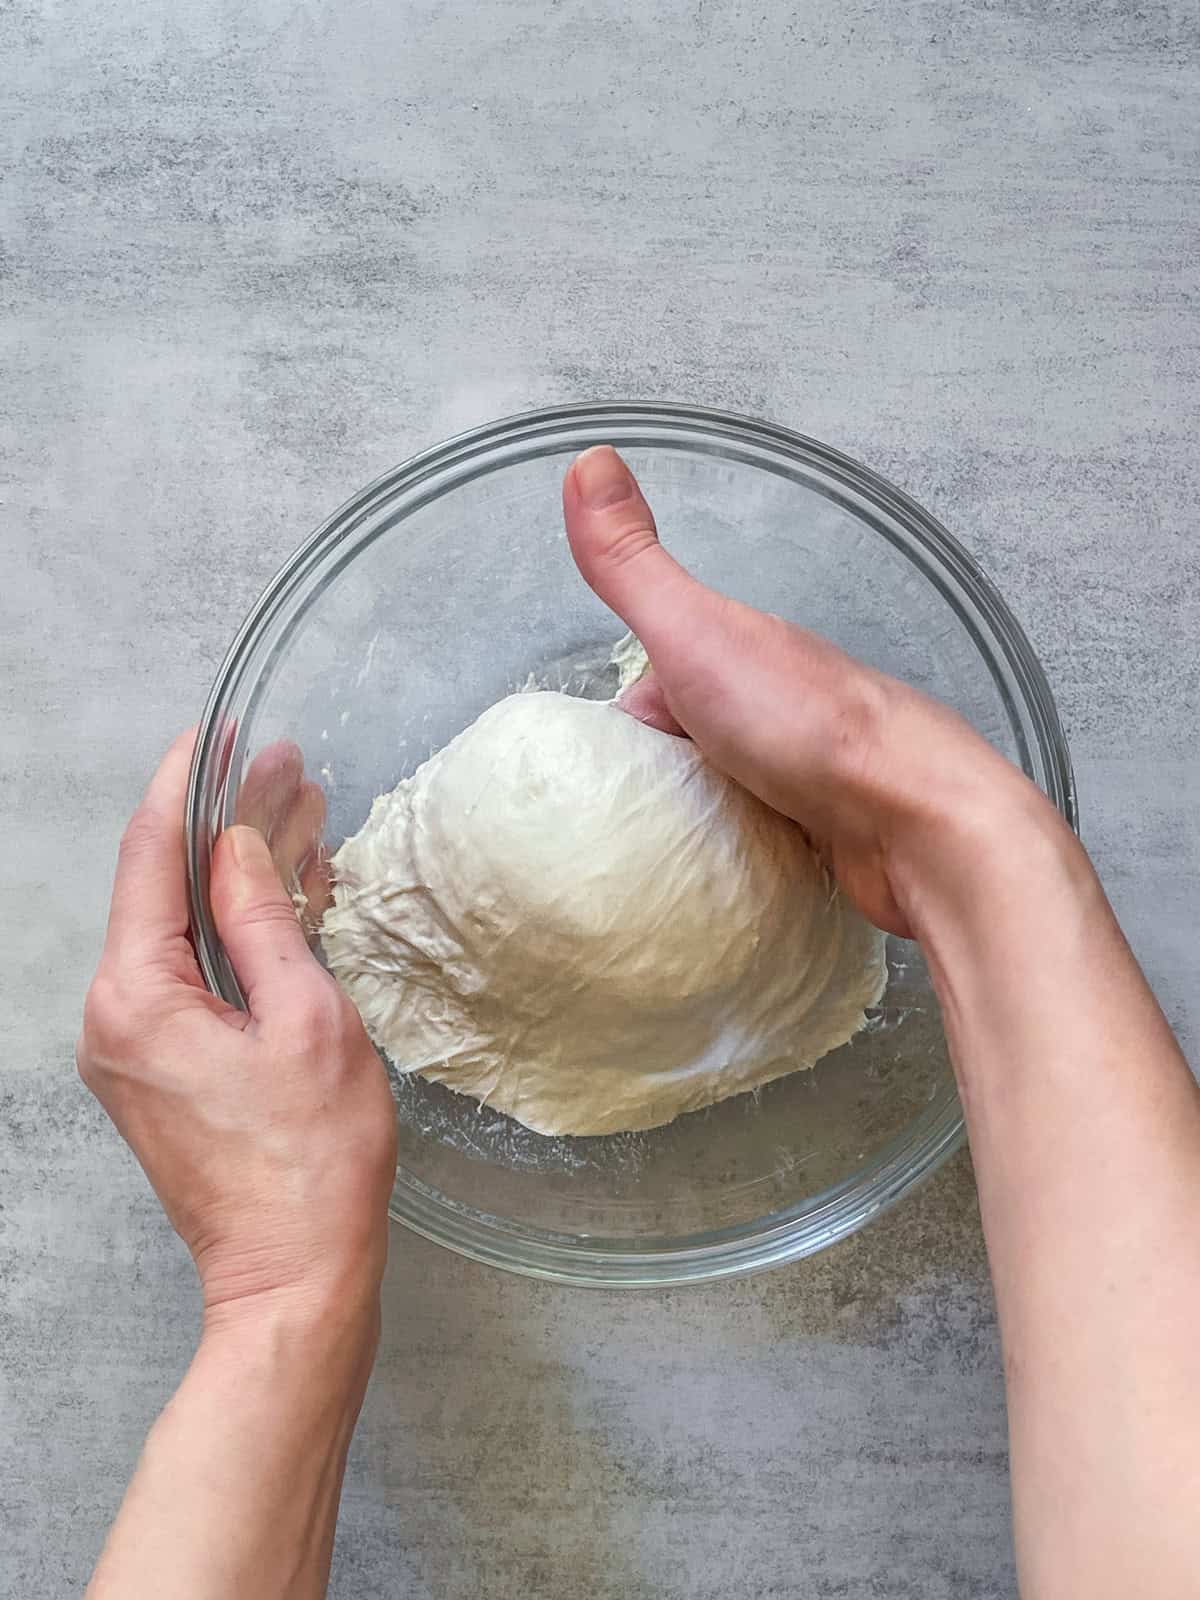
This is what the windowpane test looks like at the end of bulk fermentation.
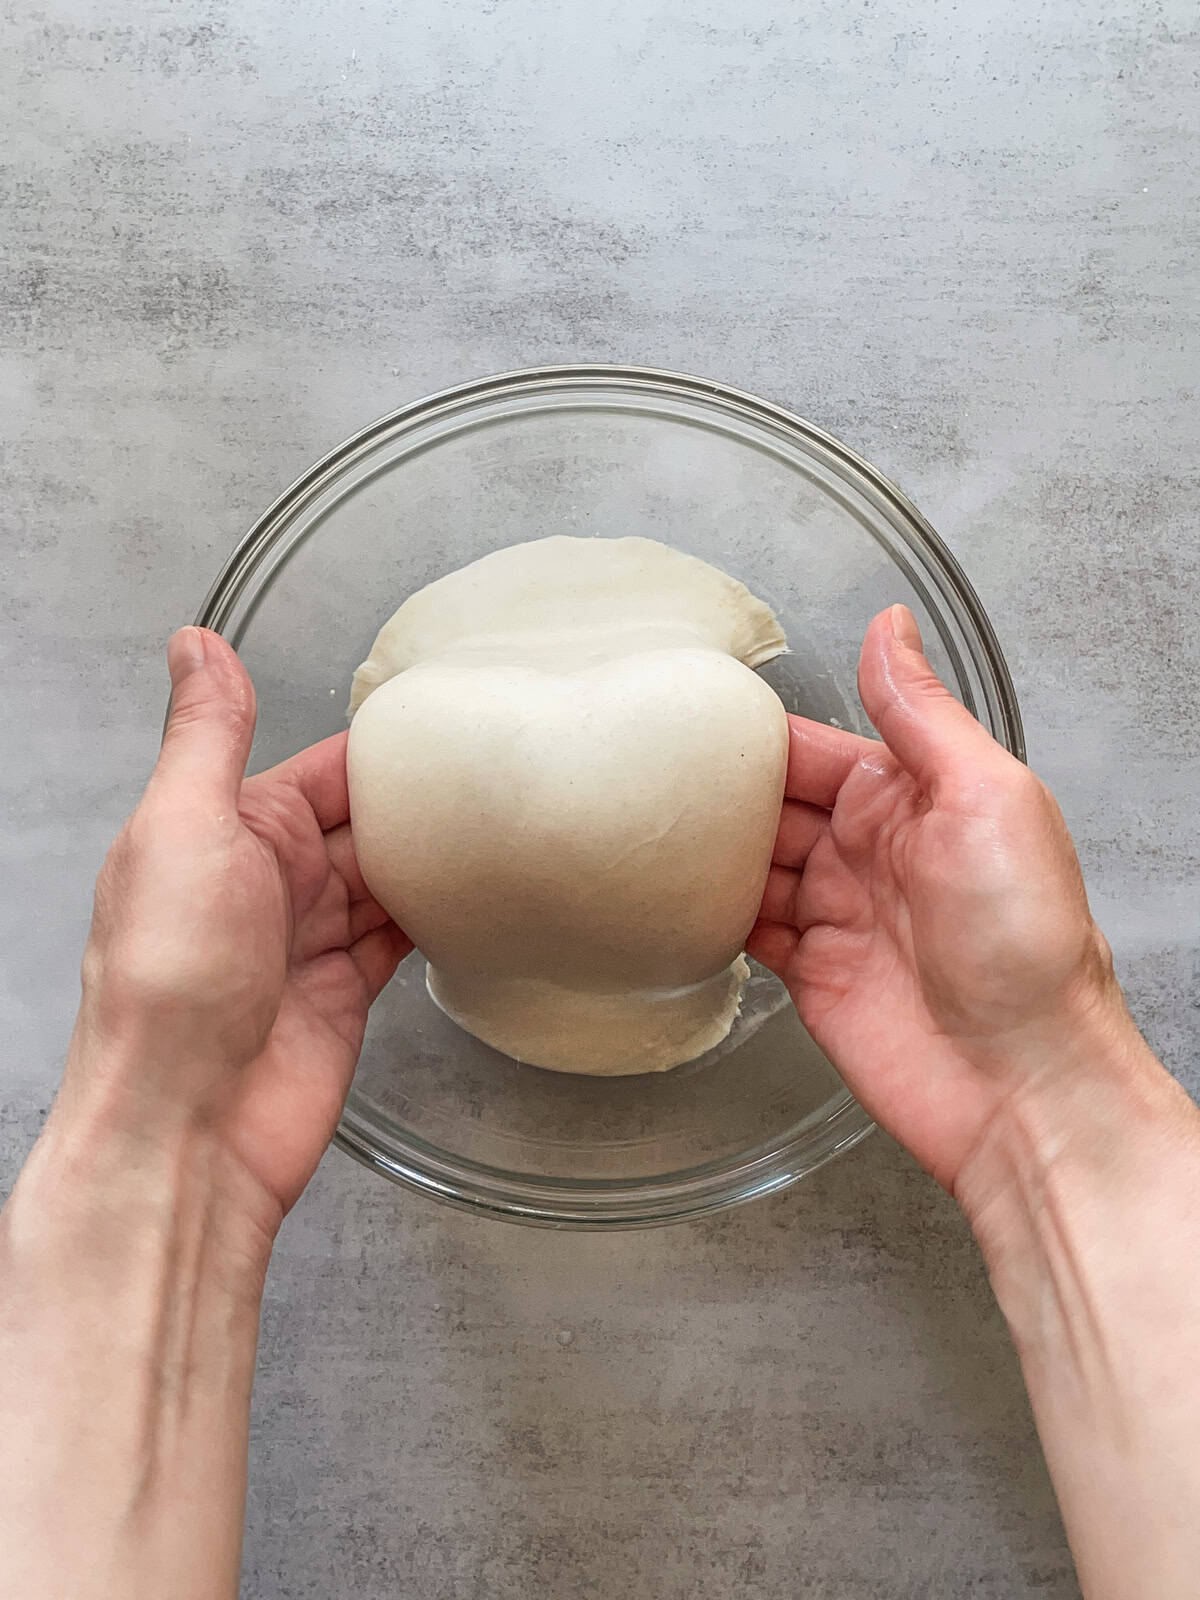
7. Preshape and bench rest
The dough is now ready for preshaping. You can do this with your hands or a bench scraper. Refer to the blog post about how to preshape sourdough.
Lightly flour your work surface with white rice flour. Flip the mixing bowl upside down and let the dough slide out. If needed, use your hand to help.
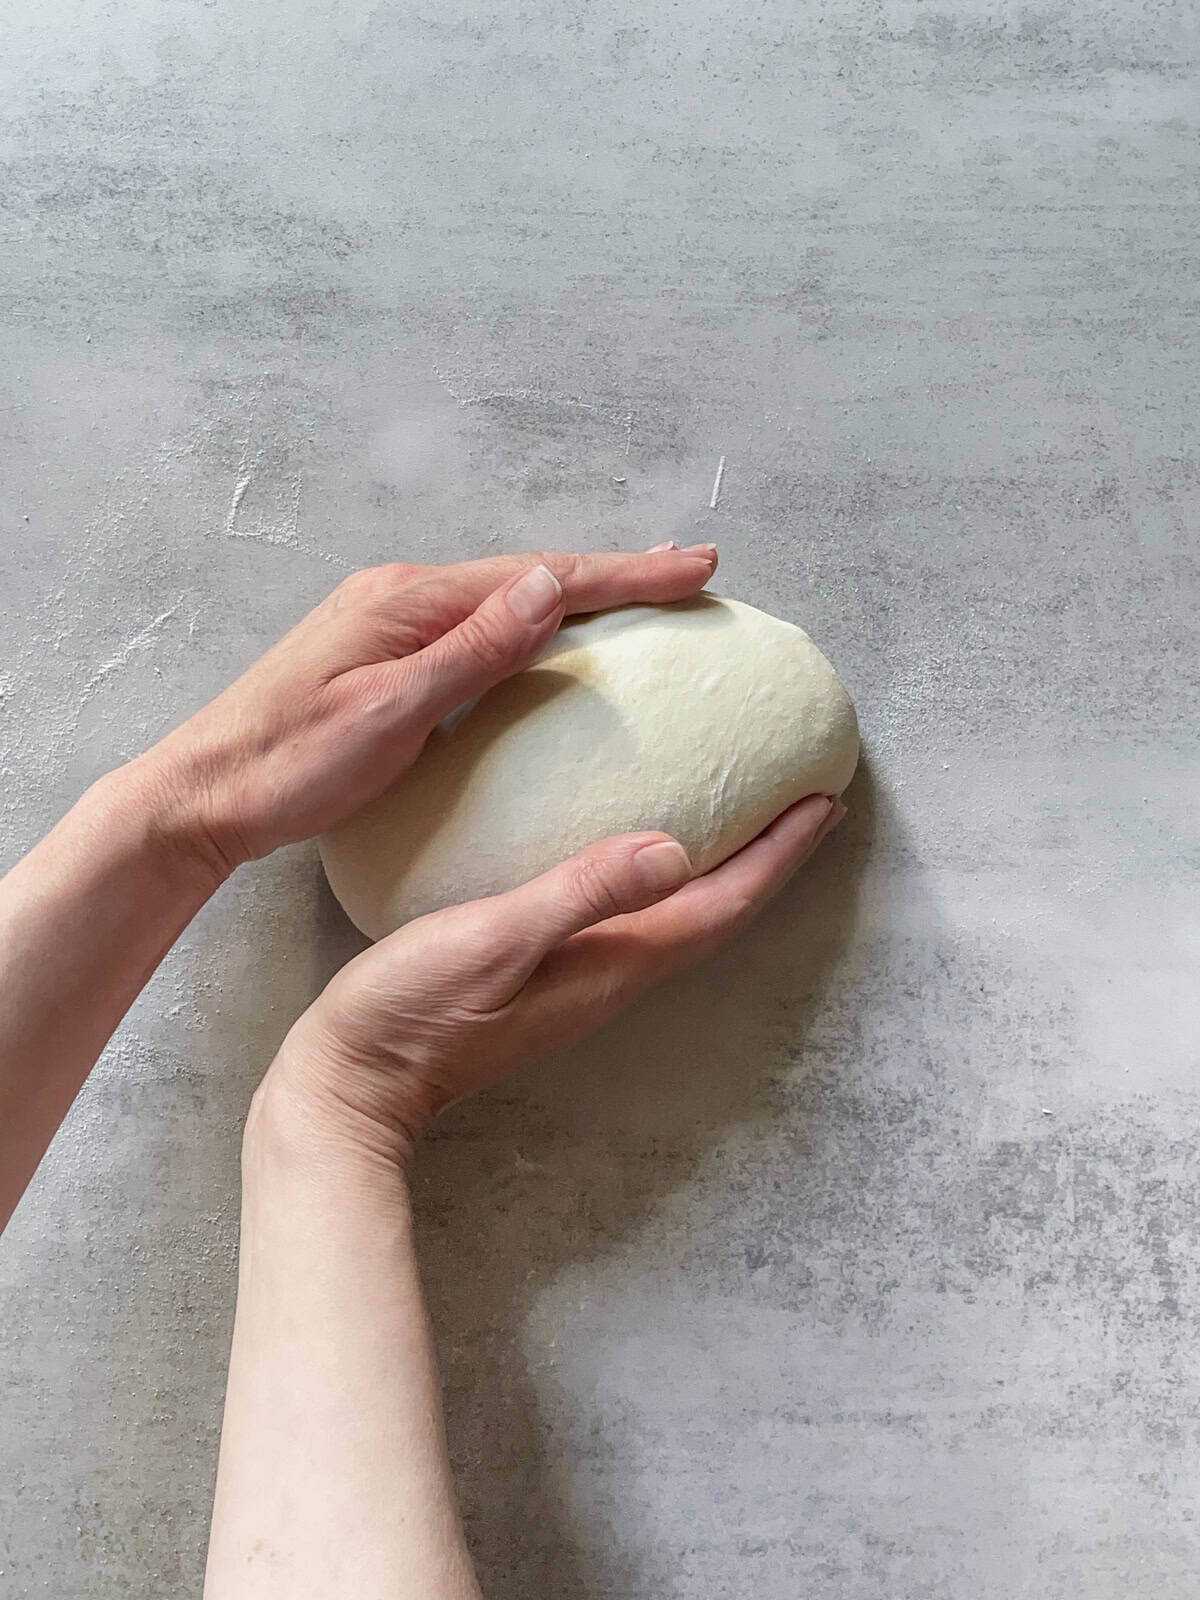
Fold the dough in half, then use both hands to gently pull it away from you, creating tension on the surface.
Rotate the dough a quarter turn.
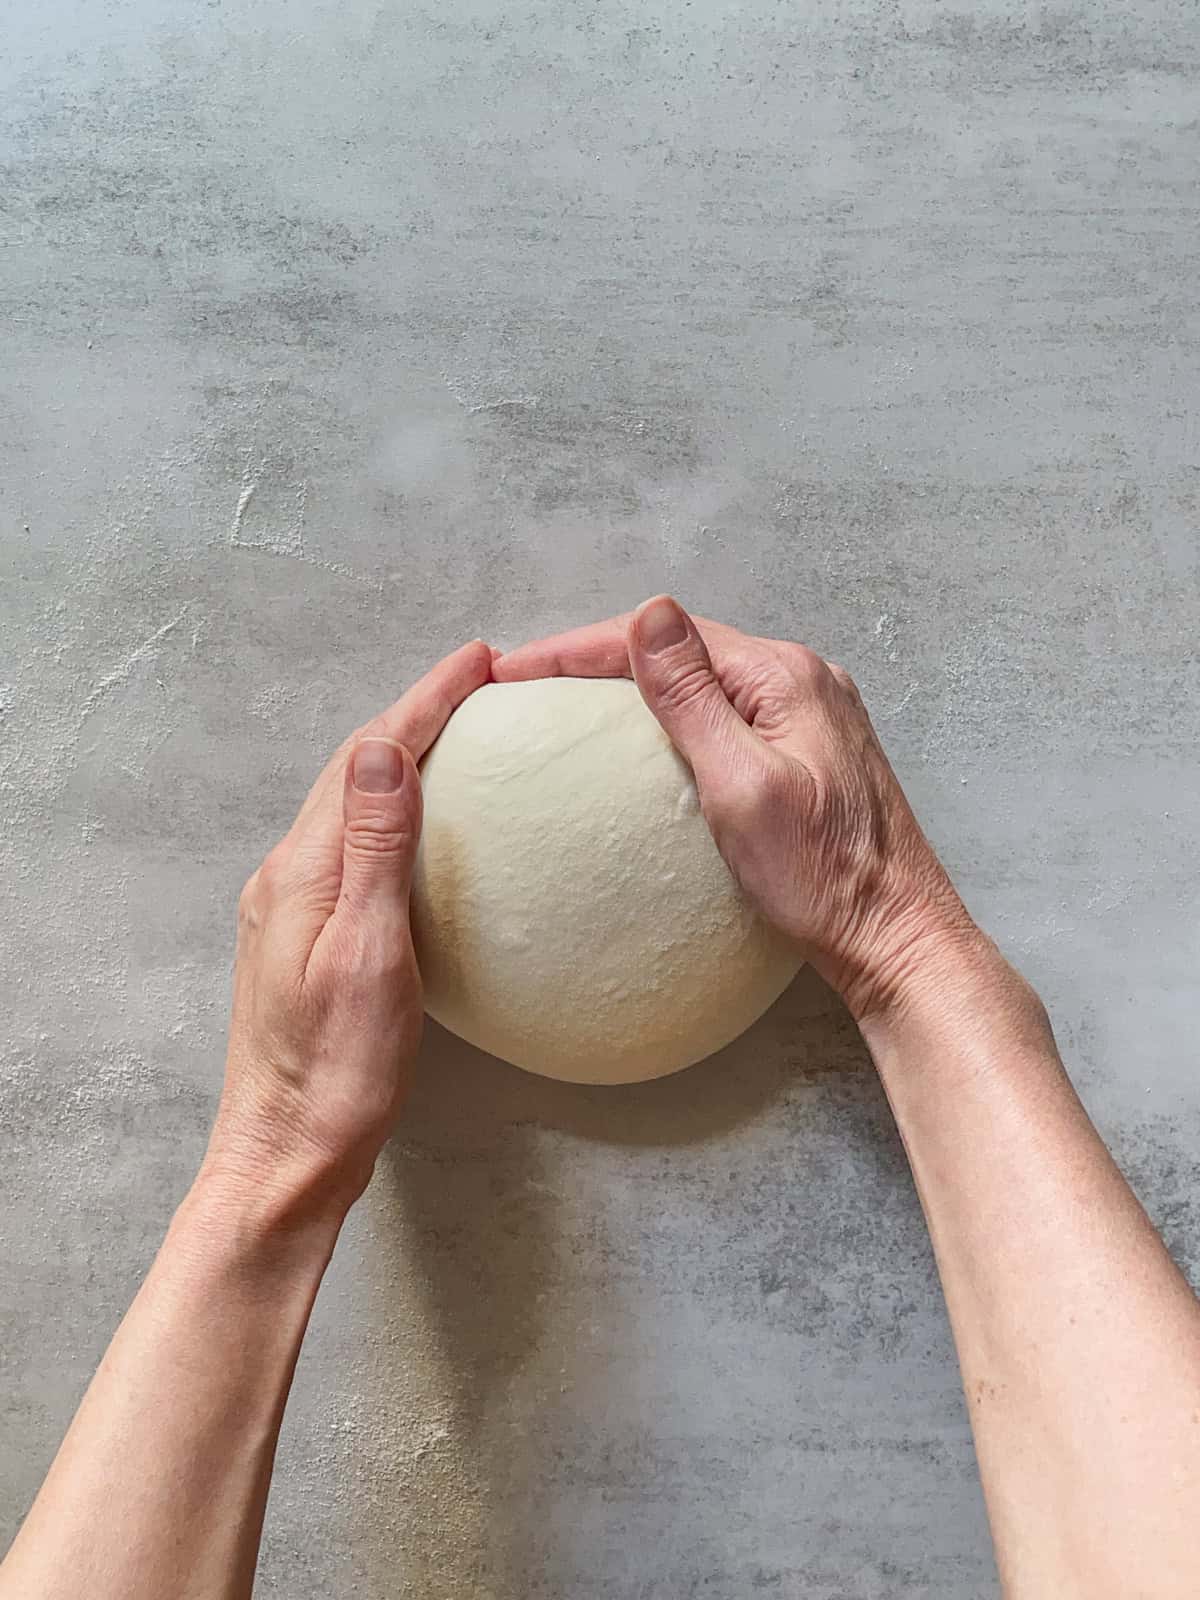
Gently push the dough back toward you, tucking the edges underneath.
Cover the dough with a clean tea towel and let it rest for 15 minutes. While it rests, prepare a 10-inch (25 cm) banneton with a liner or line it with a clean cotton towel and dust it with white rice flour.
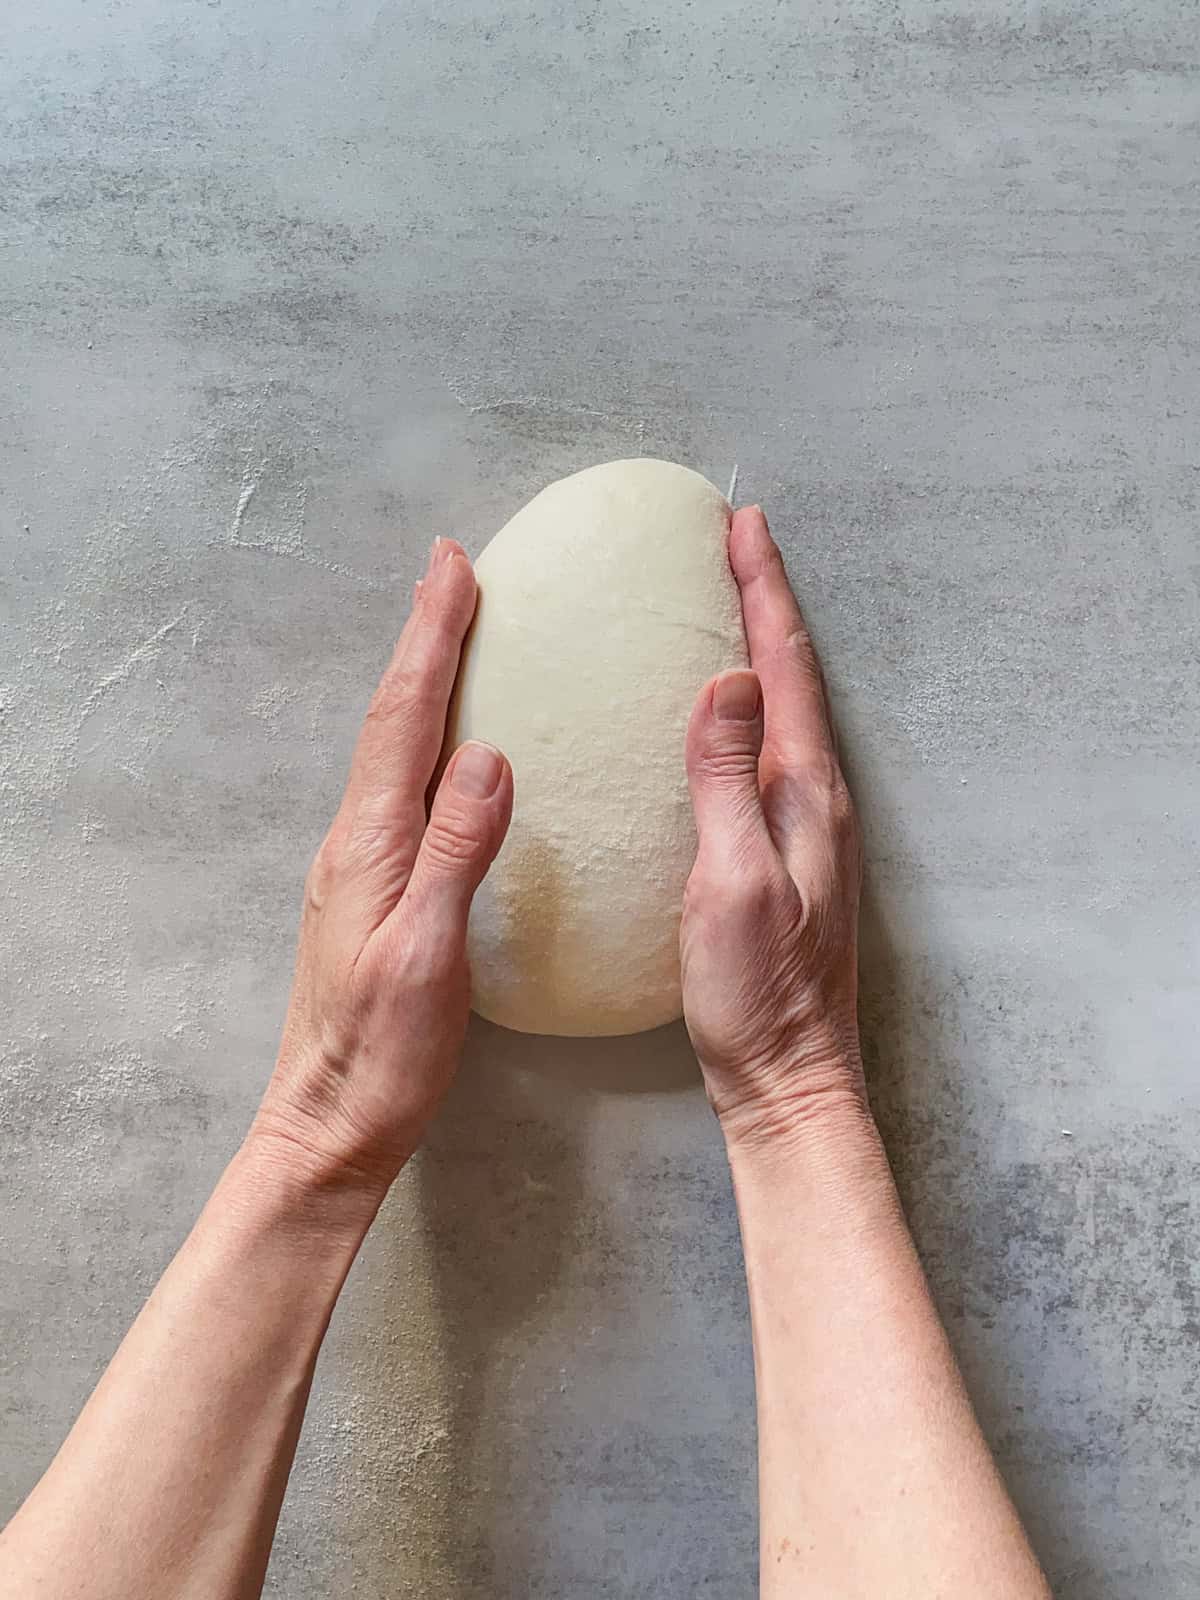
8. Shape the dough
After the dough rests, sprinkle some rice flour on your work surface and the top of the dough. Use a bench scraper to flip the dough so the floured side is down and the sticky side is up.
Next, flatten the dough into a roughly rectangular shape. Use one of the bread dough shaping techniques to shape a boule or a batard.
Here is how to shape a batard:
Lift the left side of the dough, fold it toward the center, and press gently to make it stick.

Lift the right side of the dough, fold it to the center.
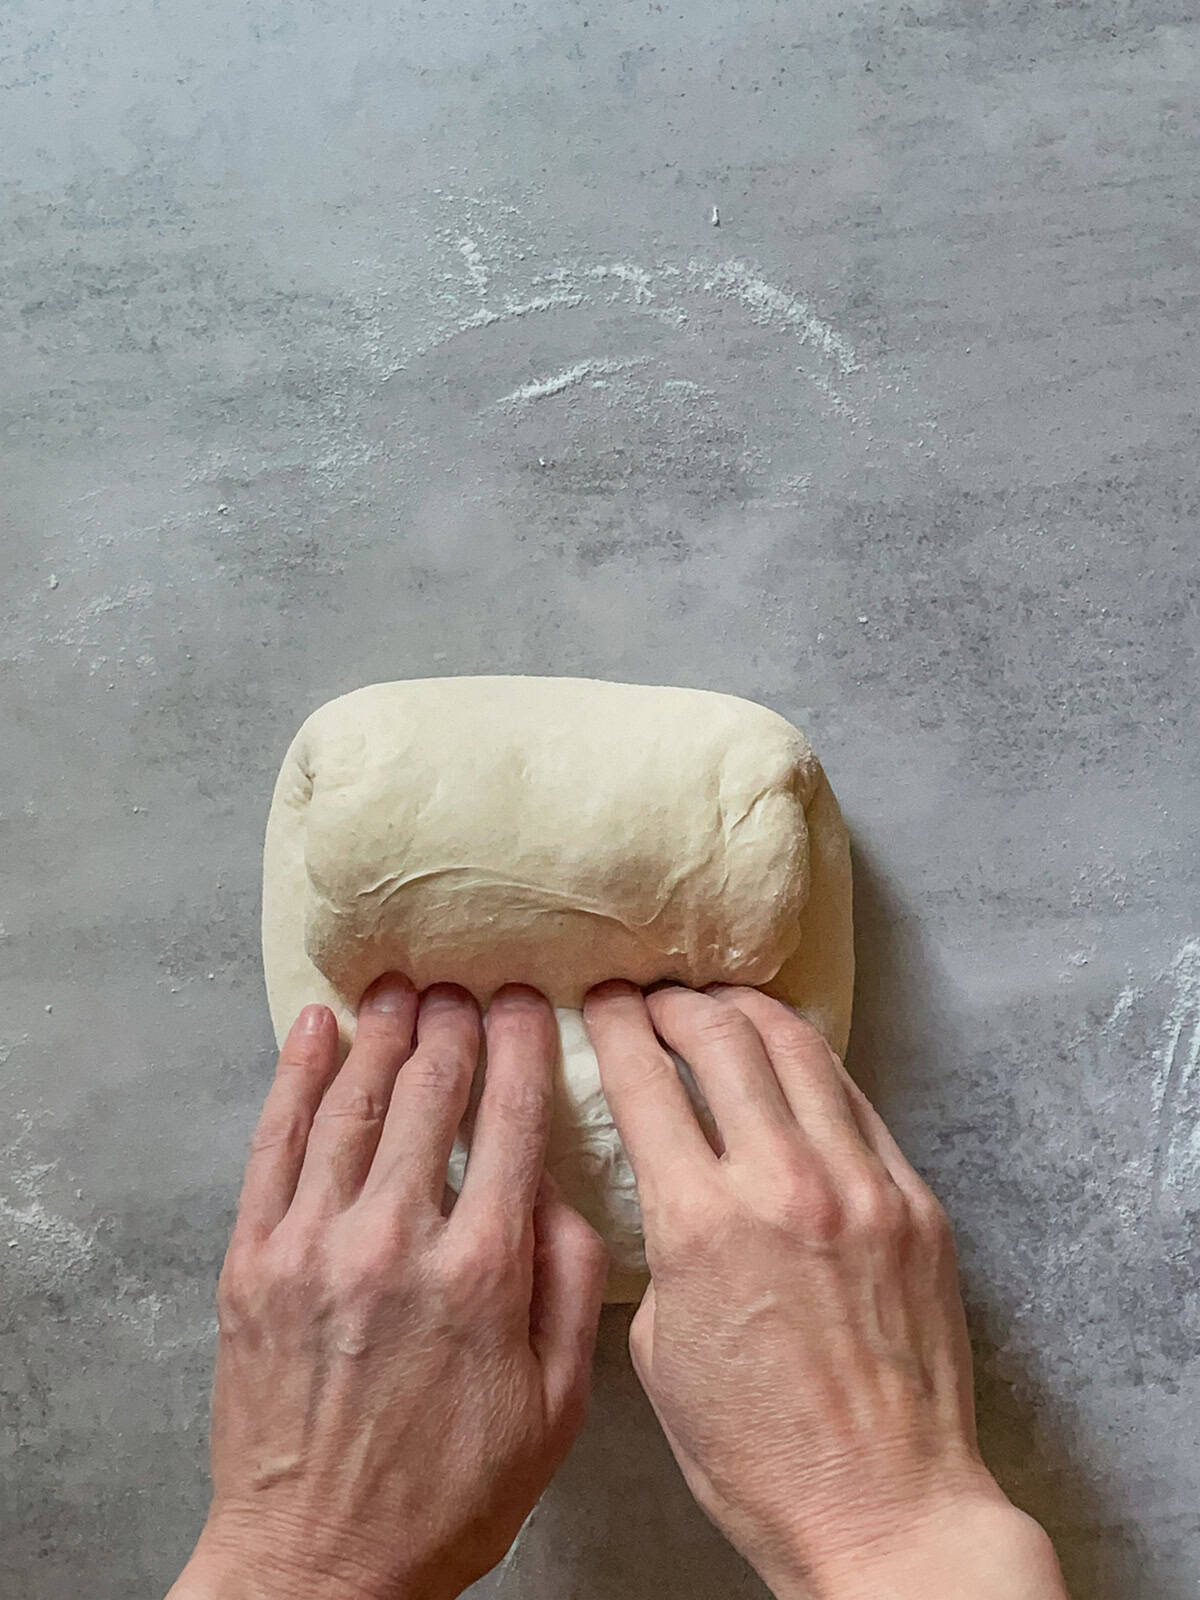
Gently pull the top of the dough toward you and roll it tightly from top to bottom, pressing lightly to create a smooth, firm surface.
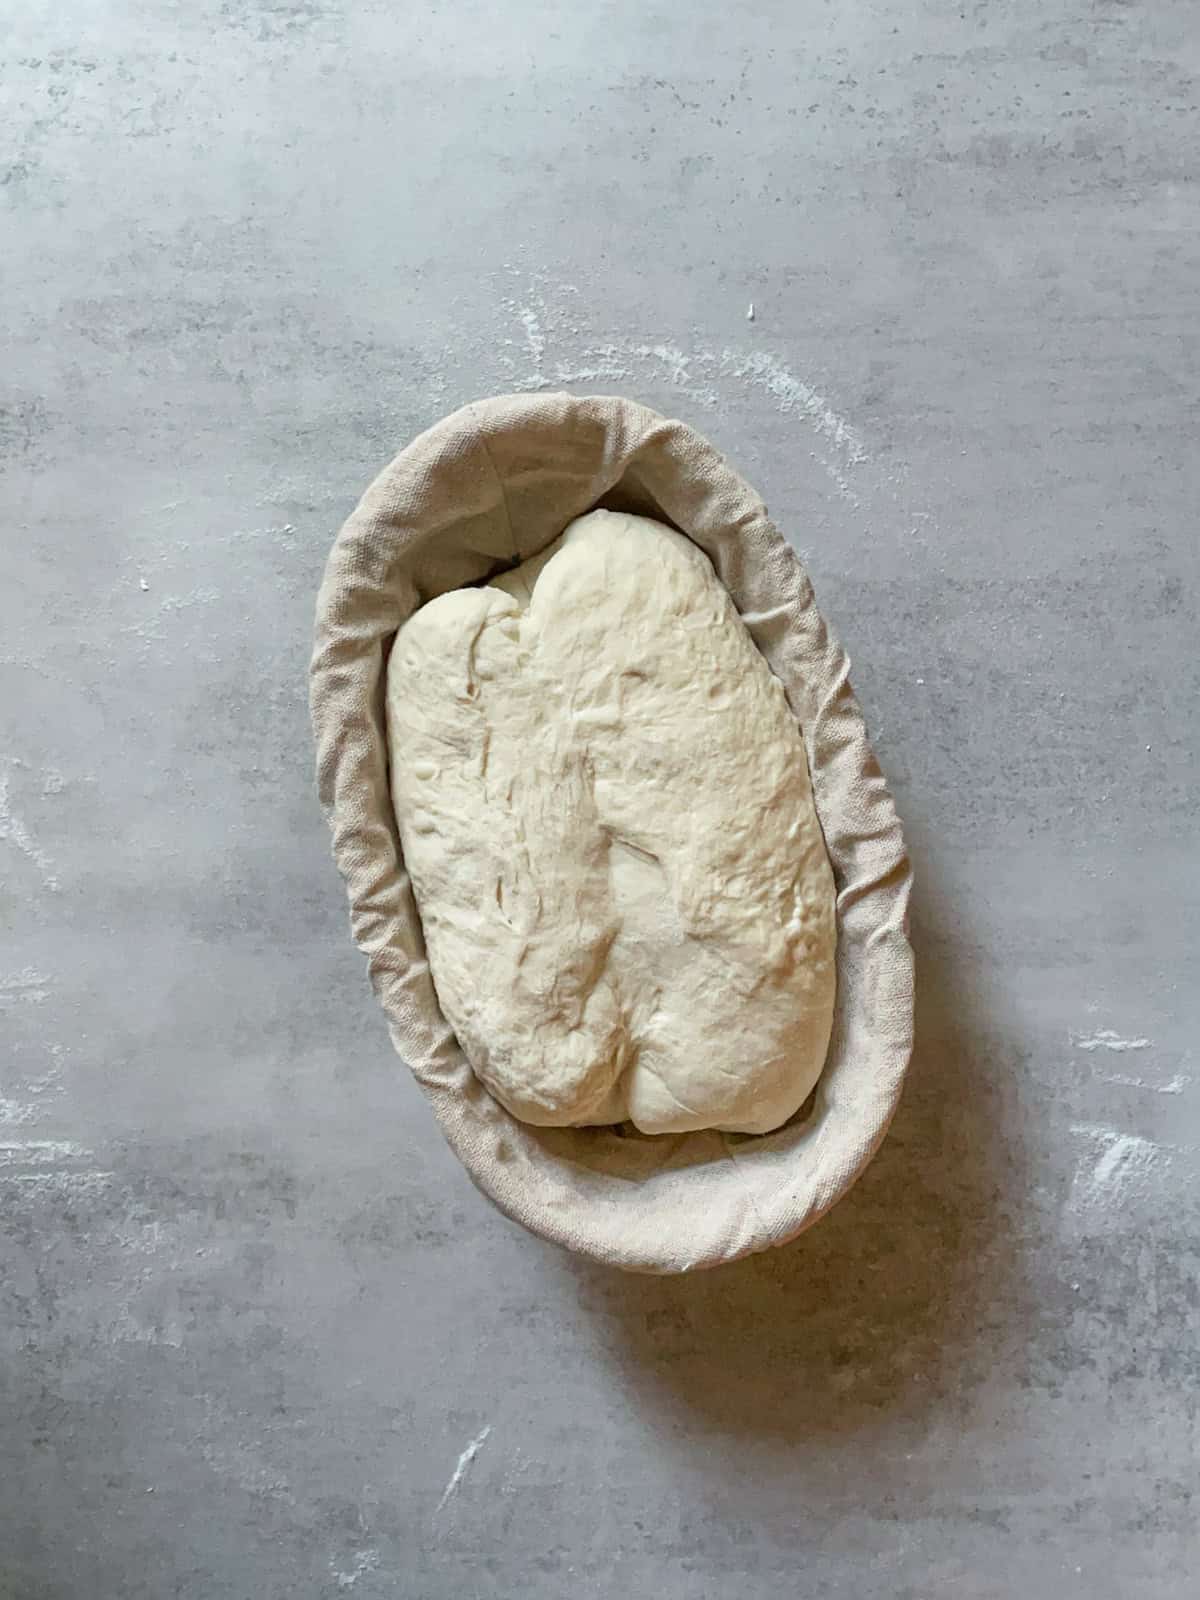
Place the shaped dough seam-side up in the prepared banneton. If needed, pinch the edges toward the center to help them stick.
To allow the bottom to seal naturally, so you won't need to pinch it, let the shaped dough sit on the work surface for 2-5 minutes. Then transfer it to the banneton.
9. Cold retard
After placing the dough in the banneton, sprinkle it with rice flour. Cover it with a towel or plastic bag, or leave it uncovered and refrigerate at 39°F (4°C) overnight (at least 8-10 hours). Leave it in the fridge for 12-48 hours for a tangier flavor.
10. Prepare the dough and score
The next day, place the Dutch oven and its lid on the middle rack of the oven and preheat to 500°F (260°C) for 25-30 minutes.
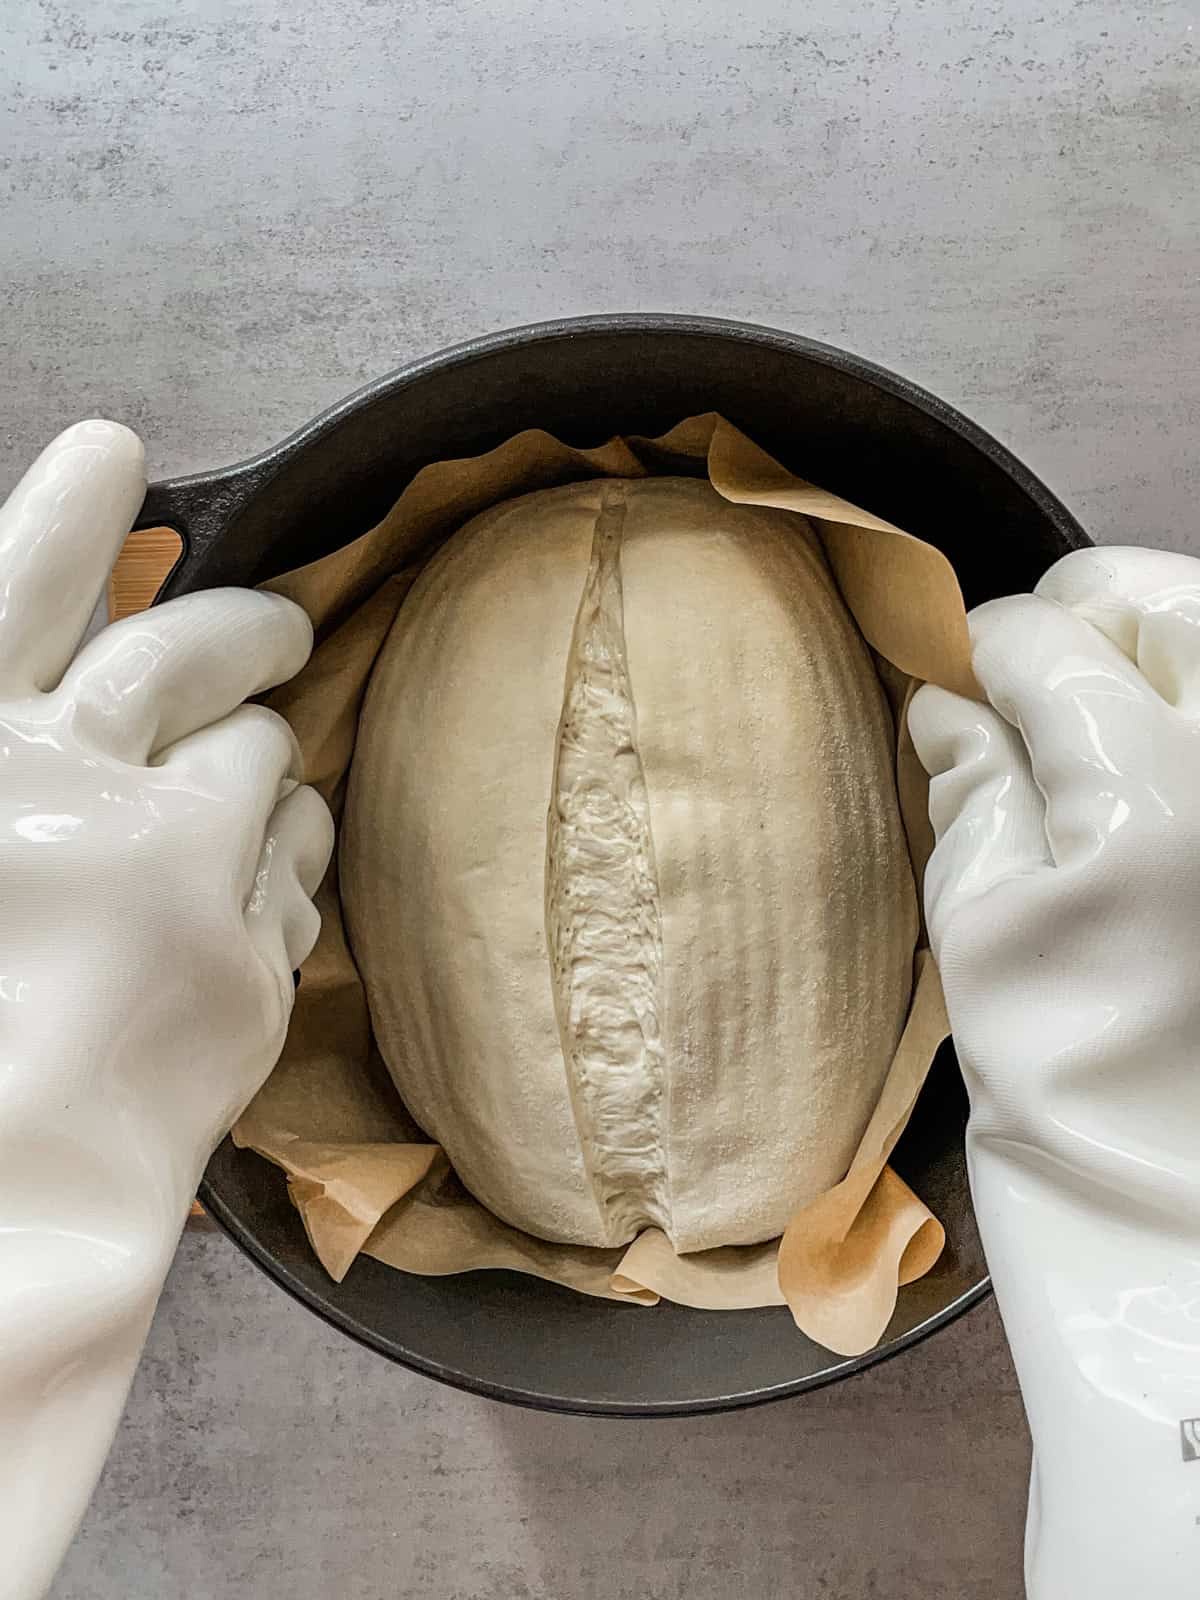
Cut a piece of parchment paper big enough to lift the loaf into the Dutch oven by the edges. Remove the banneton from the fridge.
Remove the banneton cover and place the parchment paper on top of the dough. Put one hand under the banneton and the other on top.
Carefully flip the banneton upside down, then use your hands to gently place the dough on the parchment paper, with the bottom of the dough facing up.
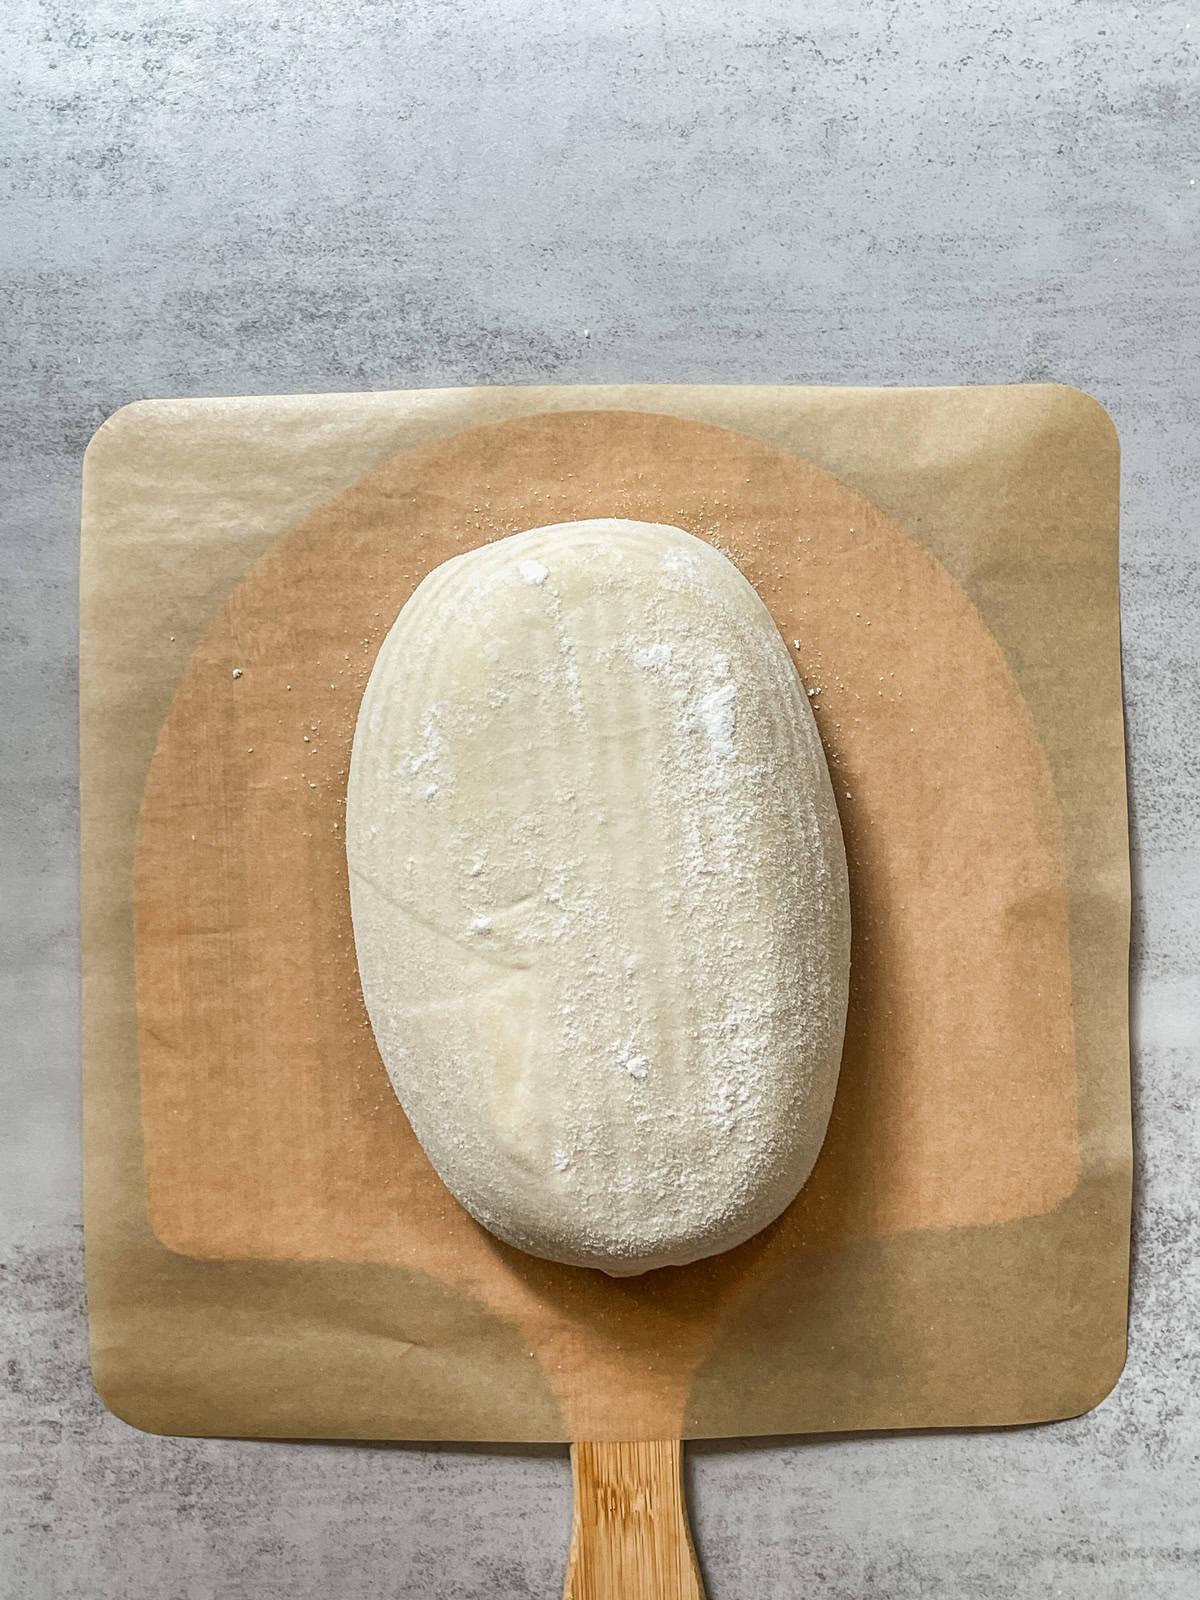
Then, place the parchment paper with the dough onto the work surface.
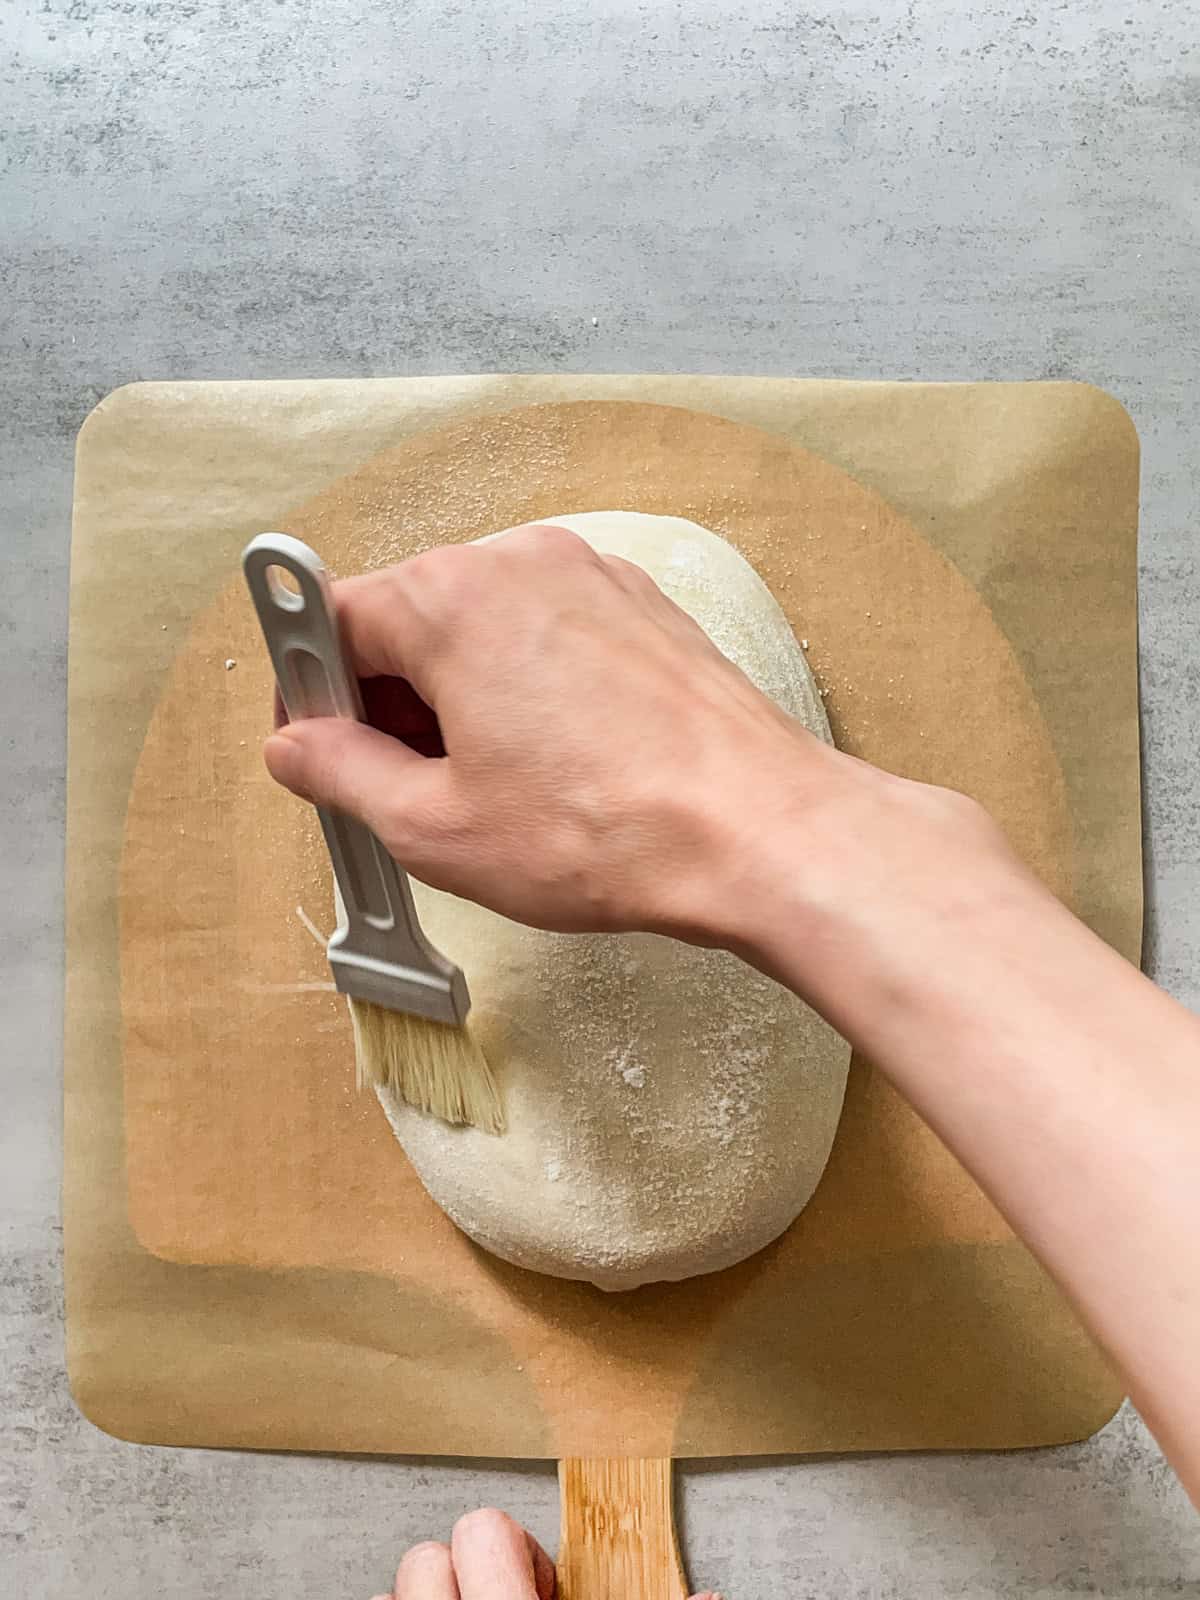
Brush off the white rice flour with a pastry brush.
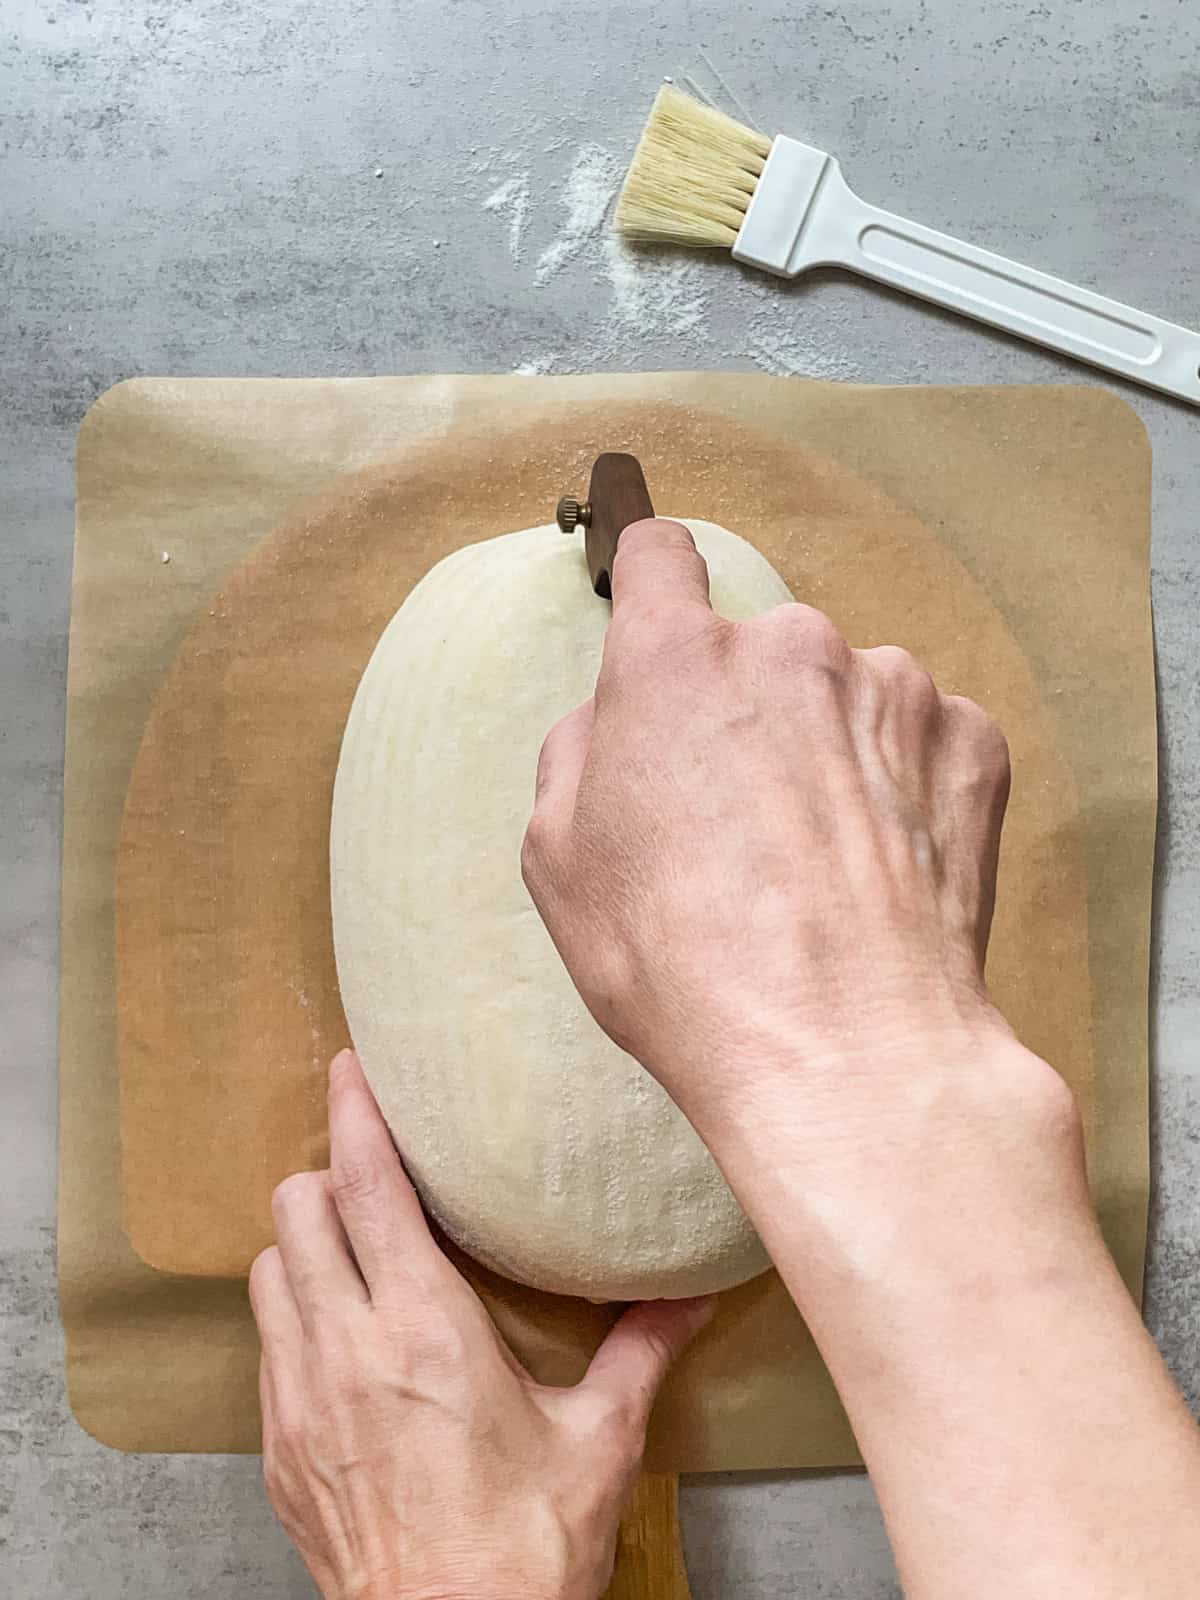
Score the dough using a bread lame or a clean razor blade (be careful!).
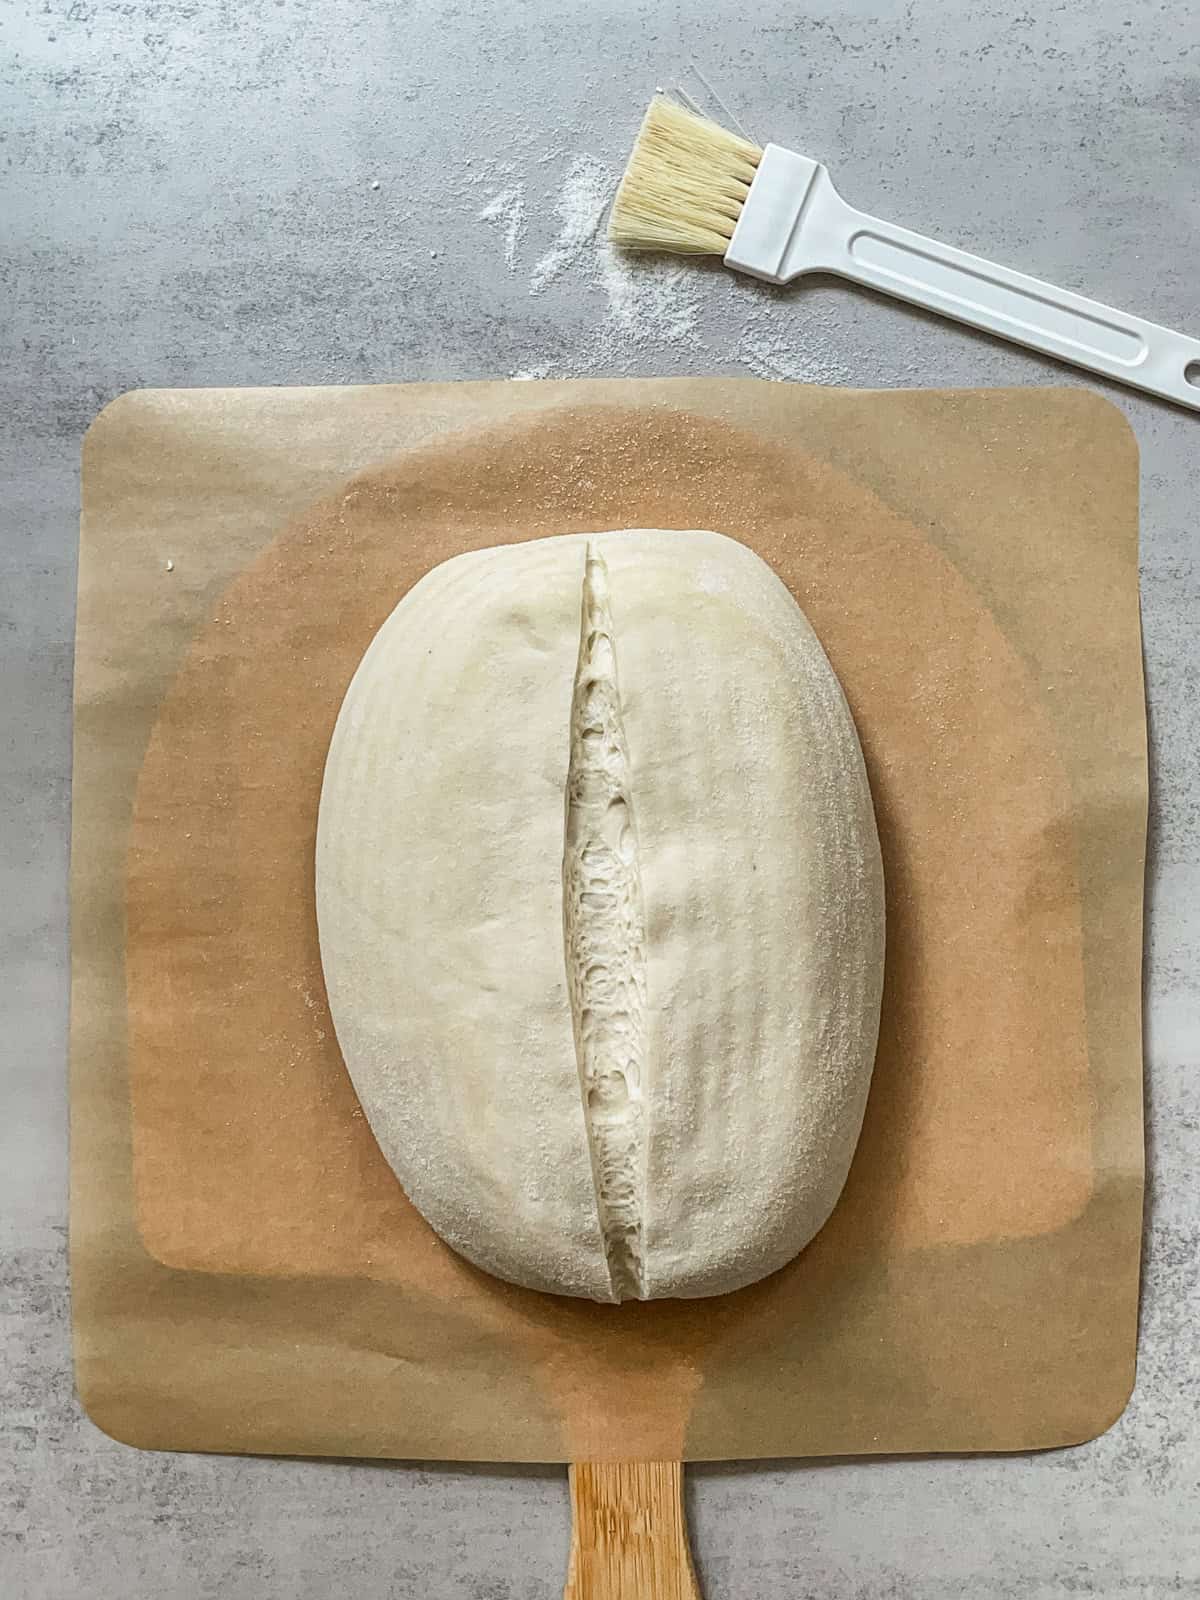
Make a single slash for a batard.
For a boule, score two slashes in an X on top. Refer to the sourdough scoring blog post for more options.
11. Bake bread
Put on oven mitts and carefully open the oven. Take out the hot Dutch oven and place it on a trivet. Close the oven to keep the heat inside.
Hold the parchment paper by two opposite sides, stretch it slightly, and gently lower the bread into the pot.
Open the oven, place the lid on the Dutch oven, and return it to the oven. Reduce the temperature to 450°F (230°C) and bake for 20 minutes with the lid on.
After 20 minutes, put on oven mitts, carefully open the oven, and remove the lid (be careful of the steam!). Close the oven and bake for another 17-20 minutes.
After baking for 17-20 minutes, check the bread's color. If it appears too pale for your liking, bake for an additional 2-3 minutes until it reaches your preferred color.
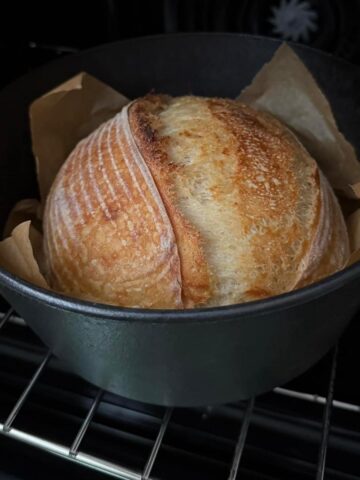
This is what the dough looks like in a preheated Dutch oven before baking.
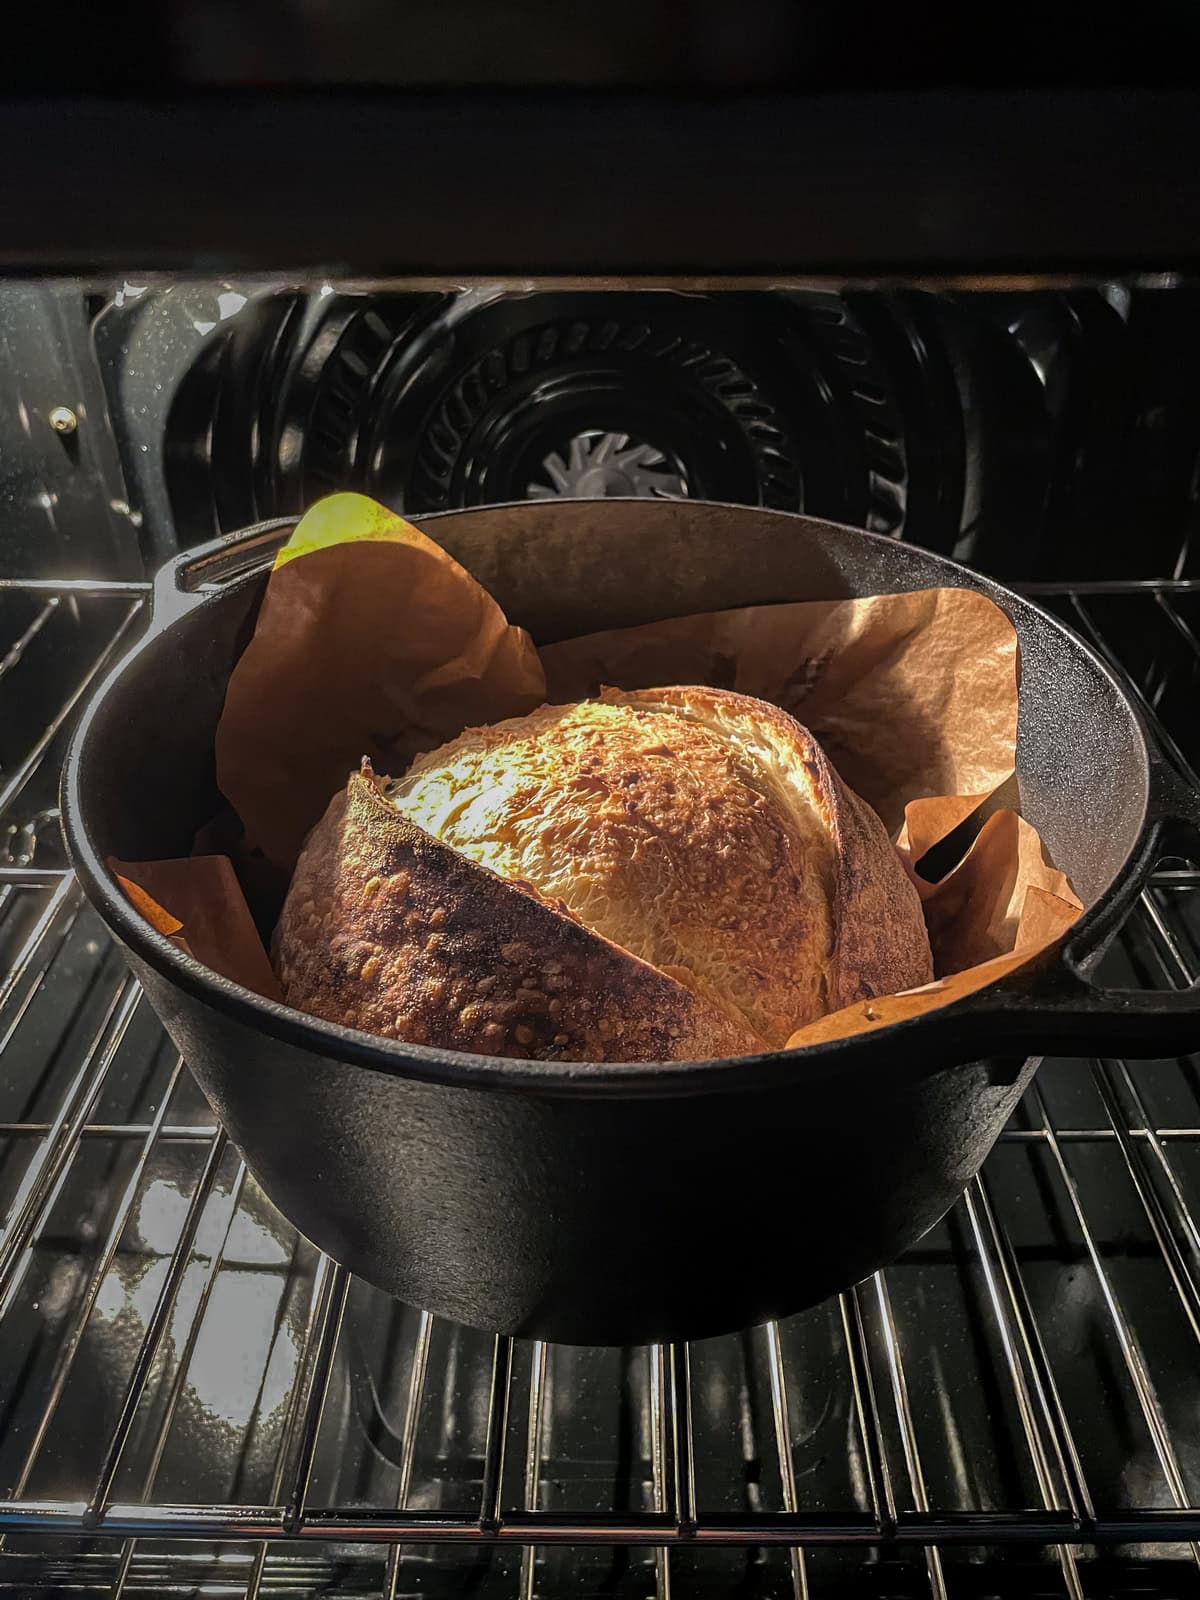
This is how the dough looks at the end of baking, still in the oven.
Remove the Dutch oven with oven mitts and place it on a trivet. Check the bread's internal temperature: it should be 205-210°F (96-99°C). I usually aim for 207°F (97°C) or higher.
If you are using a round or oval Granitware roaster, preheat the oven, but don't preheat the pan.
Place the dough in the cold pan and put it on the middle rack of the oven. Bake the bread at 450°F (230°C) for 20 minutes with the lid on, and 17-19 minutes with the lid off.
During the second baking phase, keep an eye on the bread, as you may need to reduce the baking time slightly.
12. Cool on a rack
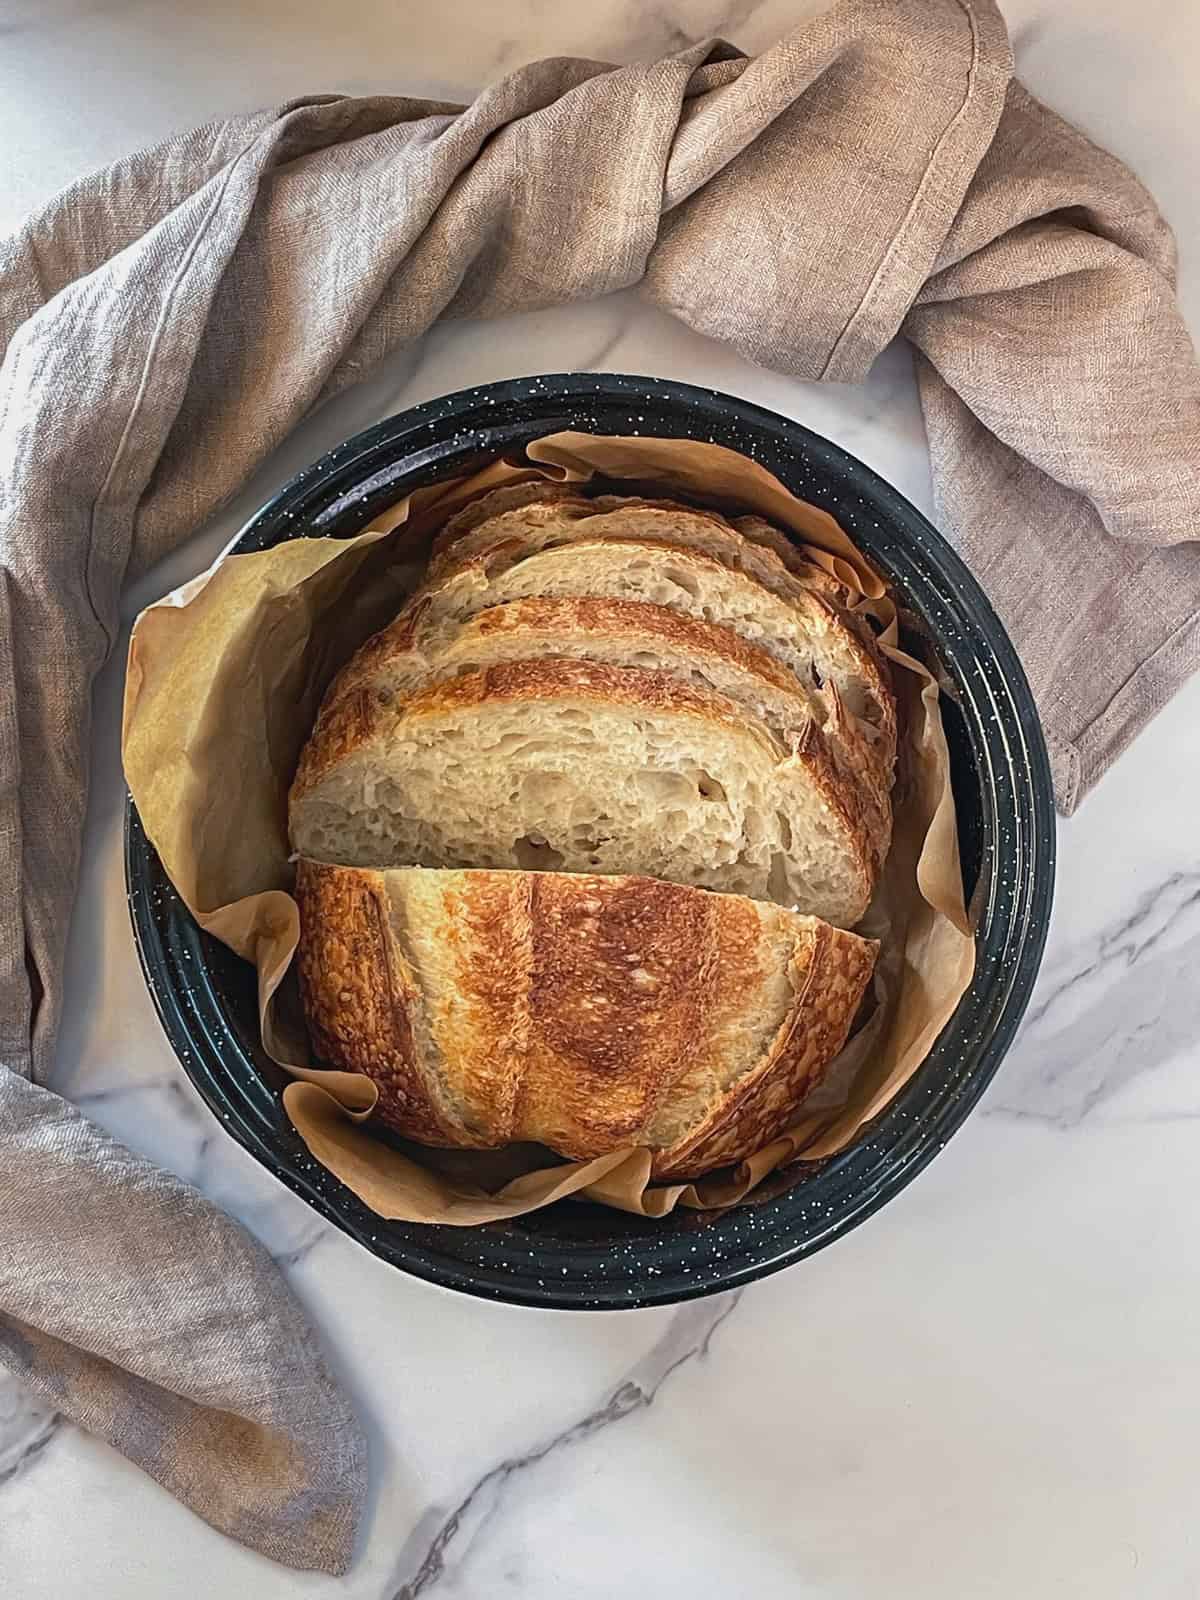
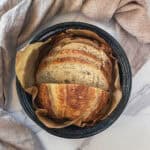
Wearing oven mitts, carefully remove the bread from the pot and transfer it to a cooling rack. Let the loaf cool for at least 2 hours before slicing. This step is important for the crumb to set. Once cooled, grab a bread knife, slice, and enjoy!
FAQ
Can I make this recipe in one day instead of overnight? Yes. Build the levain in the morning, mix and bulk ferment through the day, then proof on the counter for 2-3 hours, depending on room temperature, and bake. The overnight step is the cold proof, not the whole recipe.
Can I use all-purpose flour instead of bread flour? Bread flour is strongly recommended here for its higher protein and strength. All-purpose works but gives a slacker dough and less rise, so reduce the water slightly if you use it.
This recipe uses 400g of flour - how do I scale it up? The baker's percentages stay the same; just change the flour weight. Use my sourdough bread ratio calculator to rebuild the formula for a larger loaf or multiple loaves.
Do I have to use an aliquot jar? No, but it is the most accurate way to track the rise. You can also mark your main container or judge by visual cues (a domed top, bubbles, or jiggle). See the aliquot jar method.
How long can I cold-proof the dough? At least 8 to 10 hours, and up to 48 hours for a tangier flavor. The longer the cold proof, the more pronounced the sourdough taste.
Why preheat to 500°F but bake at 450°F? The high preheat builds up heat in the Dutch oven. Dropping the oven temperature to 450°F once the dough is in accounts for the heat lost when you open the oven and gives a strong oven spring without burning the crust.
Congratulations on your first master loaf!
You are officially on your way to mastering sourdough baking. This journey takes time and practice, and no two bakers progress at the same pace.
Some bakers feel proud of their loaves within weeks, while others spend years perfecting their skills, and that is perfectly normal. Try not to focus on mistakes, but don't be hard on yourself.
Sourdough baking is more than just making bread. It is a journey, a creative outlet, and for many, a form of therapy. Most importantly, it should be fun.
Keep practicing this recipe until it feels familiar and natural. Remember, perfect sourdough isn't just about the ingredients. It is about technique, observation, and experience.
Enjoy every bake and learn from each loaf. Each one teaches you something new and brings you closer to the baker you want to become.
Visit the website anytime for more tips, guidance, and troubleshooting help. Subscribe to the newsletter for ongoing learning, and if you ever need support, don't hesitate to reach out. I'm just a comment away.
Ready to keep learning?
Once you have baked your first master loaf, learn how to adjust bulk fermentation to match your kitchen conditions and dough.
PrintRecipe
Best Homemade Sourdough Bread Recipe
Discover the best homemade sourdough bread recipe with easy, step-by-step instructions and photos. Learn how to bake your perfect loaf of sourdough bread with helpful tips and tricks.
- Prep Time: 20 hours, 40 minutes
- Cook Time: 40 minutes
- Total Time: 21 hours, 20 minutes
- Yield: 10 slices 1x
- Method: Baking
- Cuisine: American
Ingredients
For the levain (an active starter):
- 30 g sourdough starter
- 30 g bread flour
- 30 g water
For the bread dough:
- 400 g bread flour (I use King Arthur organic bread flour)
- 300 g water (75% hydration)
- 80 g levain (active starter at peak)
- 8 g fine sea salt (I use Redmond ancient fine sea salt)
10 g white rice flour (for dusting)
Instructions
- Make a levain (an active starter): Feed the "mother" starter in the morning at a 1:1:1 ratio (30g starter, 30g flour, and 30g water), and wait 4-6 hours for it to peak.
- Fermentolyse: In a mixing bowl, combine 285g of water (the remaining 15g is set for the next step) and 80g of levain (active starter) and mix with a Danish dough whisk. Add 400g of bread flour by hand and mix for 2-3 minutes until it forms a shaggy mass and no dry flour remains. Cover the bowl with a clean tea towel or a plastic cap and let it rest at room temperature for 30 minutes. Bulk fermentation begins once the starter is added.
- Add salt: Sprinkle the salt over the dough, then pour in 15g of water (this is the water you saved from the fermentolyse step). Use the pinch and fold mixing technique to mix the dough. It takes 3-4 minutes.
- Next, mix the dough using the Rubaud method to strengthen the dough and develop the gluten. Mix the dough using this technique for 2-3 minutes, then let it rest for another 2-3 minutes. Repeat this process a couple of times more.
- Set up the aliquot jar: Place it on the scale and tare it to zero. Take a piece of dough, place it in the container, and weigh 36 g (in my case, your amount may vary). Close the jar and set it next to the main dough. Shape the dough into a ball with your hand, cover the bowl, and let it rest at room temperature for 30 minutes.
- Stretch and fold sourdough: With wet hands, reach underneath the dough and pull it upwards, then fold it on top. Turn the bowl 90 degrees and repeat the process. Do this in all four directions (like a compass or a clock) for a total of four folds. Check the dough temperature with a probe thermometer, and record it. Cover the bowl and rest for 30 minutes. Then, wet your hand again, and repeat the stretch and fold in all four directions. After that, check the dough temperature, cover the bowl, and let it rest for an additional 30 minutes.
- Coil fold sourdough: Wet your hands and lift the dough from the middle, letting the ends fold under. Turn the bowl 180 degrees and repeat the same fold. Then, turn the bowl 90 degrees and repeat the fold. Finally, turn it another 180 degrees and fold again. You will do four folds in total. Check the dough temperature, cover the bowl, and let it rest for 30 minutes. Repeat the set of coil folds one more time, then gently transfer the dough to a large measuring cup or a straight-sided container. Check the dough temperature, cover it, and let it rest at room temperature.
- Continue bulk fermentation: Keep measuring dough temperature every 30-40 minutes. Determine the target dough percentage rise. The percentage rise depends on dough temperature. Refer to Tom Cucuzza's bulk fermentation chart for guidance.
- Finish bulk fermentation: Look for a slightly domed top, large bubbles on the surface, smaller bubbles on the sides of the container, dough that easily pulls away from the sides, and jiggles when shaken. When the dough reaches the target rise in the aliquot jar, it is time for preshaping.
- Preshape the dough into a round. Lightly flour your work surface with white rice flour. Fold the dough in half, then use both hands to gently pull it away from you, creating tension on the surface. Rotate the dough a quarter turn and gently push it back toward you, tucking the edges underneath. Cover the dough with a clean tea towel or leave it uncovered for 15 minutes.
- Shape the dough: Lightly flour your work surface with rice flour. Turn the dough out onto the table and shape it into a batard. Prepare a lined 10-inch (25cm) banneton. Generously dust it with rice flour. Place the shaped dough into the prepared banneton, seam side up.
- Proof the dough: Cover it with a towel or plastic bag and refrigerate at 39°F (4°C) overnight, or for at least 8-10 hours. The longer the cold proof, the more pronounced the sourdough flavor will be.
- Score the dough: Remove the dough from the fridge. Flip it out of the banneton onto a piece of parchment paper. Use a pastry brush to remove any excess flour. Using a sharp bread lame, make a single slash.
- Bake the bread: Place your Dutch oven into the oven and preheat to 500°F (260°C) for 30 minutes. With the oven mitts on, transfer the dough to the Dutch oven, cover with the lid, and place it on the middle rack of the oven. Lower the temperature to 450°F (232°C) and bake for 20 minutes. After 20 minutes, use the oven mitts to remove the lid and continue baking for an additional 17-20 minutes, or until the crust reaches your desired color. Check the bread's internal temperature: it should be at least 207°F (97°C).
- Cool the bread: Let the bread cool on a wire rack for at least 2 hours before slicing it.
Notes
- Decide on folding: If you mixed well with the Rubaud method, go for 2-3 coil folds. If not, start with 2 stretch and folds, then finish with 2 coil folds.
- Safety tip: Always use oven mitts or silicone gloves to handle hot pans.
- Check for doneness: Your bread is fully baked when the internal temperature reaches 205-210°F (96-99°C). I usually aim for 207°F (97°C) or higher. Use a digital probe thermometer to check.
- Storage and freezing: Store sourdough bread at room temperature for 3-5 days. Freeze for up to 3 months. Thaw at room temperature. Freeze individual slices for up to 1-2 weeks, a whole loaf for 1-2 months.
- Want to create a custom formula for your loaf? Try my sourdough calculator.
- Need help getting started? Check out my beginner's sourdough bread guide to learn sourdough basics first.
- Note: Nutritional information does not include the white rice flour used for dusting.
Nutrition
- Serving Size: 1 slice
- Calories: 160.2
- Sugar: 0.1g
- Sodium: 312mg
- Fat: 0.42g
- Saturated Fat: 0.1g
- Carbohydrates: 33.6g
- Fiber: 1.2g
- Protein: 0.4g
- Cholesterol: 0mg
Jenny says
This is a great homemade sourdough bread recipe. Everything was explained clearly, and my loaf turned out really well. Thanks for sharing!
Irina Totterman says
Hello Jenny, Thank you! I'm so glad the recipe was easy to follow and that your loaf turned out well. Happy baking, and thanks for sharing your experience.