
Baking sourdough is more than just following recipes or charts. It is about understanding the process and perfecting your skills.
Every kitchen is different. Room temperature, your starter, and the ingredients you use all affect how your dough ferments. That is why it is essential to adjust bulk fermentation to fit your kitchen, rather than simply following what works for someone else.
After all, the sourdough bread recipe you are using was developed in someone's kitchen, not yours.
What makes your kitchen different?
Every kitchen is unique, and slight differences affect how your dough ferments.
Temperature
The temperature in your kitchen is one of the most important factors to monitor. If it is warm, your dough will ferment faster, while in a cooler kitchen, it will ferment more slowly. Bulk fermentation will struggle in a cold kitchen unless you plan to slow it down.
To adjust the process, you can use colder or warmer water. Use a water temperature calculator to determine the optimal water temperature for achieving the desired dough temperature.
Humidity
Humidity doesn't directly affect bulk fermentation, but it does affect bread dough by transferring heat from the air to the dough.
Humid air heats dough more quickly than dry air, but once the dough and room temperature are the same, humidity no longer affects fermentation. The dough temperature, not humidity, influences bulk fermentation.
High humidity affects the sourdough hydration, though. Flour stored in a humid environment absorbs excess moisture from the air, changing the dough hydration once mixed. When using such flour, adjust the amount of water you add to your dough to compensate for the extra moisture.
Sourdough starter ingredients
The flour and water used for your starter also make a significant difference. Some people use bread or all-purpose flour, while others add some whole wheat or rye flour.
Different types of flour and water quality affect how the starter develops (see my guide on sourdough starter ingredients). In the end, no two starters are exactly alike.
Sourdough bread ingredients
The flour and water you use for your bread dough also affect the bulk fermentation process. For example, bread flour contains more protein than all-purpose flour, which helps the gluten develop more effectively (see my guide on sourdough bread ingredients).
Moreover, the same brand of flour sold in different states of the US can differ. For example, King Arthur Company uses different mills across the country. So, their bread flour, purchased in Florida, may vary from that purchased in Maine.
The type of water also makes a difference, as hard or soft water affects how the dough absorbs moisture. Hard water, which contains more minerals such as calcium and magnesium, makes it harder for the dough to absorb moisture. Soft water, with fewer minerals, lets the dough absorb moisture more easily.
Seasonal changes
As the seasons change, so do the conditions in your kitchen. Winter brings cooler and drier air, while summer is warmer and more humid.
These changes impact how your dough ferments, and you will need to adjust the amount of sourdough starter used and the bulk fermentation accordingly (see my guide on how temperature affects sourdough).
Climate
If you live in a hot, tropical area or a cold, dry region, the climate can significantly impact bread dough. Warm, humid climates will cause your dough to ferment faster, while cool, dry climates will cause it to ferment more slowly.
How to adjust bulk fermentation for your kitchen
The struggle with bulk fermentation is real!
However, if you maintain the same kitchen conditions, such as a steady room temperature, the same starter, flour, and water, and a consistent dough temperature (read about the desired dough temperature), you can fine-tune your bulk fermentation and make it work every time.
This helps you create a sourdough routine that fits your kitchen, until one of those conditions changes.
Tom Cucuzza's bulk fermentation chart is a great starting point. It is a data-informed method that helps guide your sourdough process, but as he notes, "The guidance is at the low end of the range." This means there is room for adjustment and improvement.
Still, developing what bakers call "intuition" takes time and lots of baked loaves. You will learn to recognize the end of bulk fermentation by sight, feel, and, if you want, sound. Smile. Look for:
- Increased dough size
- Bubbles on the dough surface and the sides of the container
- A domed top with rounded edges
- A gentle jiggle when you shake the bowl
But how do you move from following a chart to trusting your own baker's intuition?
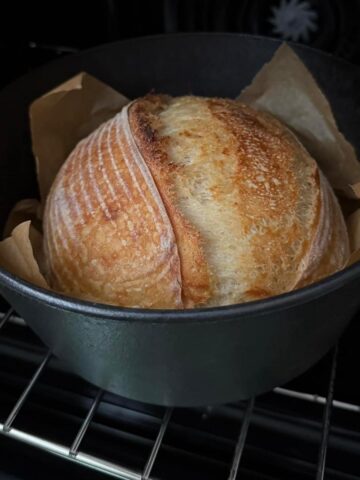
Start by baking my Master Sourdough Bread recipe. Track dough temperature and use the aliquot jar method to monitor bulk fermentation. When your dough hits the target percentage rise, move to preshape. Then bake, cool, and slice.
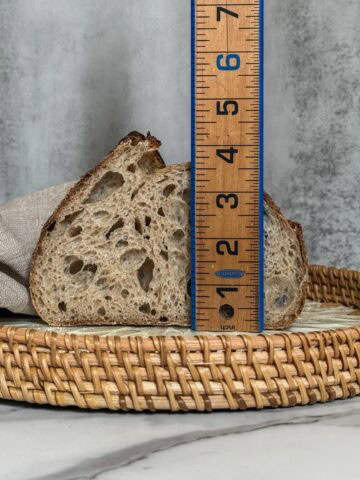
This is where the real learning begins. Read the crumb. Is your loaf underproofed? Add 10% to your target rise next time. Still under? Add another 10%.
If it is overproofed, decrease your target rise by 10%. Eventually, you may tweak by just 5%. And that's fine; this is your way of dialing in your bulk fermentation.
Once you find the sweet spot that works for your kitchen, starter, and dough ingredients, you have locked your fermentation process. And that is a win.
How to fine-tune bulk fermentation with the float test
Many sourdough enthusiasts use the float test to indicate when bulk fermentation is complete. While some bakers argue that the float test is not 100% reliable, it can still help you get started.
The float test indicates when bulk fermentation is likely to be near complete. If a small piece of dough floats in water, that means enough CO₂ has been produced and trapped in the dough's gluten structure, making it less dense than water.
Think of it like this: More gas = lighter dough = floats. Less gas = dense dough = sinks.
Once a piece of dough floats, it means your dough is likely ready or close to being ready for preshaping. When baked, your bread may be slightly underproofed, but it will still be decent and edible.
Let's say you have made my Beginner's Sourdough Bread recipe, which uses the float test to determine when bulk fermentation ends.
Can you continue baking your sourdough bread using this recipe? Yes, you can, but I would still suggest fine-tuning your bulk fermentation.
Start by using the float test to check when the dough seems ready. With a positive float test, proceed to pre-shaping and shaping the dough. Let it cold proof and bake. After baking, cut the bread and examine the crumb.
If your sourdough bread is underproofed, try the float test again next time. Once it is positive, preshape and shape your dough. Place it in a banneton (proofing basket) and let it ferment at room temperature for another 15 minutes. Cold proof, bake, and recheck the crumb.
Still not perfect? Add 15 more minutes for the dough to ferment in the banneton next time. Continue adjusting like this until your loaf is perfectly proofed.
As long as you keep all the sourdough baking conditions the same (recipe, your starter, kitchen temperature), your optimized baking method will continue to work.
Tracking dough levels for better consistency
Let's admit: sourdough bakeries don't check dough temperature from one batch to the next, yet they consistently bake perfect bread.
Their secret is in maintaining consistent baking conditions, in terms of room temperature and humidity, as well as using the same starter, flour, and dough hydration from day to day.
Another secret is that they do most of the bulk fermentation after shaping, while the dough is already resting in bannetons.
You can try a similar proofing method at home, but it requires testing and experimentation to achieve optimal results. Instead of letting bulk fermentation run to the end, cut it off earlier, around 30-50% rise, and shape your dough.
Once you place the shaped dough into a banneton, take note of how high the dough sits in the basket. Then, let it ferment at room temperature for a few hours, until it visibly rises and fills more of the banneton. This part requires some trial and error.
Before transferring the banneton to the fridge for cold proofing, check the dough level again. Notice how much it has risen since you first placed it in the basket.
Tracking both the starting and ending dough levels in the banneton will help you build consistency and repeat your best results.
This method lets you push bulk fermentation closer to overproofing without touching the dough. It is helpful if you are looking for an open crumb.
How to adjust bulk fermentation to seasonal changes
Let's say that you have perfected bulk fermentation. Will it work forever?
Yes and no.
Your bulk fermentation method is optimized for your specific conditions. If you change your flour, switch water types, or move to a different climate, you will need to fine-tune again. But the process is quicker this time because you have done it before. You know what signs to look for.
Seasonal changes play a big role in sourdough baking. Summer baking speeds up fermentation, while winter slows it down. That is why many bakers recommend learning sourdough baking in winter, since it gives you more control.
As you move through the seasons, you will get familiar with how your dough behaves in different temperatures and humidity levels.
Next, if you move to a higher altitude, you will notice that your dough acts differently. That means another round of adjusting, but with experience on your side, it is manageable.
The best way to stay consistent is to write everything down. Your sourdough baking log becomes your sourdough playbook. Over time, you will bake better, more consistent loaves, and you will always have a guide to look back on when things change.
A shortcut to perfecting your sourdough bulk fermentation
It takes time to adjust bulk fermentation to suit your recipe, starter, and room temperature, but there is a shortcut you can try. One effective method is baking three to five loaves of sourdough on the same day.
Start by mixing each loaf separately in its own bowl. Keep the dough in the same kitchen conditions and use the same mixing and folding techniques, but track them individually, noting that each loaf is mixed a bit later than the last.
To fine-tune the bulk fermentation, finish each loaf at different times, spacing them 30 minutes apart. Then cold-proof the loaves, bake, and analyze the crumb.
You may fine-tune bulk fermentation during a single baking session, or you may need a second session to finish fermenting the loaves, spacing them 15 minutes apart. But stay reassured that you will make it work for you!
Feeling overwhelmed? You can still bake good sourdough bread
"This seems so complicated! Can I make baking sourdough bread easier?" you might be thinking to yourself.
Yes, you can. You can try baking sourdough bread without fancy tools, dough temperature checks, or complicated charts. Follow my Beginner's Sourdough Bread recipe and let the dough rise until it doubles in size.
While waiting for the dough to double in size is not the most effective method, many bakers use it and are satisfied with the results.
Let's talk sourdough
Do you have any bulk fermentation tips or tricks? Share them in the comments.
Ready to keep learning?
Now you have a choice. You can keep baking the way you always have. Or you can fine-tune bulk fermentation to bake even better bread.
Practice your favorite bread recipe one session at a time, keep a sourdough baking log to track your progress, and check out the most common questions about bulk fermentation.
And remember, I'm just a comment away if you need help.
Comments
No Comments