
One of the most exciting things about baking flavored sourdough bread is how customizable it is. With just flour, water, salt, patience, and time, you can already create incredible bread, but once you start adding inclusions to sourdough, the flavor possibilities become endless.
However, making additions to sourdough bread is best when you feel comfortable with the basics. Master my Beginner's Sourdough Bread and eventually progress to my Master Sourdough Bread to lay the foundation for further experimentation.
It is completely natural to want to discover new flavors right away, but some inclusions significantly affect bulk fermentation. Without enough sourdough experience, it will be challenging to adjust the bulk fermentation. Start with sourdough basics and gradually introduce add-ins. The creativity will come with time.
In this guide, we will learn multiple ways to add inclusions, the best timing for each method, which ingredients impact bulk fermentation and which do not, and how to add seeds and grains on top of your sourdough loaf.
Then, try my cranberry walnut sourdough bread or Taylor Swift's lemon blueberry sourdough.
When to add inclusions to sourdough bread
First and foremost, you need levain (active sourdough starter at peak) to mix the dough. Begin with an autolyse or fermentolyse, then proceed with folds during bulk fermentation. The overall sourdough process remains the same whether you are baking a plain loaf or one with inclusions.
Adding inclusions to sourdough bread can be done at several stages of the sourdough process. Each method has its own advantages, and choosing the right timing depends on batch size, sourdough hydration, and the type of add-ins you are using.
Below are the most common stages for adding inclusions:
- During mixing
- During lamination
- During folds: stretch and folds, and coil folds
- During final shaping
How to add inclusions during mixing
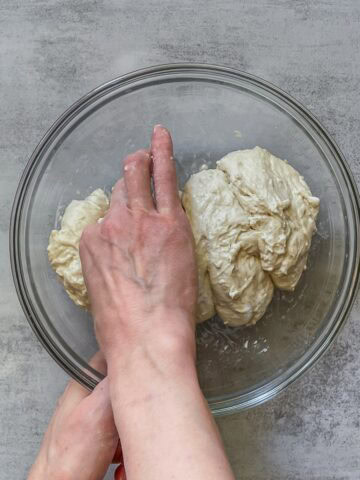
Some inclusions can be added at the end of mixing or after a 30-minute rest, after the salt has been incorporated. This method is most commonly used with a spiral mixer and works when you have good control over gluten development and mixing time.
If you are comfortable mixing sourdough in a stand mixer, you can successfully add soft or small inclusions that won't tear the gluten network.
With experience, you can add ingredients such as sesame seeds, poppy seeds, quinoa, chia seeds, raisins, and sunflower seeds, which can be mixed in without risk of breaking gluten.
However, this approach requires caution. Overmixing or adding inclusions too early can lead to gluten breakdown. That is why I recommend adding inclusions later in the process for many home bakers.
How to add inclusions during lamination
Sourdough lamination is the process that involves gently stretching the dough into a large, thin sheet and folding it over itself multiple times. This builds strength while creating layers that later help trap fermentation gases.
Lamination helps evenly distribute add-ins throughout the dough while maintaining the gluten structure and minimizing degassing.
This method works especially well for seeds, herbs, grated cheese, cream cheese, pesto, chopped dried fruit, olives, and vegetables (make sure canned ingredients are well drained).
When working with smaller batches, lamination is my preferred method. It is efficient, deeply satisfying, and surprisingly meditative once you get the feel for it.
Here is a step-by-step process of adding inclusions during lamination. The goal is to fold the dough over itself in sections, enclosing the inclusions. This creates layers and locks the add-ins inside.
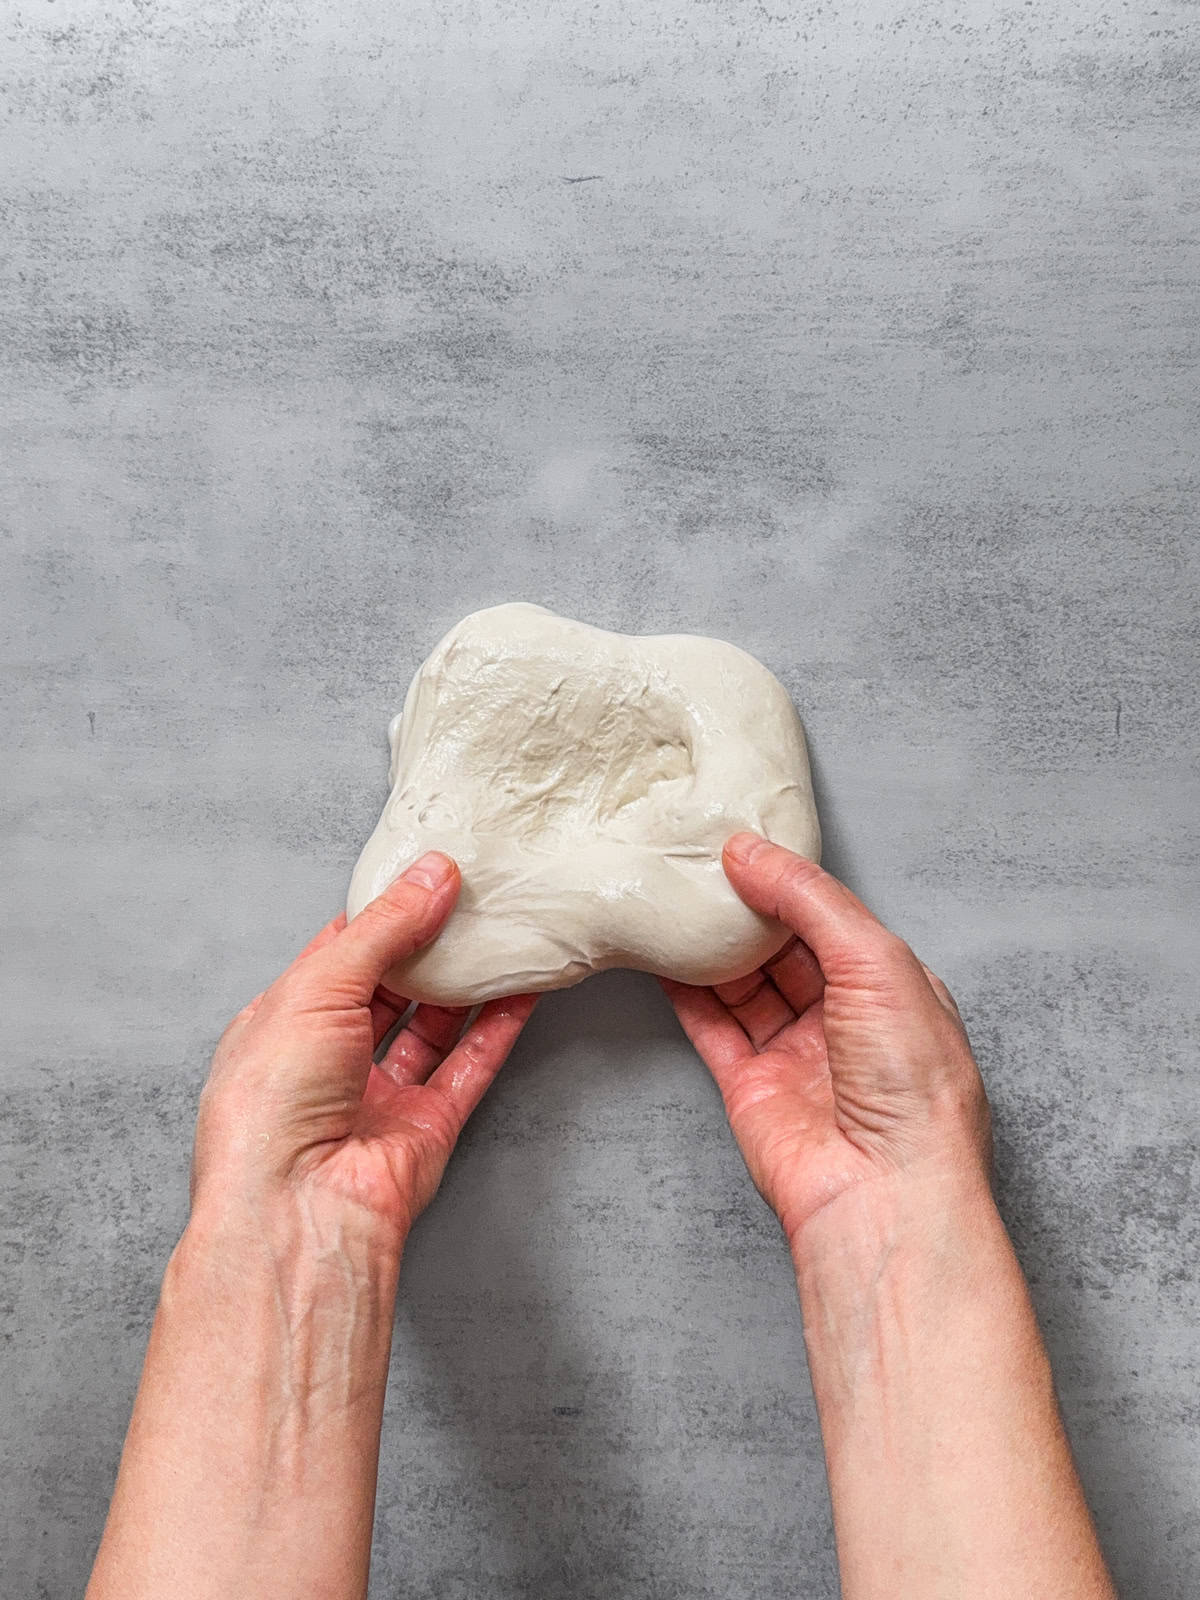
1. Lightly wet your work surface and hands to prevent sticking. With wet hands, gently transfer the dough to the prepared surface, bottom-side up, and carefully pull it away from the center.
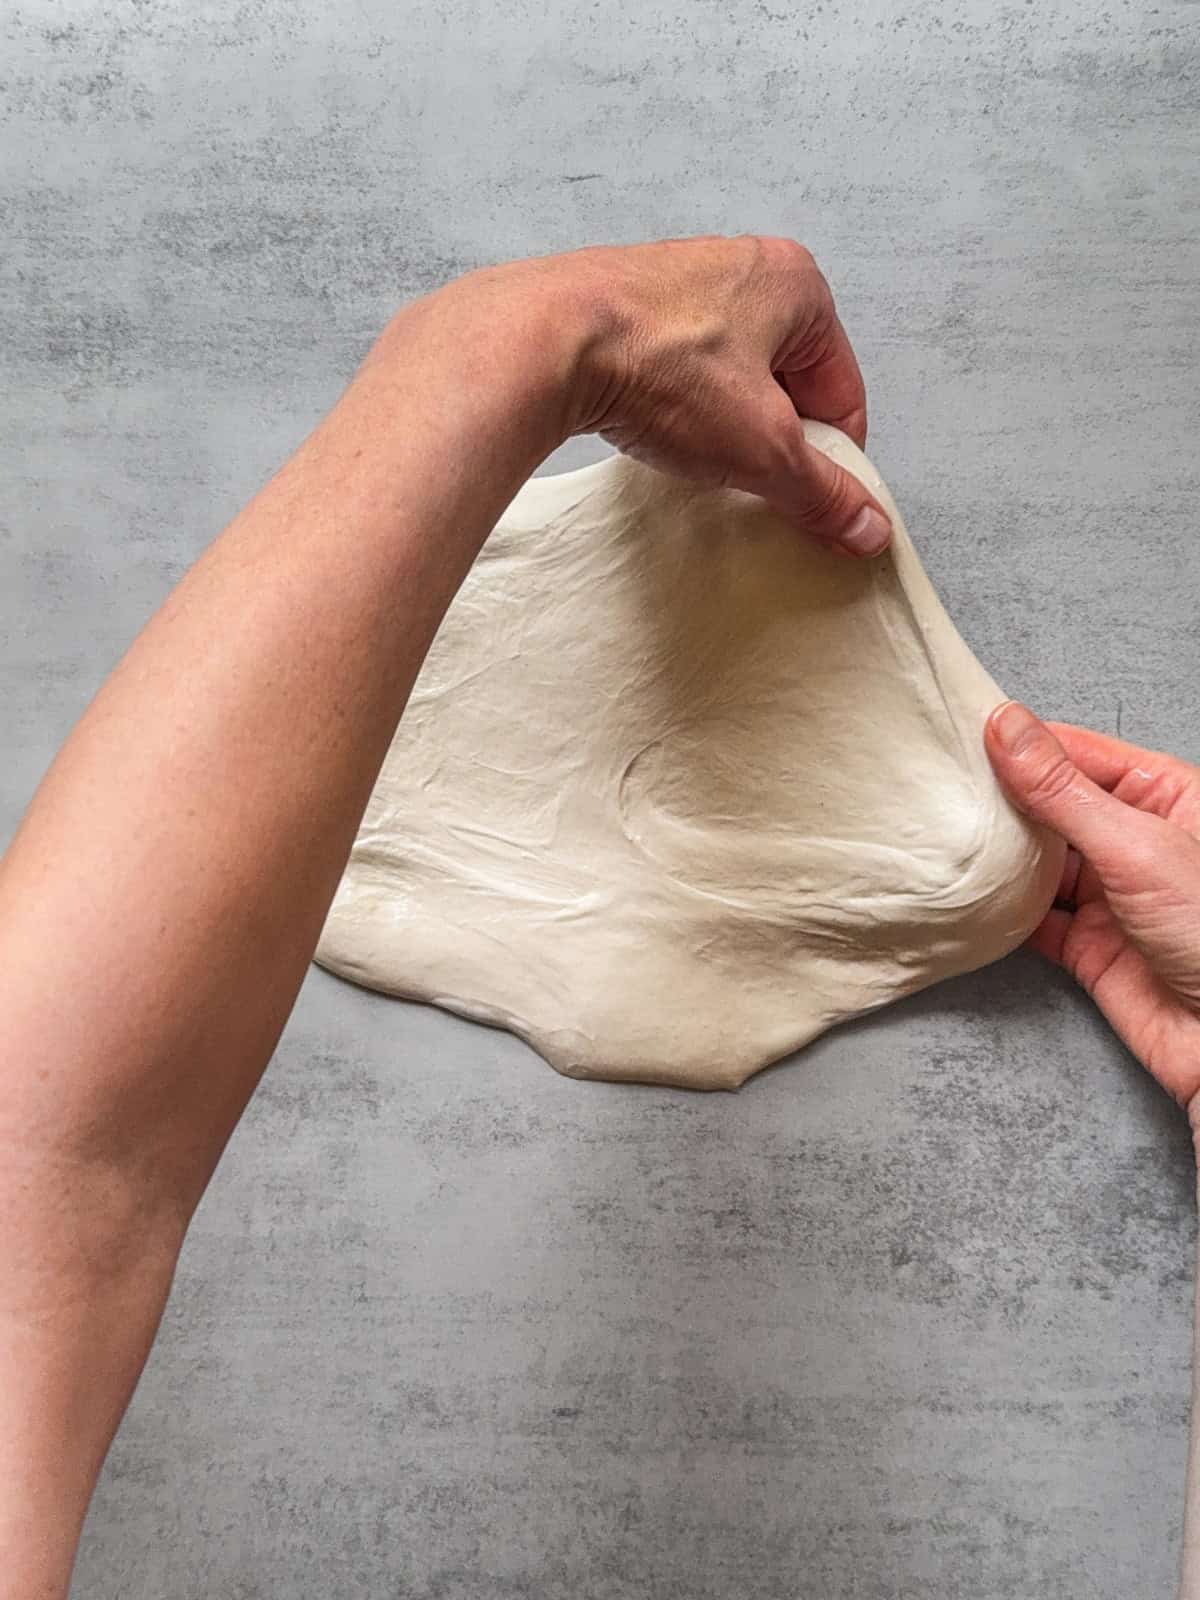
2. Stretch a corner of the dough with both hands.
3. Carefully stretch the opposite side of the dough.
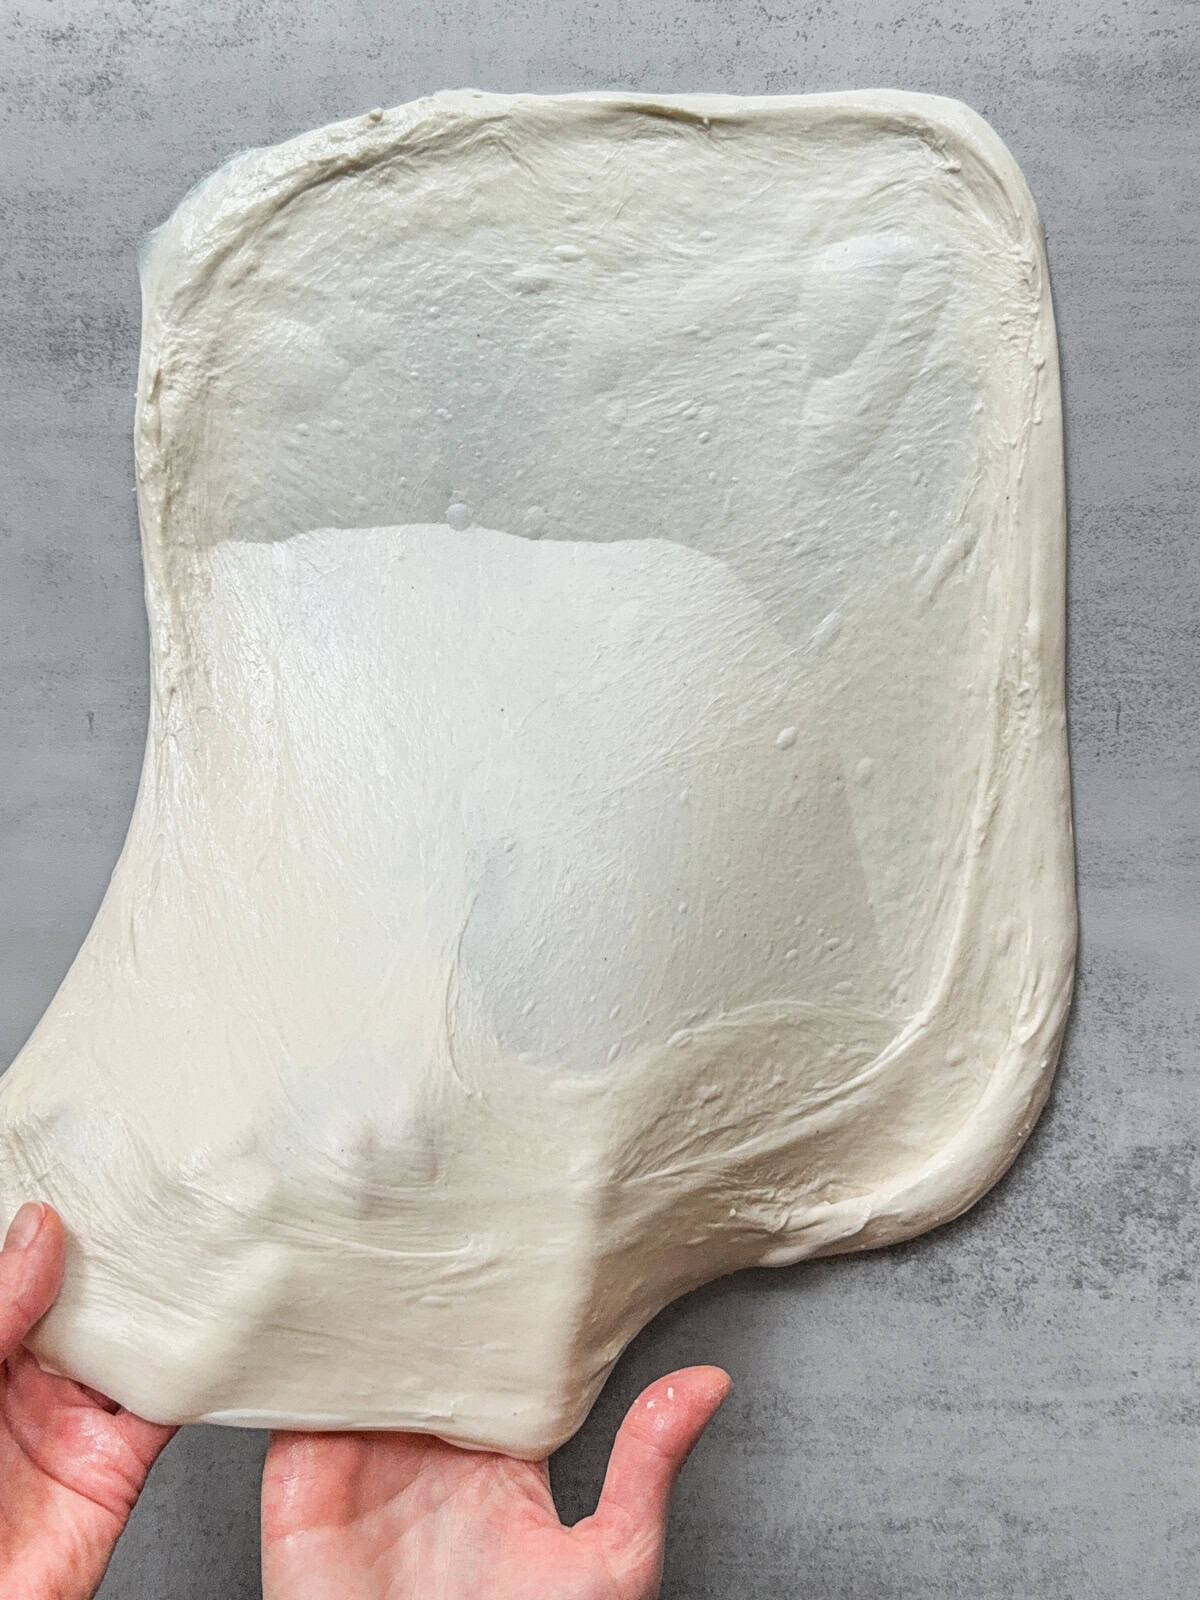
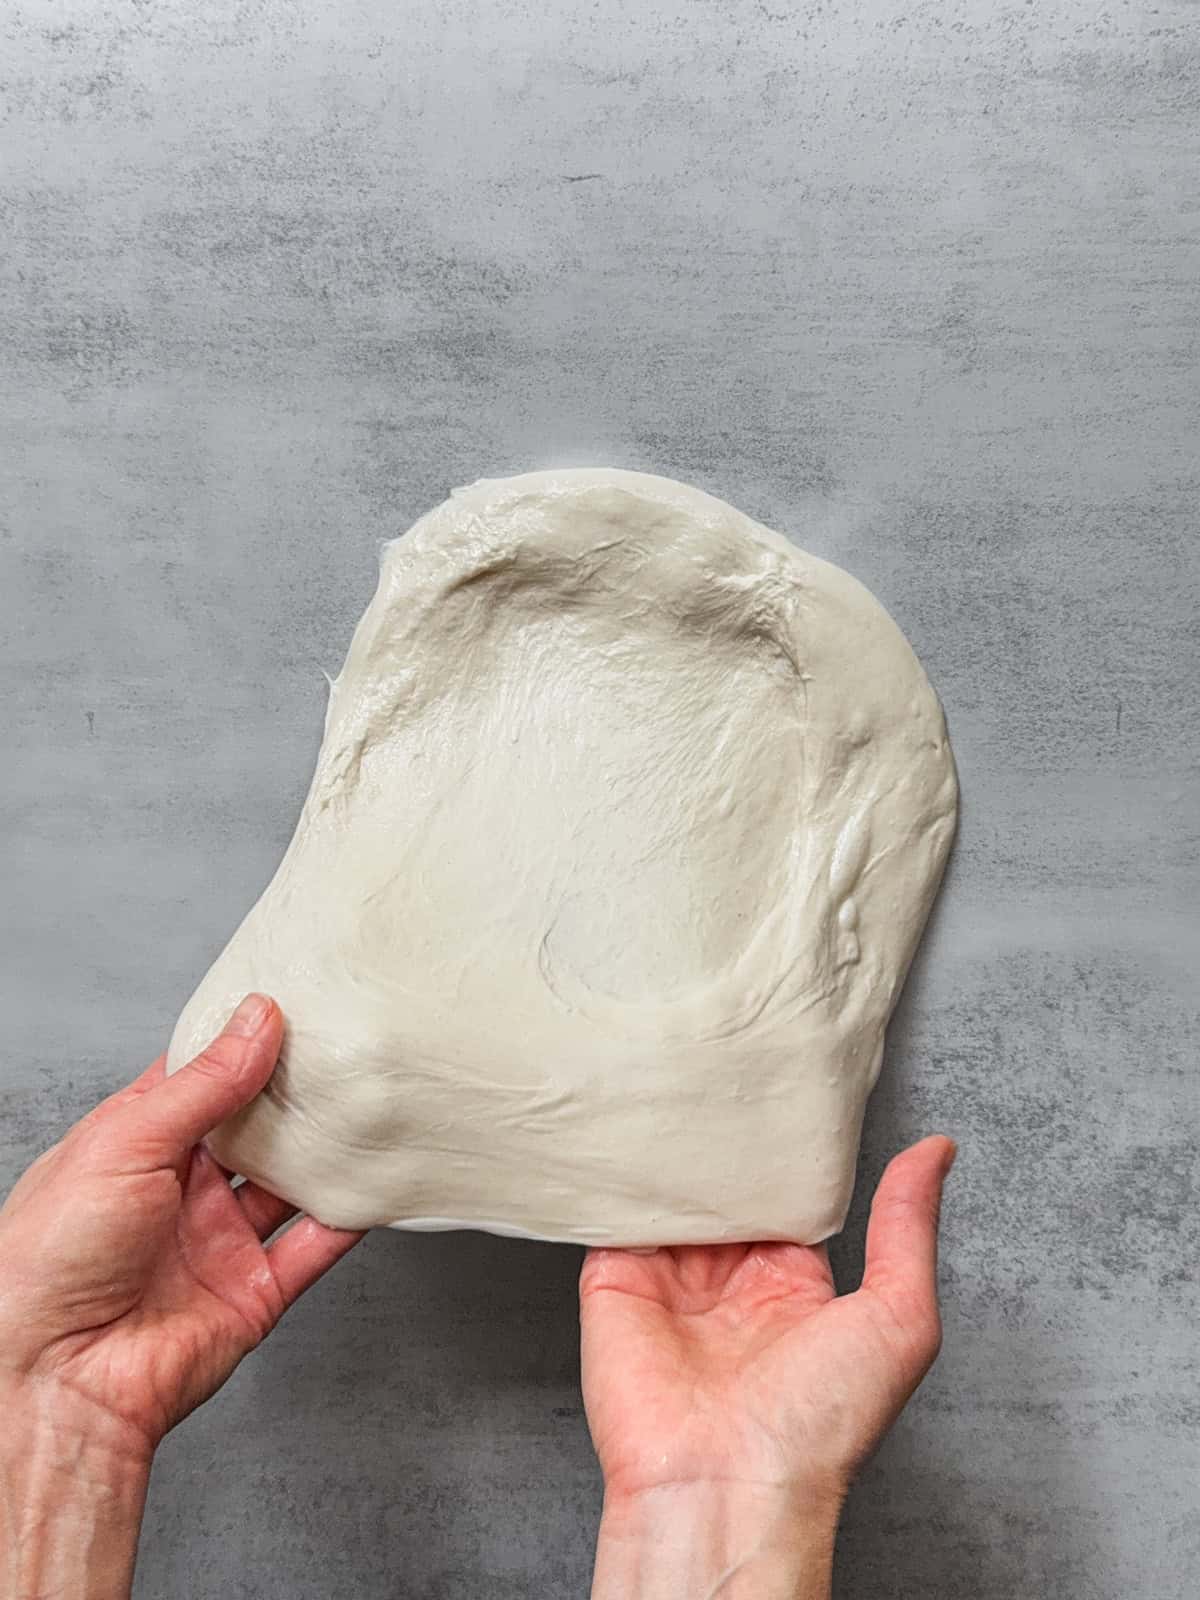
4. Continue stretching the dough in all directions to create a large, thin rectangular sheet. Take your time and avoid tearing.
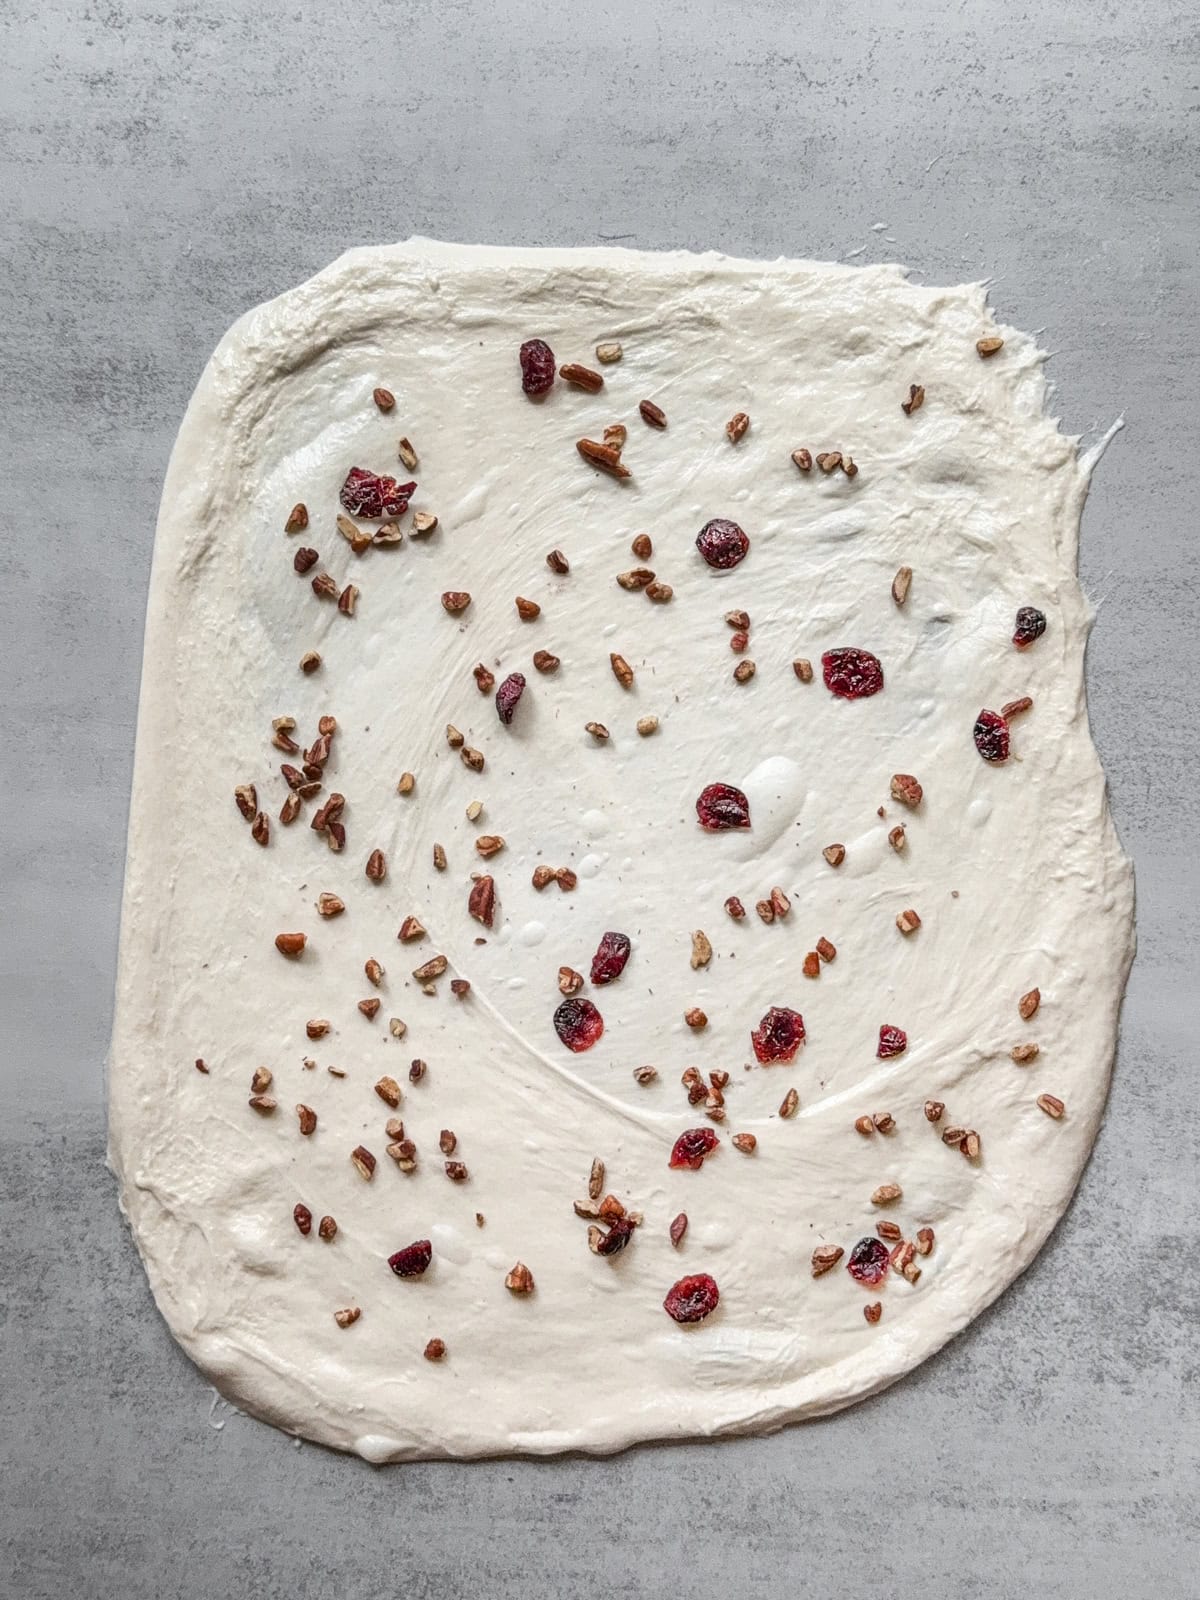
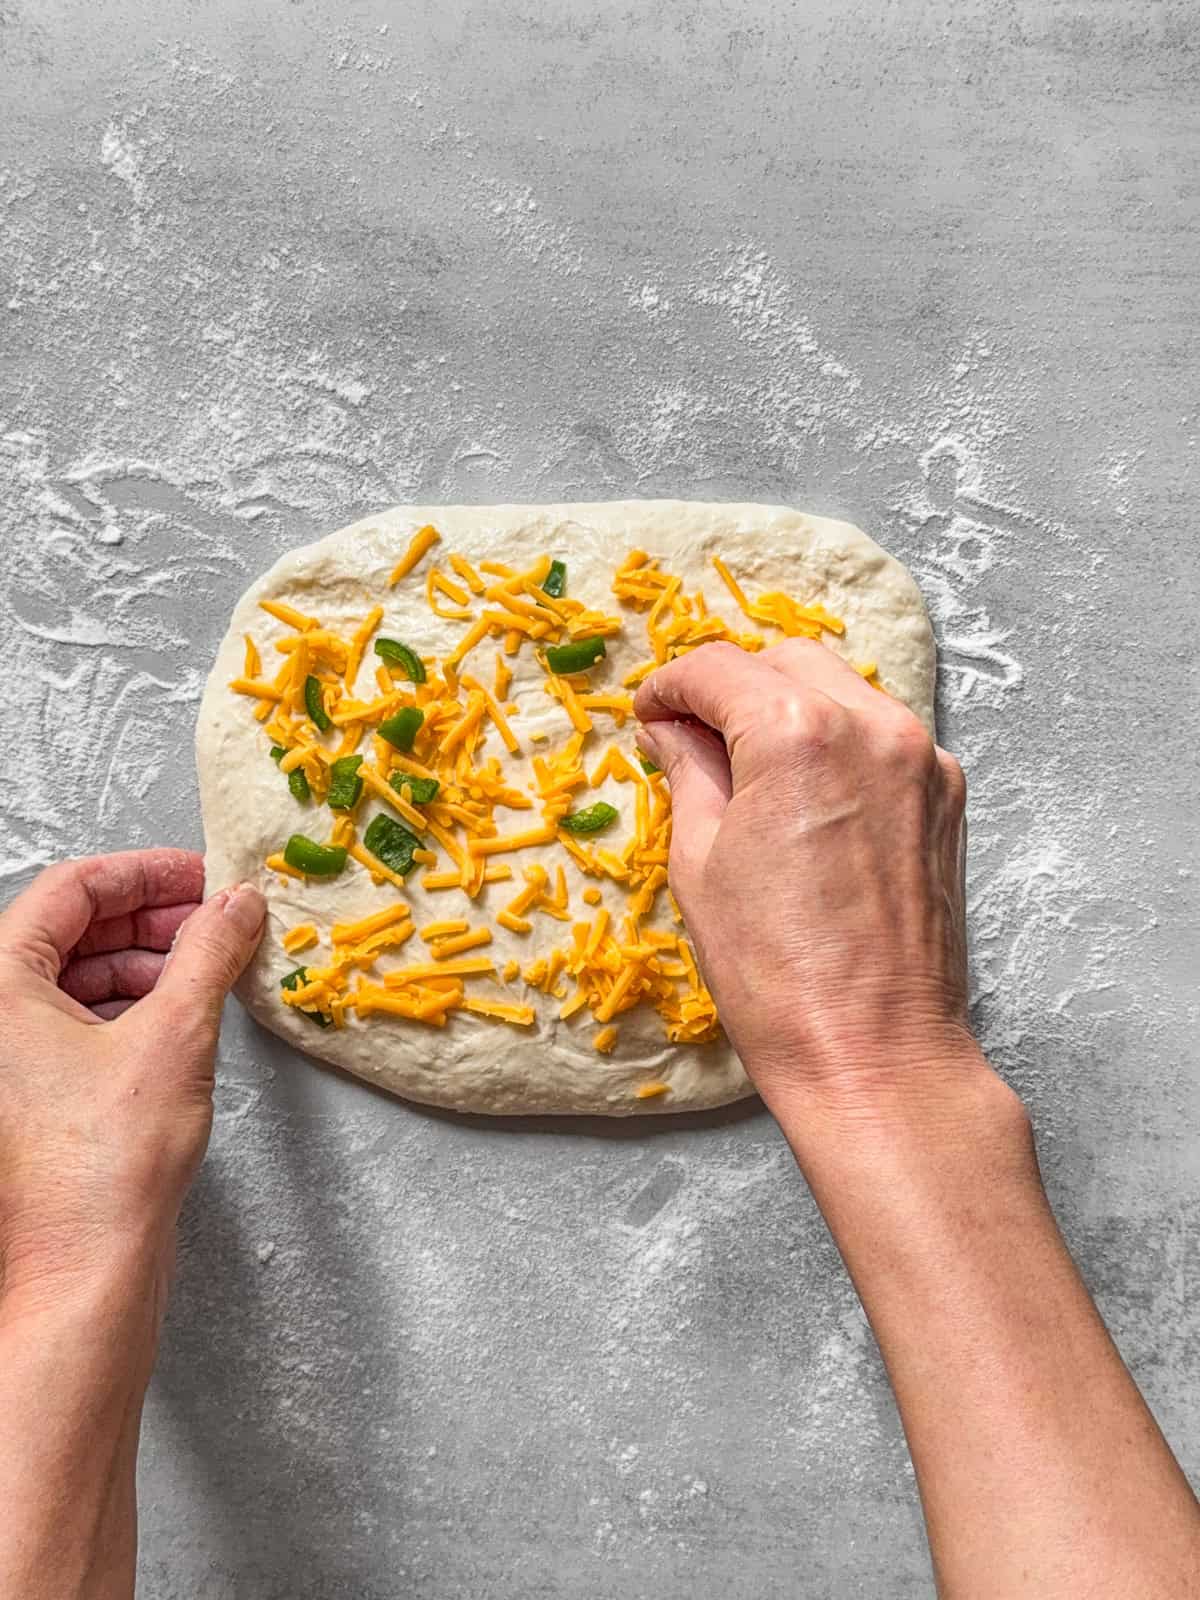
5. Sprinkle or spread inclusions evenly across the surface of the dough.
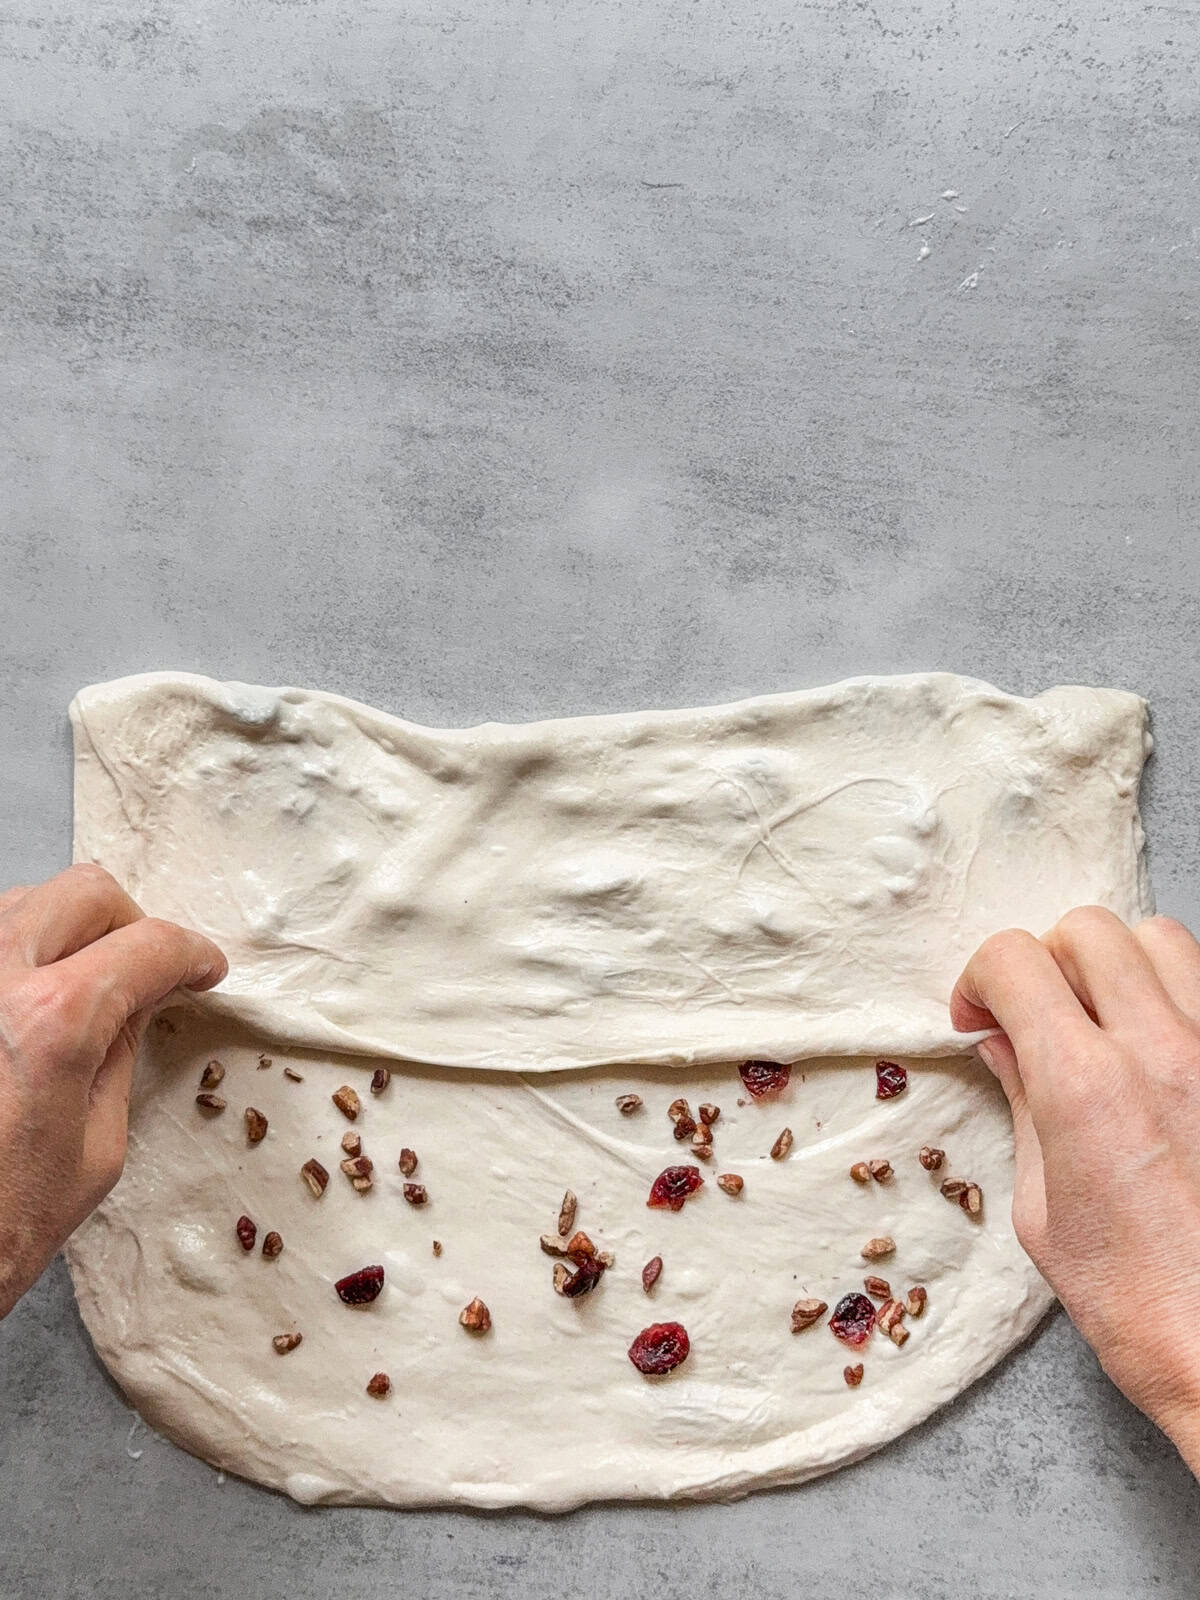
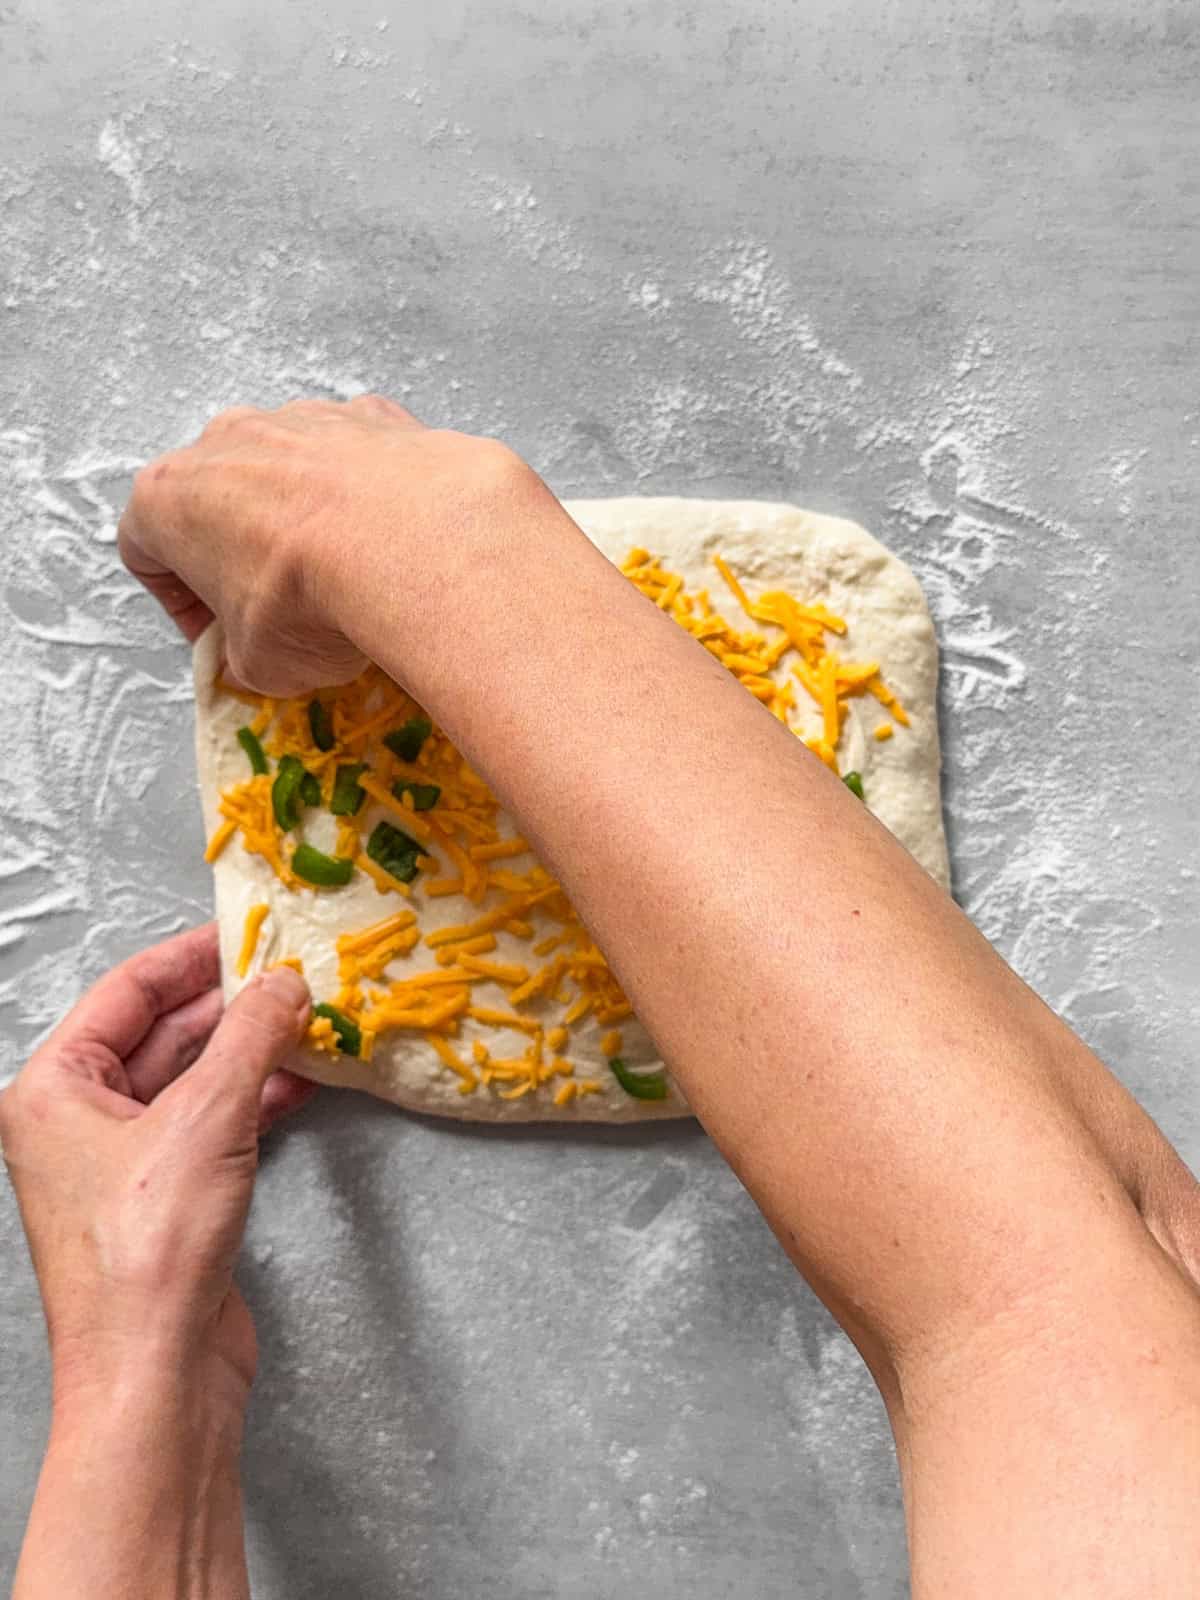
6. Take the upper third of the dough and fold it over the center.
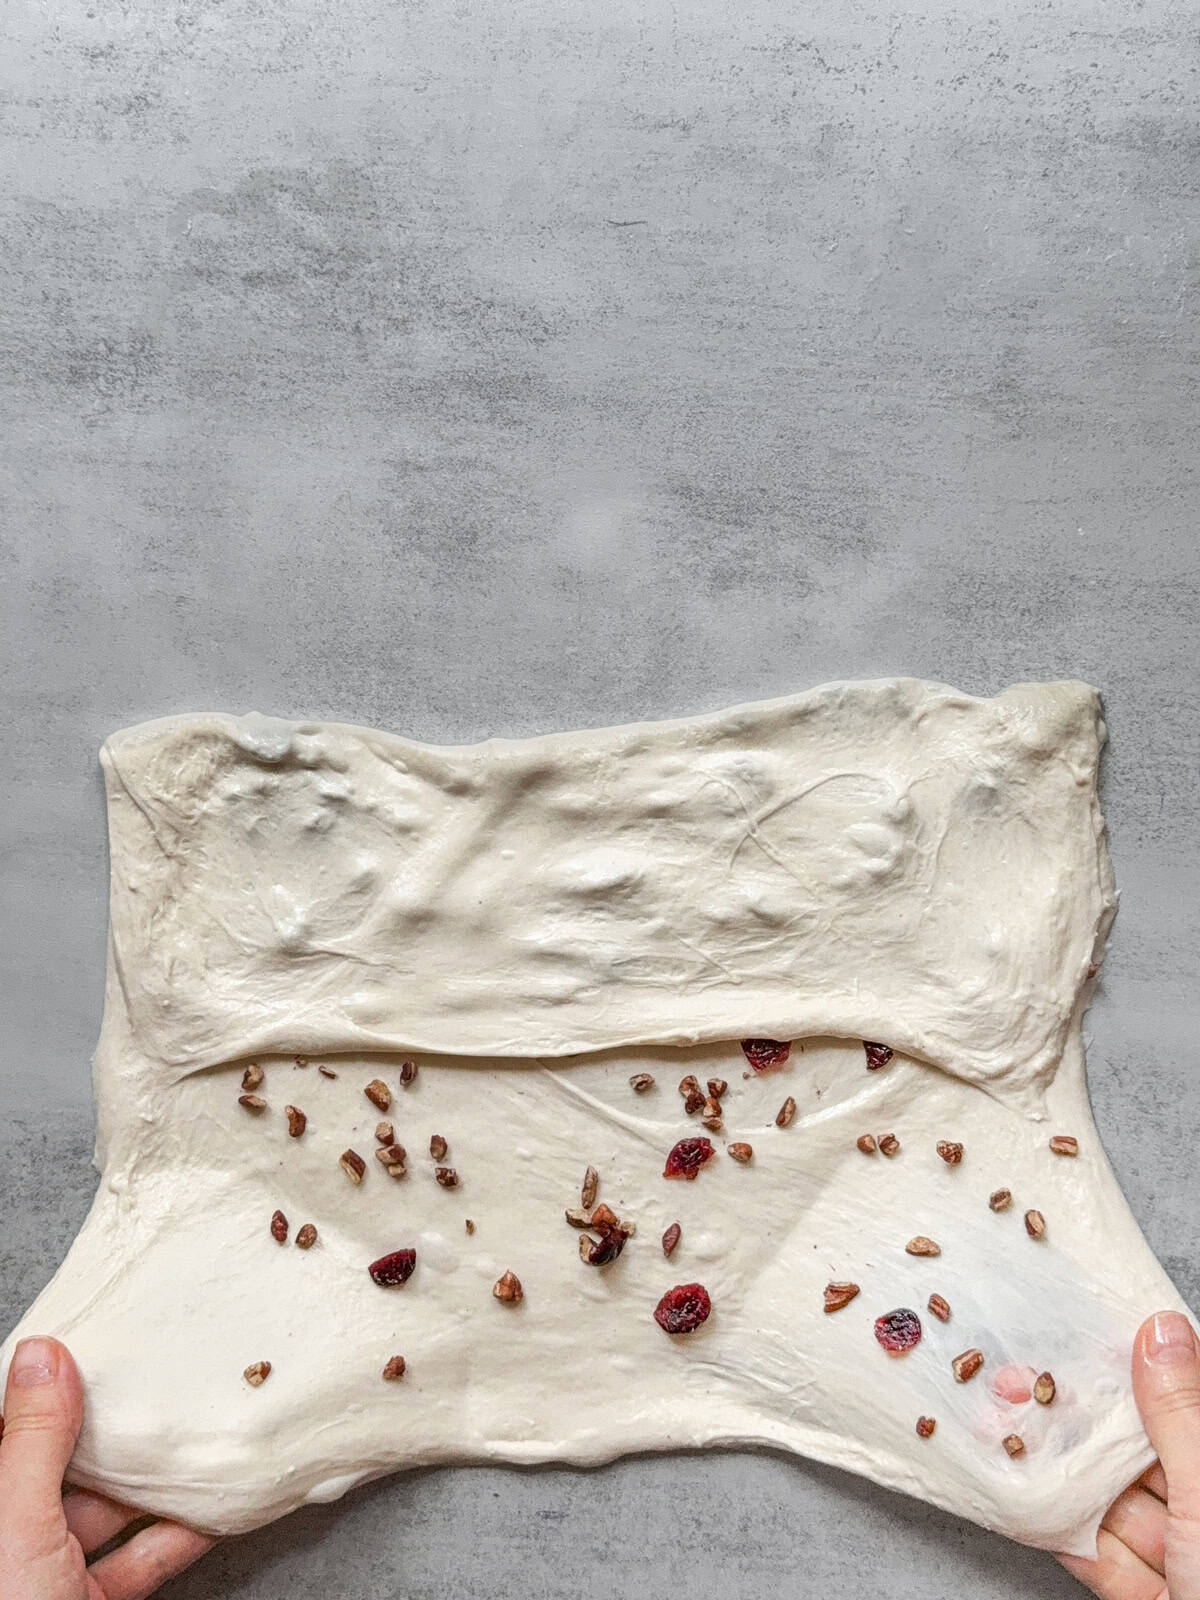
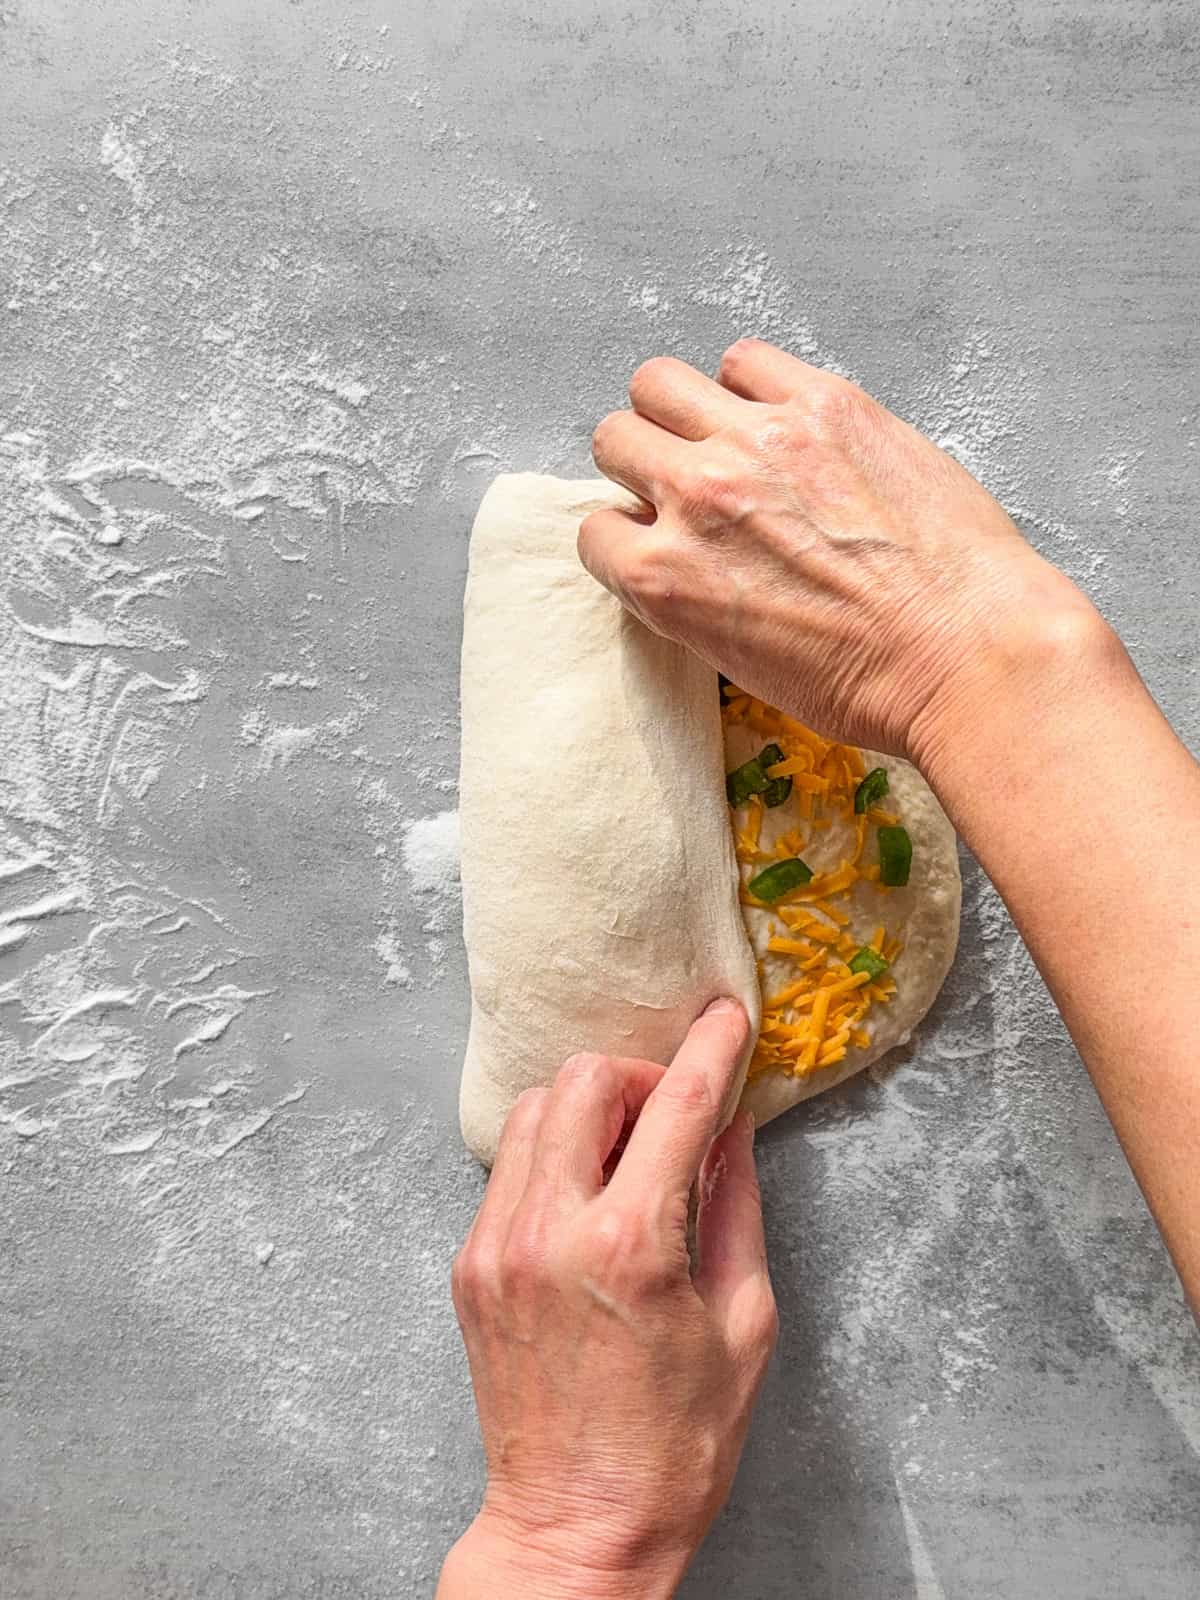
7. Take the bottom third and start folding it up.
8. Fold the bottom third over the upper third, covering the first fold.
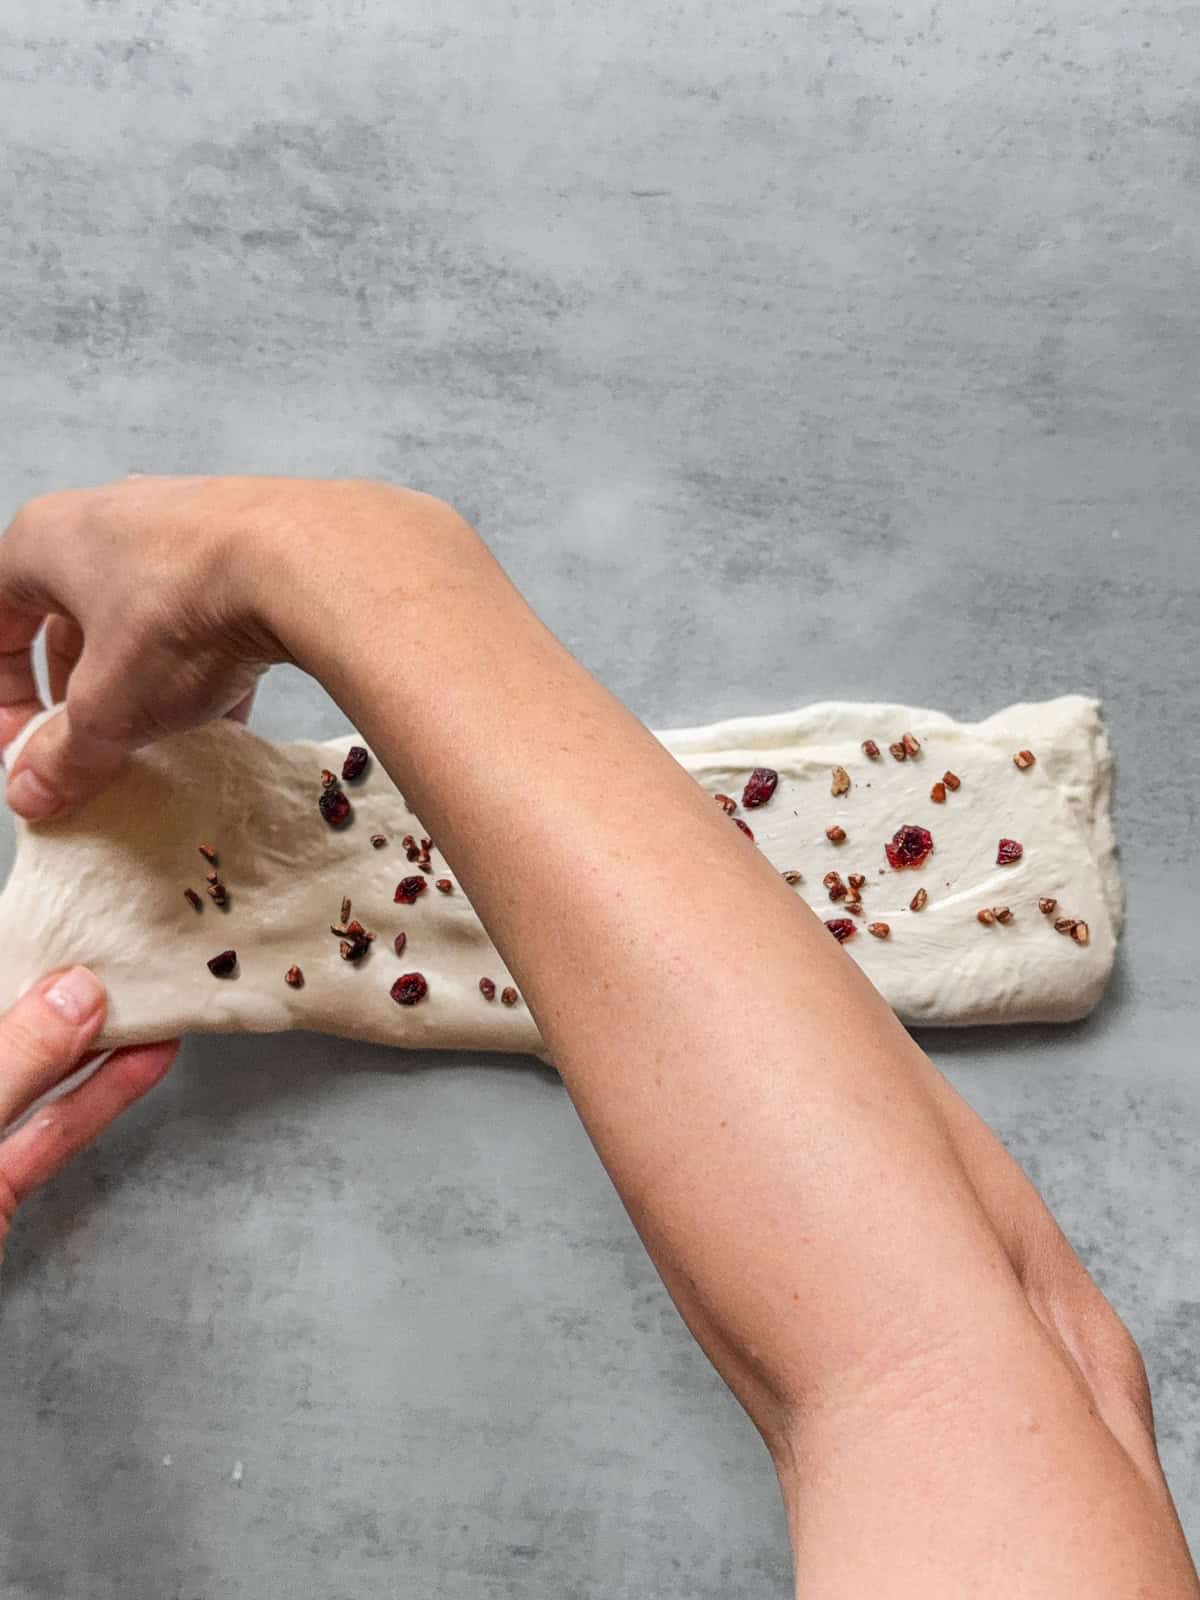
9. Sprinkle inclusions, take the left third of the dough, and start folding it over the center.

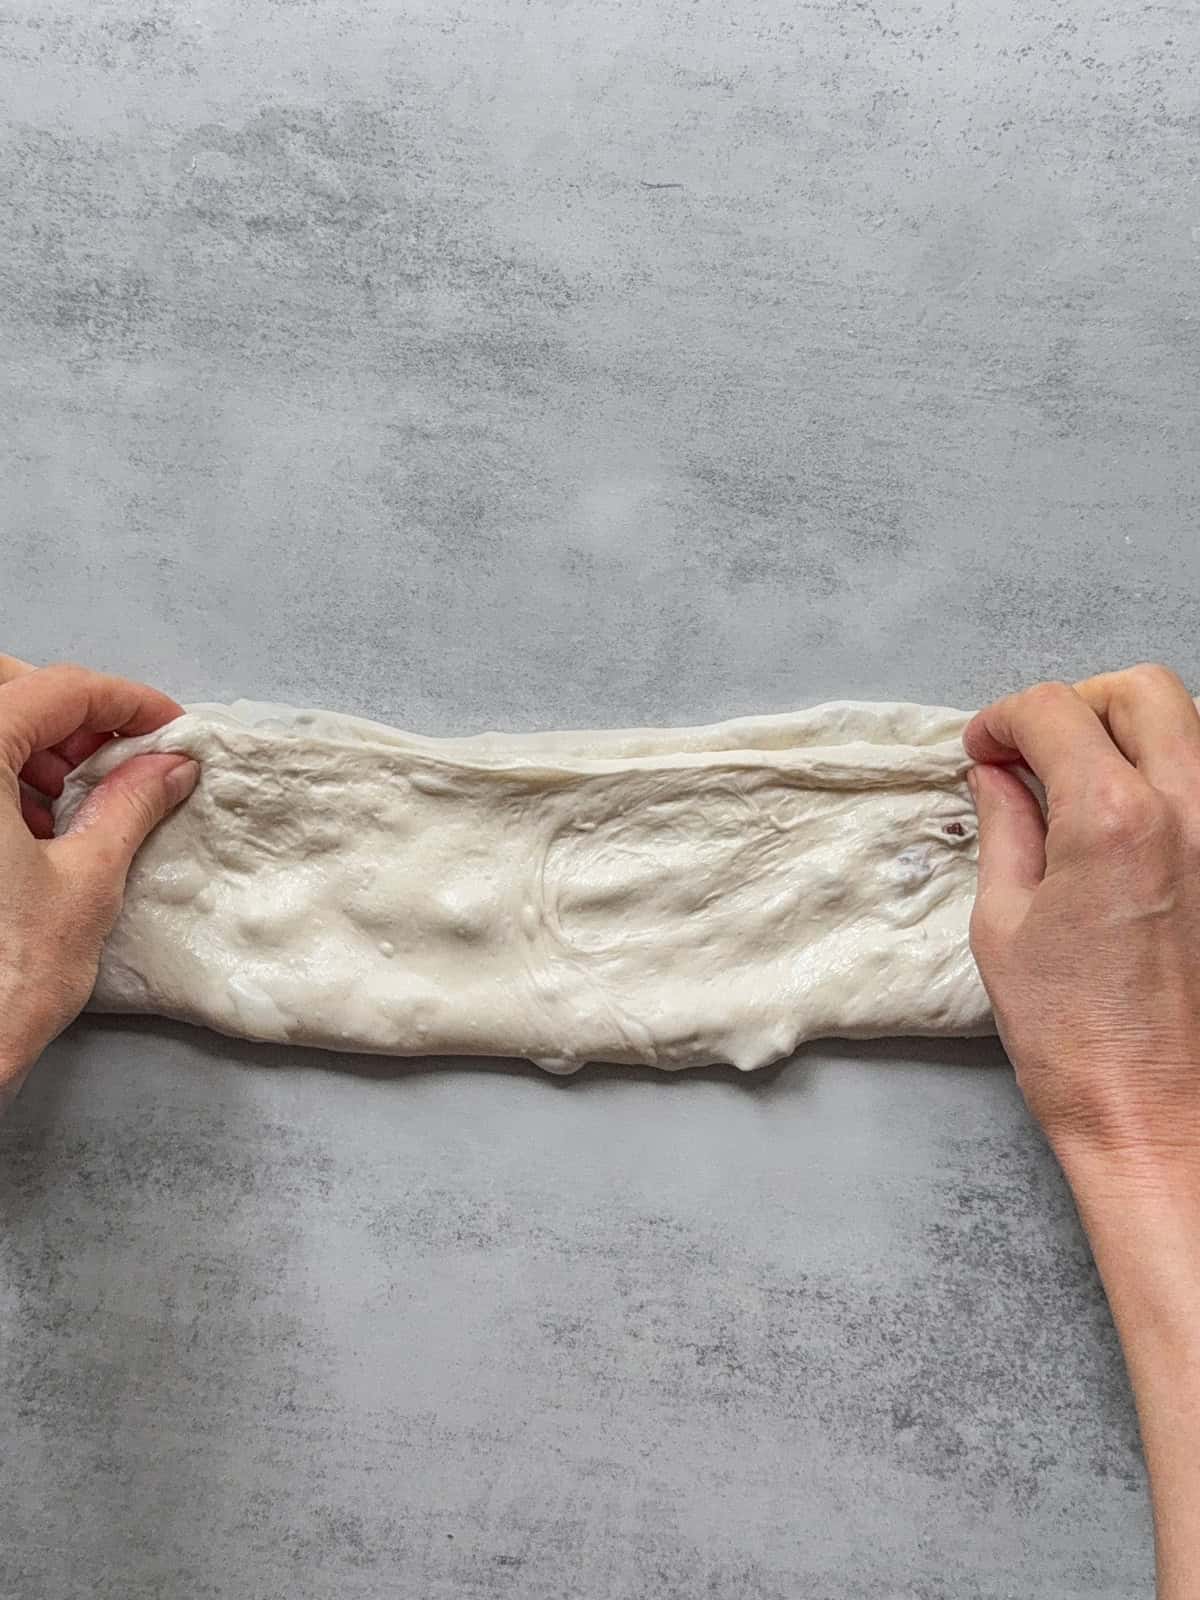
10. Fold the left third up over the layers.
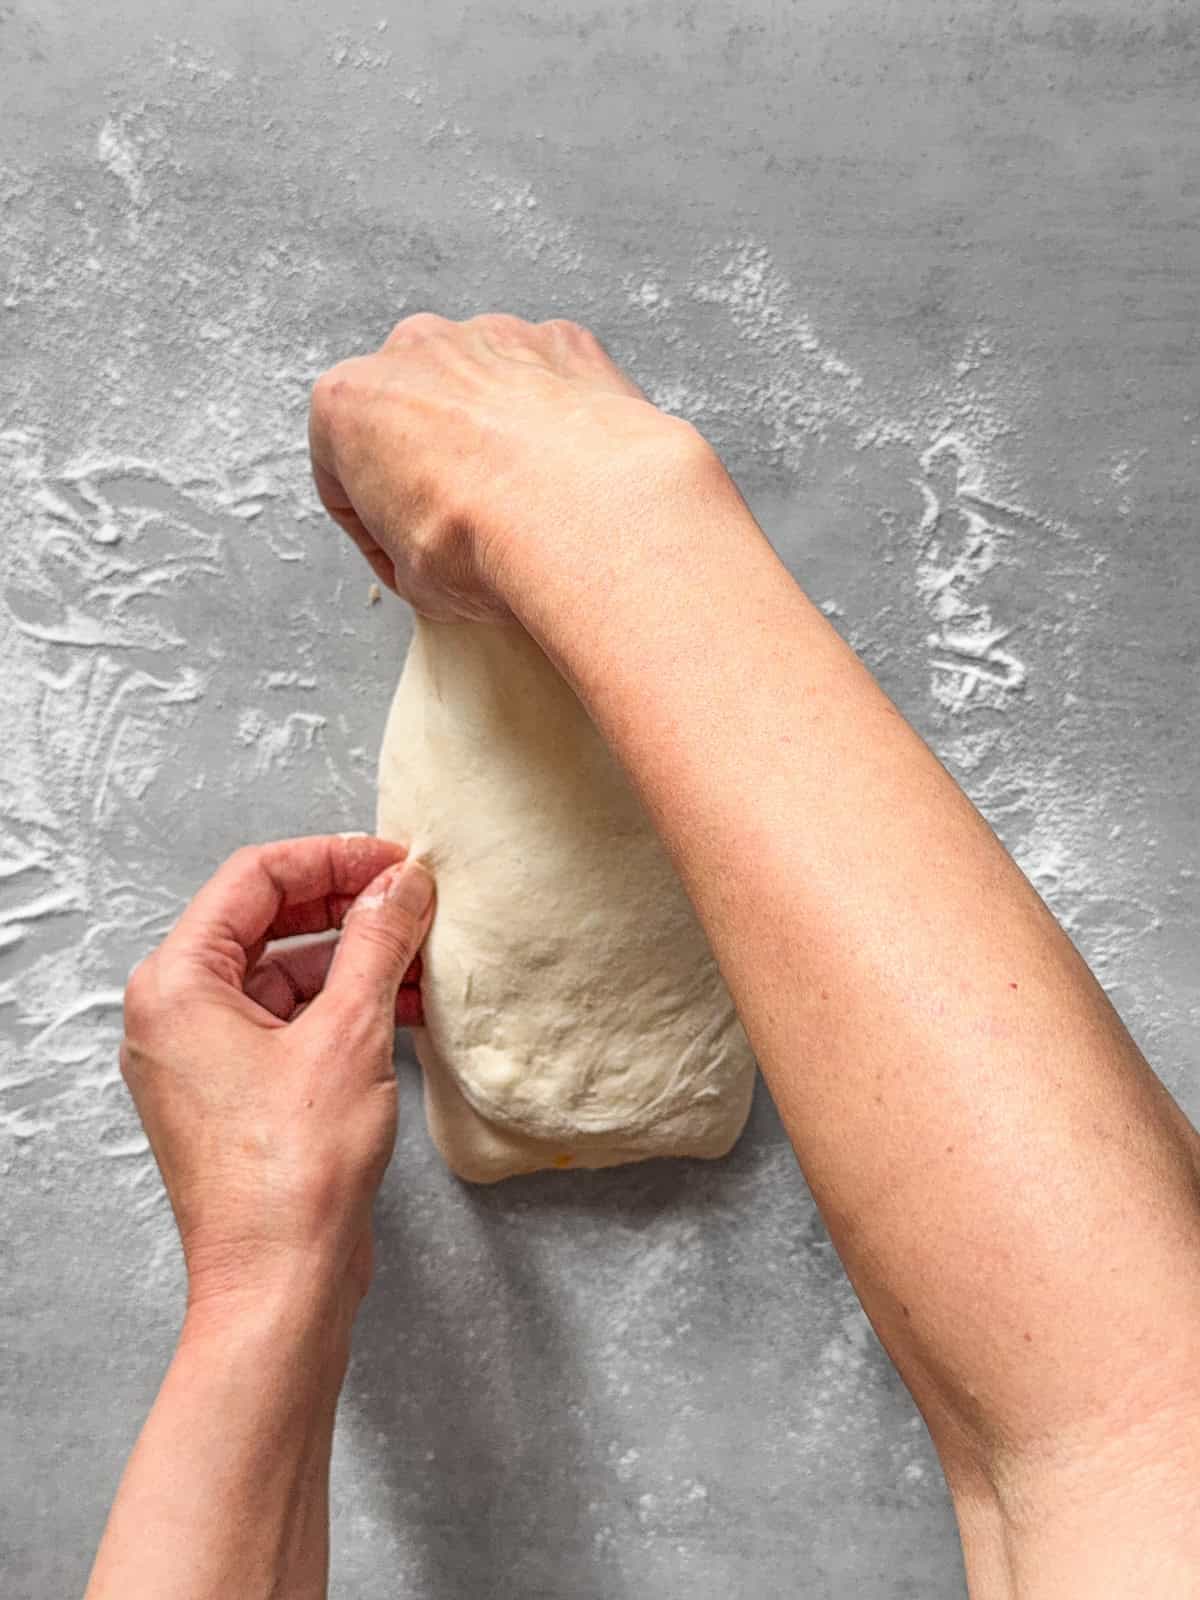
11. Take the right third and start folding it over the center.
12. Complete the fold.
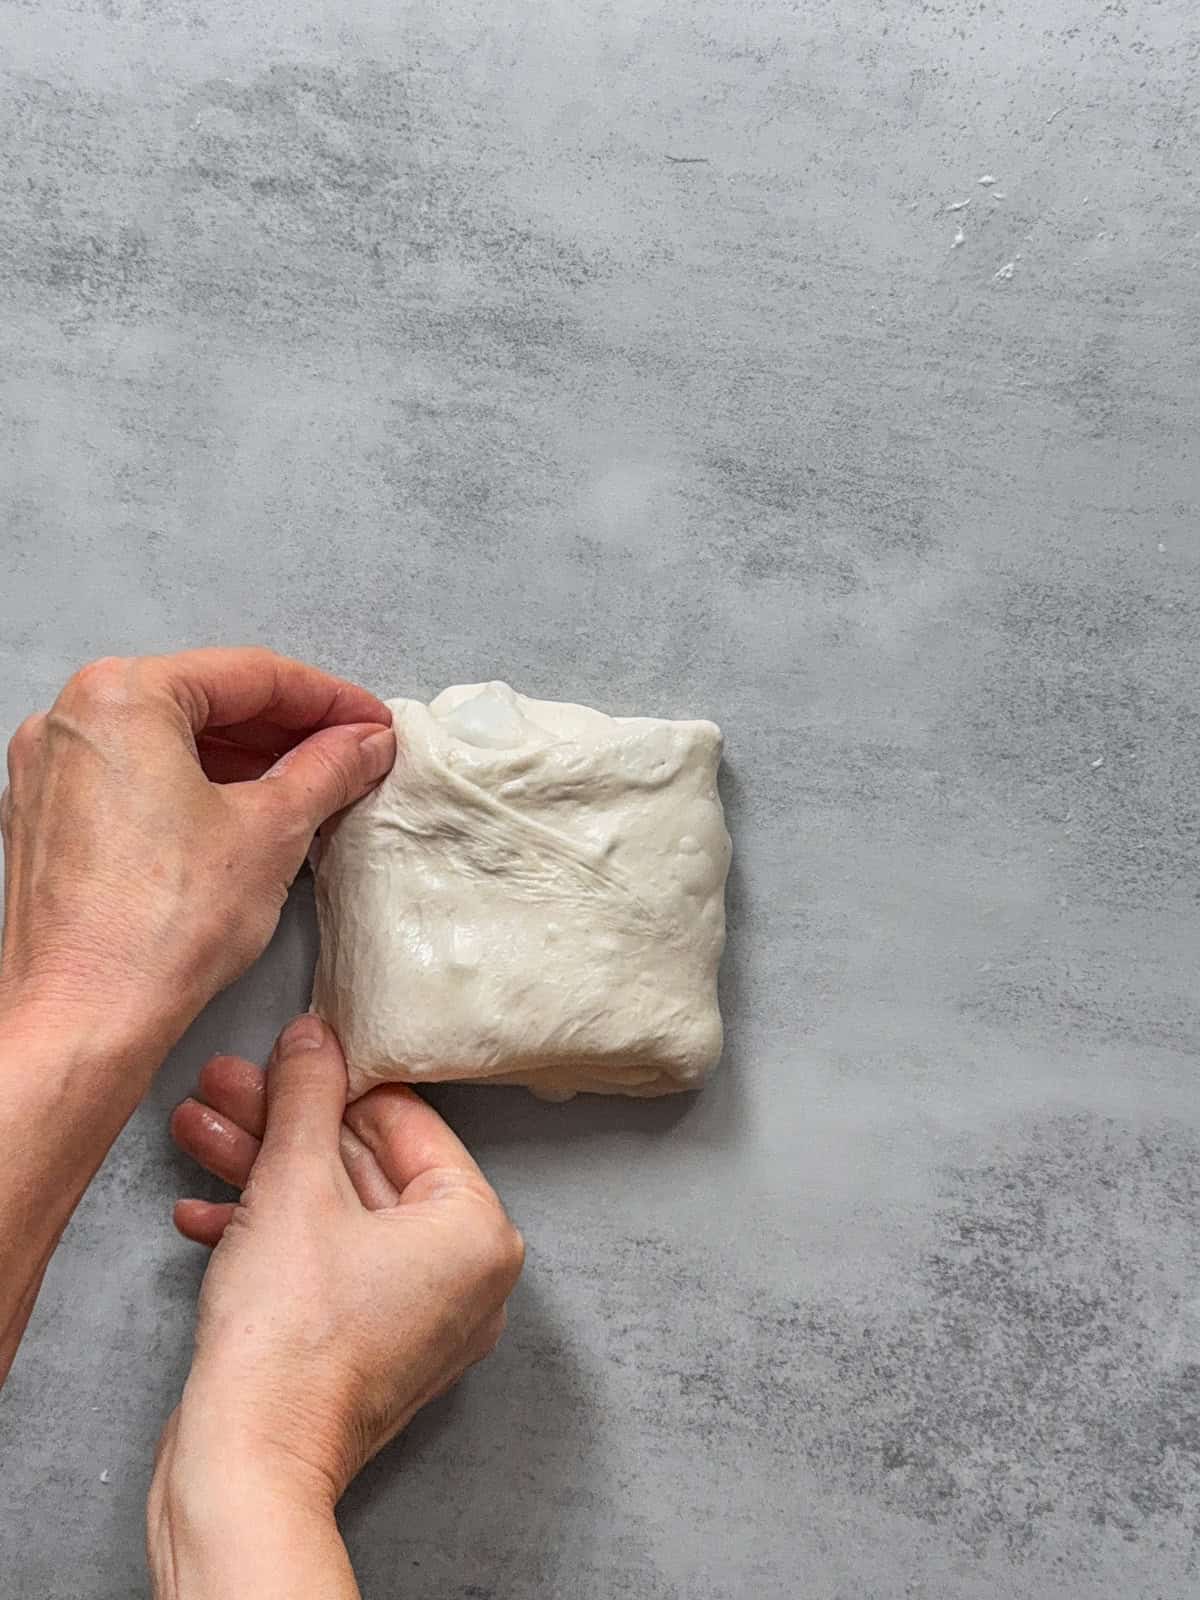
Place the laminated dough back into a bowl, seam-side up, and continue bulk fermentation with your scheduled folds (if needed).
Note: In the pictures, I performed the dough folding from the upper third (to make sure the steps were clearly visible on my iPhone camera).
You can fold the dough in any order you like. For example, start with the left third, then the right third, followed by the bottom, and finally the top. The choice is up to you.
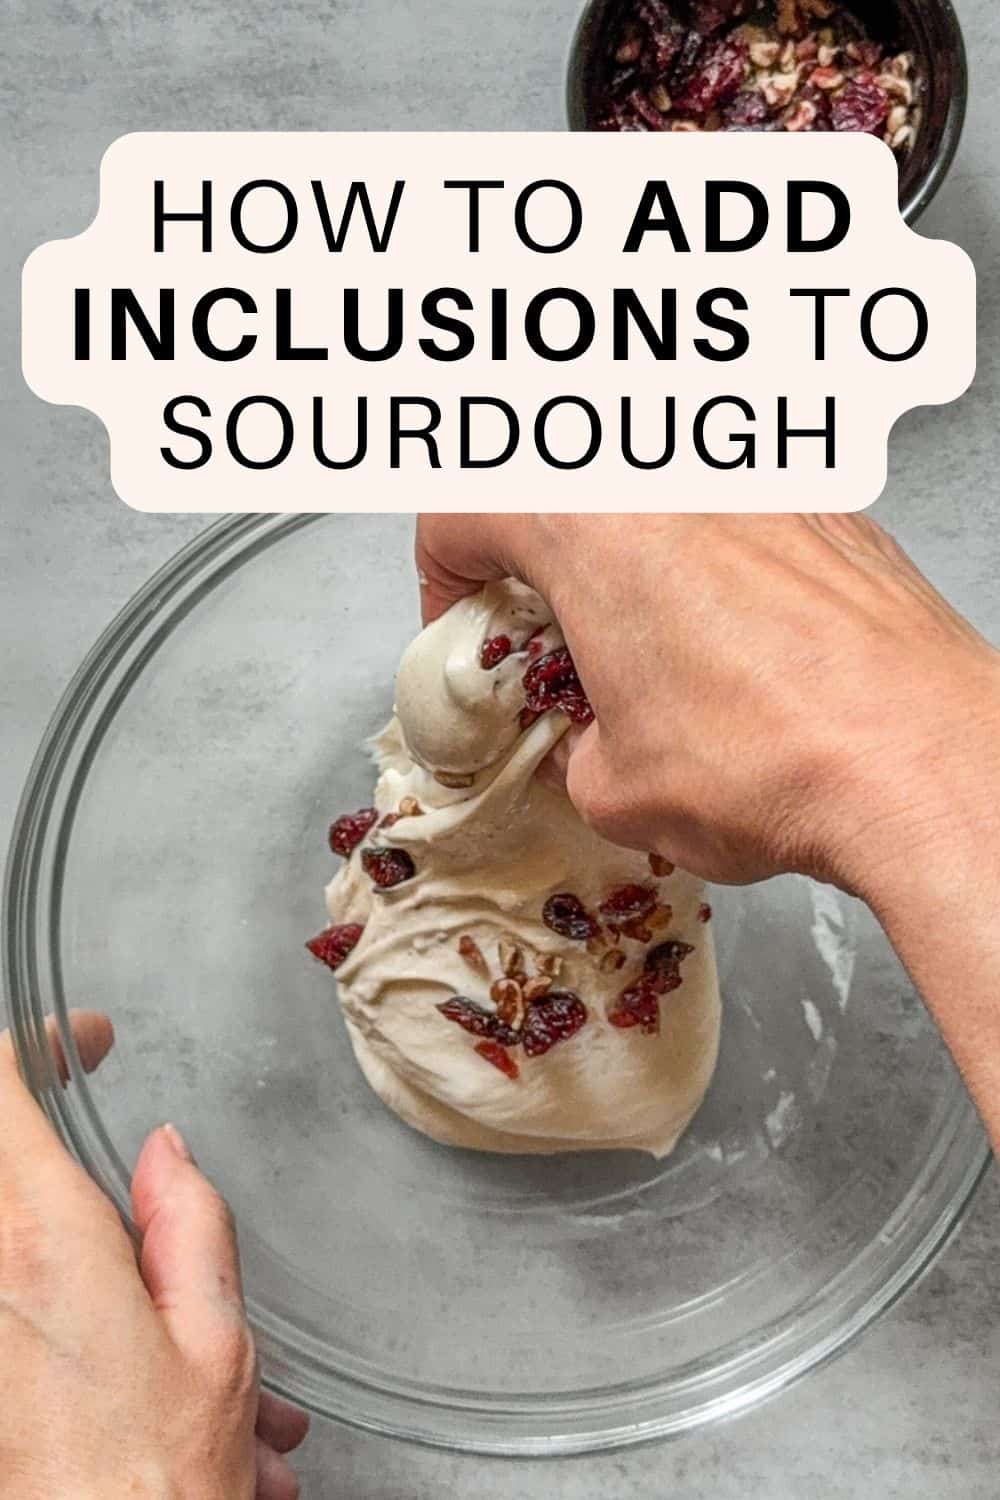
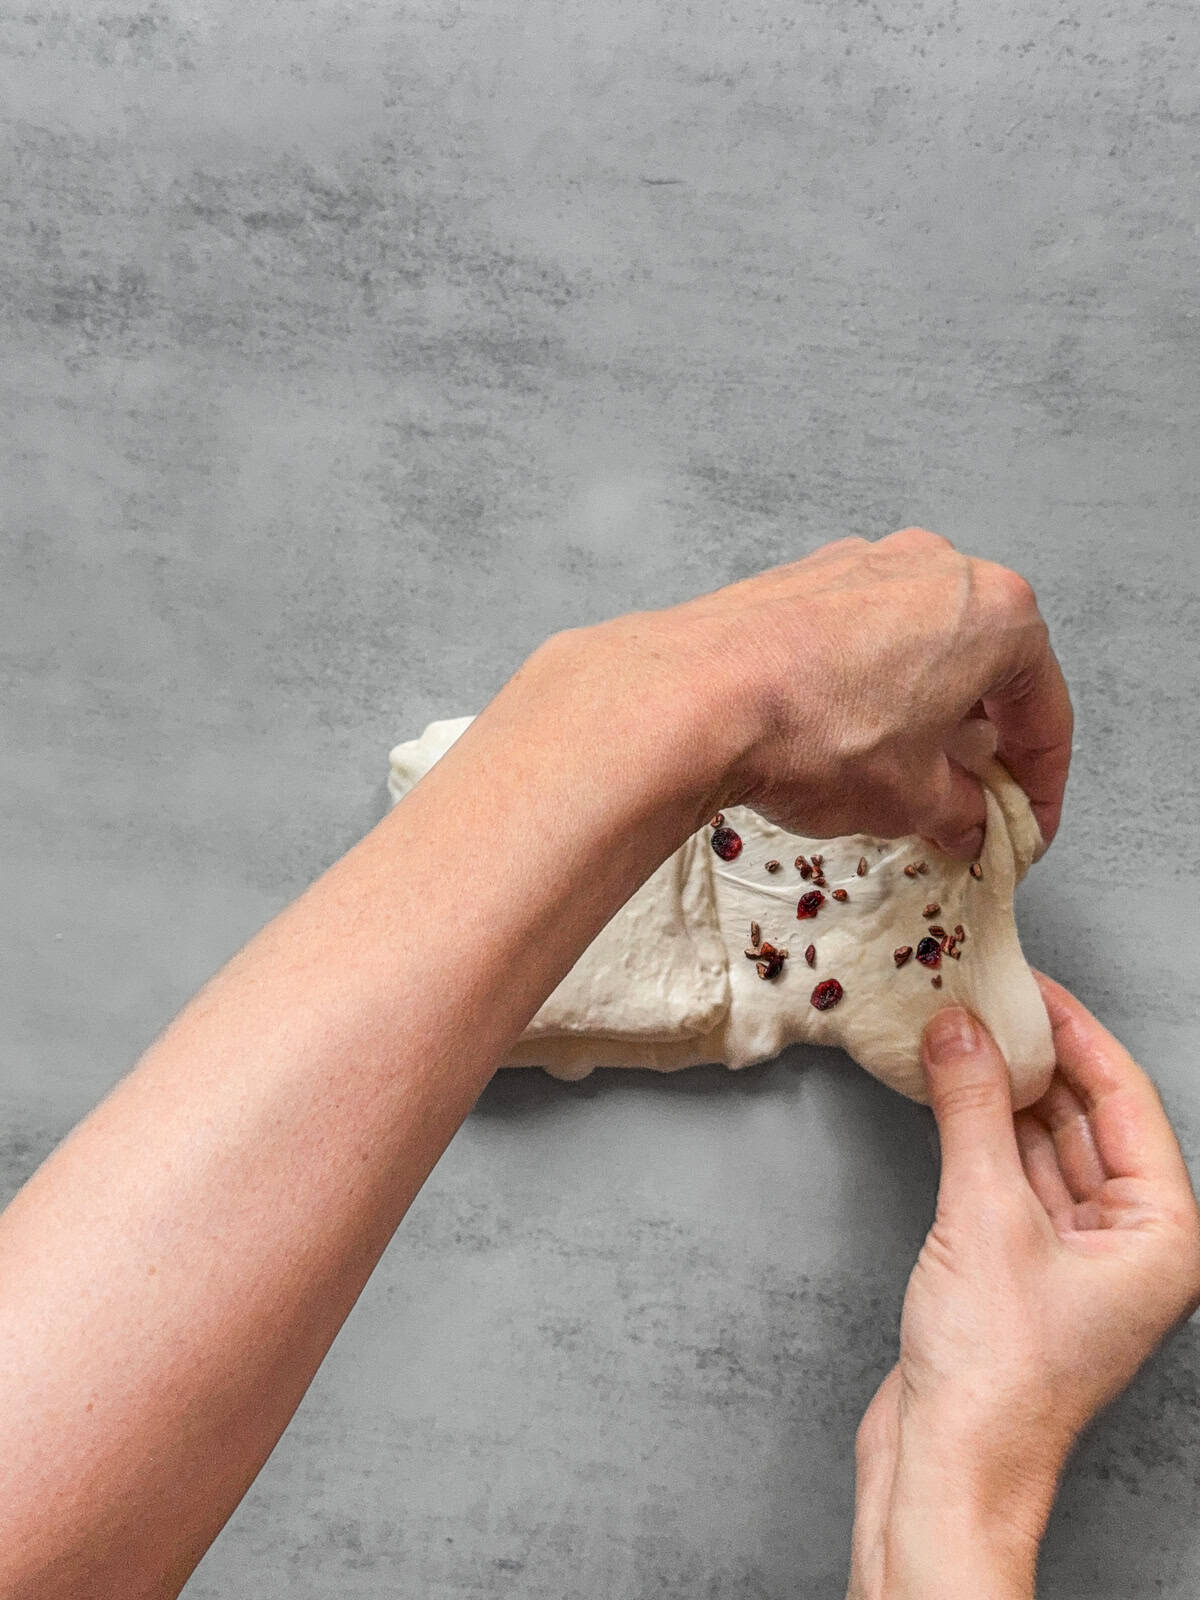
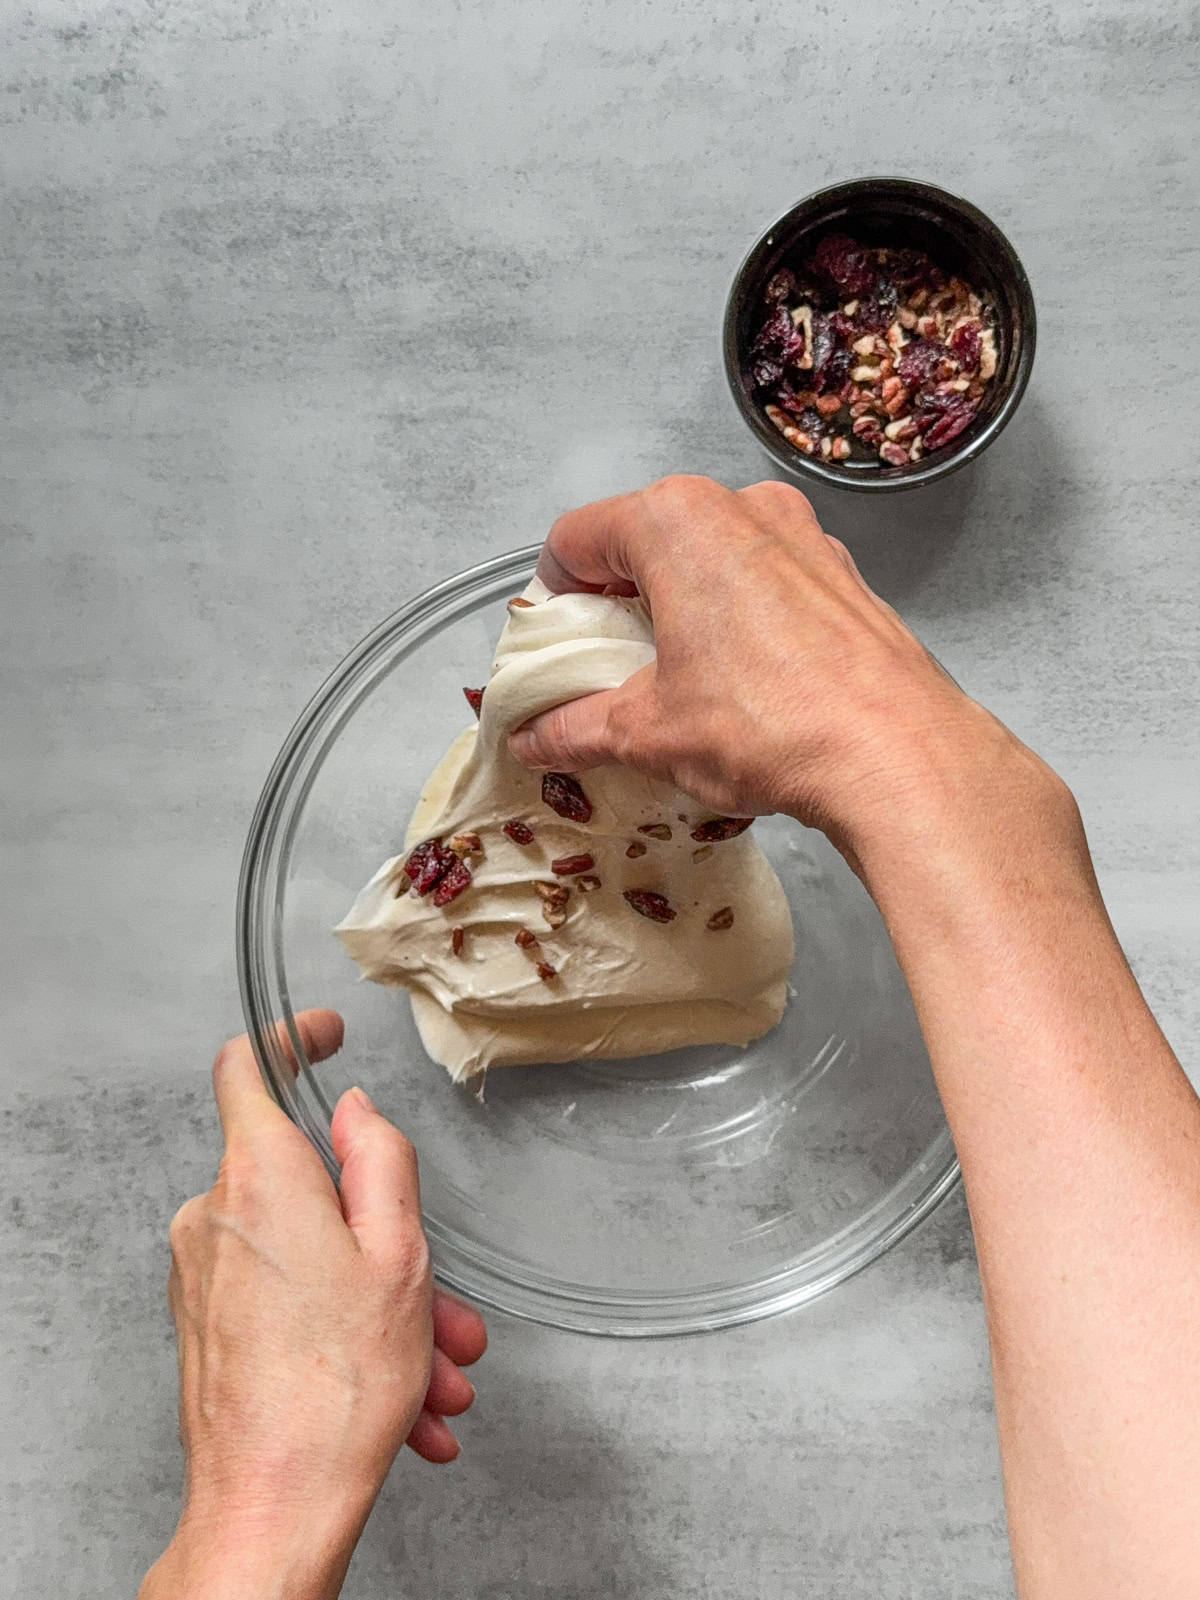
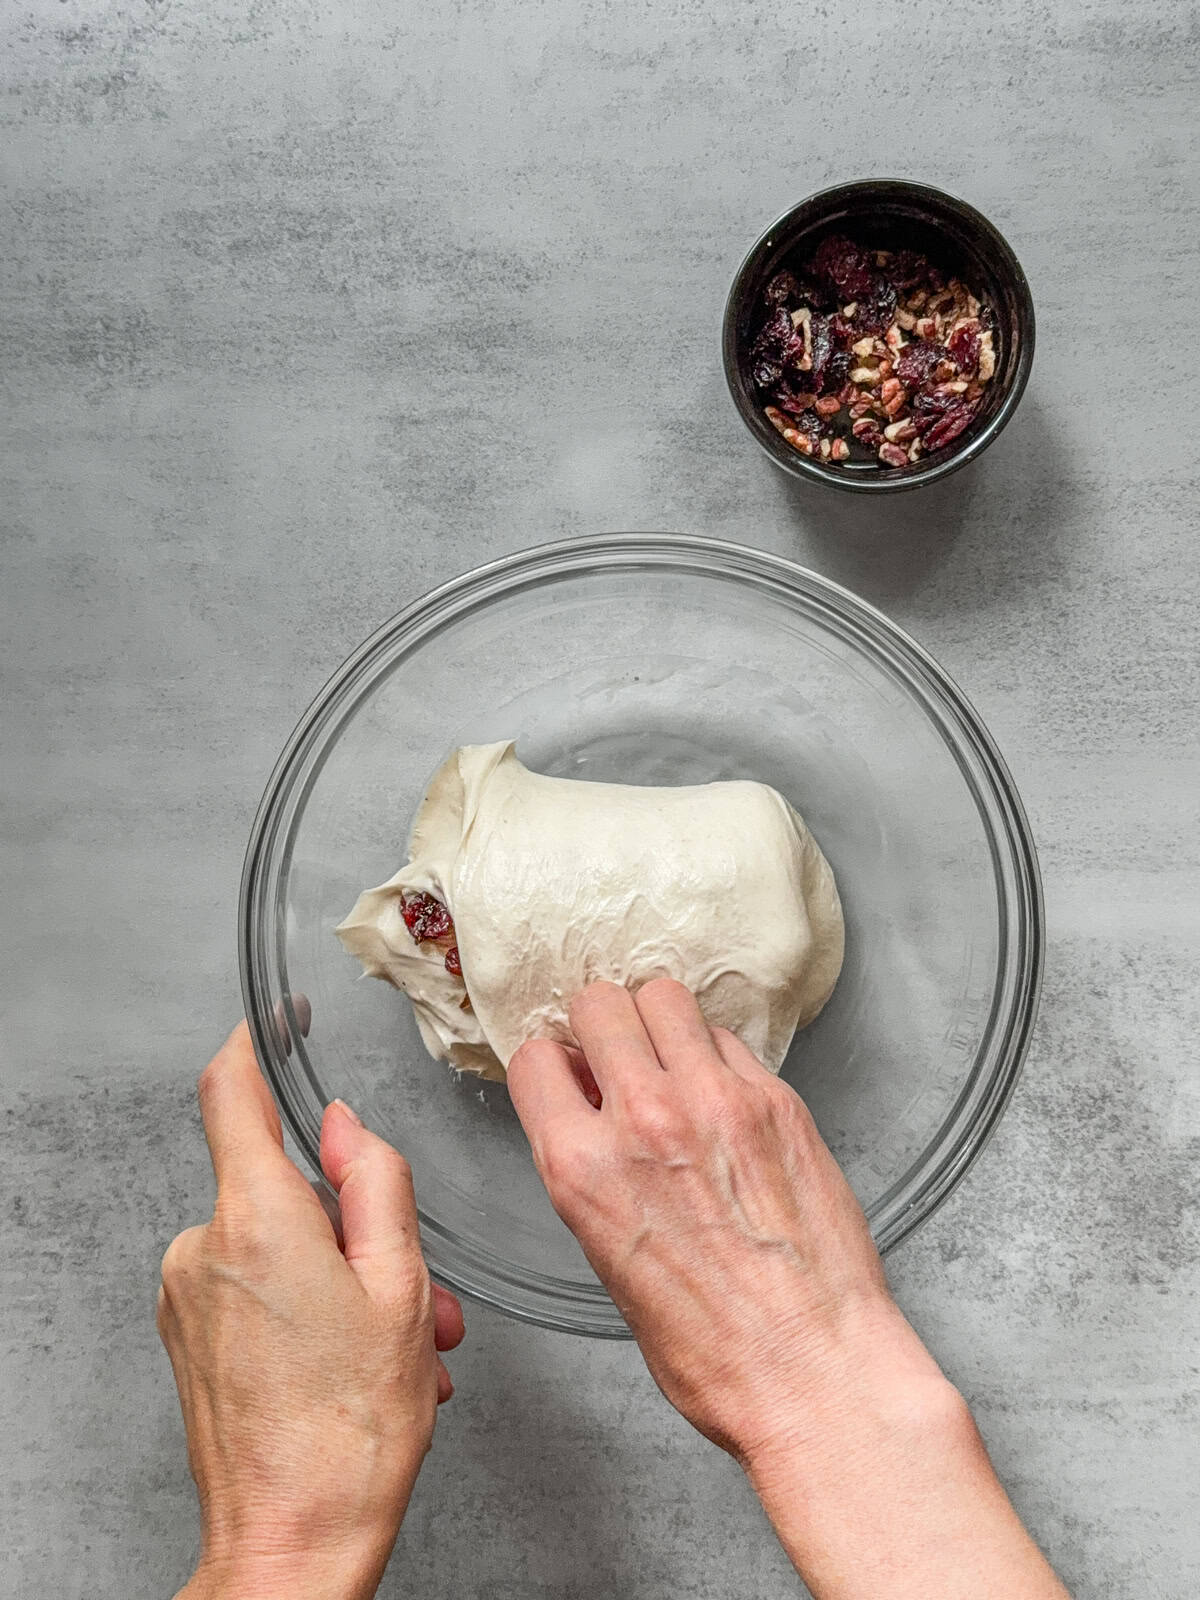
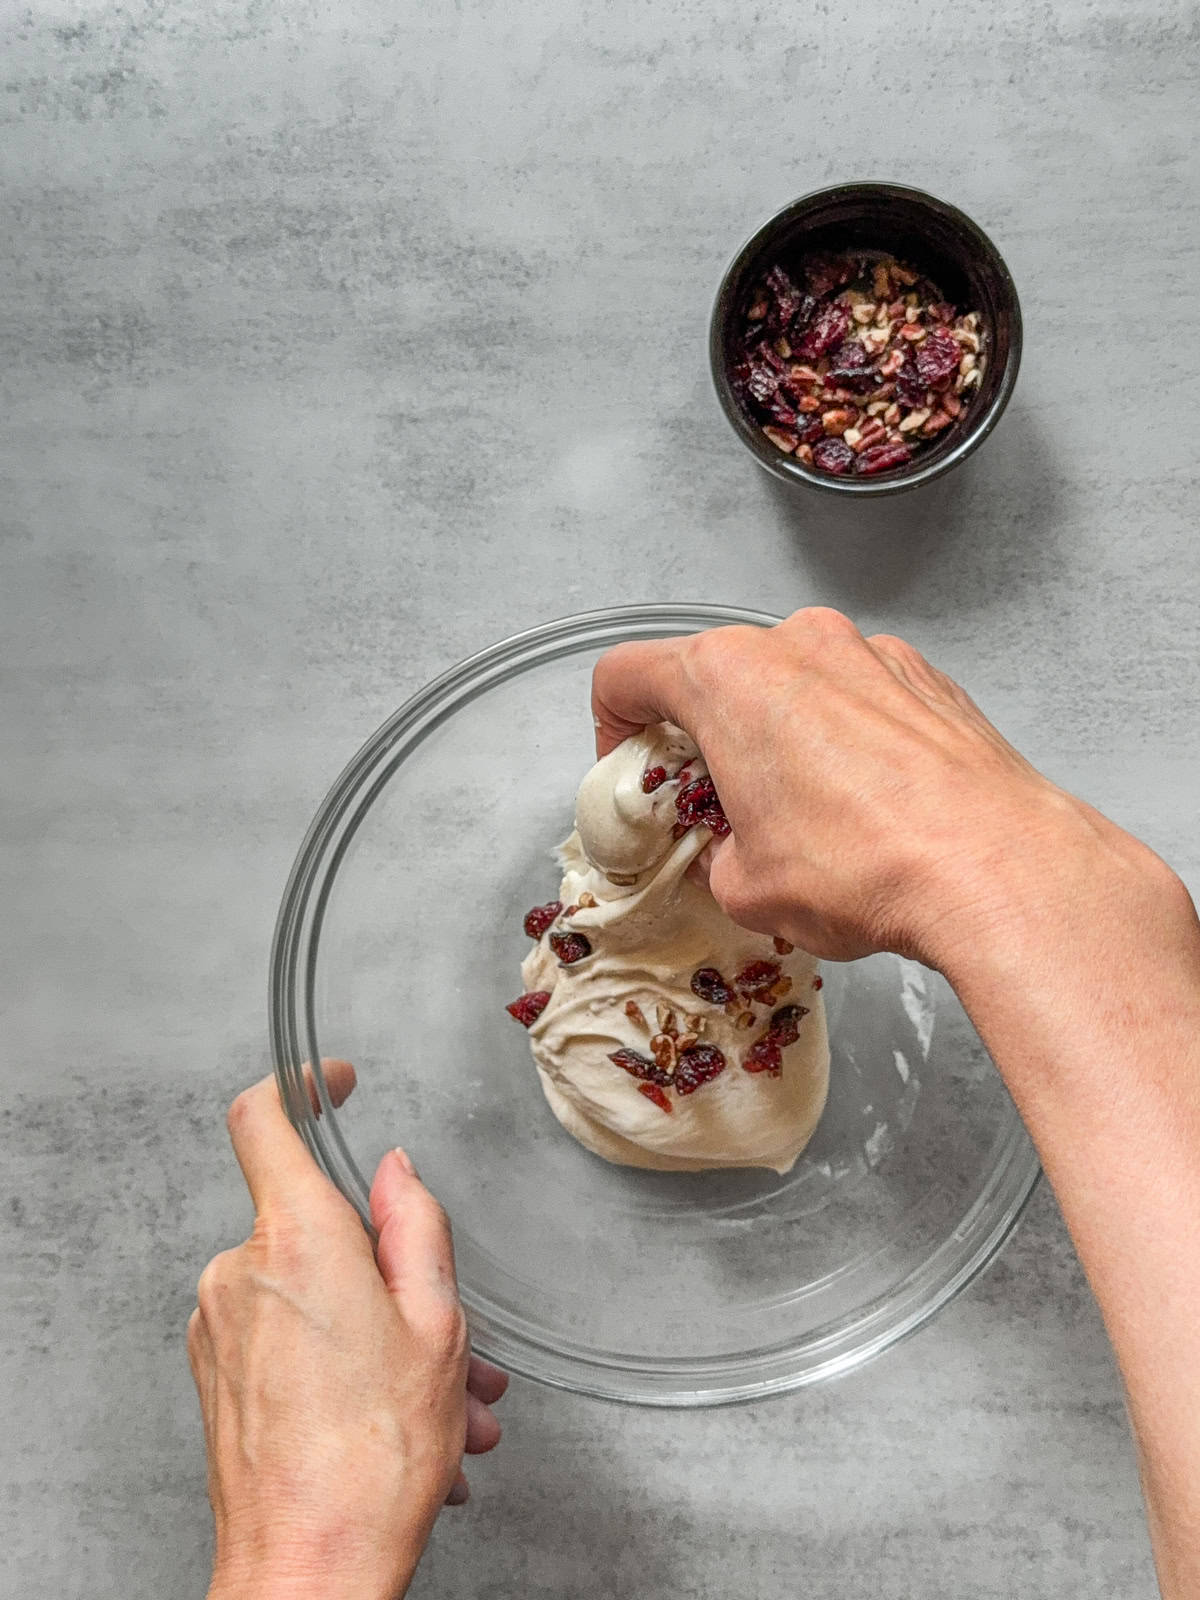
How to add inclusions during folds
Adding inclusions during dough folds is one of the easiest methods, making it especially well-suited for home bakers. This approach allows you to incorporate add-ins without disrupting the dough structure, keeping everything neatly contained within the dough.
You can add inclusions during the first or second set of stretch and folds. Sprinkle them over the dough at this stage to make sure even distribution and prevent inclusions from sitting on the surface.
If you are using a spiral mixer and skipping traditional stretch and folds, you can add inclusions during coil folds later in bulk fermentation.
When making multiple sourdough loaves, spread the inclusions evenly over the dough and gently dimple them in with your fingertips. Follow this with one or two coil folds to evenly distribute everything.
This method works particularly well for medium to large batches and is ideal for seeds, soaked grains, herbs, cheese, and other soft inclusions that won't tear the gluten network.
Here is a step-by-step guide for adding inclusions during dough stretch and folds. After mixing, let the dough rest for 30 minutes before performing the first set of stretch and folds.
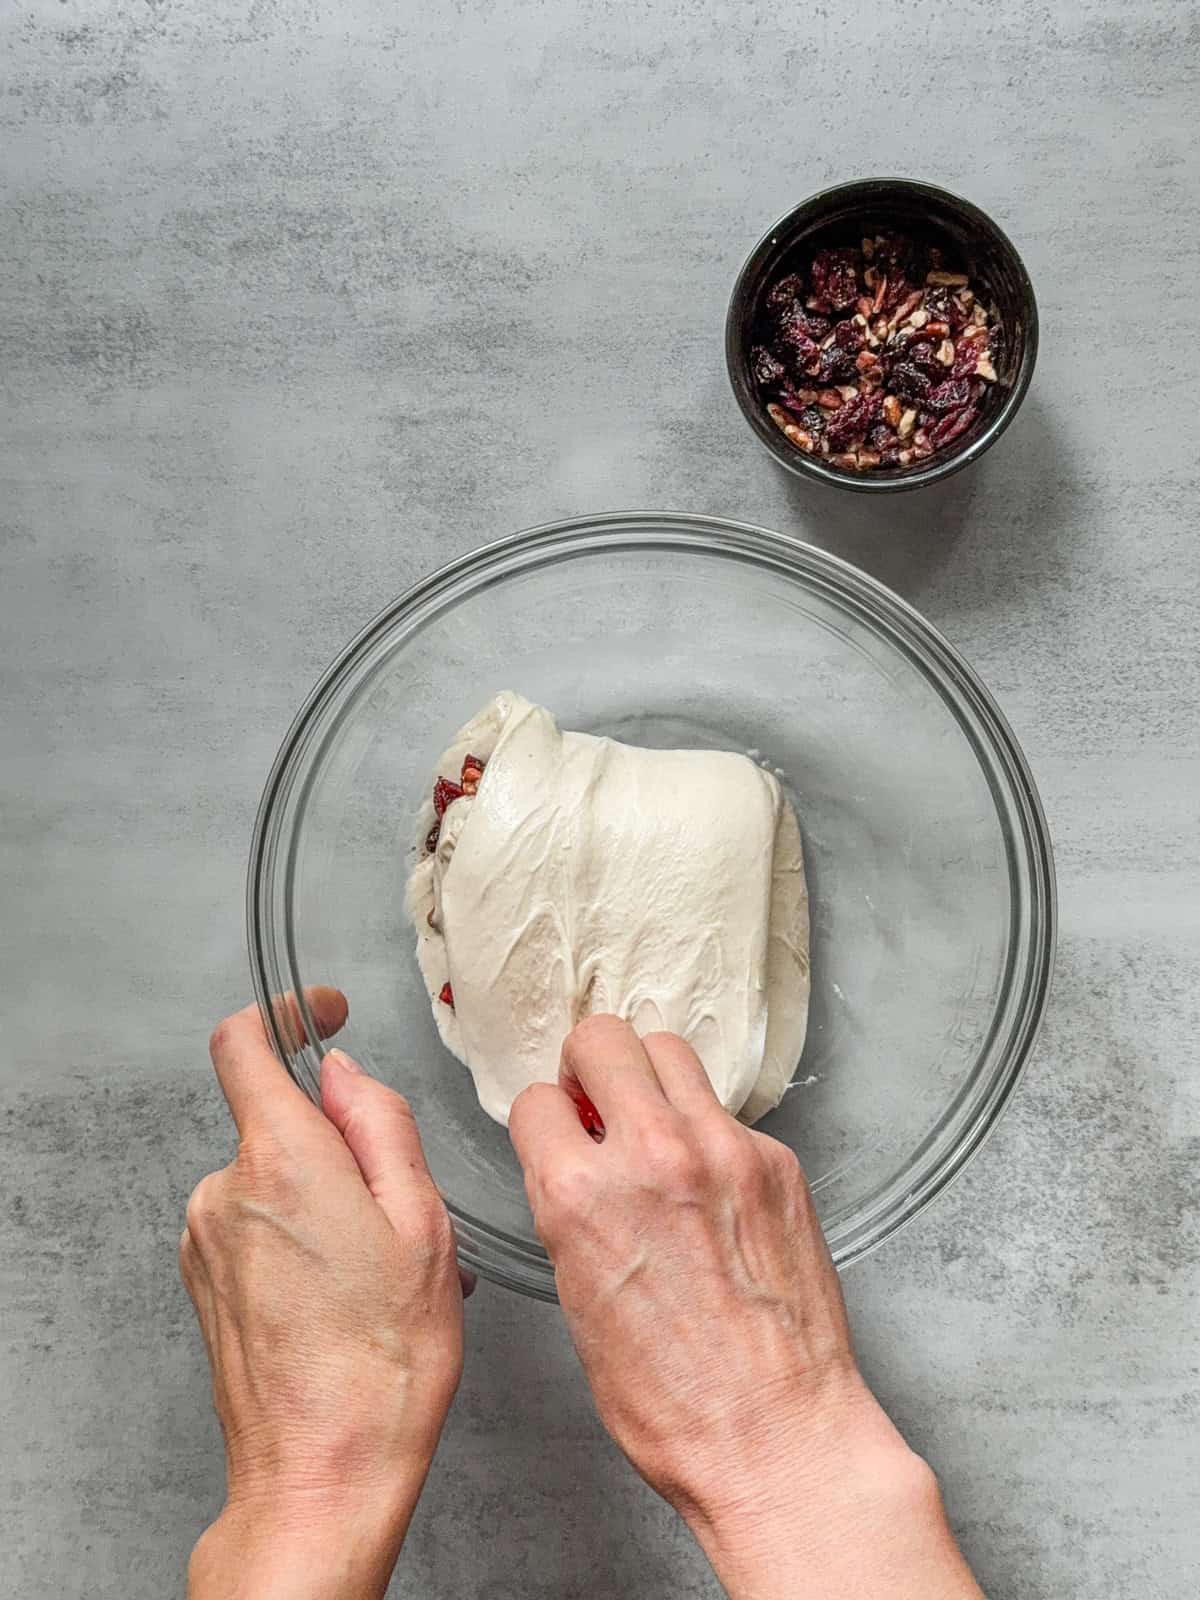
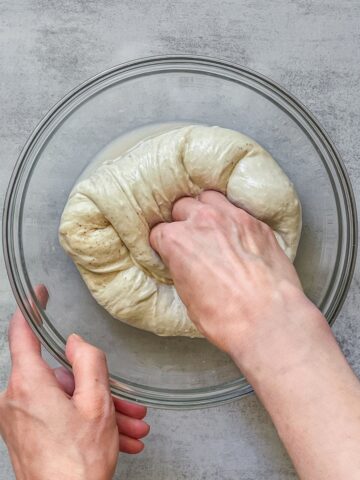
- Sprinkle inclusions evenly over the surface of the dough. Grab one side of the dough and pull it upward until you feel slight resistance.

2. Fold the stretched dough with inclusions over to the opposite side, like from the North to the South.

3. Turn the bowl 90 degrees, sprinkle inclusions, and grab another side of the dough and pull it upward.
4. Fold the stretched dough with inclusions over to the opposite side.
5. Rotate the bowl 90 degrees, add the inclusions, and lift the dough's side upward.
6. Bring the stretched dough with inclusions over and fold it onto the opposite side.
7. Turn the bowl 90 degrees, sprinkle in the inclusions, and lift the edge of the dough upward.
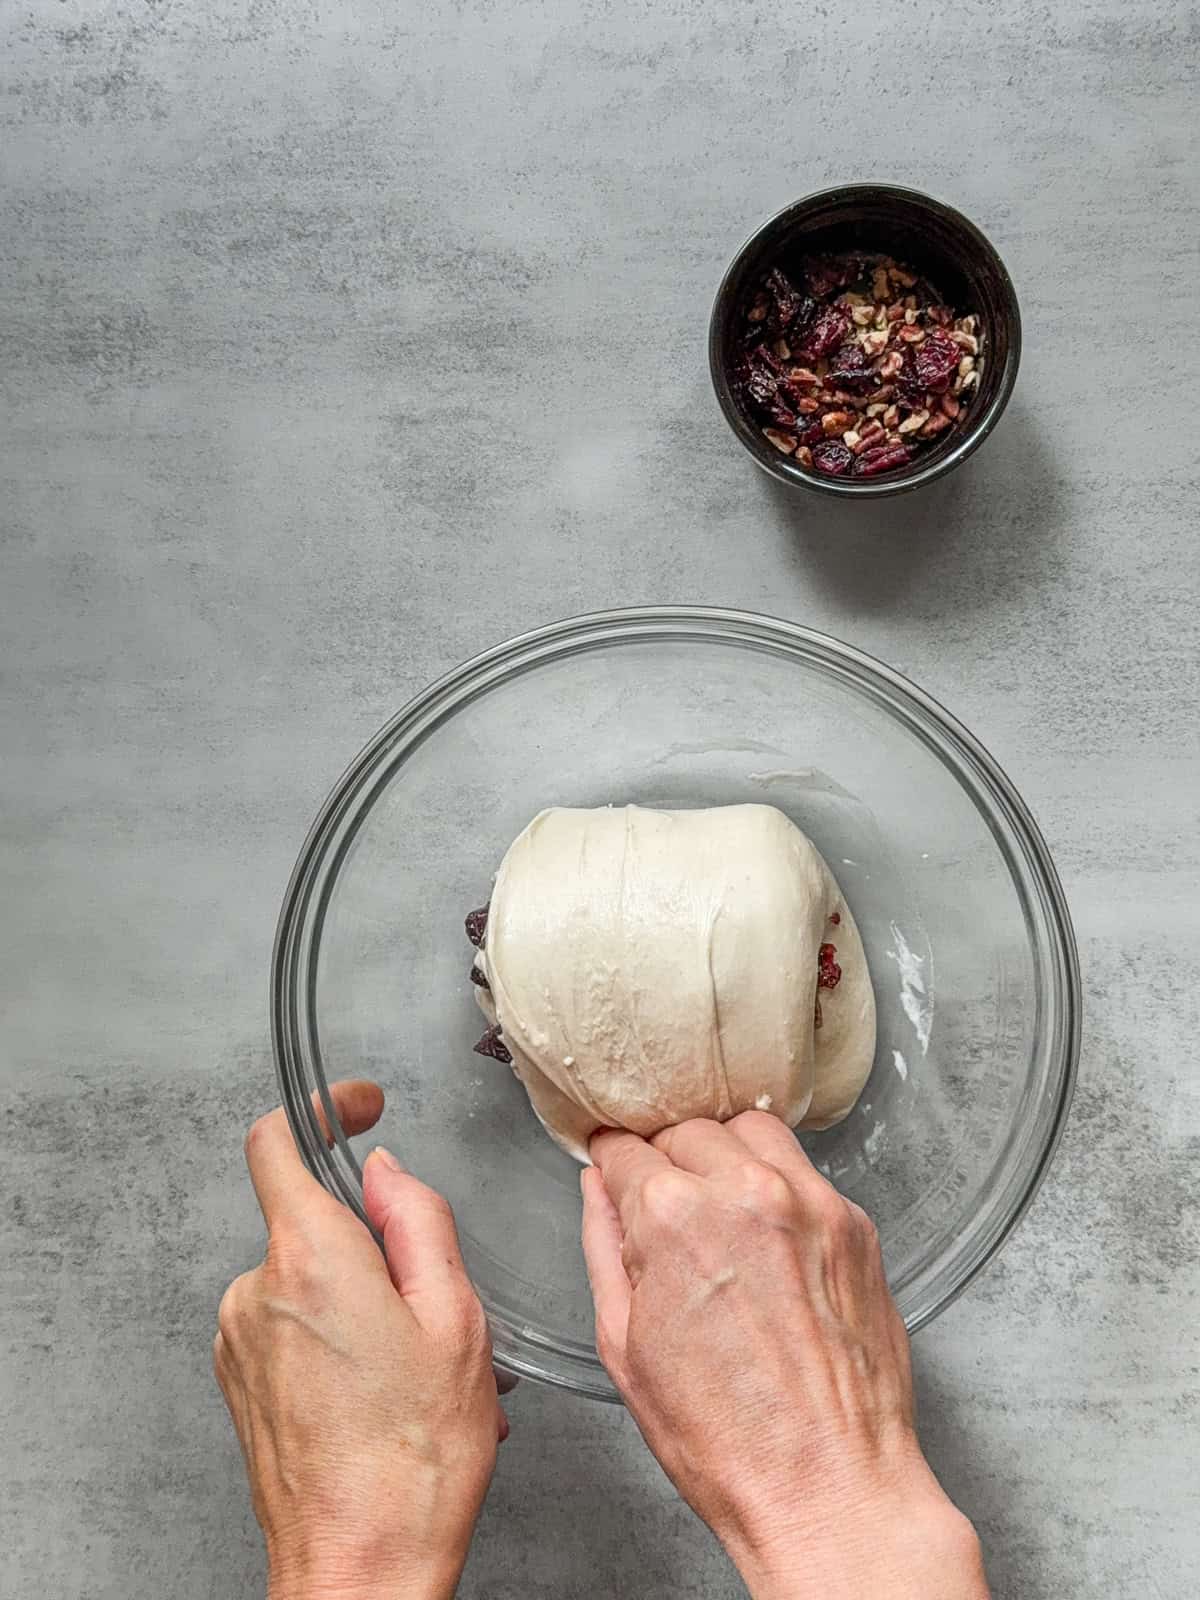
8. Fold the dough, with inclusions, over toward the opposite edge.
If you skip stretch-and-folds, sprinkle inclusions, and perform a coil fold to lift and gently fold the dough for even distribution. Repeat the coil folds in all four directions.
Continue bulk fermentation with the remaining folds as scheduled.
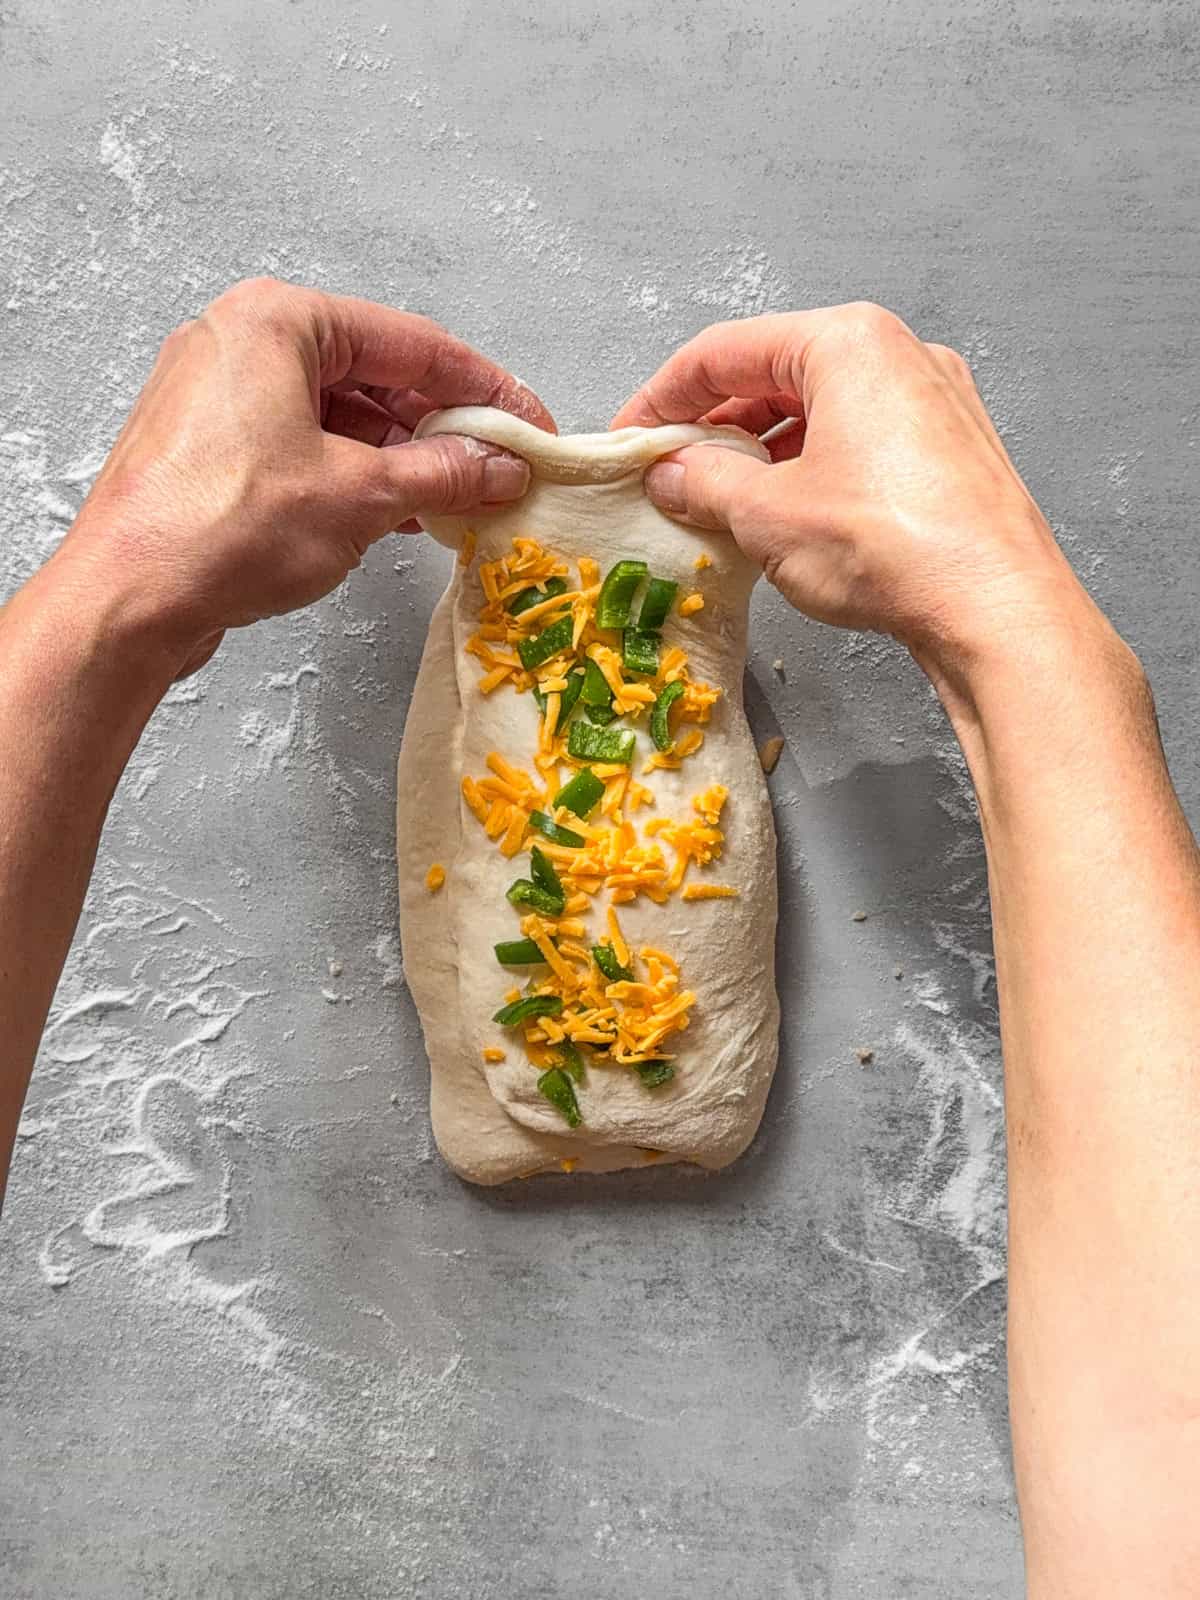
How to add inclusions during final shaping
While it is possible to add inclusions during final shaping, it is generally the least favorable method.
At this stage, the dough's structure is already well developed and filled with fermentation gases. Trying to incorporate add-ins now often leads to uneven distribution, a tighter crumb, and reduced oven spring.
However, this method is useful if you are a beginner experimenting with flavored sourdough or if you forgot to add inclusions earlier in the process.
Here is a step-by-step guide for adding inclusions during shaping.
- After bulk fermentation, carefully transfer the dough onto a lightly floured surface, taking care not to deflate it.
- Gently pat the dough into a rough rectangle or circle. Avoid pressing out too much gas.
3. Sprinkle the inclusions evenly over the surface. Keep amounts modest to avoid tearing the dough.
4. Lift the left side of the dough to fold it to the center.
5. Fold it to the center, and press it down lightly so it sticks.
6. Lift the right side of the dough, fold it to the center, overlapping the left side.

7. Sprinkle inclusions over the folded sourdough.
8. Use both hands to pull the top of the dough toward you gently.
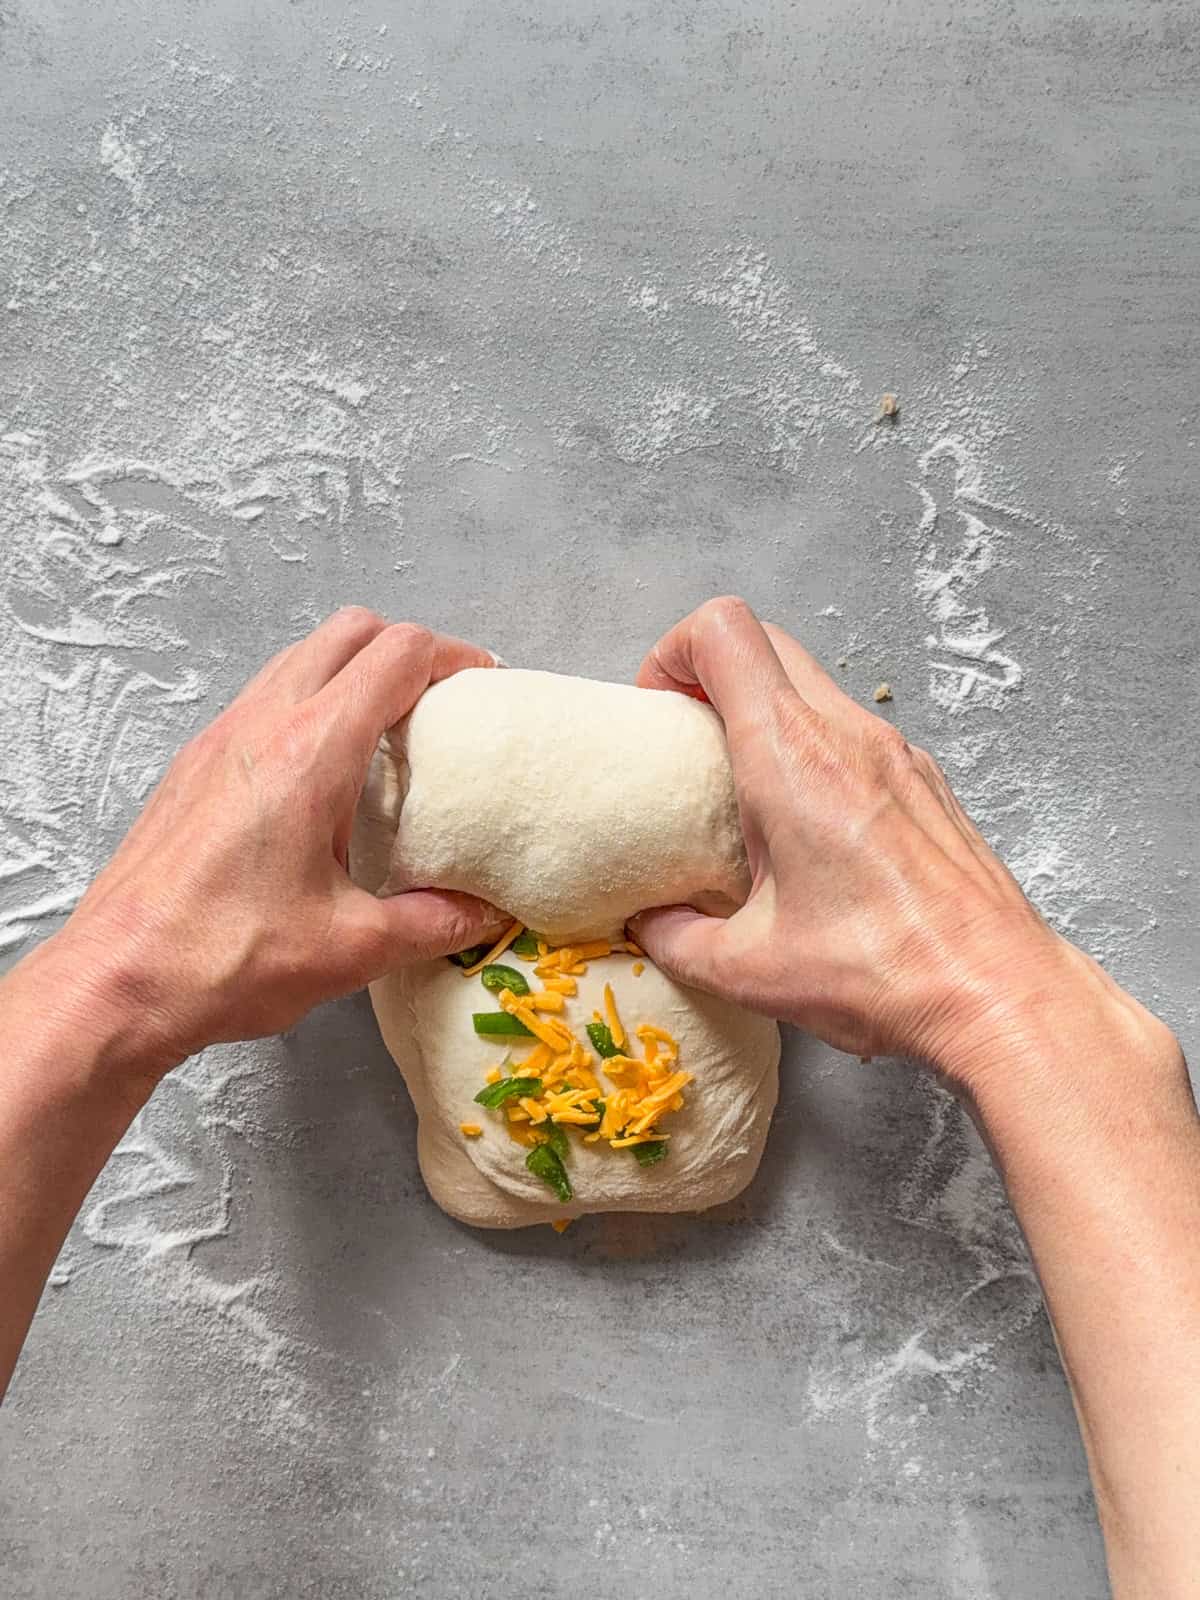
9. Roll the dough tightly from top to bottom, keeping inclusions inside and pressing the dough lightly as you go. Use your fingers to help create a smooth, firm surface.
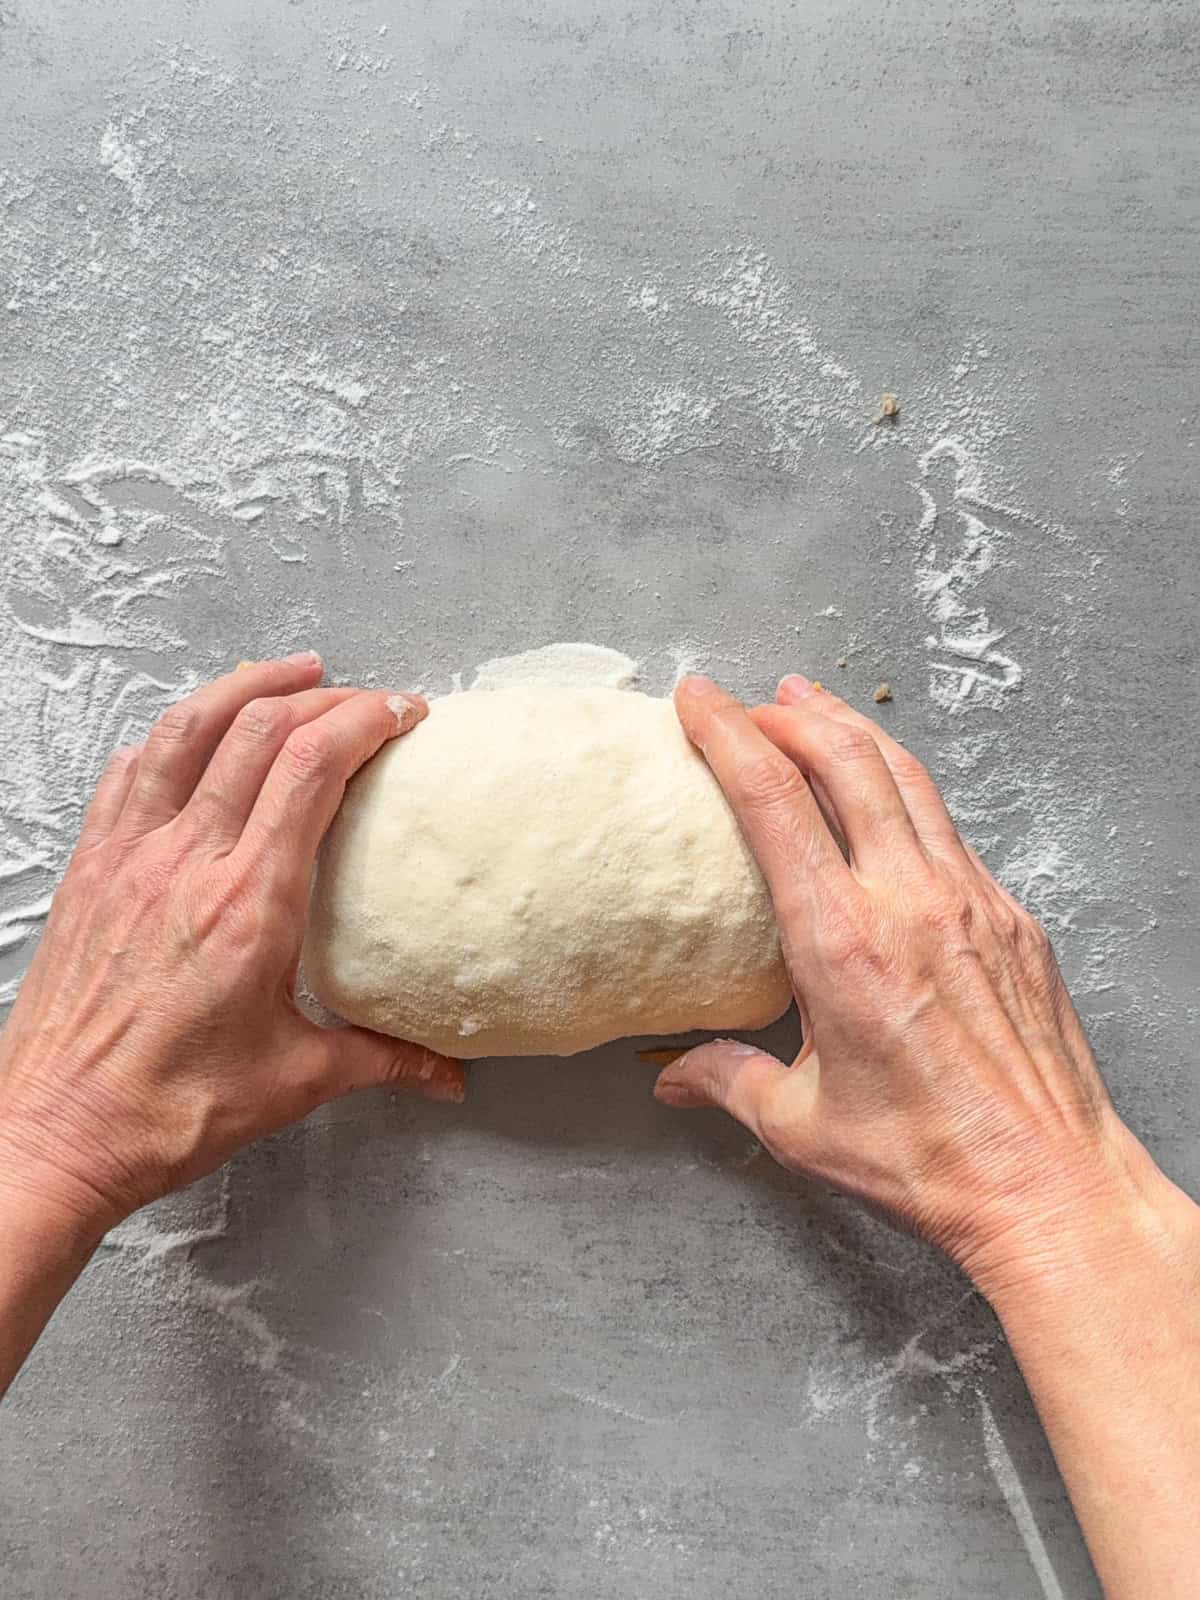
10. Roll the dough into a tight, smooth cylinder and pinch the ends to seal. Flip the bâtard seam-side up into the prepared banneton, then continue with the final proofing.
How many add-inds should you add?
Most sourdough inclusions are added at about 5-20% of the total flour weight (baker's percentage), with the exact amount depending on the type of add-in you are using.
Light add-ins (5-10%)
These ingredients are easy to distribute and rarely interfere with dough structure:
- Fresh herbs: 1-2%
- Dried herbs: 0.5-1%
- Spices: 0.5-1.5% (keep stronger spices under 1% to avoid fermentation issues)
- Low-density seeds: 4-8% (sesame, poppy, or nigella)
- High-density seeds: 8-15% (sunflower, pumpkin, oats: soak or toast to enhance flavor)
- Cocoa: 2-3%
- Garlic & onions: 4-6% (roast or confit to reduce harshness)
Moderate add-ins (10-20%)
These add flavor and texture while maintaining dough strength:
- Grated cheese, soaked seeds, chopped nuts: 10-20%
- Dried fruit: 20-25% (soak in water, juice, or tea to control moisture)
- Fresh fruit: Use sparingly and remove excess water to avoid over-hydrating the dough
- Nuts: 15-20% (pecans, walnuts, hazelnuts: toast for better flavor and texture)
Heavier or moist add-ins (15-35%)
These strongly affect hydration, fermentation, and gluten, so add them later in the mixing process:
- Hard cheese: 5-8% (Parmesan, Pecorino: limit salt content, especially in plain sourdough).
- Semi-hard cheese: 8-15% (shredded Cheddar)
- Soft cheese: Use as a filling; not ideal for direct incorporation
- Crumbly cheese: 3-6% (Feta, Stilton, Gorgonzola)
- Olives: 25-35% (drain and rinse for a cleaner flavor)
- Chocolate chips: 15-25%
Tip for beginners: Start at the lower end of each range and gradually increase as you learn how your dough handles different add-ins.
How to prepare sourdough add-ins?
The way inclusions are cut, soaked, or toasted affects bulk fermentation, gluten strength, hydration, and even the final crumb.
As a general rule, add chunky, oily, or delicate add-ins later (during folds or shaping), and fine, dry, or soaked add-ins earlier (during lamination or early folds).
Chunks vs. grated add-Ins
Chunky inclusions (such as cheese cubes, nuts, olives, or chocolate pieces) create bold pockets of flavor but can disrupt gluten if they are too large. Keep chunks small and uniform to reduce tearing during folds or shaping.
Grated or finely chopped inclusions (like cheese or vegetables) blend more seamlessly into the dough and distribute more evenly. These are ideal when you want flavor throughout the loaf rather than isolated bursts.
Tip: Add chunkier add-ins later in the process, while adding grated or finely chopped ingredients earlier, including during lamination.
Raw vs. toasted seeds
You can add seeds raw or toasted, depending on the flavor and texture you want. Raw seeds are mild in flavor and work when you want a subtle crunch. Toasted seeds bring out deeper, nuttier flavors and add aromatic flavor to your loaf.
If toasting, allow seeds to cool completely before adding them to the dough. Adding warm seeds will interfere with fermentation and dough temperature.
Chopping and shredding
You should reduce the size of large or fibrous ingredients before adding them to the dough. Chop nuts, dried fruits, olives, and vegetables into small, even pieces. Shred ingredients such as cheese or firm vegetables to help them blend smoothly.
Smaller pieces reduce stress on the gluten network and help maintain dough strength throughout bulk fermentation.
Soaking seeds and grains
Some seeds and grains absorb a lot of moisture and should be soaked before use. Seeds that benefit from soaking include sunflower, pumpkin, flax, and chia.
Soaking prevents these inclusions from pulling water out of the dough during fermentation. After soaking, drain thoroughly so excess water doesn't throw off hydration.
Using wet or juicy add-Ins
Ingredients such as olives, sun-dried tomatoes, or fresh vegetables should be well drained or, if necessary, patted dry.
Excess moisture weakens the dough, making it sticky and making shaping more difficult. Always remove as much surface moisture as possible before adding these inclusions.
How inclusions affect bulk fermentation
When you add heavy inclusions like olives, cheese, nuts, or dried fruit to sourdough, the dough behaves differently. These mix-ins weaken the gluten, slow down (or sometimes speed up) bulk fermentation, and make it harder to judge how much the dough has risen.
Bulk fermentation may take a bit longer, especially with cold or salty inclusions, and slightly shorter with sweet inclusions.
Still, don't wait for a bigger rise. Stop when the dough reaches the smaller target percentage rise (if you track bulk fermentation based on dough temperature).
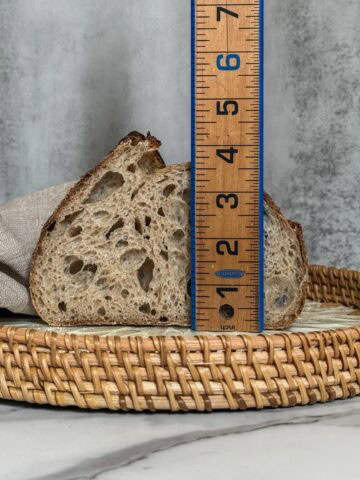
For dough with a lot of inclusions (around 30%), keeping it at 77-79°F (25-26°C) and stopping bulk at 65-75% rise usually gives the best results, with better shape and oven spring.
Don't rely only on how much the dough grows. Look for other signs. The dough should feel lighter and airy, have small bubbles on the sides and top, and jiggle a little when you move the container. It should also hold its shape slightly and look a bit domed, not flat (see my guide on when to finish bulk fermentation).
Inclusions that affect bulk fermentation (and those that don't)
Not all sourdough inclusions behave the same way. Some affect bulk fermentation and dough structure.
Inclusions that slow bulk fermentation
Some ingredients contain salt, antimicrobial compounds, or spices that naturally inhibit yeast activity. When added too early, they can slow down bulk fermentation.
These include salted ingredients (cheese, olives, cured meats, salted nuts or seeds), garlic, and cinnamon.
Because these inclusions interfere with yeast activity, add them later in the process, such as during folds or final shaping. This allows bulk fermentation to progress normally before the dough meets anything that could slow it down.
Inclusions that tighten the crumb
Fat-rich ingredients affect how gluten forms and stretches. While they create a softer, more tender crumb, they often reduce overall oven spring and loaf height. Common examples include oils and fats, cheese, and meats.
These inclusions coat gluten strands, limiting their ability to stretch fully. The result is usually a slightly more closed crumb, a softer crust, and a loaf that may spread a bit more than usual. This isn't a flaw. It is more something to expect and plan for.
Inclusions that speed up bulk fermentation
Ingredients that contain natural sugars boost yeast activity. Sugars provide extra food for yeast, which leads to faster fermentation and increased browning during baking.
These inclusions include dried fruits, and weet add-ins like chocolate or honey-soaked fruit. When using these inclusions, keep a close eye on bulk fermentation, as your dough can be ready sooner than expected.
Inclusions that affect dough hydration
Some inclusions add additional moisture to the dough, which can change its hydration and handling. These inclusions are vegetable purées and fruit purées.
Because these add water to the dough, you need to reduce the water in your base recipe slightly. Without adjustment, the dough can become overly slack and difficult to shape.
Neutral inclusions with minimal impact on fermentation
Many inclusions have little to no effect on fermentation or gluten development when added at the right time. These include plain, unsalted seeds, fresh or dried herbs, well-drained vegetables, and unsalted nuts.
These ingredients are usually added early, including during lamination, and tend to distribute evenly without disrupting fermentation or dough structure.
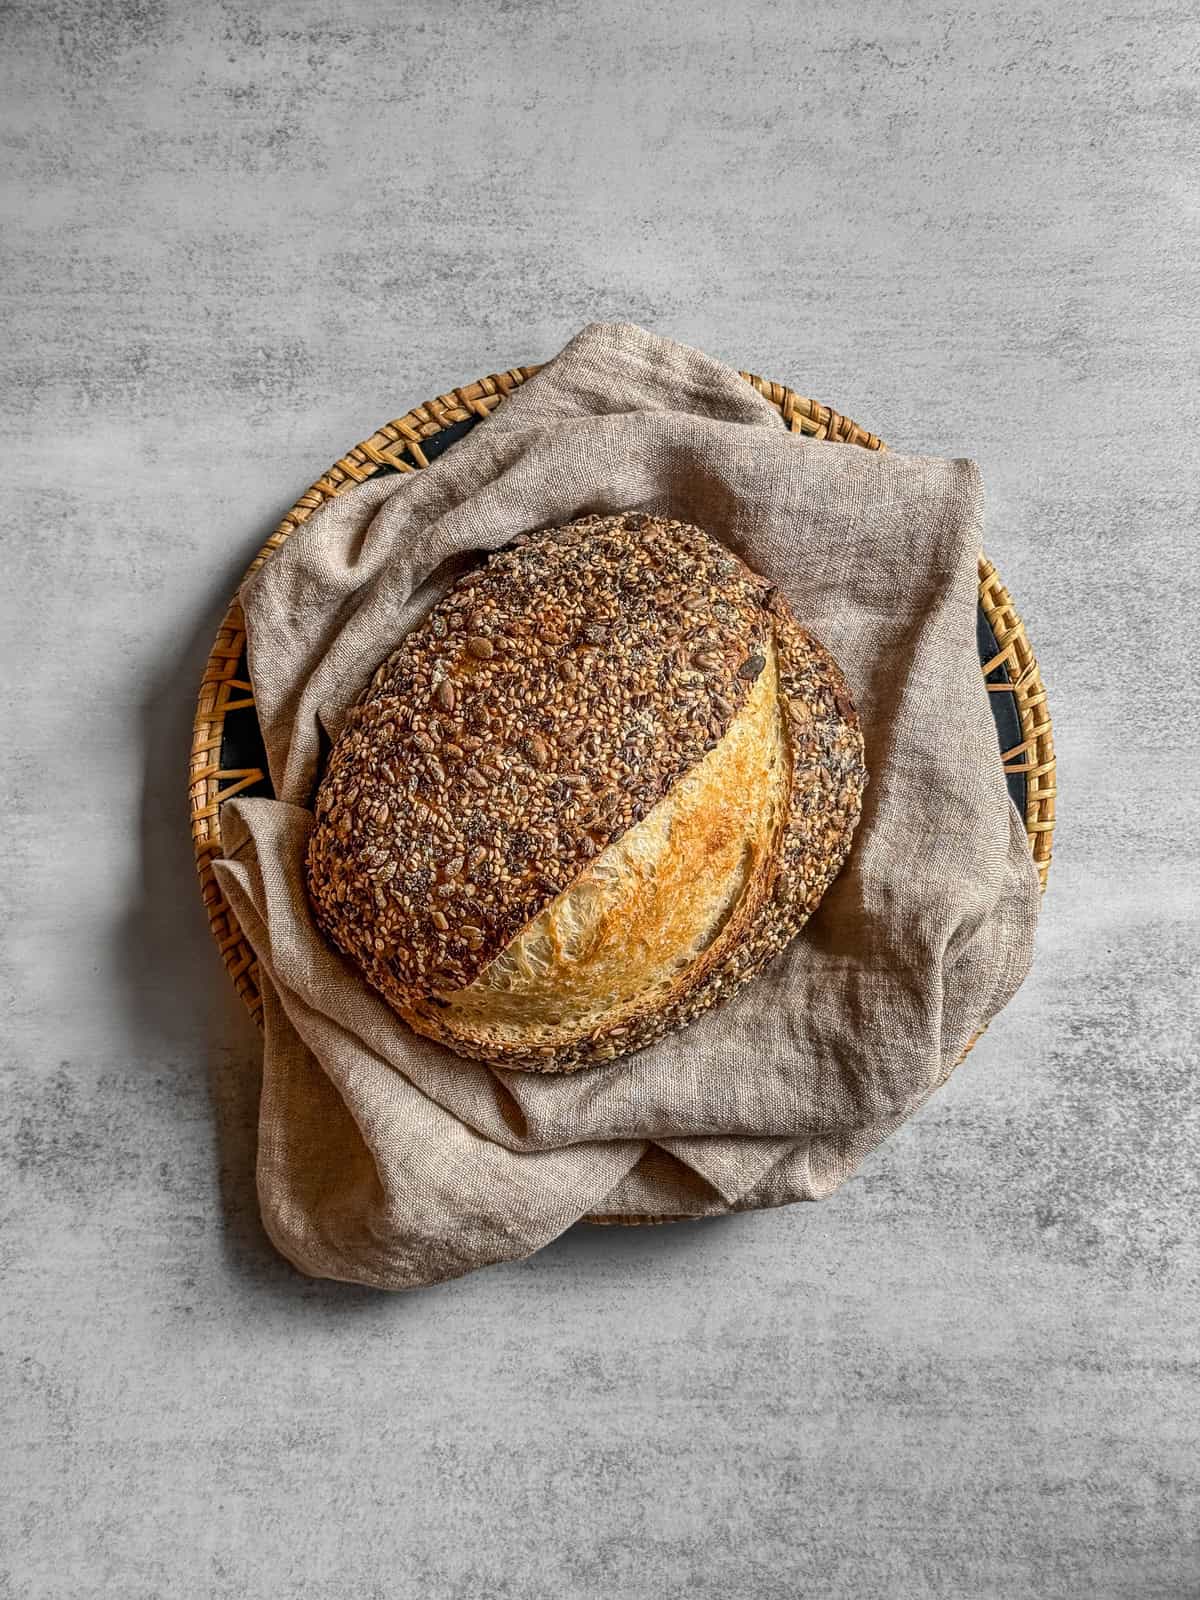
How to top sourdough bread
Topping sourdough bread with seeds or grains adds texture, flavor, and beautiful visual contrast.
You can top your dough with grains like oats or a variety of seeds, including sesame (white, black, or tricolor), pumpkin, sunflower, quinoa, flaxseed, linseed, and nigella seeds. Be sure to use raw seeds, not toasted ones.
Here is a step-by-step seed coating method:
- Spread a generous layer of seeds (sesame, sunflower, pumpkin, poppy, etc.) on a tray or a large shallow plate.
- Set up a second tray with a clean, damp towel.
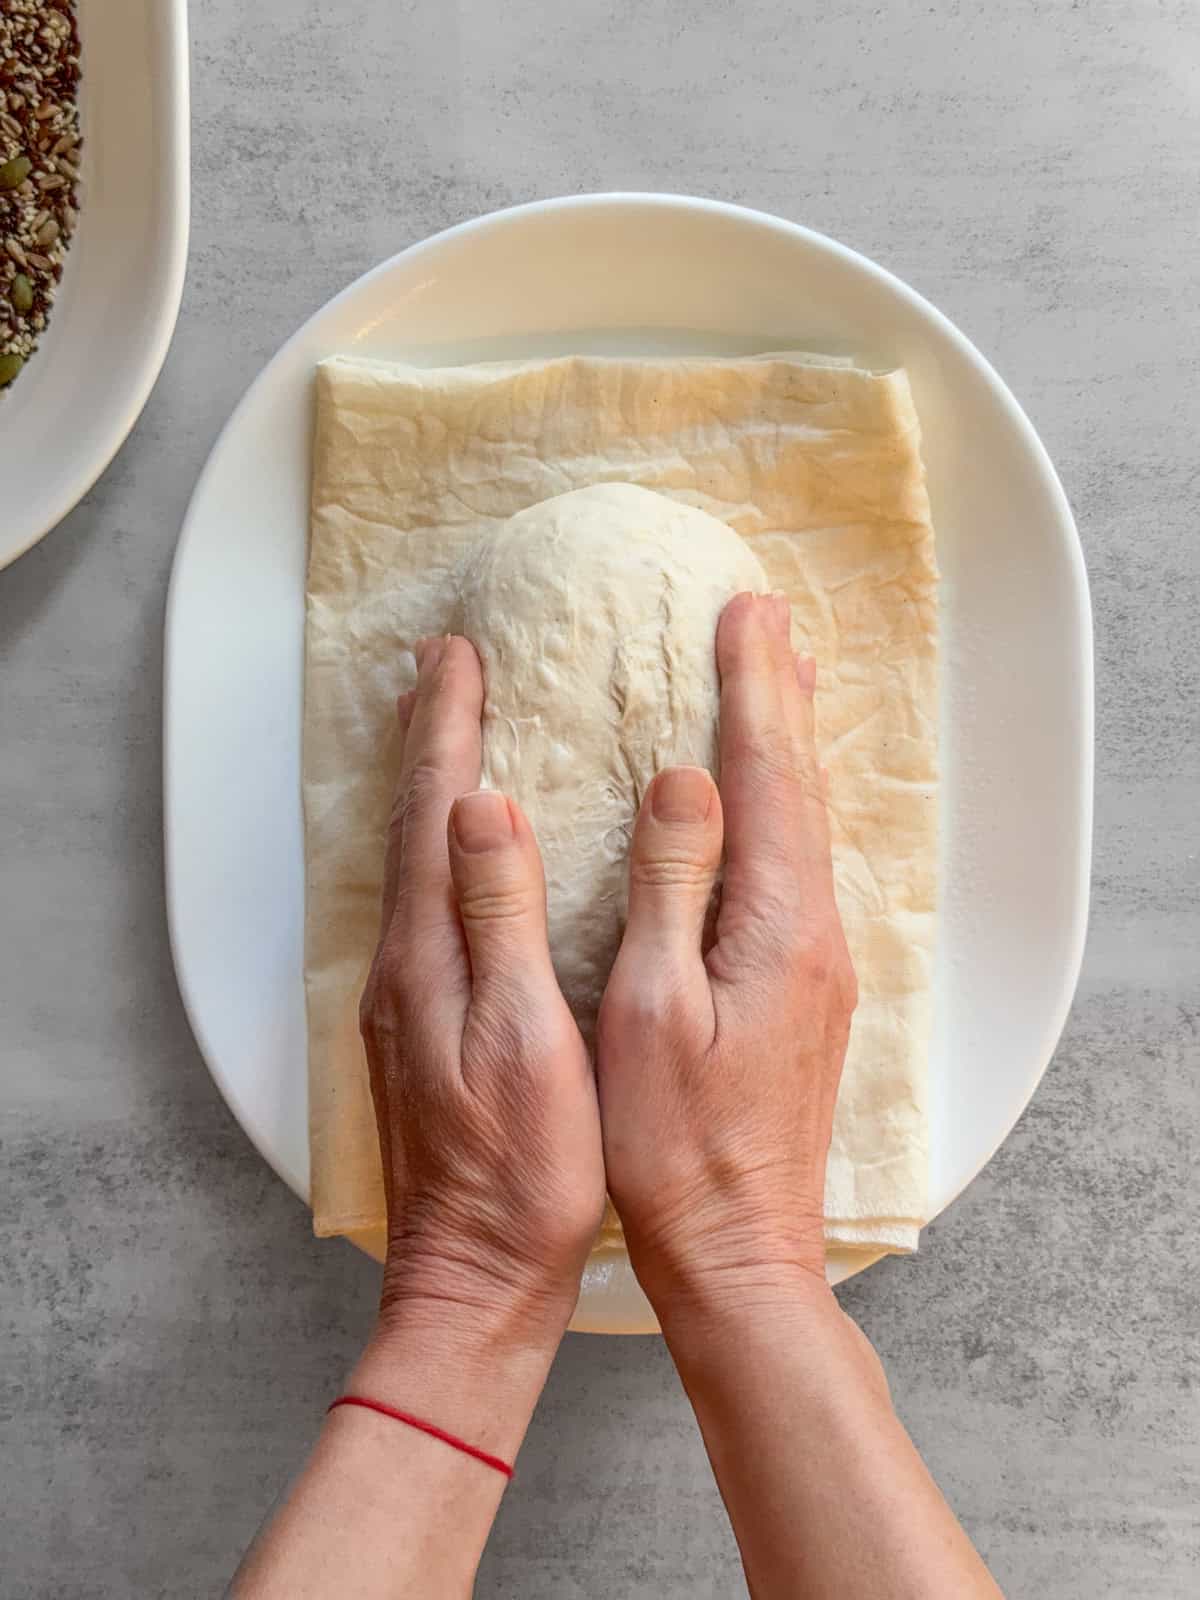
3. After shaping, gently place the dough (seam side up) on the damp towel to lightly moisten the surface.
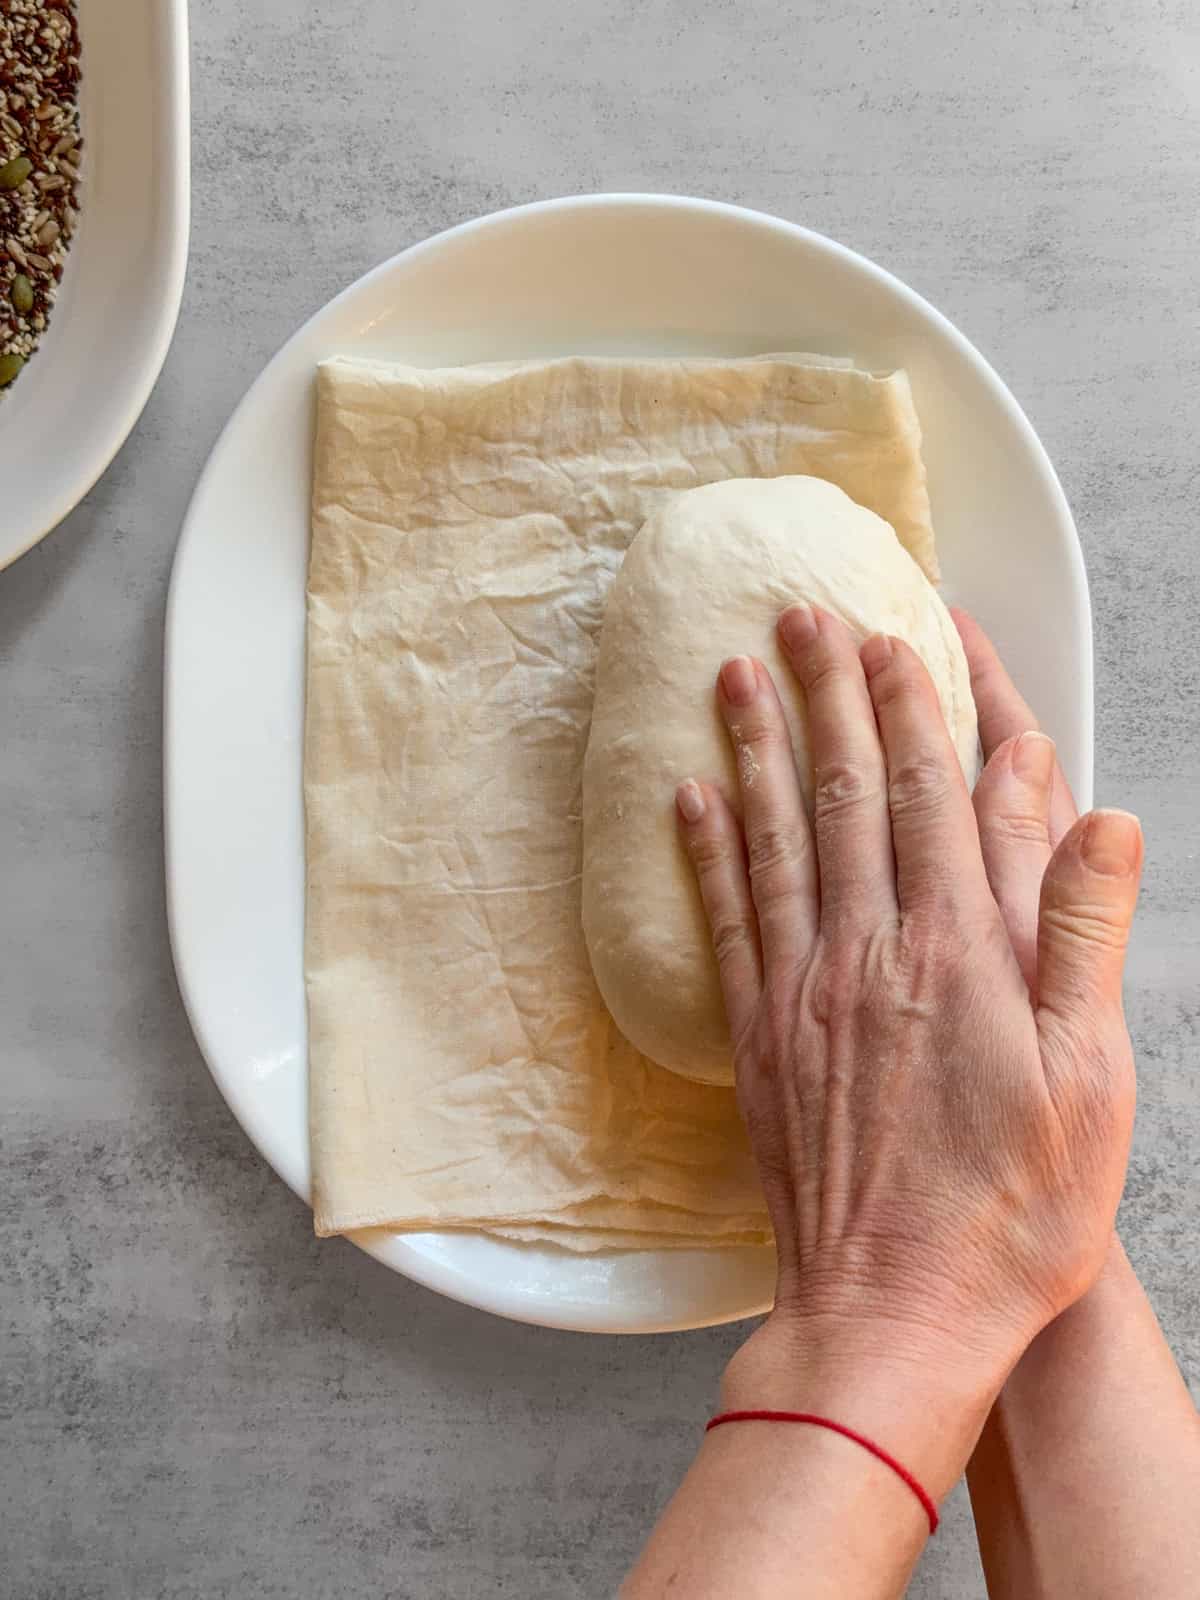
4. Gently roll the dough to one side on a damp towel to lightly moisten its surface.
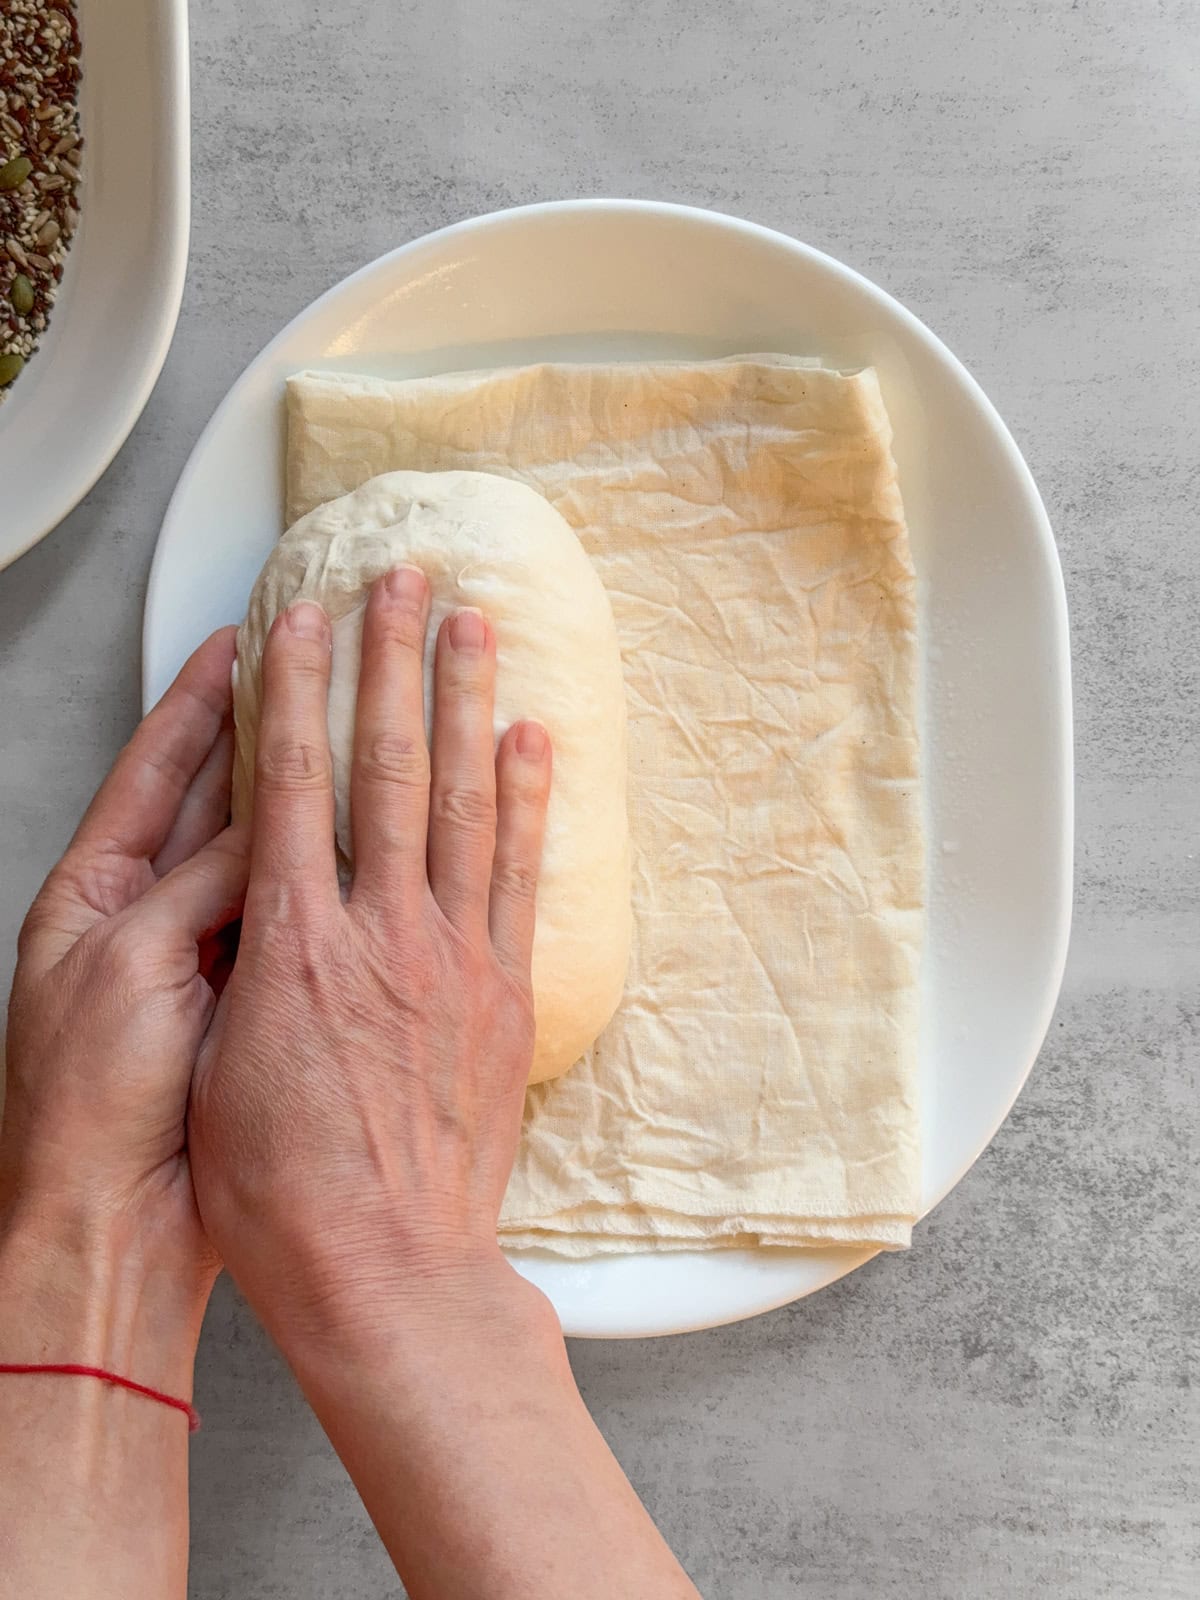
5. Then, roll the dough gently to the other side to moisten that surface as well.
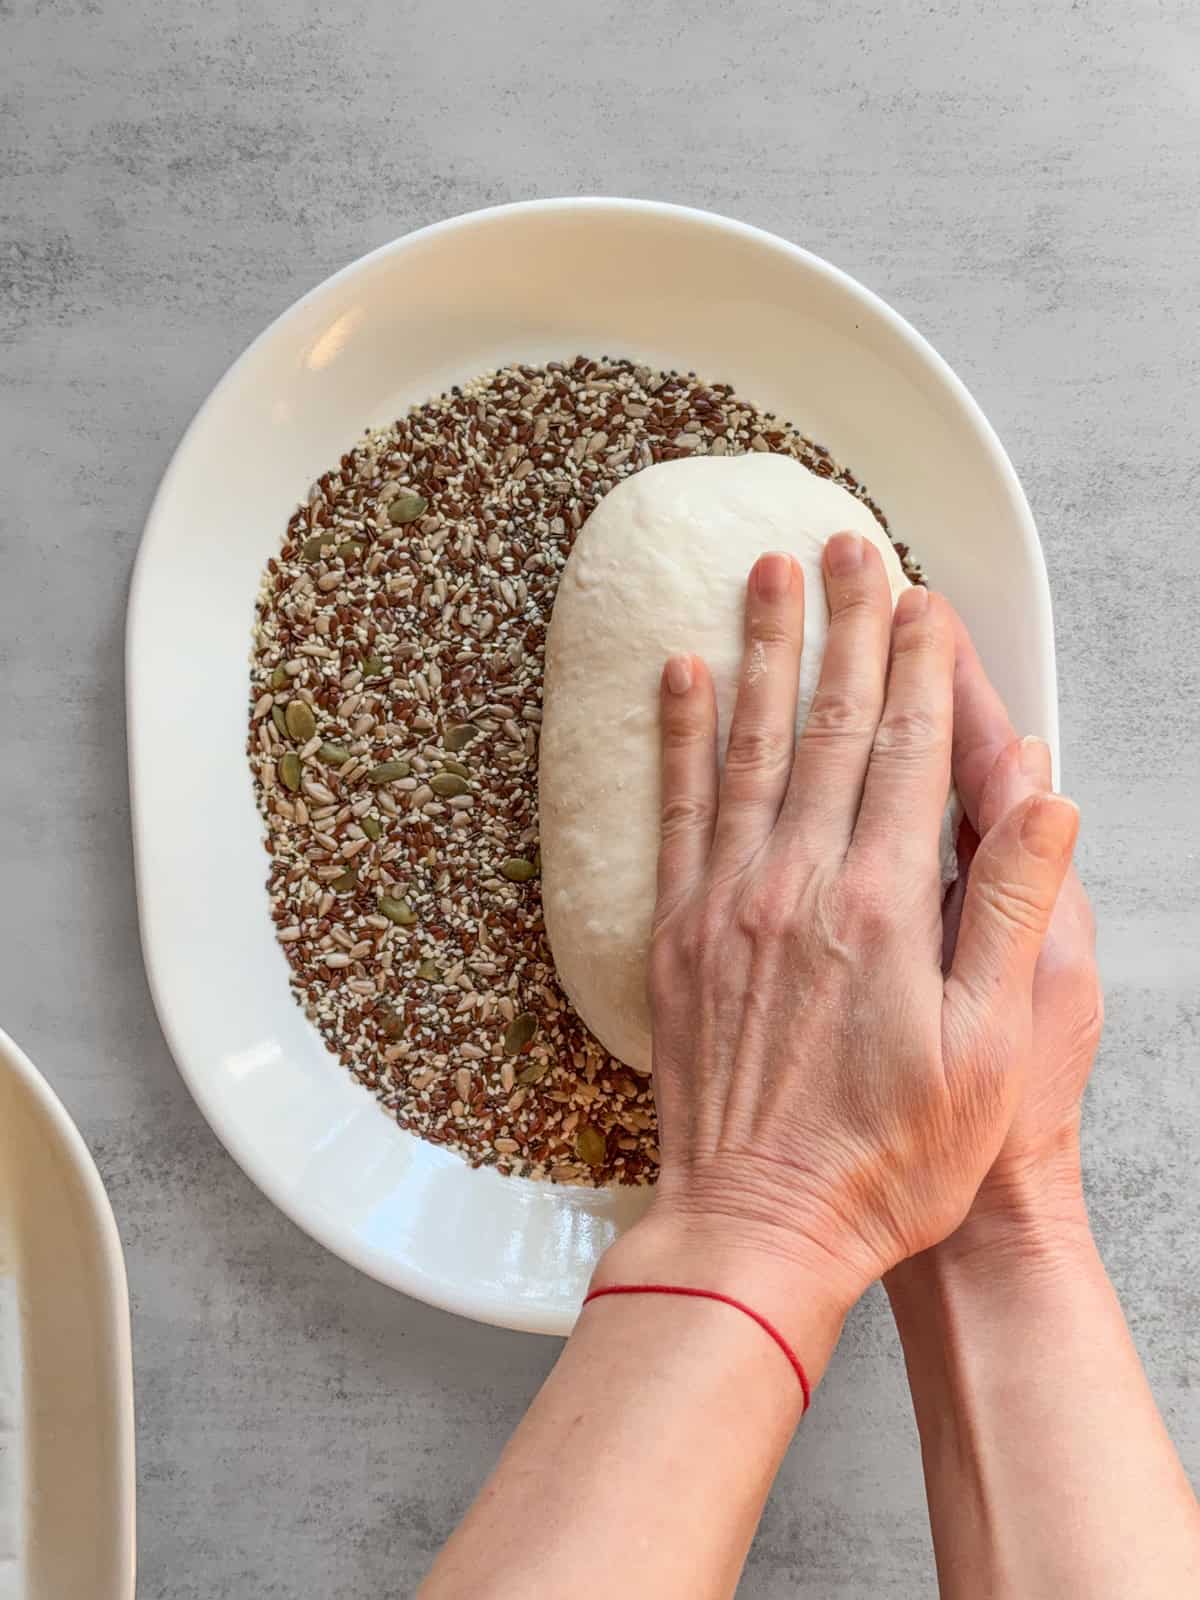
6. Transfer the dough to a shallow plate with seeds and roll it over the seeds on one side.
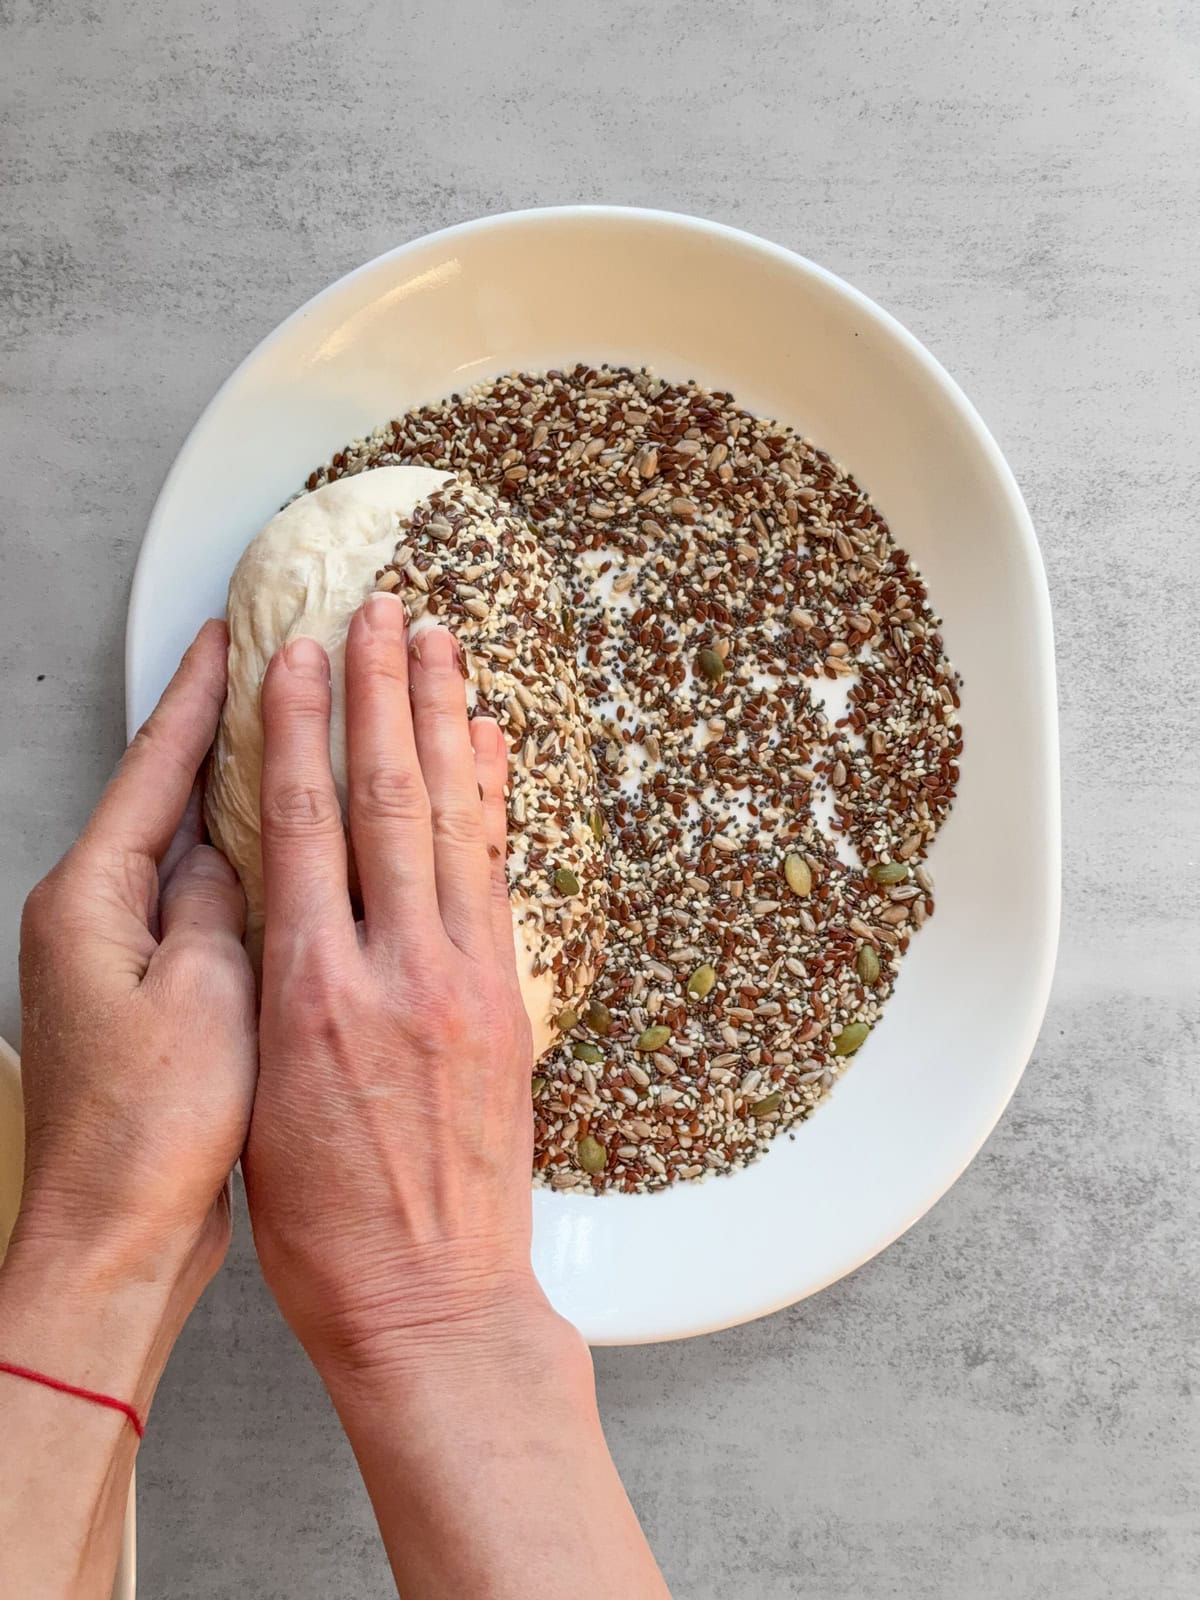
7. Then, roll the dough over the seeds on the other side.
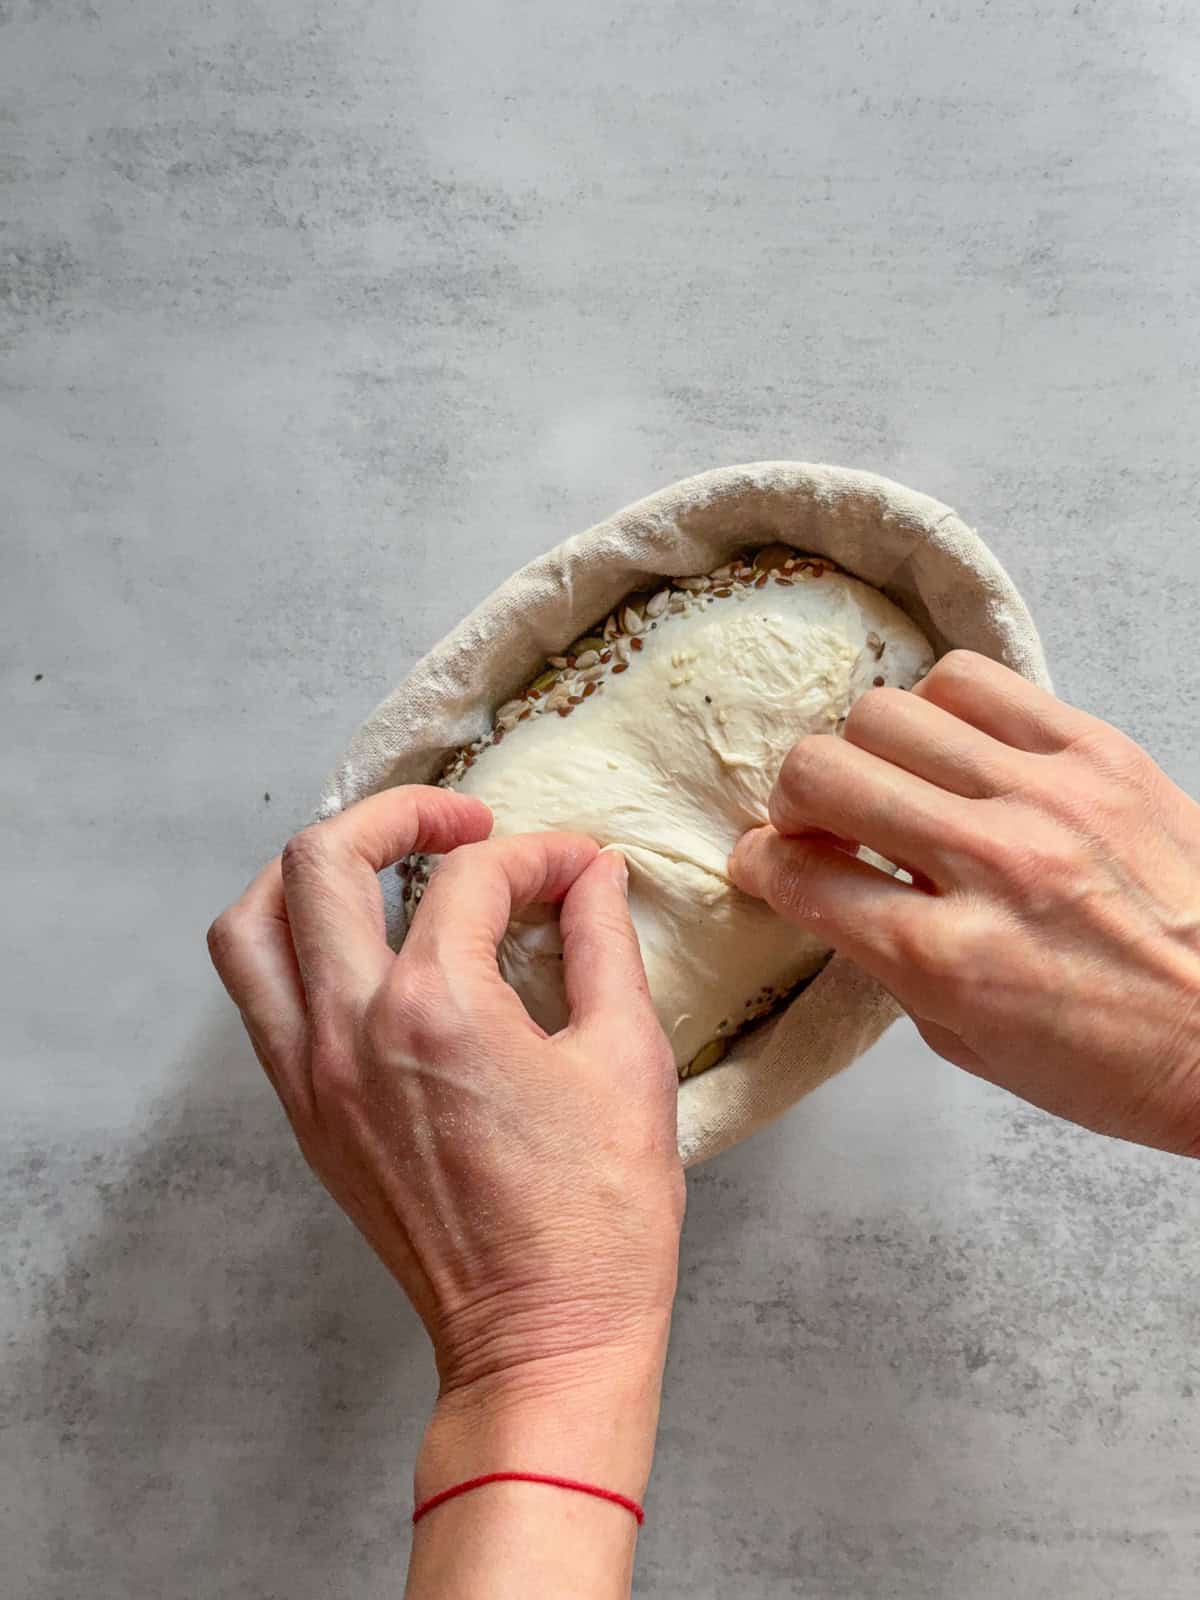
8. Place the dough, seed-side down, into the prepared banneton, stitch it, and continue with final proofing.
You can also apply seeds and oats right before baking, but the dough must be well proofed so it holds its shape.
Carefully flip the dough from the banneton onto your palm, lightly spray the top with water, and roll the loaf into the seeds. Transfer it to parchment paper with the seed side facing up. This method requires a bit more confidence and control, but it is manageable with practice.
If you bake sourdough in a loaf pan, proof the dough on the counter or in the refrigerator. Just before baking, lightly spray the dough with water, then sprinkle seeds or grains evenly over the top. Score, then bake as usual.
Depending on the type and quantity of seeds or grains used, scoring can be more challenging. Dense seed coatings can cause the blade to drag or skip, so use a sharp bread lame and a confident, single slash. In some cases, use kitchen scissors to snip into the dough.
Expert tips
- Line your bakeware with parchment paper: It helps prevent sticky add-ins like cheese, fruit, or seeds from sticking to the pan, makes it easier to transfer the bread dough and baked bread, and keeps the bottom crust clean.
- Use comfortable hydration: Keep the dough at a hydration level you can handle. For light add-ins like herbs, small seeds, or spices, stick to 65-75% hydration. For grated cheese, soaked seeds, or chopped nuts, reduce water slightly (2-3%) if they are moist or oily. For heavier or wetter add-ins like olives, fruit, cheese chunks, purées, or vegetables, reduce hydration by around 5% or adjust gradually.
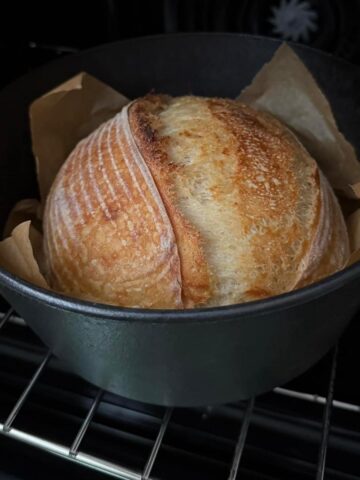
- Choose the right baking method: Bake in a Dutch oven for great oven spring and steam. Use open-baking for decorative or seeded crusts, and use a double loaf pan method for softer, inclusion-heavy doughs that need extra support.
Sourdough bread flavor combinations
Here are some proven combinations to try:
- Sun-dried tomatoes and basil
- Sun-dried tomatoes, Italian seasoning, and Parmesan
- Caramelized onion and Gruyère
- Jalapeno and cheddar cheese
- Parmesan and Italian herbs
- Parmesan and dill
- Parmesan and roasted garlic
- Olive and rosemary
- Dark chocolate and dried cherries
- Orange zest, cranberries, and walnuts
- Walnuts, cranberries, and blue cheese
- Honey, cinnamon, and walnuts
- Cocoa powder, chocolate chips, and hazelnuts
- Cinnamon and raisin
- Strawberry and white chocolate
Once you understand timing and technique, almost anything can work.
Let's talk sourdough
So, how do you like to add inclusions to your sourdough? Have you experimented with different methods? Which one gives you the best results? Please share your experience in the comments below.
Comments
No Comments