

If you wonder how to bake sourdough in a loaf pan, you can do so, and you will love the results. This is one of the most forgiving sourdough baking methods, especially when you are still learning to judge bulk fermentation.
The dough proofs directly in a loaf pan, eliminating the need for a banneton or its alternative, unless you prefer to use one.
To keep track of your process and results, download and print my sourdough baking log. If you are new to sourdough, start with my Beginner's Sourdough Guide to learn the basics.
Why bake sourdough bread in a loaf pan
Baking sourdough in a loaf pan is a practical, beginner-friendly approach with several benefits:
- Cost- and time-efficient: There is no need for specialized tools, such as a banneton or Dutch oven.
- Consistent shape: The loaf pan supports the dough, which results in a neat, even loaf that is easy to slice, store, and use for sandwiches.
- Saves over-proofed dough: A loaf pan helps support the over-proofed dough, preventing it from collapsing in the oven.
- Beginner-friendly: Simplifies the baking process and removes the stress of complex shaping or scoring.
- Great for batch baking: Ideal for making multiple loaves at once and maximizing oven space, perfect for those who sell sourdough bread.
Steam methods for baking sourdough in a loaf pan
There are two simple ways to bake sourdough in a loaf pan and still create steam for a beautiful crust:
- Single loaf pan with added steam: Place your sourdough in a loaf pan and set a separate pan of hot water on the oven rack below it. The rising steam helps mimic the effect of a covered baking environment.
- Double loaf pan method: Use two loaf pans by stacking a second, identical one upside down over the first to create a homemade steam chamber. This setup traps steam naturally, similar to baking in a Dutch oven, and works well in both electric and gas ovens.
Ingredients
- Flour: Go for unbleached bread flour with a protein content of at least 12.5%. If you are comfortable with whole-grain baking, you can substitute 5-10% of the flour with whole wheat. For this recipe, I am using King Arthur bread flour with a protein content of 12.7%.
- Water: Use filtered, spring, or chlorine-free tap water. To dechlorinate the water, leave it in an open container on the counter overnight.
- Sourdough starter: You will need a wheat levain or an active starter at 100% hydration, used at its peak activity.
- Salt: Use fine sea salt. Skip the iodized table salt.
- Rice flour: White rice flour is great for dusting your proofing basket (banneton) and work surface to prevent sticking.
Before you begin, make sure all your ingredients are at room temperature. Use a digital scale to measure the ingredients accurately.
Bread formula for sourdough bread
| Ingredient | Baker's Percentage | Weight |
|---|---|---|
| Bread flour | 100% | 500g |
| Water | 70% | 350g |
| Leavin/Active starter, 100% hydration | 20% | 100g |
| Fine sea salt | 2% | 10g |
- The total dough weight is 960g, which is ideal for a standard 9x5-inch loaf pan. For Norpro loaf pans, I use 700g of dough for the 8‑inch pan and 900-920g for the 10‑inch pan. If you need to adjust the bread formula for your own loaf, see my guide to baker's percentages or use my sourdough calculator.
- My kitchen temperature is 73°F (23°C), with a humidity level of 40%
- Bulk fermentation: 6 hours 30 minutes to 7 hours 30 minutes hours with a 75-80% increase in dough size
- Proofing time: 14 hours cold-proof in the fridge
- Baking in a conventional oven: 430°F (230°C) with steam, 20 minutes; without steam, 17-20 minutes.
Tools & Equipment
- A kitchen scale for accurate measurements.
- A large mixing bowl with enough space to mix and bulk ferment the dough.
- A probe thermometer to check the dough temperature and the internal temperature of baked bread.
- A Danish dough whisk for mixing levain into water. Some bakers also use it to mix dough instead of using their hands.
- A bowl scraper for scraping dough from the sides of a bowl.
- An aliquot jar to track dough rise if using the aliquot jar method. I use this 2.7-oz. plastic container.
- A damp linen or cotton towel to cover the dough and prevent drying. I love using flour sack towels.
- A bench scraper helps preshape the dough and keep your work surface clean.
- A dough scoring tool for slashing the dough. This bread lame is my favorite.
- Loaf pans: Choose standard 9×5-inch loaf pans with rims, or 8- or 10-inch loaf pans without rims, such as Norpro or USA pans. Read below for tips on how to select the best loaf pan.
- Long oven mitts protect your hands when handling hot Dutch ovens or roasting pans. I love these silicone gloves.
- Bread knife for slicing sourdough into clean, even slices. Read more about choosing the best bread knife.
How to bake sourdough in a loaf pan
1. Make a levain (an active starter)
Feed your starter in the morning at a 1:1:1 ratio (35g starter, 35g flour, and 35g water), and wait 4-6 hours for it to peak (see my blog post about what a sourdough starter peak is).
2. Autolyse
Mix water and flour with your hand or a dough whisk into a large mixing bowl until you have a shaggy dough. Cover the bowl with a plastic film or a damp tea towel and let it sit for 30 minutes (see my guide on how to autolyse sourdough).
If you are familiar with fermentolyse, you can use that instead. Mix the levain (an active starter) with flour and 95% of the water amount first. Rest the dough for 30 minutes, then add the salt and the remaining 5% of water. Mix.
3. Mix the dough
Add the levain (an active starter) to the dough and mix it in, then sprinkle in the sea salt. Use your hand to mix thoroughly for 3 to 10 minutes. Adjust the mixing time based on your schedule and the desired level of gluten development. A longer mix builds a stronger gluten network.
Cover the bowl with plastic wrap or a damp tea towel and let it rest for 30 minutes. Once the levain is added, bulk fermentation begins.
4. Bulk fermentation
Start with two sets of stretch and folds, spaced 30 minutes apart. Then perform two sets of coil folds, also 30 minutes apart. For each set, stretch the dough in all four directions. Between folds, cover the bowl with plastic wrap or a damp kitchen towel and let the dough rest for 30 minutes.
After the last set of coil folds, let the dough continue to ferment. Bulk fermentation is done once you see visible bubbles across the surface and along the sides, if you are using a glass bowl. The edges of the dough will appear slightly domed, and if you gently shake the bowl, the dough should have a soft, wobbly jiggle.
Note: I usually aim for about a 75-80% rise at 73°F (24°C), though with King Arthur bread flour and proper mixing, I can push it to 90%.
6. Preshape and bench rest
Preshape the dough into a round, then let it rest uncovered for 15-20 minutes (see my guide to preshaping sourdough).
7. Shape the dough
There are different ways to shape dough for baking in a loaf pan, but it is always a bâtard, shaped slightly differently depending on the pan size.
You can use the classic bâtard shaping method for a standard 9 x 5-inch loaf pan. However, if you use a longer 10-inch pan, the shaping is slightly different but follows the same basic steps. Here is how to do this:
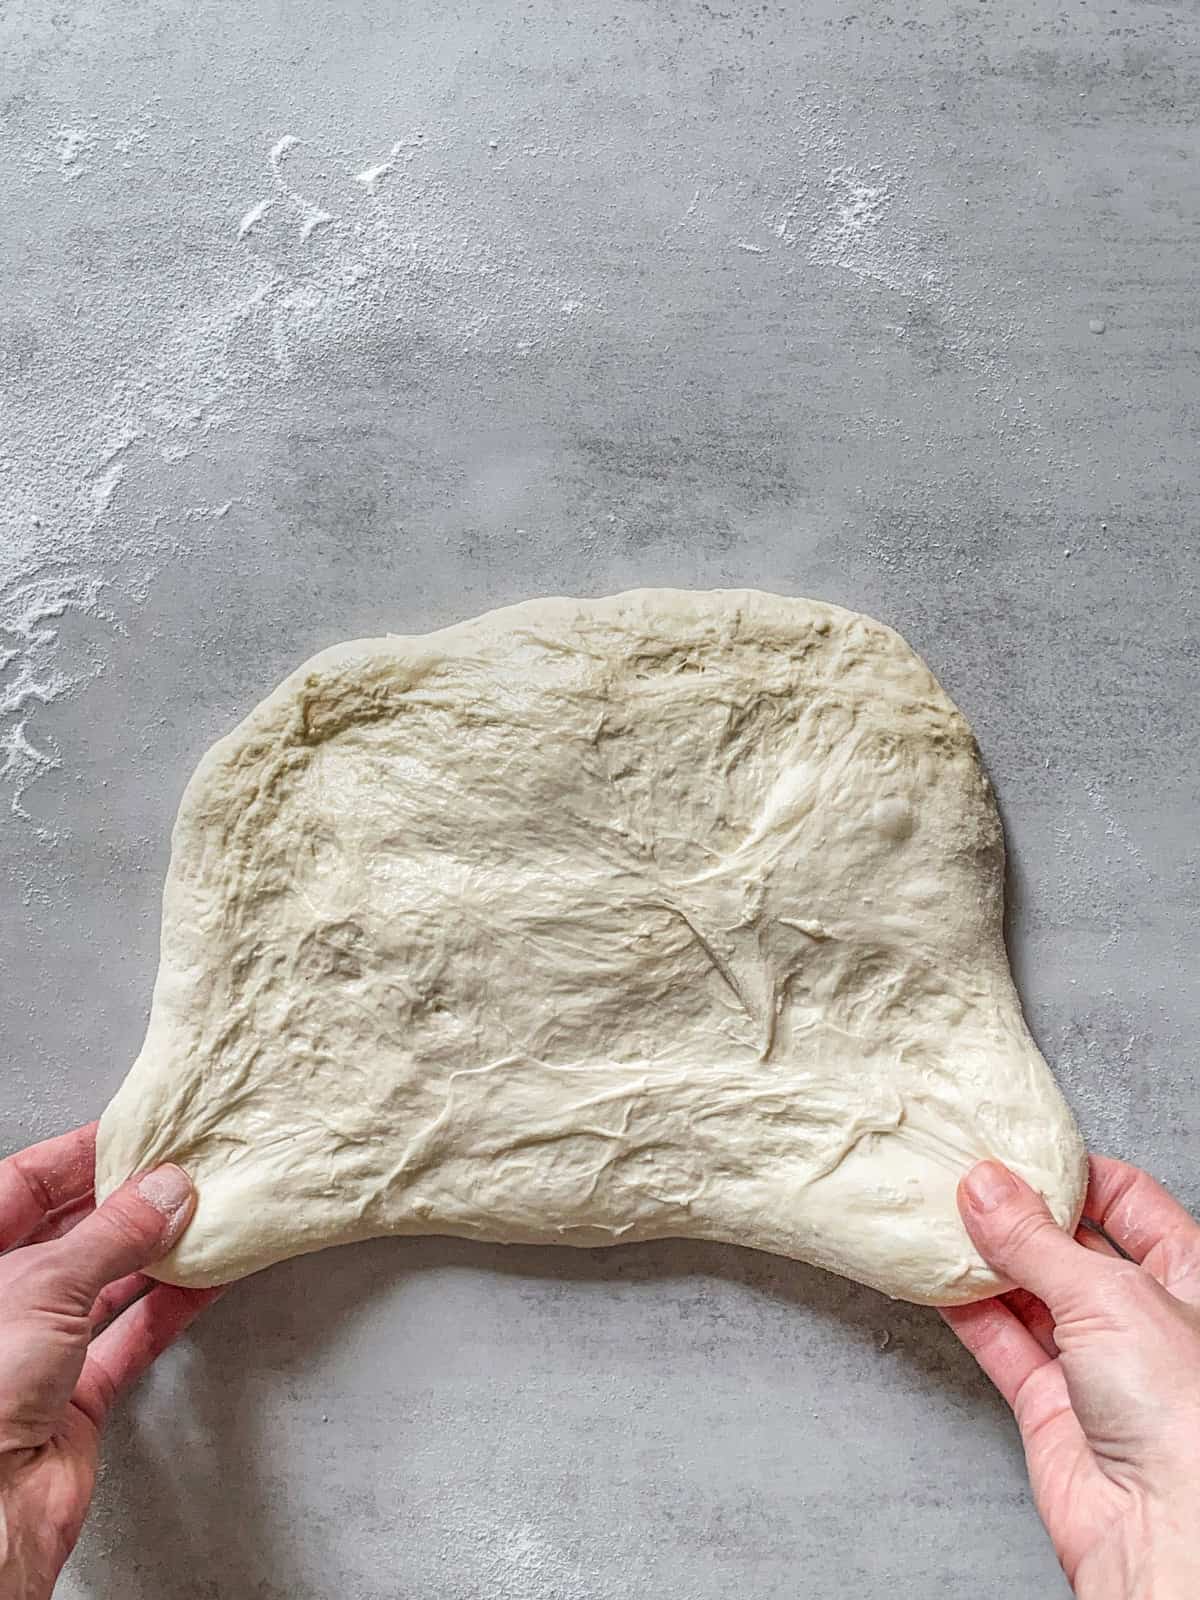
- Step 1: Lightly sprinkle a little flour (white rice flour, bread flour, or all-purpose flour) on top of the dough and your work surface to keep the dough from sticking. Gently flip the dough onto your work surface, sticky side up, and stretch it into a rough rectangle.

- Step 2: Press down on the dough with your fingers to lightly degas it, using motions similar to those for making focaccia.

- Step 3: Lift the bottom edge of the dough and fold it upward about 2 inches (5 cm), not all the way to the center. Gently press the fold to seal it in place.

- Step 4: Lift the left side of the dough and fold it in about 2-3 inches toward the middle, pressing it down slightly to stick.
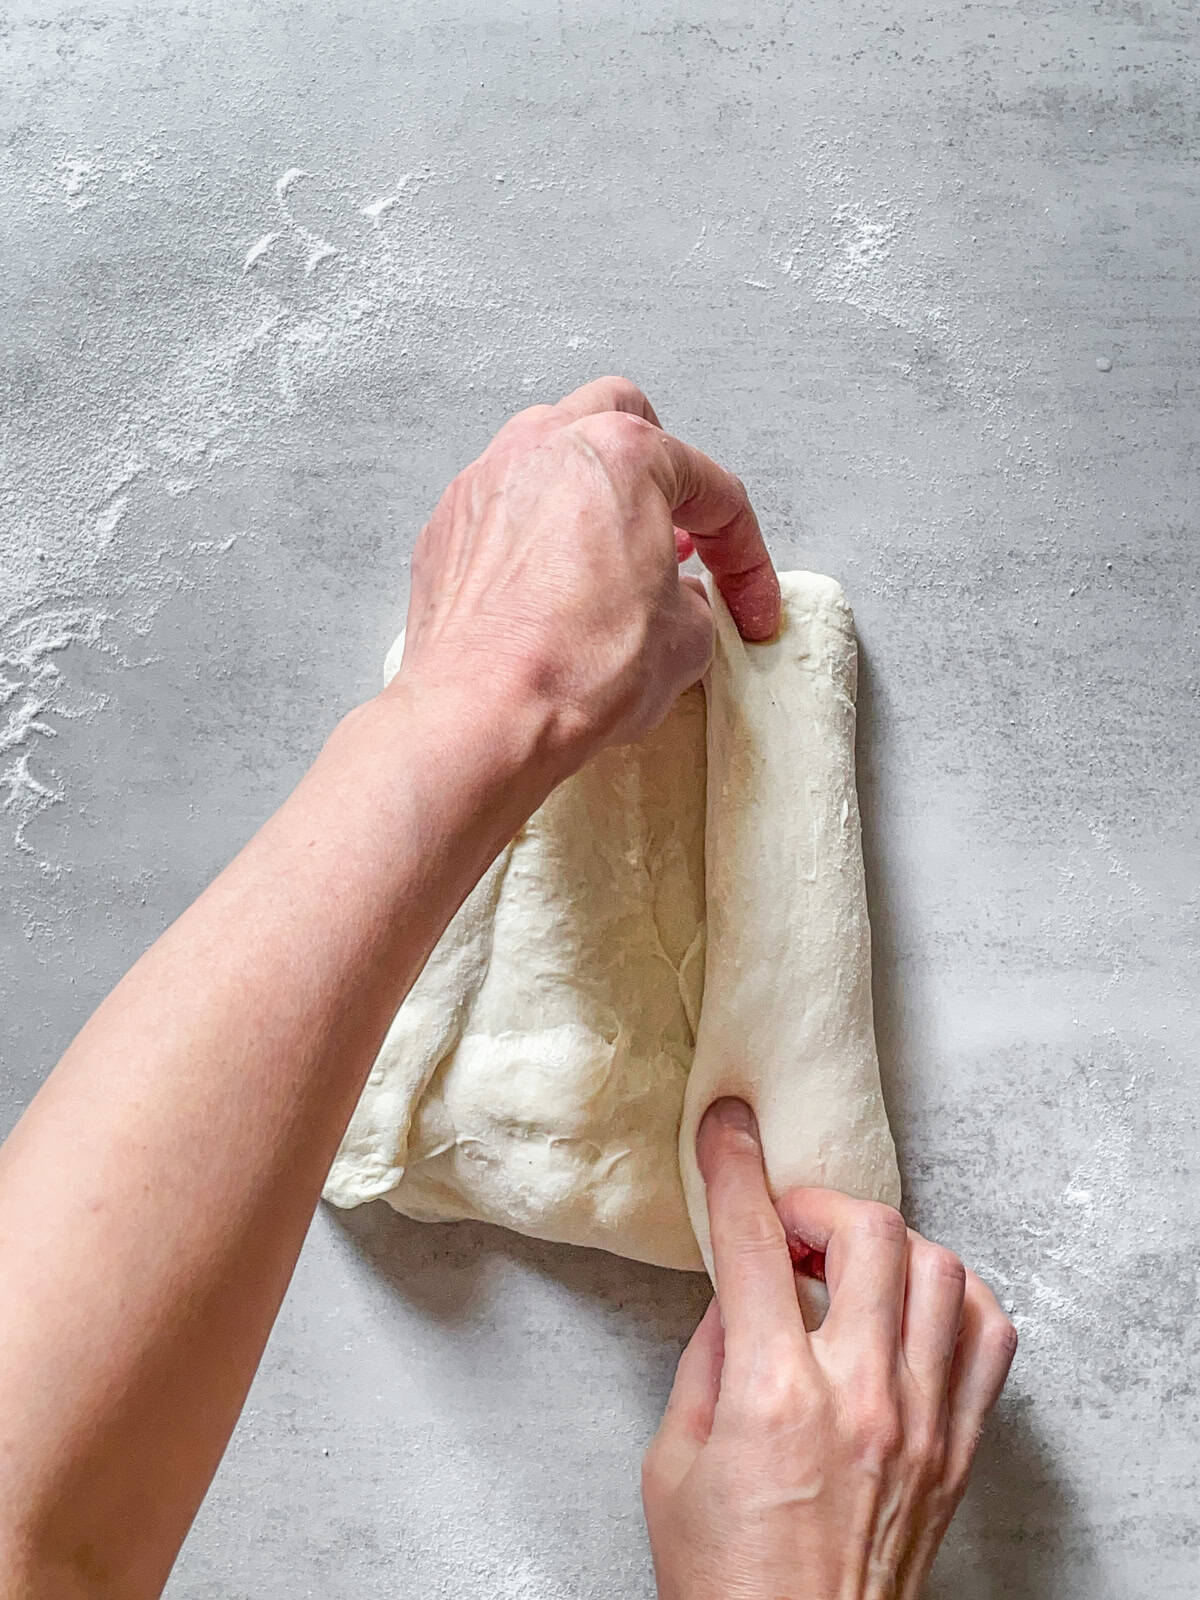
- Step 5: Repeat on the right side, lifting the dough about 2-3 inches and folding it toward the center. Gently press to make it stick.
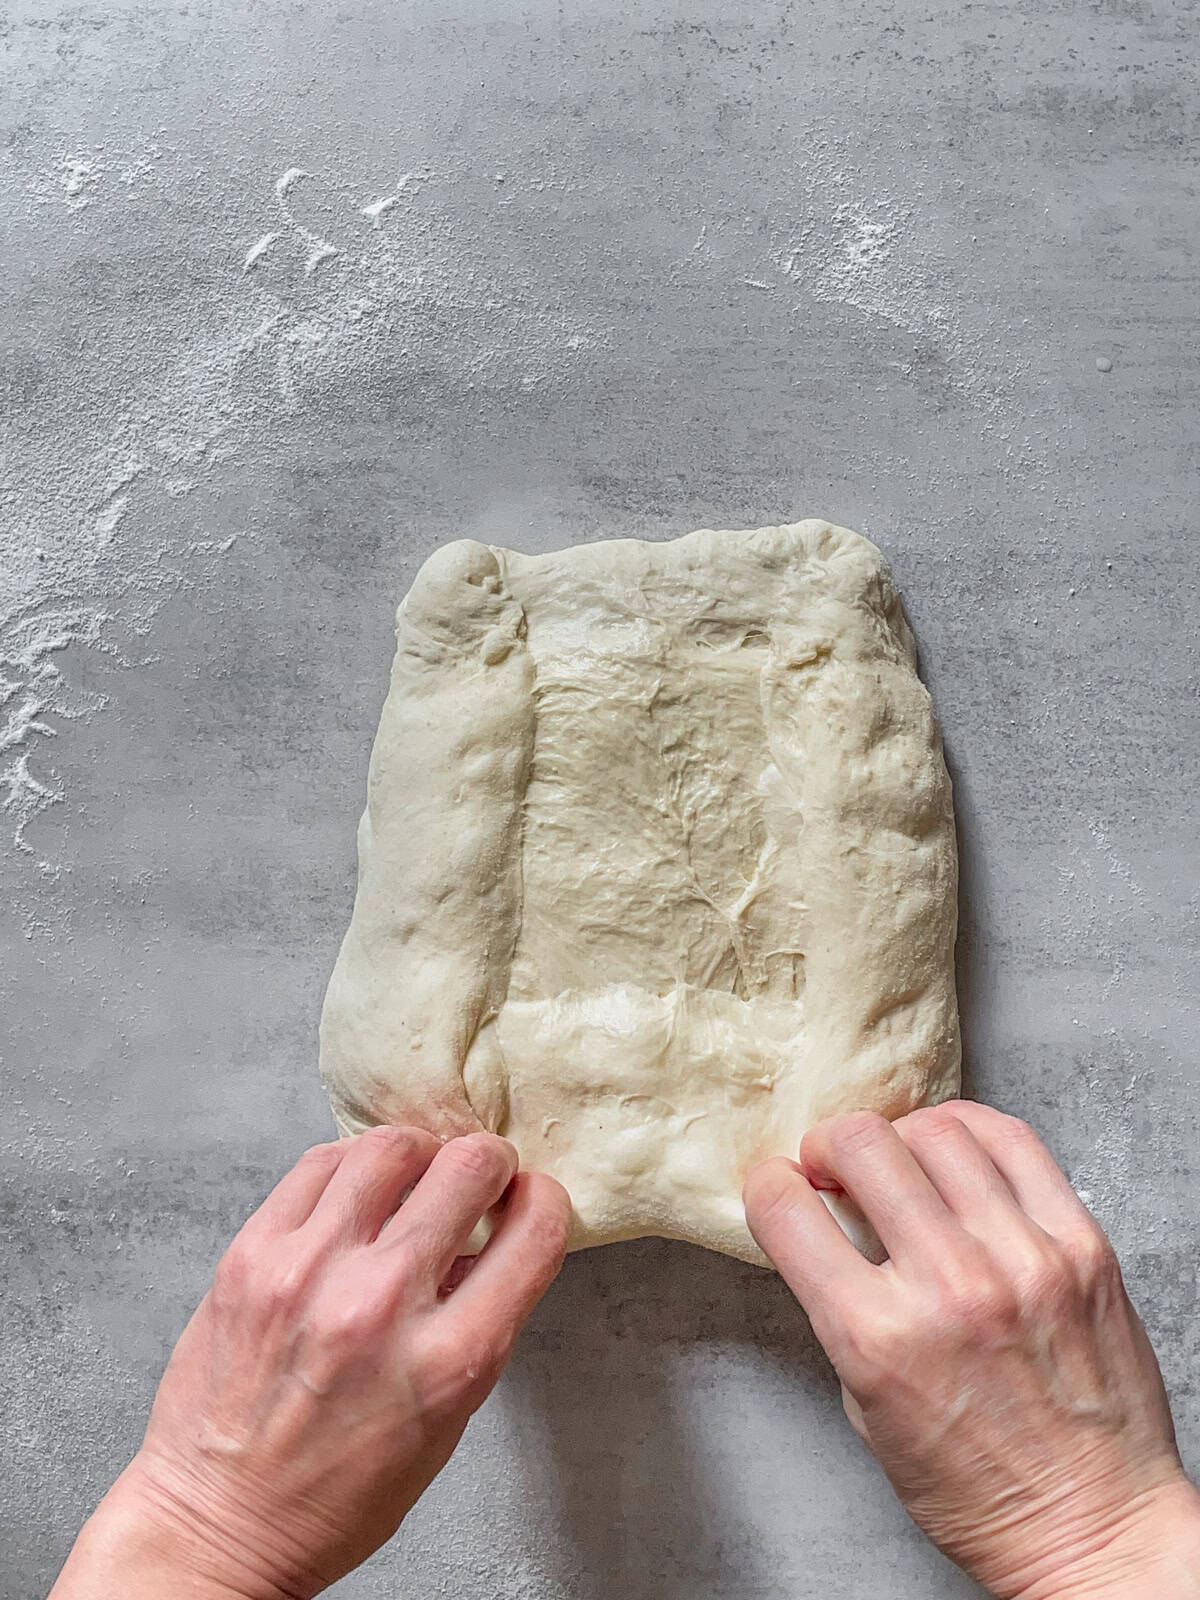
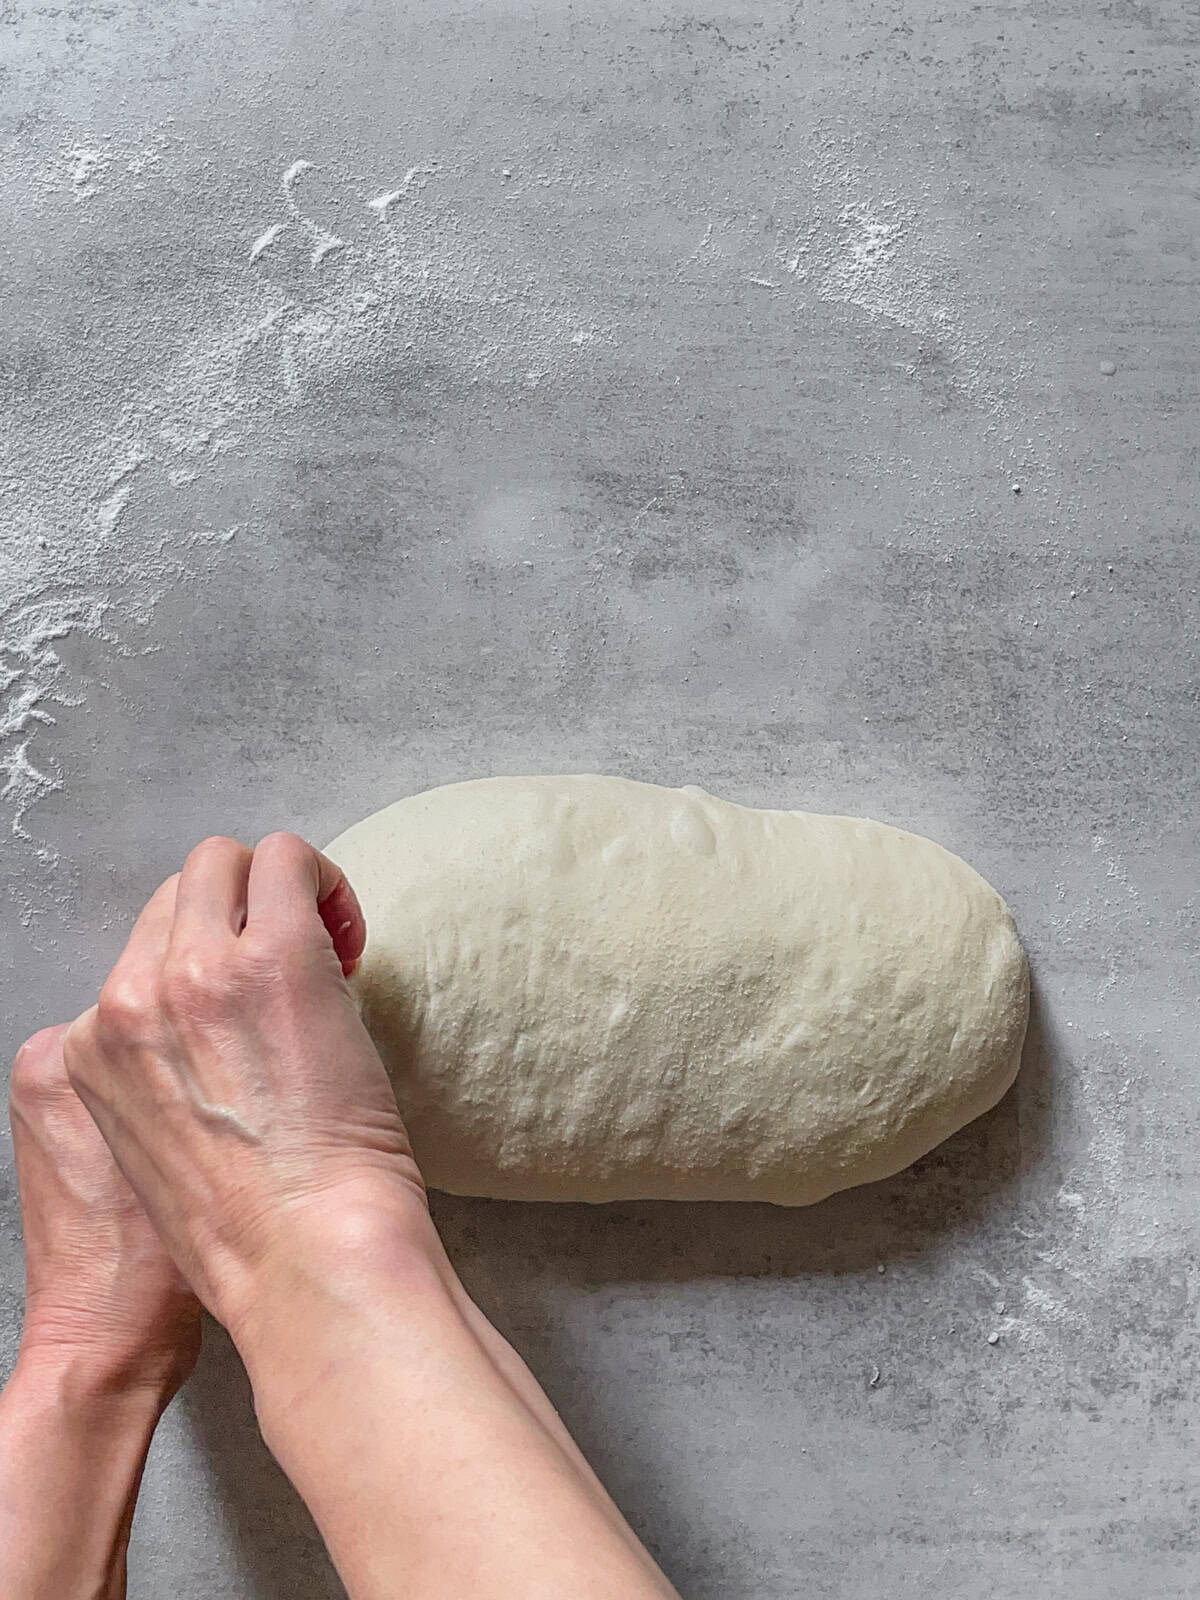
- Step 6: With both hands, grab the bottom of the dough and pull it up.
- Step 7: Continue rolling the dough from bottom to top until it forms a tight, smooth, long cylinder.
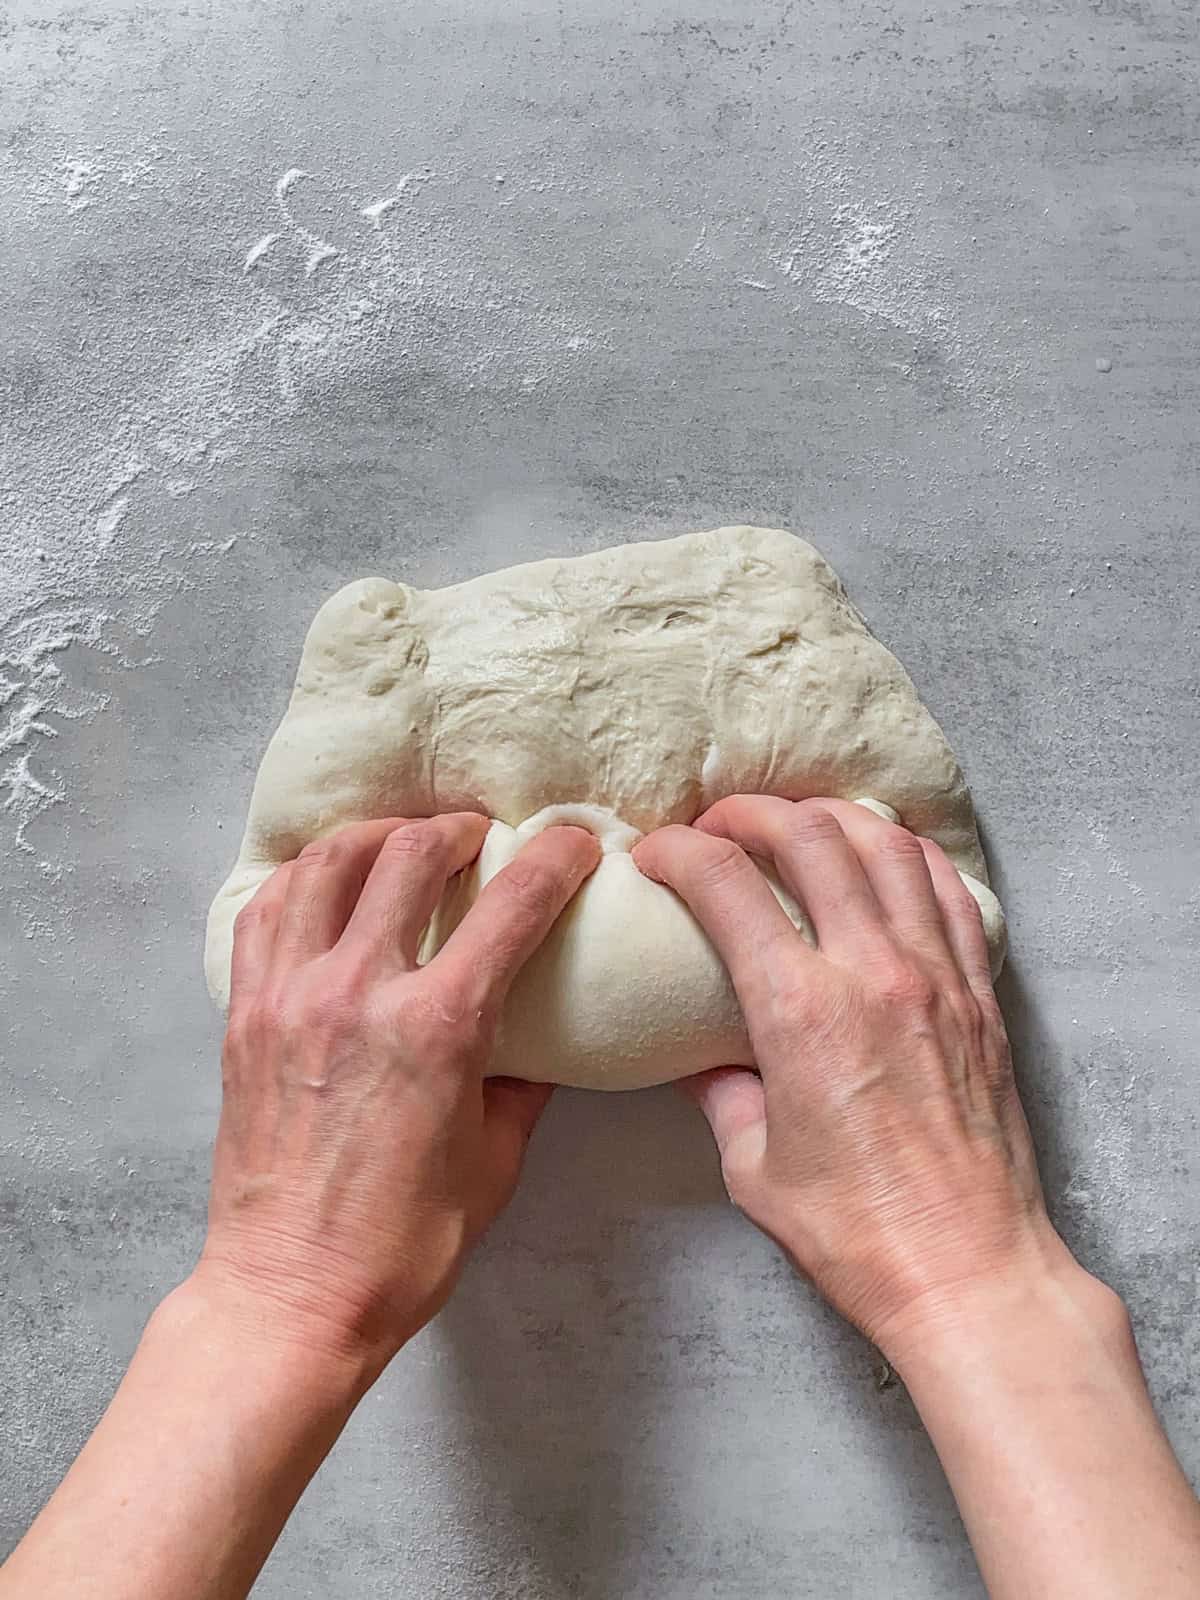
- Step 8: Use your fingers to stitch the ends to close them tightly.
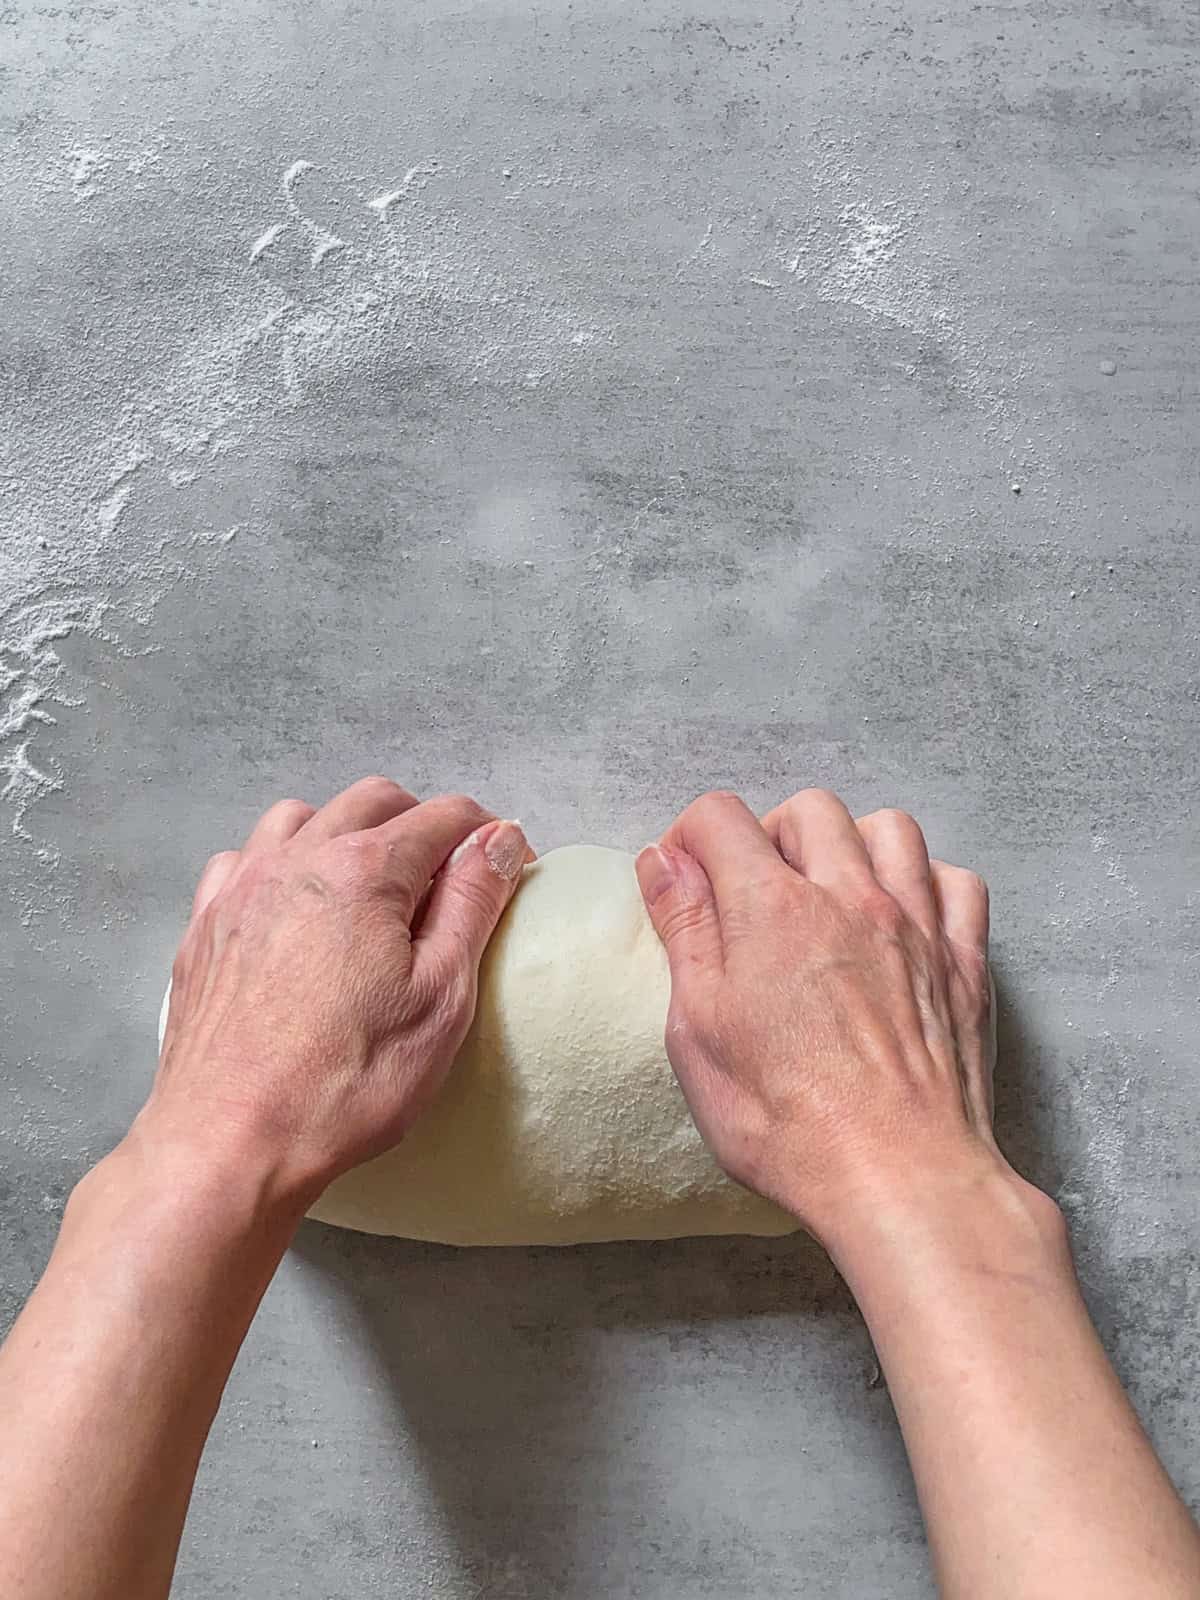
- Step 9: Tighten the seam side using the bench scraper or your hands by pulling the long side of the bâtard along the working surface.
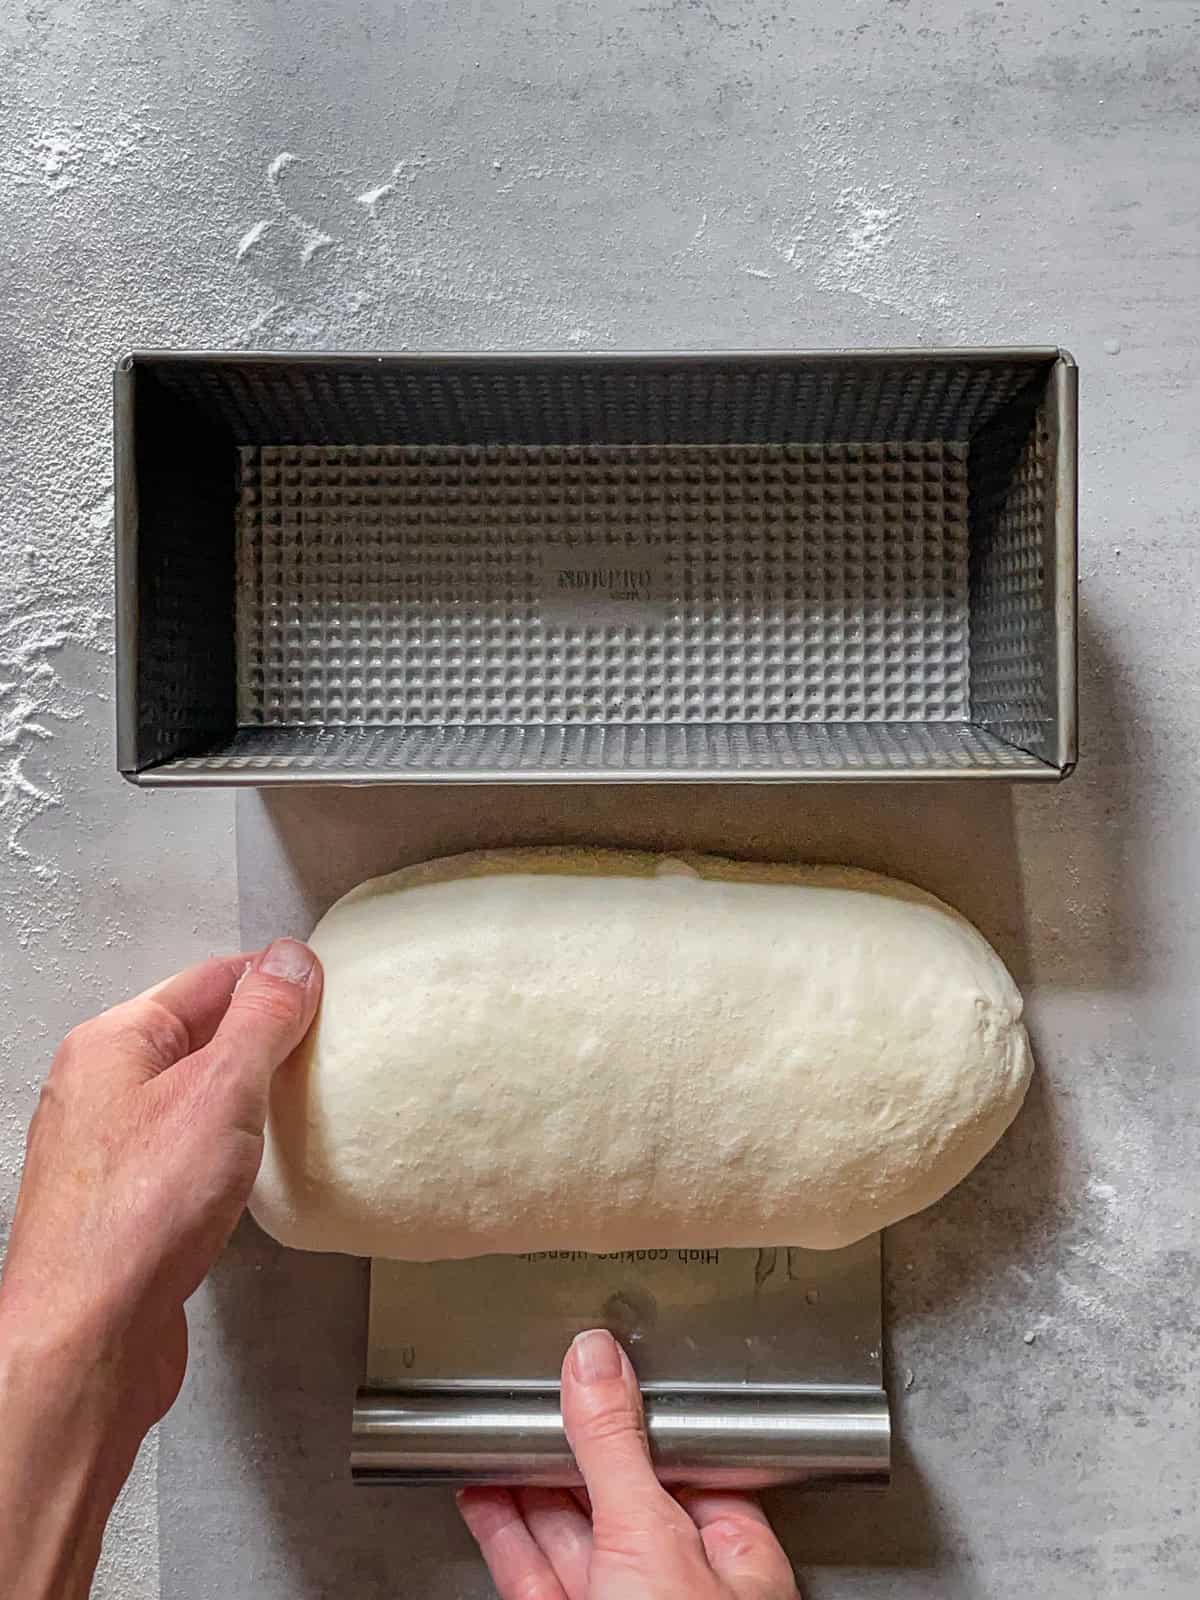
- Step 10: Use a bench scraper to flip the batard into the prepared banneton or a greased loaf pan (use a cooking spray or parchment liners).

- Step 11: Place the dough with the seam side facing down.
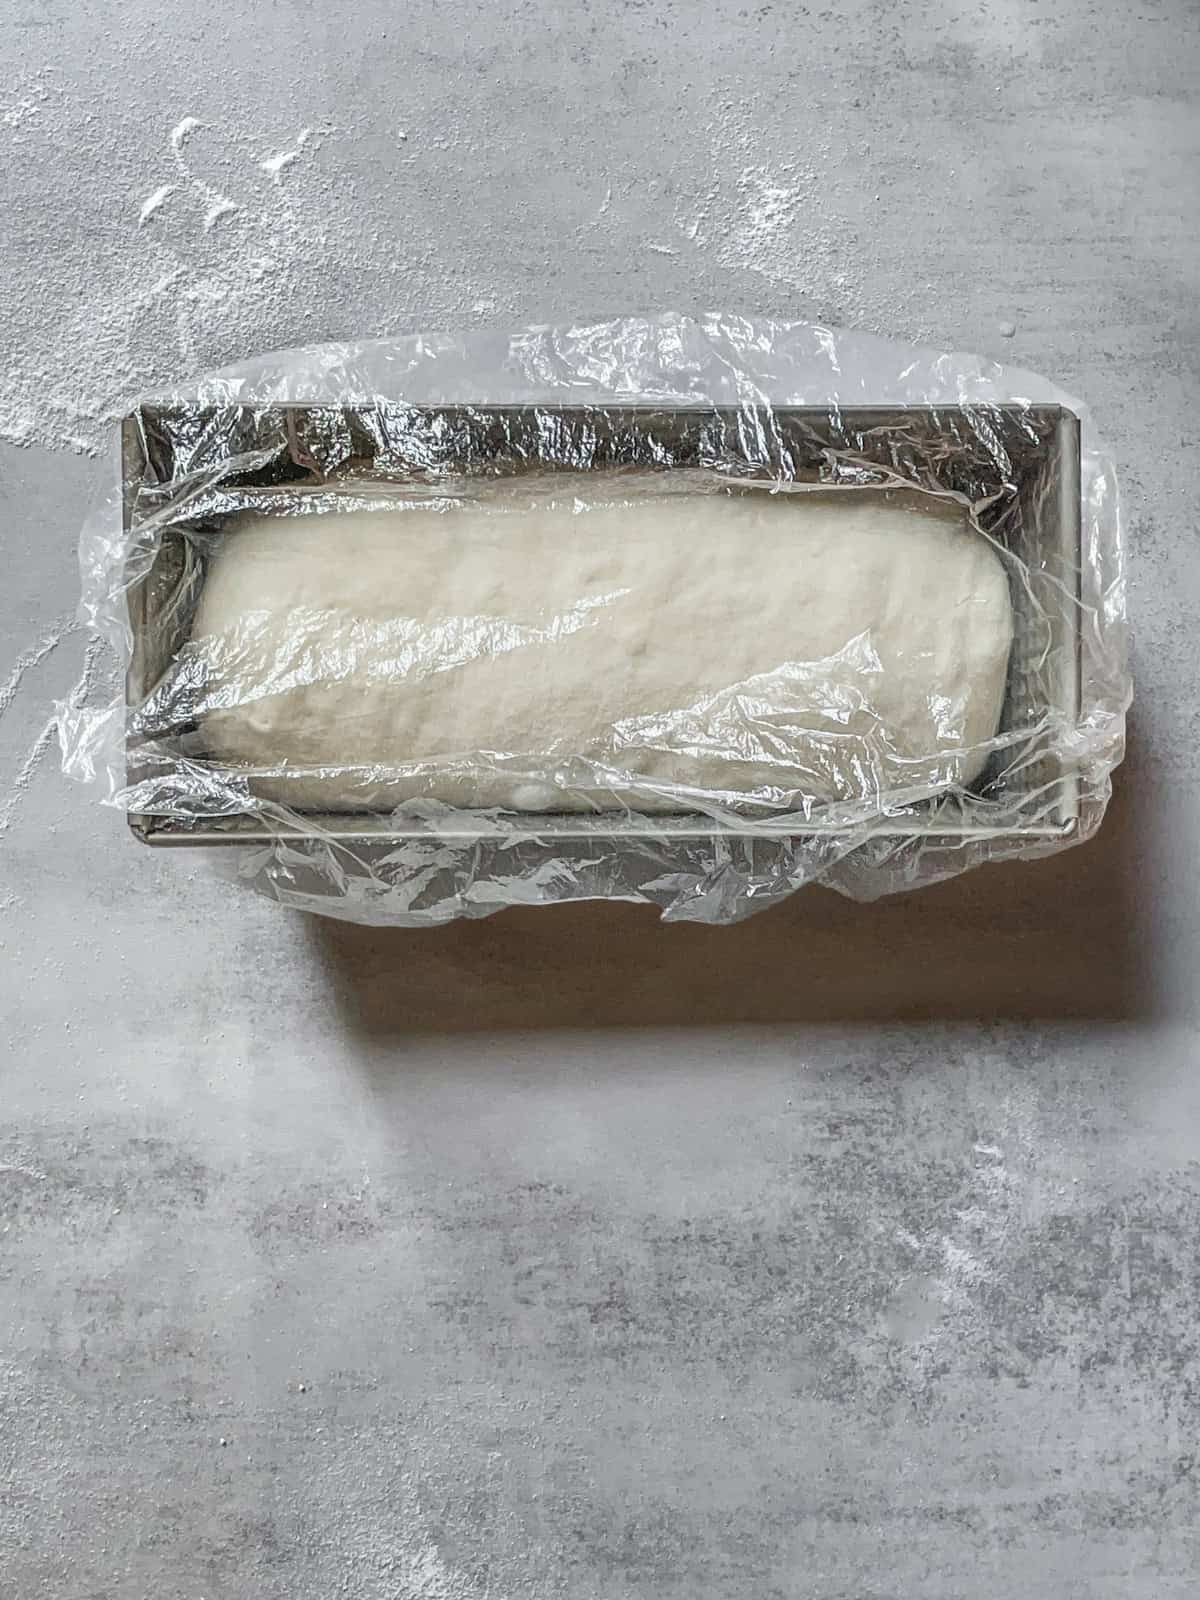
- Step 11: Cover the loaf pan with a plastic cap, plastic wrap, or a clean plastic bag.
8. Proof the dough
There are two methods for proofing sourdough: using a loaf pan or a banneton.
To proof the dough in a loaf pan, line the loaf pan with parchment paper cut to fit the bottom. Some bakers prefer using parchment paper strips or disposable loaf pan liners. Others opt for silicone loaf pan liners, but consider reading about the pros and cons of baking with silicone molds before making this choice.
Alternatively, you can lightly grease the pan with avocado oil, using a silicone brush to reach all corners and prevent sticking. I usually spray four spritzes of avocado oil, then spread it evenly with a silicone brush.
Place the shaped dough seam side down into the pan. Cover with a clean towel or place it inside a plastic bag. Let it proof either at room temperature (countertop proofing) or in the fridge overnight (cold proofing).
To proof the dough in a banneton, place the shaped dough seam side up in a proofing basket. Cover with a clean towel or place it inside a plastic bag. Let the dough proof at room temperature (countertop proofing) or in the fridge overnight (cold proofing).
Using cold proofing, refrigerate the dough for 12 to 16 hours, or up to 48 hours. The longer it proofs, the deeper and more complex the sourdough flavor will become.
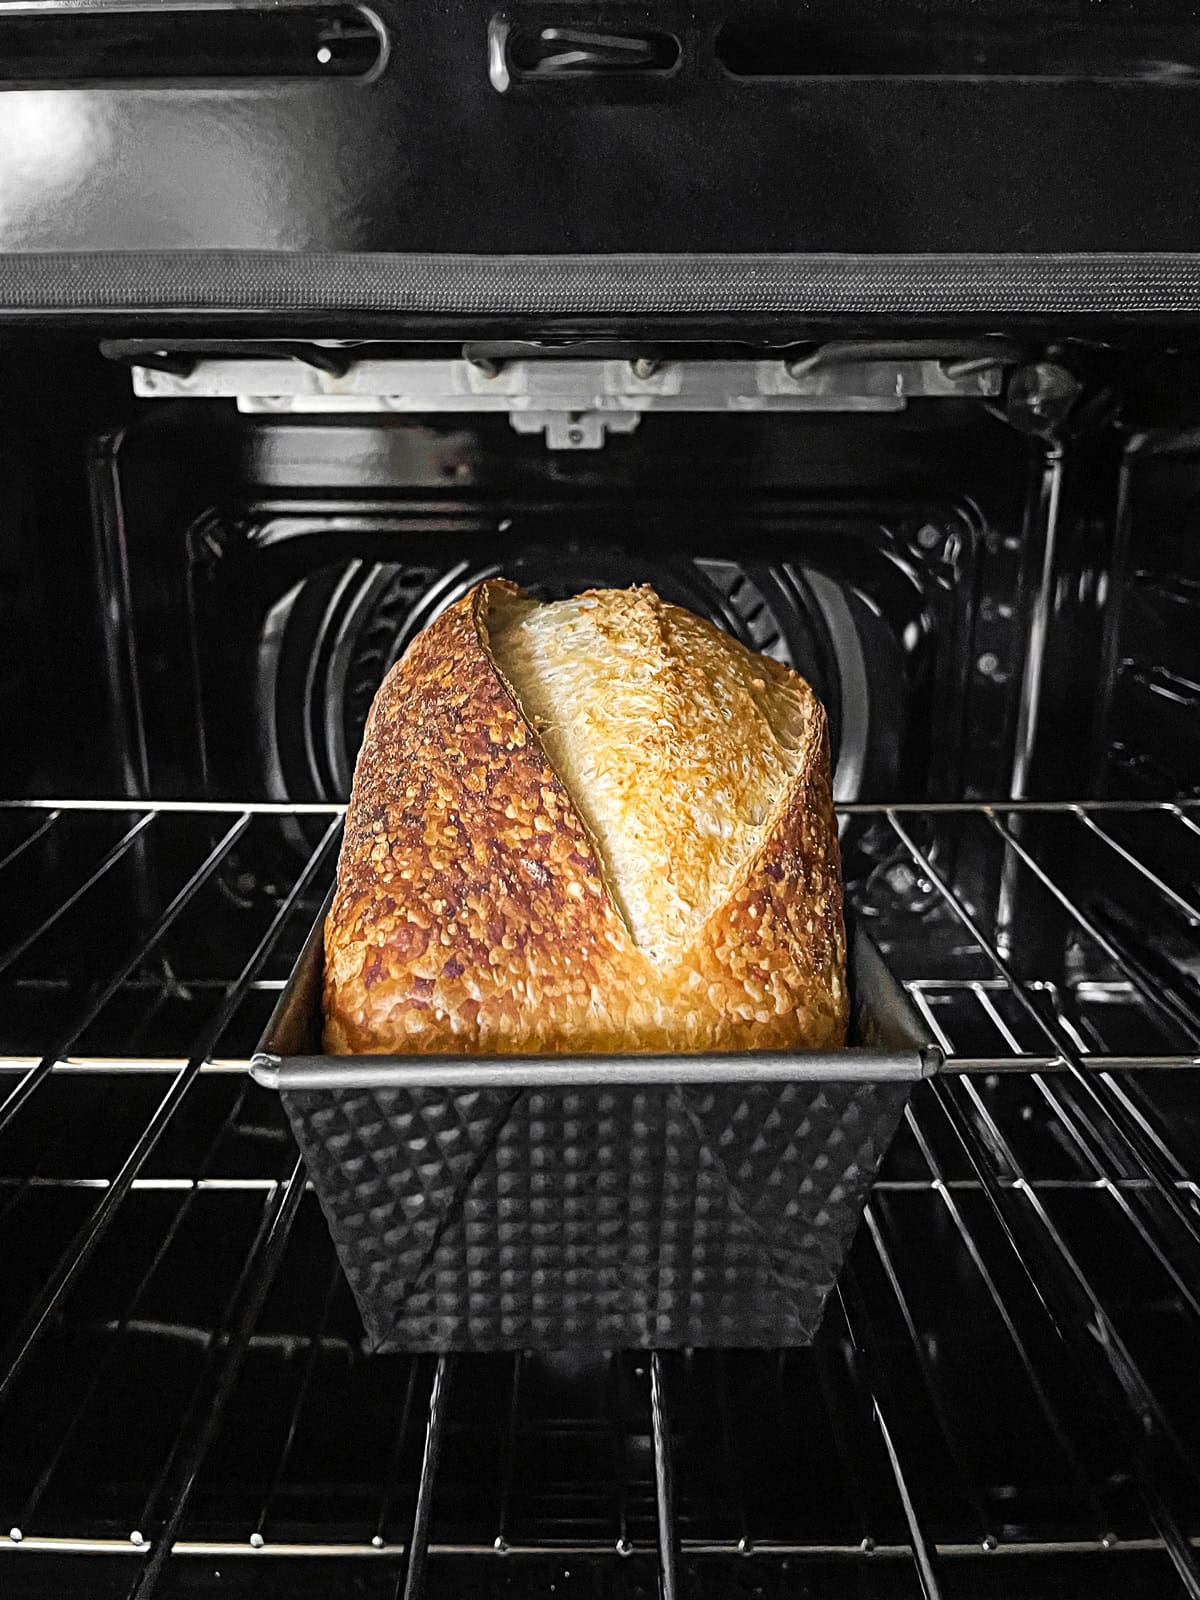
9. Baking
You can bake sourdough in a loaf pan using two methods: the double loaf pan method, which traps steam naturally, or the single loaf pan method, which relies on adding steam manually.
For the double loaf pan method (great for electric and gas ovens), start by preheating your oven to 500°F (260°C) for 30 minutes.
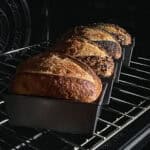
If your dough was cold-proofed in a banneton, flip it into a greased or parchment-lined loaf pan, seam side down. Score the top with a single slash using a bread lame, then cover the loaf pan with a second identical pan to trap steam.
Place the pan stack into the oven using oven mitts. Lower the oven temperature to 450°F (230°C) and bake for 20 minutes. After that, carefully remove the top pan and continue baking for an additional 15-20 minutes, until the crust is golden brown.
For the single loaf pan method, which mimics the "open bake" method, place a heatproof pan (such as a roasting pan, a cast-iron skillet, or a medium-size stainless steel pan) on the lower rack and preheat the oven to 500°F (260°C) for 30 minutes. Meanwhile, boil water in a kettle.
Once ready, flip the cold-proofed dough into a prepared loaf pan (if a banneton is used for proofing), seam side down, and score it with a single slash. Using oven mitts, place the loaf pan on the middle rack.
Wear safety goggles and carefully pour 350-400g of boiling water into the hot pan below, then quickly close the oven door. You can also spritz the dough and oven walls for additional steam.
Reduce the oven temperature to 430°F (220°C) and bake for 20 minutes. Then, open the oven, remove the steam pan, and continue baking for an additional 17-20 minutes, until the bread is deeply golden brown.
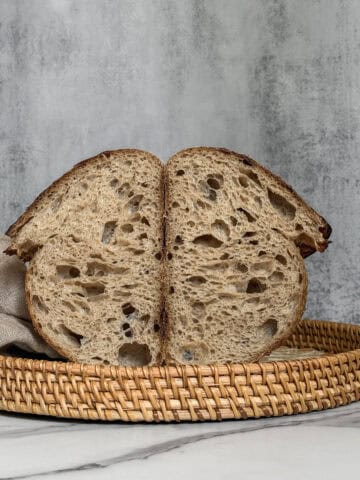
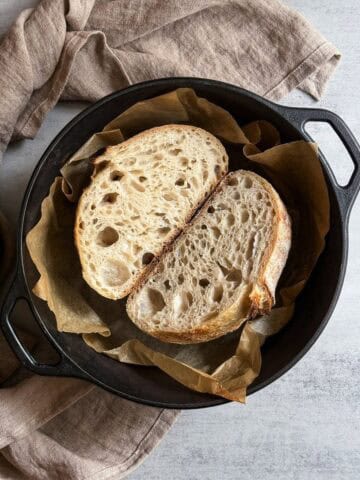
Remove the bread from the oven using oven mitts. Let it cool on a wire rack for at least 2 hours before slicing.
Once baked, let the bread cool on a wire rack for at least 2 hours before slicing. I share tips for cutting sourdough bread and storing sourdough bread in separate guides.
Expert Tips
- Add simple decorative scoring before baking, in addition to a single slash if desired.
- Always use oven mitts or silicone gloves for a secure grip when handling hot pans.
- Wear safety goggles for protection when adding hot water to a steam pan when baking without a Dutch oven.
- Cover the loaves with aluminum foil after removing the top pan to prevent over-browning or burning when baking with two loaf pans.
- Check for doneness: The internal temperature of bread should be 205-210°F (96-99°C).
- Let the oven return to 500°F (260°C) before loading the next batch when baking multiple batches.
- Adjust the baking temperature and time as needed by testing.
- Advanced notes: Track bulk fermentation using the aliquot jar method. Check the dough temperature after each set of folds and every 30-40 minutes during bulk fermentation. End the bulk fermentation once the dough reaches the target percentage rise. Refer to my Master Sourdough Bread recipe if needed.
How to choose the right loaf tin
For the double loaf pan method, use standard 9×5-inch loaf pans or 9.25×5.25-inch non-stick Wilton pans. Many bakers also like Mainstays non-stick 9×5-inch pans from Walmart (USA) or stainless steel loaf pans from various brands.
Some bakers secure the top pan with 1.25-inch 100% metal binder clips, attaching them to the "grip handles" or "wide rim" at both ends to help trap steam inside.
For baking sourdough bread in a single loaf pan, try a 9×4-inch USA loaf pan or an 8-inch or 10-inch Norpro loaf pan.
A standard 9×5-inch pan holds 900-950 g of dough, while a 9.25×5.25-inch pan fits 960-1000 g. The 9×4-inch USA Pan and 10-inch Norpro pan each hold 880-950 g, and the 8-inch Norpro pan holds about 700 g of dough.
Alternative baking regimens to try
Double loaf pan method:
- Bake at 450°F (230°C) for 30 minutes, covered, then increase the temperature to 475°F (245°C) and bake for an additional 15 minutes, uncovered.
- Alternatively, bake at 465°F (240°C) for 30 minutes covered, then 7 minutes uncovered.
Single loaf pan method with a steam pan:
- Conventional oven: Bake at 430°F (220°C) for 20 minutes with steam, then 18-20 minutes without steam.
- Convection oven: Bake at 405°F (205°C) for 15-18 minutes with steam, then 15 minutes without steam. Use a cast-iron pan with lava rocks to generate a lot of steam. Alternatively, try baking at 450°F (230°C) for approximately 40 minutes without steam.
FAQ
You don't need to grease the top pan for plain sourdough. However, if your dough includes add-ins that may stick, lightly greasing the top pan can help prevent issues.
Yes. You can score the dough in the hot oven after 5-6 minutes to encourage delayed expansion, then rescore after another 5-6 minutes. Just be sure to add more steam by spraying the loaves again.
Every oven behaves a little differently, but in my experience, the baking time stays the same whether I bake one loaf or four. You may need to adjust slightly when baking very large batches.
In a double-wall oven, you can bake up to 24 loaves at a time, with six loaves per rack. If your loaf pans have a lip, they may take up extra space, so plan your layout accordingly.
Recipe
How to Bake Sourdough in a Loaf Pan
Here is how you can make sourdough bread in a loaf pan, whether it is baked in a single loaf tin or using a double loaf pan method. Perfect for sandwiches and baking sourdough bread in bulk.
- Prep Time: 17 hours
- Cook Time: 40 minutes
- Total Time: 17 hours, 40 minutes
- Yield: 1 loaf 1x
- Method: Baking
- Cuisine: American
Ingredients
For the levain (an active starter):
- 35 g sourdough starter
- 35 g bread flour
- 35 g water
For the bread dough:
- 500 g bread flour (I use King Arthur organic bread flour)
- 350 g water
- 100 g levain (active starter at peak)
- 10 g sea salt (I use Redmond ancient fine sea salt)
10 g white rice flour (for dusting)
Instructions
- Make a levain (an active starter): Feed your starter in the morning at a 1:1:1 ratio (35g starter, 35g flour, and 35g water), and wait 4-6 hours for it to peak.
- Autolyse: Mix water and flour with your hand or a dough whisk into a large mixing bowl until you have a shaggy dough. Cover the bowl with a plastic film or a damp tea towel and let it sit for 30 minutes.
- Mix the dough: Add the levain (your active starter) and mix it in. Then, sprinkle in the sea salt. Use your hand to mix thoroughly for 3 to 10 minutes, adjusting the time based on your schedule and the desired level of gluten development. A longer mix builds a stronger gluten network. Cover the bowl with plastic wrap or a damp kitchen towel and let it rest for 30 minutes. Once the levain is added, bulk fermentation begins.
- Fold the dough: Start with two sets of stretch and folds, spaced 30 minutes apart. Then perform two sets of coil folds, also 30 minutes apart. For each set, stretch the dough in all four directions. Between folds, cover the bowl with plastic wrap or a damp kitchen towel and let the dough rest for 30 minutes.
- Continue bulk fermentation: Allow the dough to keep fermenting. Bulk fermentation is finished once you see visible bubbles across the surface and along the sides, if you are using a glass bowl. The edges of the dough will appear slightly domed, and if you gently shake the bowl, the dough should have a soft, wobbly jiggle.
- Preshape the dough into a round and let it rest uncovered for 15-20 minutes.
- Shape the dough: Lightly dust your work surface with white rice flour. Gently flip the dough out of the bowl. Shape it into a batard. Place the dough seam side down in a lightly greased tin. Alternatively, place the shaped dough inside the banneton with the seam side up.
- Cold proof: Cover the loaf tin with a towel or place it in a plastic bag. Refrigerate the dough for at least 12 hours, or up to 48 hours. The longer it chills, the tangier the flavor.
- Score: Preheat the oven to 500°F (260°C) and let it heat for 30 minutes. Remove the dough from the fridge. If it was proofed in a banneton, gently flip it into a greased or parchment-lined loaf pan, seam side down. Score the top of the dough with a single slash using a bread lame or sharp knife.
- Bake the bread: Place a second, identical loaf pan over the first to cover it, creating a mini oven. Use oven mitts for safety when placing it in the oven. Immediately lower the oven temperature to 450°F (230°C) and bake for 17-20 minutes. Carefully remove the top pan using oven mitts. Continue baking for 15-20 minutes, or until the crust turns golden brown. Let your bread cool for at least 2 hours before slicing. This helps set the crumb and gives you the best texture.
Notes
- To bake in a single loaf pan, place an empty steam pan (such as a roasting pan or cast-iron skillet) on the lower rack and preheat your oven to 500°F (260°C). Once preheated, bring water to a boil. Bring the loaf pan with the dough to the middle rack of the oven. Carefully pour about 350-400g (or 1½ to 2 cups) of boiling water into the steam pan, then quickly close the oven door. Lower the temperature to 430°F (220°C) and bake for 20 minutes. After that, remove the steam pan and bake for an additional 17-20 minutes, until the crust is nicely browned.
- Multiple batches: If baking several loaves, allow the oven to return to 500°F (260°C) before loading the next batch. Adjust the baking temperature and time as needed by testing.
- Safety Tip: Always use oven mitts or silicone gloves when handling hot pans. When pouring boiling water into the steam pan, wear safety goggles.
- Check for doneness: Your bread is fully baked when the internal temperature reaches 205-210°F (96-99°C). Use a digital thermometer to check.
- Storage and freezing: Keep your sourdough bread at room temperature for 3 to 5 days. For longer storage, freeze individual slices for up to 1-2 weeks, or freeze a whole loaf for 1-2 months.
- Want to create a custom formula for your loaf? Try my sourdough calculator.
- Need help getting started? Check out my beginner's sourdough bread guide to learn sourdough basics first.
- Note: Nutritional information does not include the white rice flour used for dusting.
Nutrition
- Calories: 2002
- Sugar: 1.5g
- Sodium: 3923mg
- Fat: 5.4g
- Saturated Fat: 0.9g
- Carbohydrates: 419.7g
- Fiber: 14.9g
- Protein: 56.8g
- Cholesterol: 0mg

Mary Moylan says
I love the concept of baking my sourdough in loaf pans and have done so several times but they ALWAYS BURN on the sides and usually the bottom. I've used different loaf pans: the USA non-stick ones and simple store bought ones they have ALL burned on the sides. I just pulled one out this morning and had baked it at 425 degrees and it burned on the sides also. Yet, all those online who write about this method pull out beautiful NON-BURNED loaves. So please tell us your secret!!
Thanks!
Irina Totterman says
Hello Mary, I'm sorry to hear you're having issues with burnt loaves. I use NorPro loaf pans and usually bake using the open-bake method with a steam pan placed below the loaves. I bake at 430°F for 20 minutes with steam, then remove the steam pan and continue baking for another 17–18 minutes. One thing I would suggest checking is your oven temperature. Sometimes the actual oven temperature can differ from what the display shows. Using an oven thermometer can help confirm that your oven is heating accurately.
Christopher Morgen says
How can I best adjust this recipe for 1 loaf in a 9x5x3" 1.5# double pan method?