
If there is one habit that completely changed my sourdough baking, it wasn't a new flour, a fancy tool, or a complicated technique. It was keeping a sourdough baking log.
At first, I baked by feel and memory. Sometimes the bread was incredible. Other times… not so much. And when a loaf failed, I often had no idea why. It sounds familiar. Right?
At some point, I started using sticky notes to write the most important details, like short recipe notes, dough temperature, percentage rise, and the final result.
It helped at first, but over time it turned into a mess. Notes got lost, details blurred together, and I couldn't easily find what worked and what didn't.
That is when I created a sourdough bread log, and everything became clearer. Instead of guessing, I could look back, compare bakes, and slowly understand what changes I needed to make for my next loaf.
Scroll down to download and print out my sourdough baking log.
What is a sourdough baking log?
A sourdough baking log is a baking notes worksheet that records each sourdough bake. It captures conditions, decisions, and results of your bread.
Whether you are making Beginner's Sourdough Bread or my Master Sourdough Bread, you will spot patterns over time, repeat your best loaves, and understand why a loaf didn't turn out as expected.
It is one of the best ways to track sourdough bakes. Think of it as a conversation between past you and future you.
Why logging every bake is important
Sourdough isn't just a recipe. It is a relationship between flour, water, time, and your environment.
Two loaves made from the same recipe can behave very differently because of room temperature, humidity, starter strength, ingredients, dough temperature, and your choice of when to end the bulk fermentation.
A baking log helps you stop blaming yourself and start learning from real data. It gives you the insight you need to improve your bread by making thoughtful adjustments to bulk fermentation.
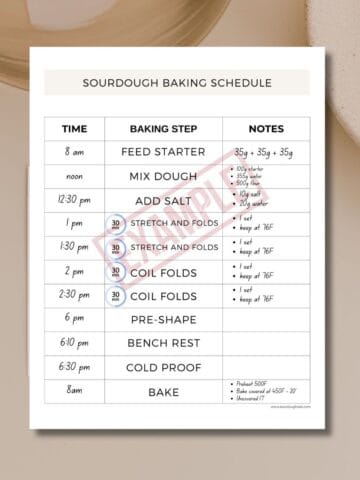
My step-by-step sourdough baking log system
This is the exact order I use when logging a bake.
1. Recipe, date, and bake number
Start by writing down the recipe name and the date. Over time, this becomes more meaningful than you might expect. You will remember your very first bake, celebrate your sourdough anniversary, and notice new milestones along the way.
I always number my bakes. Why? Because it shows progress. Seeing something like "Bake #33" instantly takes me back to my first, almost perfect sourdough loaf. It wasn't truly perfect, but it was really good, and that was important.
Later on, Bake #123 marked the moment I finally nailed my bulk fermentation (even though I continued fine-tuning it after that). When I look at my current bake number, I can clearly see how much experience I have already gained.
And once you start baking multiple loaves regularly, you will truly appreciate having a dedicated line on your baking log for the number of loaves.
2. Kitchen conditions and DDT
This is where sourdough really starts to make sense. I always note the room temperature and humidity using a simple digital thermometer with a built-in humidity meter that hangs on my fridge.
Over time, you will start to notice patterns such as faster bulk fermentation in the summer and a slower rise on cooler days. This section alone can help explain so many sourdough mysteries.
I also often record the desired dough temperature (DDT), especially when mixing bread dough with a mixer, to help keep results consistent.
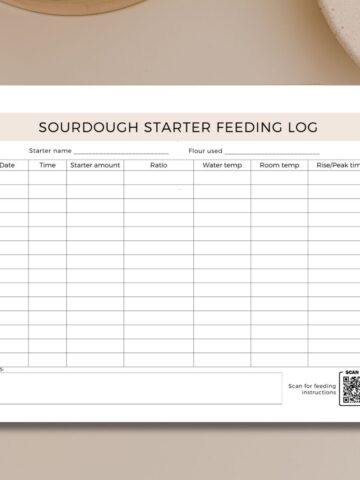
3. Levain/starter details
For the levain, I always write down the feeding ratio, peak time (when the starter reaches its peak), and the starter ingredients used. I sometimes change the flour when making a levain, so this detail is especially helpful to record.
4. Bread dough formula
I write down all the ingredients for the sourdough bread, including their weights and baker's percentages. This includes the flour type(s), levain amount, water, salt, and the total dough weight before baking. To create and scale my bread recipes, I use my sourdough calculator.
When a loaf turns out amazing, this section tells you exactly what you did.
5. Baking steps
This is one of the most important sections because it helps you connect your process with the final result.
I write down whether I use a fermentolyse or autolyse (yes/no and the time), how many stretch and folds or coil folds I do, the dough temperature, resting periods, and simple notes on how the dough feels (slack, elastic, or strong).
These notes train your hands and eyes just as much as your mind. Instead of blindly following charts, you begin to understand how your dough behaves in your kitchen.
I also note whether I preshape the dough, the final shape (boule or batard), the proofing method (room temperature or cold retard), and the total proofing time.
Over time, you will be able to connect these shaping and proofing choices with crumb structure and oven spring.
6. Baking details
This is a section many bakers forget to log, but it is important. I always write down the baking temperature, steam time, steam release or uncover time, and the total bake time. These details help explain crust color, crust thickness, and oven spring.
7. Final notes and results
Here, I record the total bulk fermentation time so I can later connect it to room temperature, humidity, and dough temperature. If I use the aliquot jar method, I also note the percentage of dough rise. I even included space for the dough's pH at the end of bulk fermentation, in case you ever decide to start measuring it.
I also record the oven spring, crumb structure, and, sometimes, flavor. This can be a short phrase or even a simple "+" to mark a successful bake. That single line or symbol turns every loaf into progress because every loaf is a lesson.
What you will notice after a few weeks of logging
If you stick with this system, you will start trust your instincts, adjust bulk fermentation, repeat good results, and feel calm even when a loaf isn't perfect.
That is when sourdough stops feeling intimidating and starts feeling natural. You will finally notice a moment when it all clicks, that sourdough click when you begin baking the best loaves you have ever made. Trust me, it happens.
Sourdough baking log download
This is the exact baking worksheet I use for every single bake.

Download and print the sourdough baking log PDF now.
How to use the sourdough bread baking log
Use one log sheet for each bake. On the dough day and the following day, fill out the sheet with a water-resistant ballpoint pen.
Avoid gel pens, fountain pens with non-waterproof ink, or any non-permanent pens, as their ink can smear or fade over time (you will thank me later for this small tip!). You don't need perfect handwriting, but it is important to record every bake.
I designed this sourdough baking log template to be printed on both sides, hole-punched, and stored in a binder. This way, you can create your own DIY sourdough baking journal and keep all your bakes organized in one place.
You will notice a beautiful logo on this one-page worksheet. LD stands for Sourdough. The logo isn't just decorative. It is intentional. It takes up space on purpose.
If you ever decide to use a Kodak smartphone photo printer to print photos of your loaves, you will get 3 x 2-inch prints. These mini photos are perfect for reading the crumb and understanding why this happened instead of that.
The prints are waterproof and fade-resistant, with a peel-off sticky back, so you can place the photo right over the logo area.
Let's talk sourdough
What system do you use to record your sourdough bakes, and what has it helped you learn so far?
Christopher Morgen says
Please send me the sourdough baking log. The link on the download page keeps saying "something went wrong" when I enter my email.