Quick Summary: Underproofed sourdough hasn't fermented long enough, so it goes into the oven before the yeast has built enough gas. Tell-tale signs are a dense, heavy crumb (often a gummy bottom with large holes near the top, called a "fool's crumb"), poor oven spring, a pale, thick crust, and a U-shaped bottom.
The fix is almost always more fermentation, either warmer or longer, until the dough is light, airy, and jiggly. You can still bake and eat underproofed dough, but it will be dense and slightly raw, with a floury taste.
Underproofing is one of the most common sourdough challenges, affecting both beginners and seasoned bakers. The good news is that it is also one of the easiest mistakes to correct once you know what to look for.
Jump to:
- What does underproofed sourdough mean?
- How to tell if your sourdough is underproofed before baking
- How to tell if your sourdough is underproofed after baking
- Underproofed sourdough: real-life examples
- What does properly proofed sourdough look like?
- What causes underproofed sourdough?
- How to fix underproofed sourdough
- Can you bake underproofed dough?
- Can you eat underproofed dough?
- Underproofed vs. underbaked sourdough
- Underproofed vs. overproofed sourdough
- FAQ
- Let's talk sourdough
- Ready to keep learning?
- Comments
What does underproofed sourdough mean?
Proofing (or fermentation) is the stage where your dough rests and rises as wild yeast and bacteria produce gas and acids. This process gives sourdough its structure, flavor, and texture.
When sourdough is underproofed, it simply hasn't had enough time to ferment and develop properly. The yeast hasn't produced enough gas to expand the dough, and the gluten structure hasn't relaxed enough to allow for good oven spring.
In other words, the dough isn't quite ready to go into the oven.
While the term proofing originally came from baking with commercial yeast, it is now widely used in sourdough baking too, essentially meaning the same thing as fermenting. In this post, I will use the terms underproofed and underfermented interchangeably.
And one more note: when you hear underproofed dough mentioned in sourdough baking, it refers first to insufficient fermentation during the bulk fermentation stage, and second to incomplete fermentation during the final (cold) proof.
How to tell if your sourdough is underproofed before baking
The clearest signs of underproofing are a dense, heavy dough that springs back fast, low volume, no jiggle, and a tight crumb after baking.
1. Low volume during bulk fermentation
The dough hasn't increased much in size (volume) and looks relatively small compared to its original volume. Although the dough percentage rise depends on dough temperature and varies from one bake (or even one day) to another, a volume increase of only about 30% usually means the dough is still underproofed.
2. Heavy, compact feel
The dough feels heavy and compact rather than light and airy. A properly proofed dough feels relaxed and full of air, with a pillowy feeling. An underproofed one feels firm and dense.
3. No jiggle when shaken
The dough doesn't jiggle when you gently shake the bowl. Properly fermented dough should have a light, airy wobble, showing that it is full of gas and ready for shaping.
4. Finger poke springs back
During final proofing on the counter, a quick poke that springs back immediately or leaves no indentation is a sign of underproofing. It shows the gluten is still tense, and the dough hasn't developed enough gas to hold its shape.
How to tell if your sourdough is underproofed after baking
1. The loaf feels heavy
An underproofed loaf often feels heavier than expected after baking. Because the dough didn't ferment long enough, it didn't trap enough gas, resulting in a denser final loaf.
2. Smaller loaf size
A noticeably smaller loaf is a common sign of underproofing. When the dough hasn't fermented long enough, it lacks the gas and strength needed to expand fully during baking.
3. Thick, uneven crust
The crust is usually hard, pale, or unevenly browned. Underfermented dough doesn't develop enough surface sugars for deep caramelization. Plus, the interior hasn't fully stretched the crust, resulting in a mix of thick, rigid areas and thin, soft spots.
4. Weak or uneven oven spring
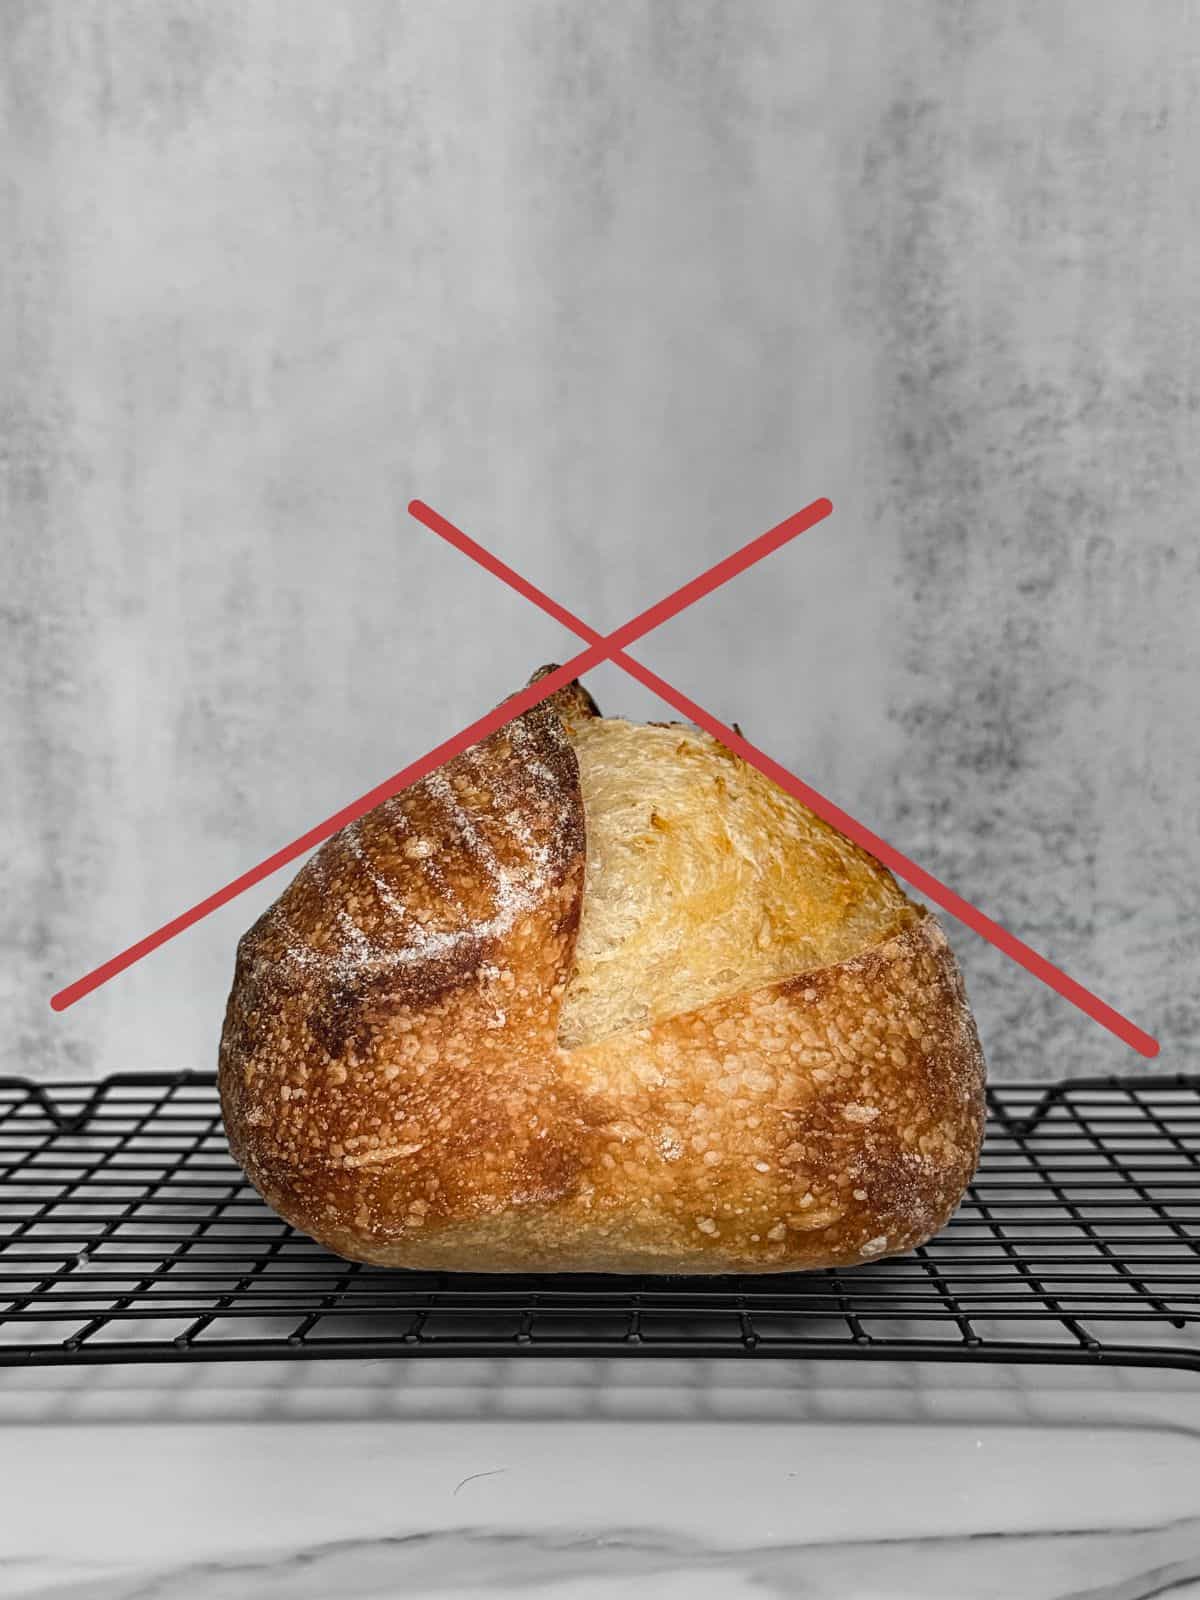
Underproofed dough often lacks the internal strength to rise evenly. Significantly underproofed loaves barely expand and look flat, while slightly underproofed ones rise tall but form a triangular or pyramidal shape. In some cases, the dough may collapse on one side, giving a lopsided loaf.
5. Bursting along the score
The scoring line doesn't open for loaves that are significantly underproofed. Slightly underproofed loaves often rise more upward than outward and often burst open randomly instead of following the score. Because the dough can't expand evenly, it creates its own weak spots during oven spring.
6. Dense, compact crumb
In significantly underproofed loaves, the interior crumb often looks tight and compact, sometimes with a gummy strip along the bottom. You can also see large holes or tunnels near the top. This happens because the dough didn't have enough time to fully develop gluten or evenly trap gas.
Slightly underproofed loaves tend to show a similar pattern, a dense layer at the bottom and large holes at the top, which bakers call a "fool's crumb." It may look beautifully open at first glance, but those big, uneven holes and dense patches are signs the dough wasn't fermented quite long enough.
7. U-shaped bottom
A pronounced U-shaped bottom also indicates underproofing. The strong upward push during baking forces the crumb structure upward, rather than allowing the loaf to expand evenly across the base.
8. Dull sound when tapped
Tap the bottom of your loaf: a properly proofed sourdough should sound hollow. A dull, heavy knock indicates a dense interior, a classic sign of underproofing.
9. Missing or exaggerated sourdough ear
If the dough is severely underproofed, the sourdough ear doesn't form. With slight underproofing, the ear rises tall and thick, peeling back dramatically in a bold, exaggerated arc.
10. Uneven slice shape
When sliced, underproofed loaves often have a domed top and compressed bottom. This happens because the dough didn't expand evenly, causing the top to rise while the bottom stays dense, resulting in wedge-shaped slices.
Underproofed sourdough: real-life examples
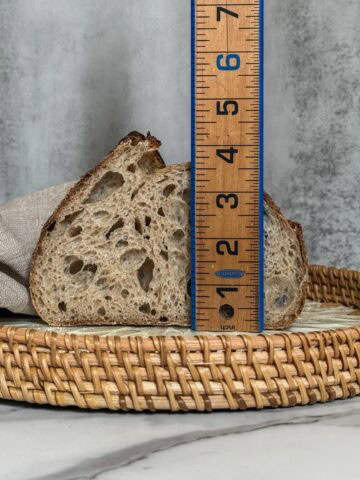
Example #1: Significantly underproofed

Significantly underproofed sourdough loaf: flat, compact, and tight, with a sharply slightly lifted ear and limited side spread.
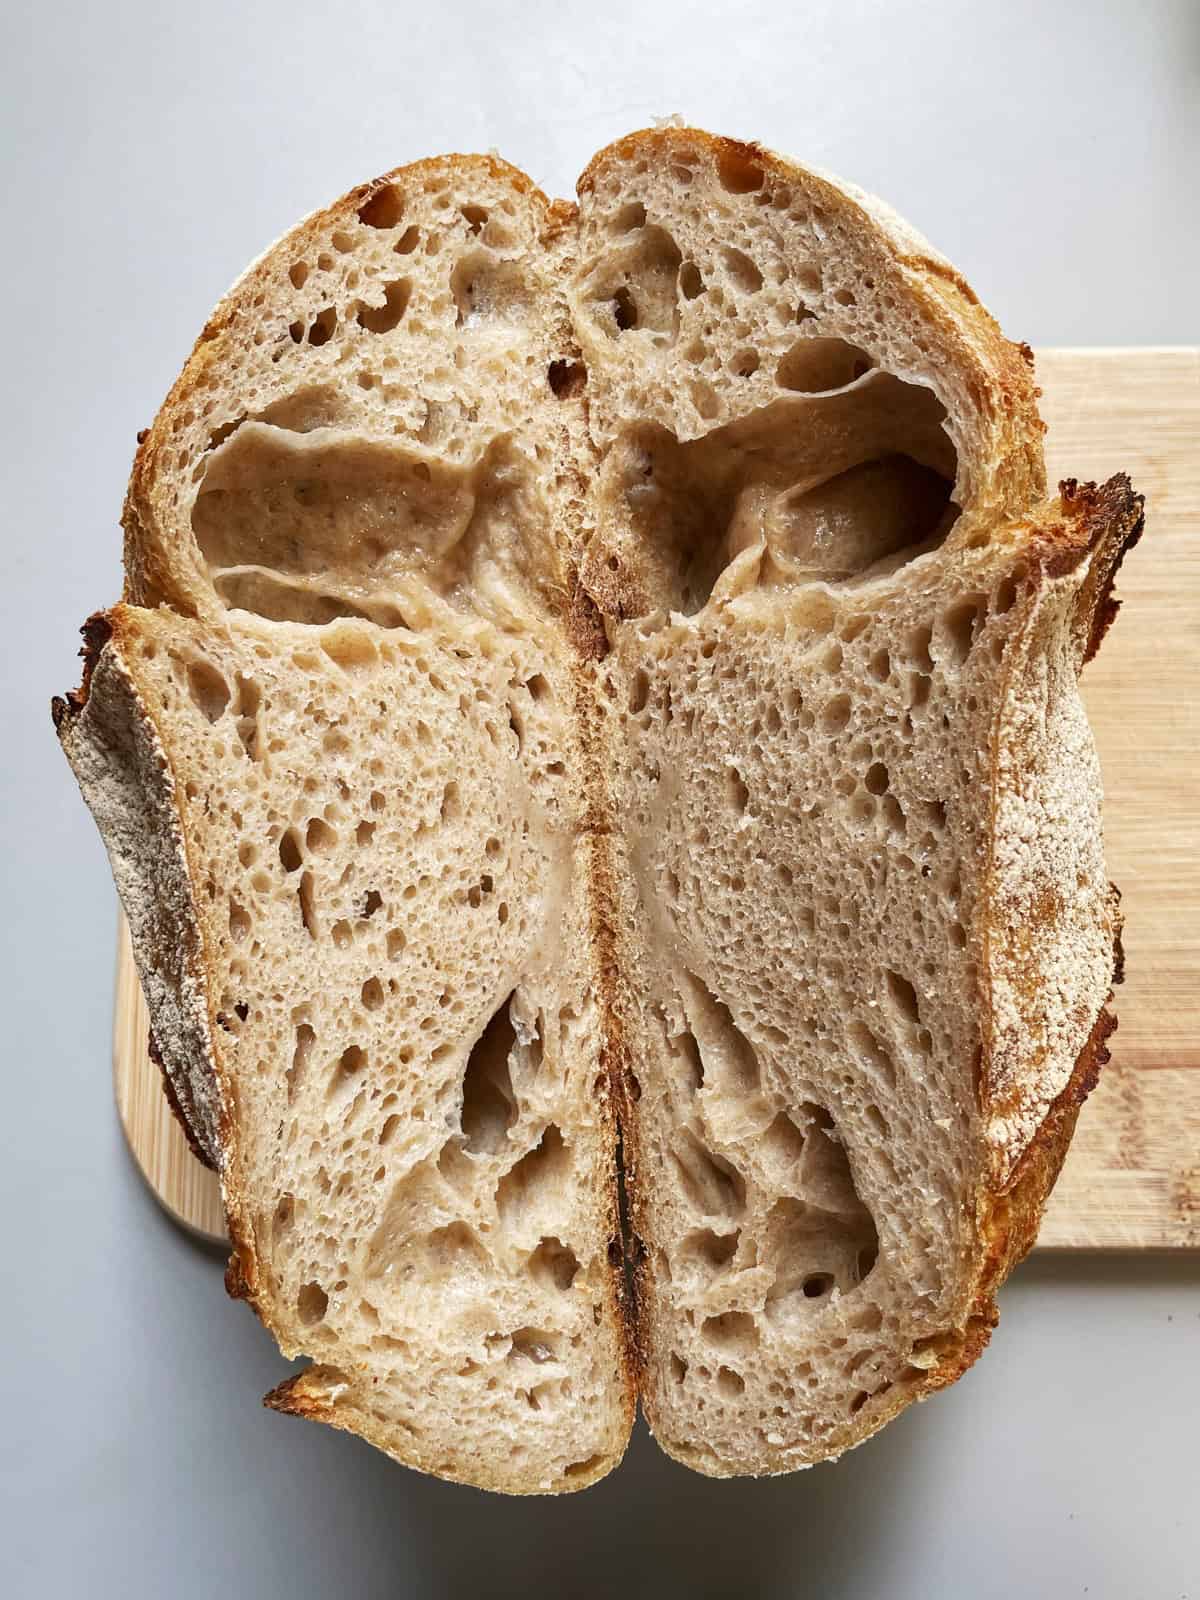
Significantly underproofed sourdough crumb: dense strip at the bottom, large hollow pockets near the top, and a slightly gummy texture overall, showing incomplete fermentation.
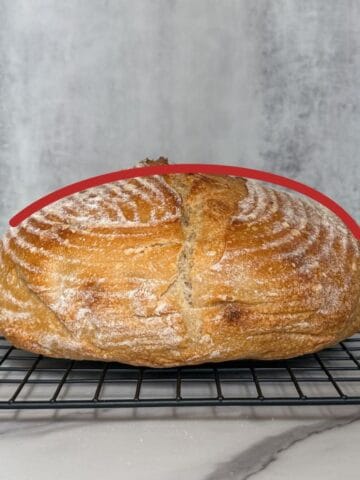
Example #2: Slightly underproofed
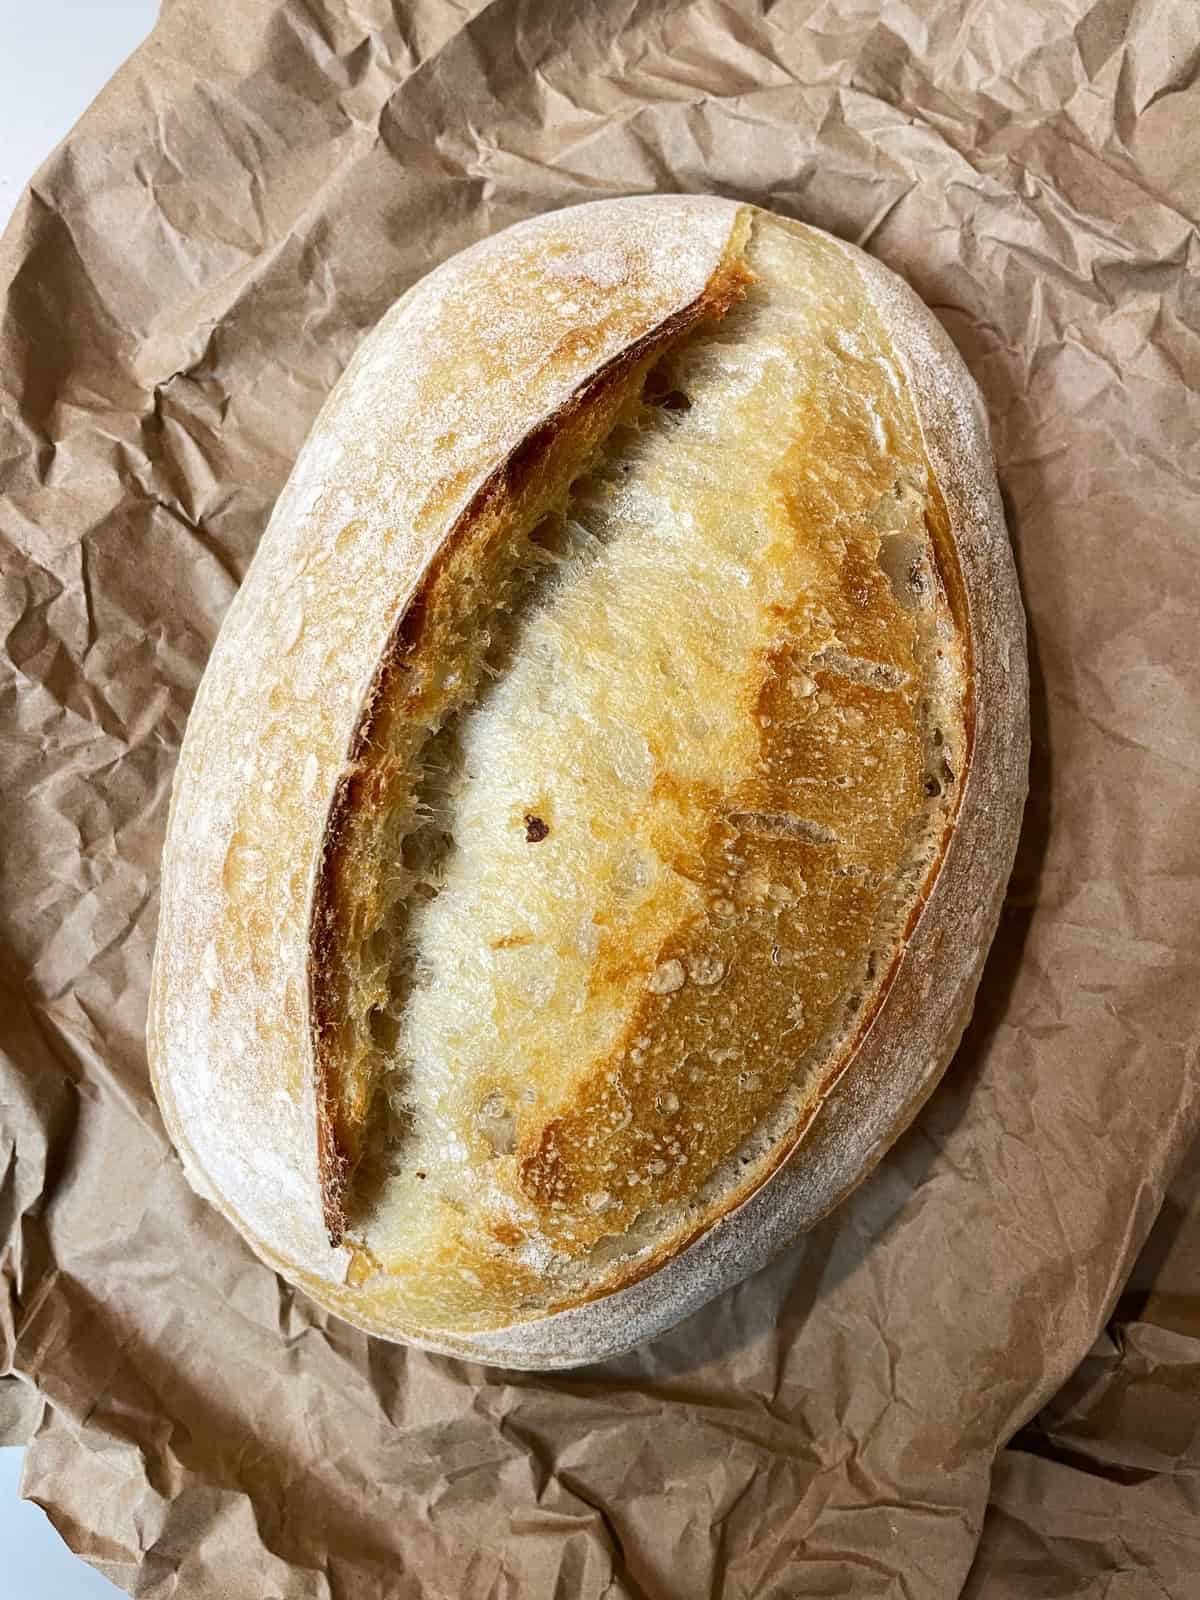
Slightly underproofed sourdough loaf: pale, blonde crust, tall with a narrow bloom and sharp ear, showing strong enough oven spring but limited lateral expansion.
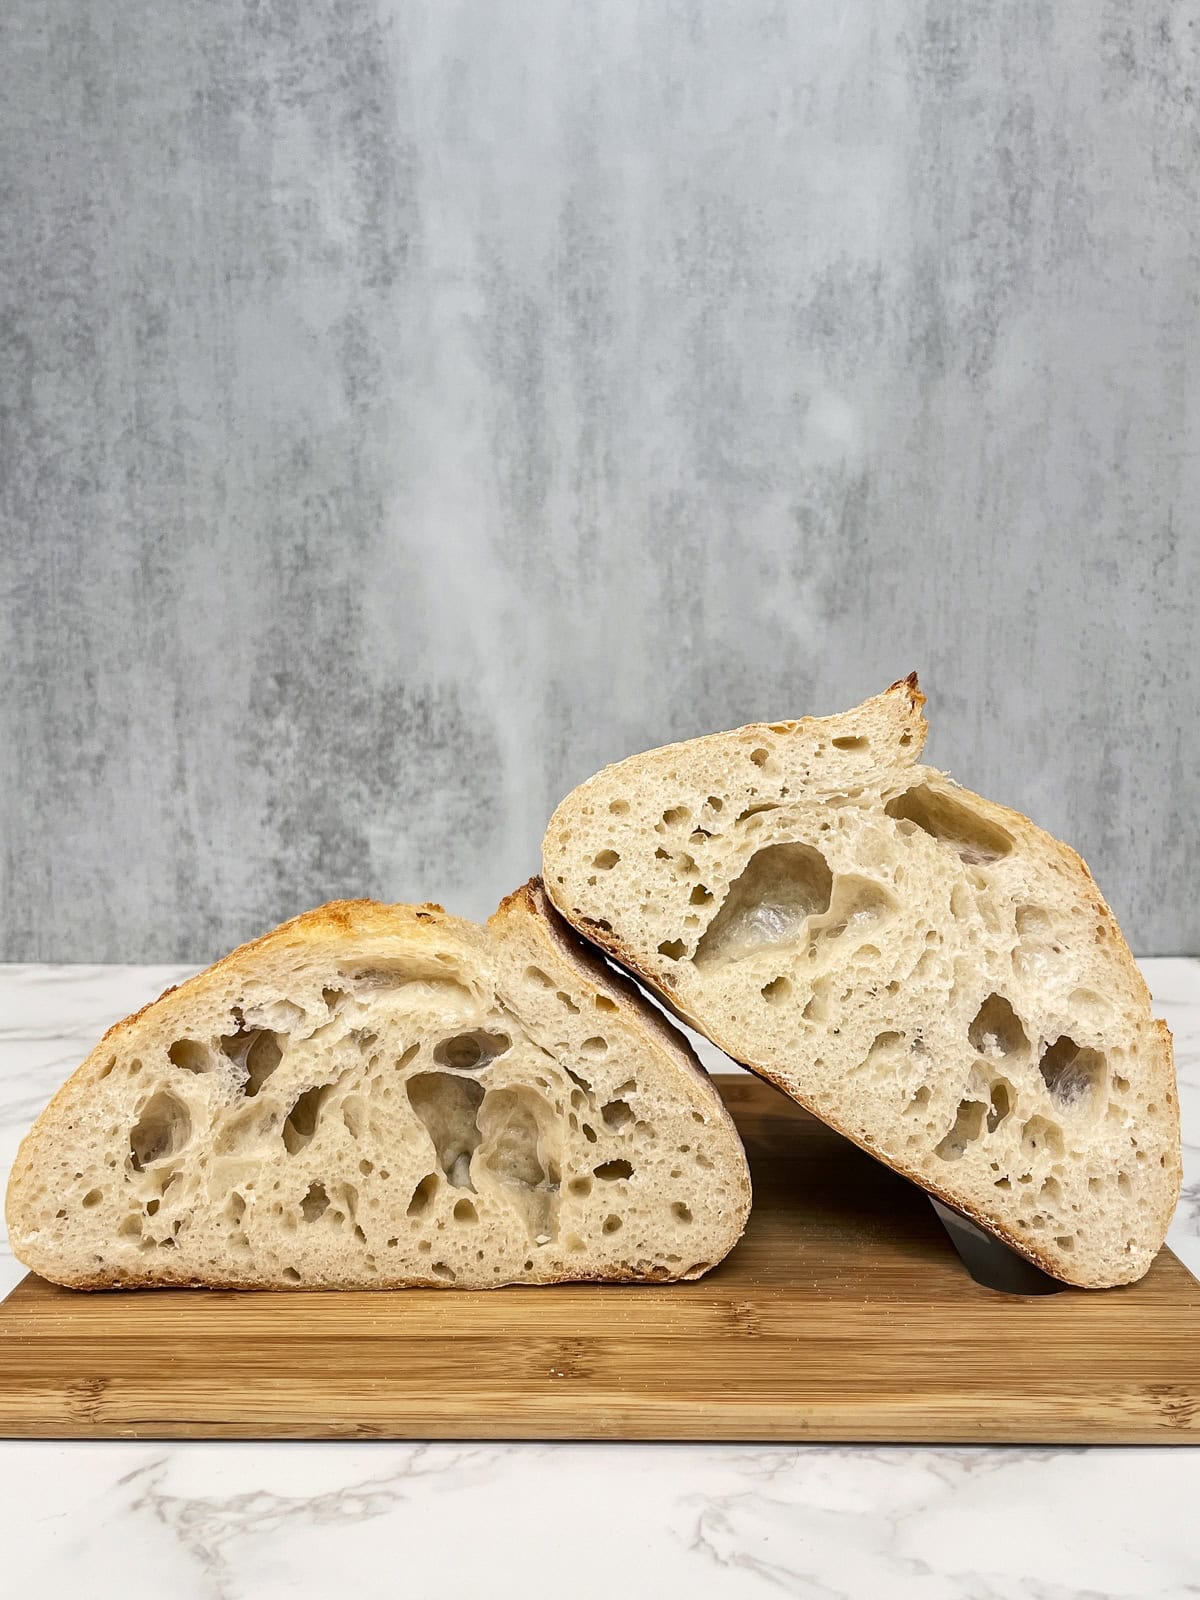
Slightly underproofed sourdough crumb: uneven, dense patches, mixed with a few large, irregular holes and a gummy texture, indicating the dough hadn't finished fermenting.
What does properly proofed sourdough look like?
Properly proofed dough and bread look and feel noticeably different from underproofed ones.
Before baking, properly proofed dough:
- Has risen well during bulk fermentation (judged by the percentage rise for your dough temperature), so it looks puffy and alive.
- Feels soft, airy, and slightly jiggly, not dense or tight.
- Holds its shape but feels relaxed and extensible, not stiff.
- With the countertop proofing, it springs back slowly and only partway when gently poked, leaving a slight indentation, rather than bouncing straight back.
After baking, a properly proofed loaf:
- Has good volume and an open, even crumb, with holes spread throughout rather than a dense band near the bottom.
- Shows a clean ear where you scored, with controlled oven spring.
- Sounds hollow when you tap the base.
- Slices cleanly into an even shape, without a gummy or tight layer.
If your loaf looks like this, you have hit the sweet spot. If it leans toward the underproofed signs above, the causes and fixes in the next sections will help you get there.
What causes underproofed sourdough?
In most cases, the problem comes down to one thing: the dough didn't ferment long enough. The fix is usually to give it more time, more warmth, or use a stronger starter. Here are the most common causes:
- Bulk fermentation ended too early. This is the most common cause. If you stop the bulk before the dough has risen enough (judging by percentage rise, not the clock), it goes into the fridge and oven underfermented.
- A cool kitchen slowed things down. Bulk fermentation depends on temperature. In a cool kitchen, the same dough needs much longer to ferment, so a routine that works in summer can leave you underproofed in winter.
- A weak or inactive starter. If your starter isn't strong and at peak when you build your levain, it won't ferment the dough efficiently, leaving it underproofed.
- Too much flour or too stiff a dough. A very stiff, low-hydration dough ferments more slowly and can look underproofed if you don't give it extra time.
- A cold proof that was too short. If you shape and then cold-proof for only a short time, the dough may not finish fermenting, especially if the bulk was already on the short side.
- Judging by the clock instead of the dough. Following a fixed time from a recipe, rather than watching how your dough actually looks and behaves, is the root cause behind most of the above. Room and dough temperature change everything, so the same number of hours gives very different results.
How to fix underproofed sourdough
Even if your dough seems underproofed, there are ways to fix it, both during bulk fermentation and the final proof. Here is a step-by-step guide:
1. Improve gluten development
If your dough feels weak or slack, try a few additional sets of stretch and folds or coil folds during bulk fermentation. Strengthening the gluten network helps the dough retain gas better, resulting in a higher rise and a more structured loaf.
2. Extend bulk fermentation
Sometimes the dough needs a bit more time. Let it sit at room temperature until it shows signs of readiness, such as passing the float test.
Note: While the float test isn't completely reliable, even for sourdough starters, and some bakers argue it shouldn't be used for sourdough dough, it can still help beginners bake an edible loaf.
If your goal is to master sourdough and achieve that ideal bakery-style bread, focus on dough percentage rise and other signs of proper fermentation.
3. Warm your dough
Cool kitchen temperatures slow down fermentation. If your dough is sluggish, move it to a warmer spot at 75-78°F (24-26°C).
Your options include a turned-off oven with the light on, a proofing box, or any slightly warm area in your kitchen (see my full guide to proofing sourdough in a cold kitchen).
4. Read the dough
Bulk fermentation times vary depending on dough temperature, flour type, and starter strength. Use visual and tactile cues to guide you.
5. Fix underproofing during countertop proofing
If you notice your dough is underproofed during the final proof on the counter, let it proof a bit longer. Use the poke test to check readiness: the dough should spring back slowly, not stay flat or bounce back immediately.
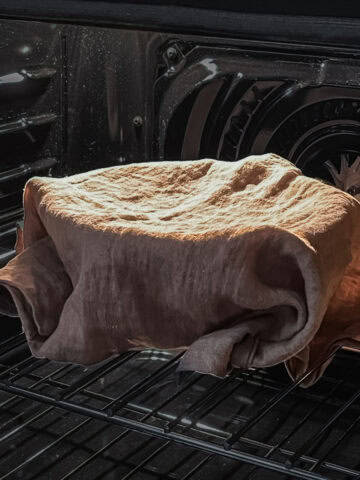
6. Fix underproofing after cold proofing
If you removed the dough from the fridge and it feels underproofed, let it sit at room temperature to continue fermenting. The dough will first warm up (from around 39°F (4°C) to your room temperature, let's say 73°F (24°C), then continue its fermentation. This may take a few hours, but it can save your loaf.
I like a video from Eat Basil and Bloom that shows how to fix a batch of underproofed sourdough loaves by letting them finish fermenting on the counter.
You just learned to fix underproofing, but it is only one of the problems that can trip you up.
Can you bake underproofed dough?
Yes, but the result will likely be dense and tight-crumbed. You will also see poor oven spring and possibly random cracks or blowouts.
Can you eat underproofed dough?
Yes, underproofed sourdough is safe to eat as long as it is fully baked to an internal temperature of 205-210°F (96-99°C). It will just be denser and a little raw-tasting.
Because the dough hasn't fully fermented, it won't develop the full flavor, airy texture, or open crumb of a well-proofed loaf. It is perfectly edible, just not at its best, so give it more bulk fermentation next time.
Underproofed vs. underbaked sourdough
Both underproofed and underbaked sourdough result in dense, gummy bread, but for very different reasons.
Underproofed sourdough hasn't fermented long enough. The dough hasn't built enough gas, so it feels tight and elastic, and the baked loaf turns out dense with little rise. The crumb often looks uneven, with large holes near the top and a heavy, gummy bottom.
Underbaked sourdough, on the other hand, is all about baking time and temperature. The dough may have proofed perfectly, but it wasn't in the oven long enough. The crust might look done, but the inside remains pale, sticky, or even wet. You will also notice the loaf feels heavier than it should.
For beginners, underproofing and underbaking sometimes happen together. If mastering fermentation takes practice, fixing underbaked loaves is the easy part.
Just check the bread's internal temperature. A fully baked sourdough should reach 205-210°F / 96-99°C. I usually aim for 207°F (97°C) and higher.
Underproofed vs. overproofed sourdough
Underproofed and overproofed sourdough can look similar at a glance, both dense and gummy, but they are opposite problems: one has not fermented enough, the other has fermented too long. Here is how to tell them apart.
| What you see | Underproofed | Overproofed |
| Cause | Not enough fermentation | Too much fermentation |
| Dough before baking | Tight and firm; poke springs back fast | Slack, wet, sticky; poke doesn't spring back |
| Rise | Low volume, never quite doubles | Over-rises, then deflates |
| Oven spring | Weak or bursts randomly; can rise tall and triangular | Little to none; spreads flat and wide |
| Sourdough ear | Missing, or tall and exaggerated | Missing; no defined score |
| Crumb | Dense bottom with large holes on top ("fool's crumb"), gummy | Flat, gummy, or full of collapsed, irregular holes |
| Crust | Pale, thick, uneven | Pale; may blister |
| Can you fix it? | Yes, ferment longer or warmer | Hard to undo; bake as-is or repurpose |
Underproofing is usually the easier of the two to fix, since you can simply ferment longer. If your loaf shows the opposite signs instead, slack dough, a flat spread, and a collapsed crumb, it is likely overproofed.
FAQ
What's the difference between underproofed and overproofed sourdough? Underproofed dough hasn't fermented enough: it is tight, dense, and springs back quickly. Overproofed dough has fermented too long: it is slack, sticky, and spreads flat with no structure. Both can bake up gummy, but for opposite reasons. (See the comparison table above.)
Why does my sourdough have big holes at the top and a dense, gummy bottom? That's the classic "fool's crumb," and it usually means underproofing. The dough didn't ferment long enough to evenly trap gas, so it pushed up into a few large tunnels near the top while remaining dense and gummy at the base. More bulk fermentation and stronger gluten development usually fix it.
My dough is jiggly but too sticky to shape and won't hold a score. What do I do? Very sticky, hard-to-shape dough that flattens and won't hold a score is often a strength or shaping issue rather than simple underproofing. If it is already cold-proofed and flat, don't fight it: bake it in a greased loaf pan, which supports the shape and still gives you good bread.
How long should sourdough proof so it isn't underproofed? There's no fixed time as bulk fermentation shifts with dough temperature, flour, and starter strength. Judge by signs (a roughly 50%+ rise, a light jiggle, an airy feel) rather than the clock, since the same dough can take very different times on a warm day versus a cold one.
Let's talk sourdough
Have you struggled with underproofed loaves? Share your experience or questions in the comments below. I'd love to help you troubleshoot.
Ready to keep learning?
On the other end of the spectrum is overproofed sourdough, which can be just as frustrating. Discover the signs of overproofing and practical tips to prevent or correct it.
And if your loaf shows a different symptom entirely, browse all my sourdough bread troubleshooting guides to find the fix.