
If you bake sourdough, you have probably noticed those beautiful sourdough ears scrolling through Facebook or Instagram threads.
Ears are more than just a pretty detail. Sourdough ears are a proud visual sign of a baker's skill, showing that fermentation, shaping, and scoring all came together perfectly.
In this post, I will explain what sourdough ears are, how to get them reliably, and troubleshoot if they are missing.
And if you still think scoring alone creates the ear on your loaf, I will show you it is not that simple. As James Bridges explains, "The score itself doesn't create the ear - it simply directs how the dough expands during oven spring."
What are sourdough ears?
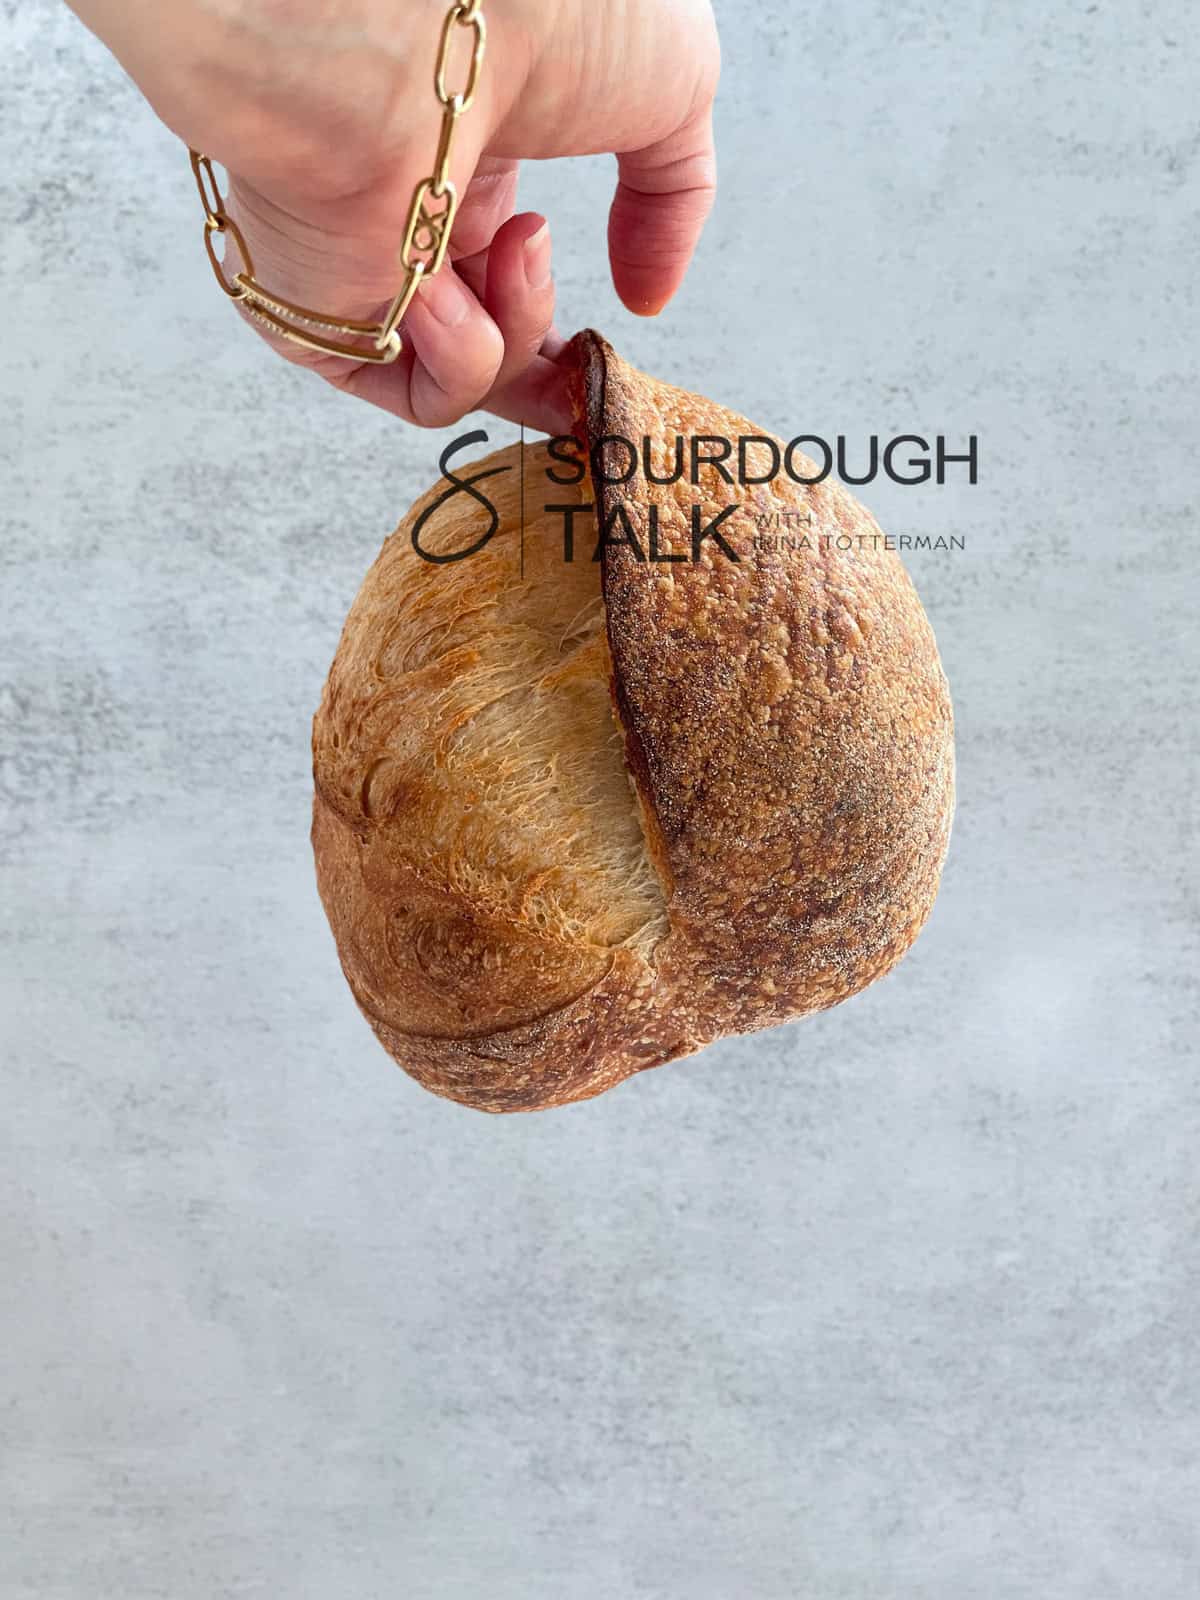
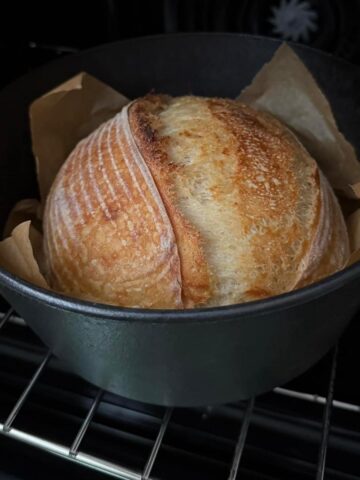
Sourdough ears are the beautiful, raised flaps of crust that form along a loaf's score line when it bakes. They are the proud little ridges that "peel back" as the dough expands in the oven, showing off a crisp contrast between the dark baked crust and the golden inner edge.
In the baking world, you might also hear them called grignes (a French term for "slash") or, playfully, "bread ears."
When you slice your loaf in half, you will notice the ear resembles a little bunny ear, giving the bread what bakers like to call a charming "bunny profile."
Are ears important?
While some people find sourdough ears frustrating because they make cutting bread harder, and others see them purely as an aesthetic touch, they are important in certain ways.
As Flourhaus Bread Co. humorously puts it, "Some people don't like the ear on sourdough. I can't relate and have no advice to offer. Have a bagel."
First, ears give a loaf a bakery-style appearance. The first things people notice are the shape and crust before the crumb.
Second, a well-defined ear indicates that you have mastered the key elements of sourdough baking, including bulk fermentation, shaping, scoring, and baking.
And finally, the ear often caramelizes more, creating a slightly darker, crunchier crust that many bakers (myself included) love.
Science behind sourdough ear
The formation of a sourdough ear is a mix of fermentation, dough strength, and heat. When well-fermented dough goes into a hot oven, the trapped gases expand quickly. This creates what bakers call oven spring.
Steam keeps the dough's surface soft just long enough for it to stretch before it sets. The score line acts as a weak spot, letting the dough expand in a controlled way. As the heat builds, the edge of the cut lifts and curls back, forming that signature crispy "ear."
When the dough has the right balance of tension, hydration, and fermentation, the ear rises high and browns beautifully thanks to the Maillard reaction.
Key factors that control ear formation
Getting a good ear on a sourdough loaf depends on several important elements. Let's get them one by one.
1. Starter health and fermentation
A healthy and active sourdough starter is the heart of your sourdough. Proper starter fermentation sets the stage for successful dough fermentation.
Your starter is ready to use when it consistently doubles in volume at a 1:2:2 feeding ratio at 74°F (23°C) for three days in a row. To learn more, check out my guide on sourdough starter peak.
If you are just getting started, check out my step-by-step guide on how to make a sourdough starter from scratch.
2. Dough strength and gluten development
In recent years, bakers have paid more attention to developing gluten early, during the initial mixing stages.
While it is possible to make a good sourdough without proper mixing, techniques like the pincer method, pinch and fold, slap and fold, and the Rubaud method are important if you want a well-formed sourdough ear.
These techniques help build both elasticity (the dough's ability to spring back) and extensibility (its ability to stretch without tearing), two essential properties of well-developed dough.
My bread dough mixing guide covers all the mixing techniques in detail, and I highly recommend reading it.
Once again, while gluten continues to strengthen during bulk fermentation, proper mixing at the start plays a key role.
3. Proper bulk fermentation
Bulk fermentation is one of the critical stages in building dough strength. It plays an essential role in determining whether your loaf develops a well-defined ear.
During this stage, the dough ferments, allowing the gluten to strengthen and the yeast to produce gases that give the loaf its rise.
However, it is equally important to allow the gluten to relax between each stage of development, from mixing to folding. That is why bakers give the dough about 30 minutes to rest after mixing and between folds.
If the dough is under-fermented, it lacks sufficient gas and elasticity, which can prevent the ear from forming properly or cause an overly large ear. Over-fermented dough, in contrast, becomes slack and weak, often spreading instead of rising properly.
Bulk fermentation is the most challenging part of sourdough baking, especially when it comes to knowing when to end bulk fermentation. It requires time, practice, and careful observation, but with experience, judging the right moment becomes much easier.
To simplify the process, I have created a detailed bulk fermentation guide, which explains how to master this stage. I also wrote a blog post on how to adjust bulk fermentation according to your kitchen conditions.
4. Surface tension and shaping
As baker Satchie Flay perfectly puts it, "Tension is the key for both phases [preshape and final shaping]. Nice and tight without tearing the gluten. A nicely wrapped loaf will give you a nice ear (granted the scoring is correct) and belly."
Surface tension plays an important role in achieving a beautiful sourdough ear. When you shape bread dough, you are not just giving it a loaf shape. You are also creating a tight, smooth surface that holds the gases produced during baking.
A dough with good surface tension traps gas more effectively, allowing it to expand upward in the oven rather than spreading out. This upward expansion is what helps create a well-defined ear.
If the surface is too slack or rough, the dough will spread instead of springing upward, and the ear will fail to form.
Shaping into a batard often produces a more prominent ear than a boule. Tight, careful shaping helps the loaf maintain its structure and promotes the ear to lift, while loose shaping causes the dough to spread.
To learn more about shaping bread dough, read my detailed guide on the blog.
5. Scoring technique
Scoring is more than just decorating your sourdough. It controls how the loaf expands in the oven and where the ear forms.
A shallow cut won't give the dough enough guidance to expand, while a cut that is too deep can collapse the structure and prevent the ear from forming.
The angle of the cut is also important. A slightly slanted single slash is the best scoring method that encourages the dough to rise upward, creating a defined ear, while a straight vertical cut gives a more subtle lift.
The speed and confidence of your motion also make a difference. A quick, decisive cut prevents dragging or tearing the dough and helps maintain surface tension for a proper ear.
6. Dough hydration
Higher hydration improves oven spring and open crumb. However, very wet dough can be too soft to hold a clean, defined ear.
Moderate to high hydration (70-75%) often gives the best combination of oven spring, crumb openness, and a controlled, attractive ear.
7. Steam
Steam is essential for a perfect sourdough ear. During the first part of baking, steam keeps the dough's surface soft and flexible, giving it room to expand fully before the crust hardens.
Without it, the crust sets too quickly, limiting oven spring and preventing the ear from forming correctly. A good burst of steam not only helps the loaf rise but also creates a thin, crisp crust that beautifully frames the ear.
This initial steam is important for both the dough rise and the development of sourdough ear. It is important regardless of whether you bake in a Dutch oven, an enamel pan with a lid, or use a steam tray during an open bake.
How to get perfect sourdough ear step-by-step
Now, let's create a detailed checklist you can follow for your next loaf.
1. Feed your starter properly
Make sure your starter is active, recently fed, doubled or even tripled in size. The best time to use it is when it has reached its peak. Using your starter at this stage provides strong fermentation, good oven spring, and a better chance of getting that beautiful sourdough ear.
2. Autolyse or fermentolyse and mix
Choose autolyse or fermentolyse for better gluten development. Then, add levain (if using autolyse) and salt, then mix until the dough feels smoother and more elastic.
To check your progress, use the windowpane test: stretch a small piece of dough between your fingers. If it forms a thin, translucent membrane without tearing, your gluten is well developed.
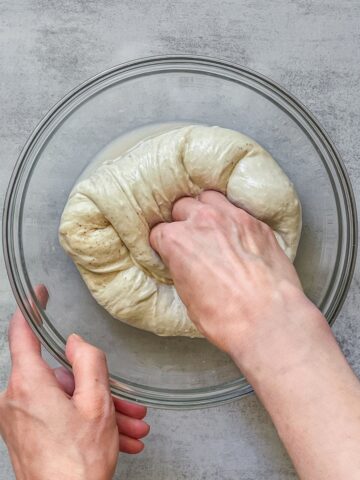
3. Bulk fermentation with stretch & folds and coil folds
Perform several sets of stretch and folds, and coil folds spaced out (for example, every 30 minutes) to strengthen the dough and build its structure.
These folds help strengthen the gluten network, improve dough elasticity, and build internal structure, essential for a strong oven spring. A well-developed dough traps more gas and holds its shape better, allowing the score to open cleanly and produce a pronounced, attractive ear.
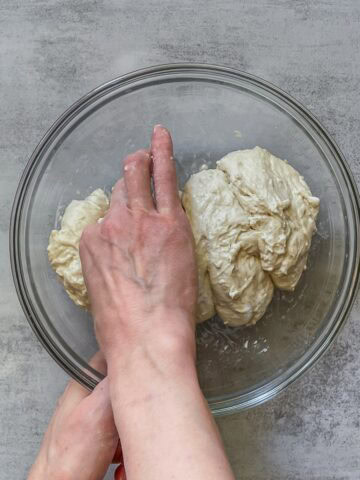
4. Preshape (if your workflow uses it) and shape
Pre-shape and shape your dough to build good surface tension. During the final shaping, focus on creating a taut, smooth outer skin, which helps the dough expand evenly in the oven.
5. Final proofing
While room-temperature proofing produces a great loaf, opt for cold proofing overnight.
The cooler temperature firms up the surface, allowing the blade to glide cleanly and giving you better control. This helps create neat cuts and a more defined ear once the loaf goes into the oven.
6. Scoring
To achieve a beautiful ear, score the loaf at a 45° angle from the dough's surface, holding a sharp bread lame almost parallel to the counter.
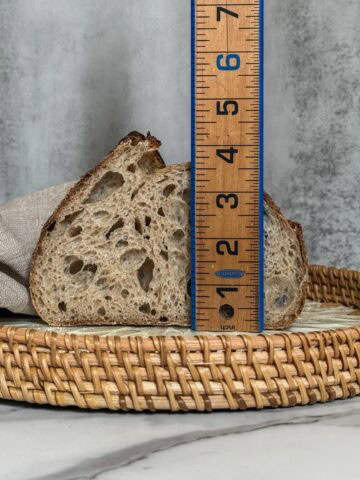
Aim for a single curved slash (a gentle crescent, arc, or C-shape) along the side of the loaf rather than one straight cut down the center.
As for depth, score about ½ inch (1 cm) deep, depending on the size of your loaf. You can go slightly deeper if you want to experiment with different ear shapes.
Cut with one confident, quick motion. No hesitation or dragging. Your clean, decisive score will help the dough open up neatly and form that classic sourdough ear.
Choose the right blade: a sharp razor or bread lame. I prefer using a straight lame to achieve a sharp, defined ear, but feel free to try a curved lame as well. Some bakers find that the curve helps lift the flap for the ear.
For smoother cuts, try dipping your blade in water or lightly misting it before scoring. It helps the blade glide cleanly without tearing the dough.
If you want to learn more about scoring techniques and examples, visit my sourdough scoring guide on the blog. Also, read about double and partial scoring to help achieve a sourdough ear.
7. Baking
Make sure to check your oven temperature with an oven thermometer, as the display doesn't always match the actual temperature.
Also, don't overlook the steaming phase of baking. Steam is essential for oven spring and for forming a beautiful sourdough ear. Make sure to preheat your oven with a Dutch oven inside for at least 30 minutes.
Whether you use the open bake or alternatives to a Dutch oven, the effect on the ear isn't drastic. Feel free to experiment and see what you like best.
Common mistakes and how to fix them
1. No ear, just smooth top
If your loaf ends up with a smooth top instead of a nice ear, it is usually because the score was too shallow or straight down, the dough was overproofed, or the oven wasn't hot enough.
Next time, try scoring at a 45° angle with a sharp blade, shorten the bulk fermentation, and check the oven temperature.
2. Ear fuses back or doesn't stay flapped
Sometimes the ear merges back into the loaf or won't stay open. This often happens when the dough is overproofed or too slack.
Next time, try to reduce the bulk fermentation, slightly lower hydration, and tighten your shaping.
3. Score tears instead of forming flaps
If your score ends up tearing rather than opening into a flap, it is usually because the blade was too dull or the cut was too deep.
Next time, use a clean, sharp blade, score at a moderate depth, and keep good surface tension.
4. The ear is small or minimal
A small or barely noticeable ear can be caused by weak oven spring, insufficient steam, or underproofed dough.
Next time, make sure the oven is very hot, generate sufficient steam, and prolong the bulk fermentation.
5. Extreme ear
If the ear turns out too large or dramatic, it is usually because the dough was underproofed and scored too deeply. This can also cause tearing or bursting, especially on boules with decorative scoring.
Next time, try extending the bulk fermentation slightly.
FAQs
Q: Is sourdough ear a must?
A: Not at all. You can bake sourdough without scoring, and a random burst can look beautifully rustic.
Q: Do ears affect taste?
A: Not directly. They affect crust texture, but flavor mostly comes from fermentation, flour, and salt.
Q: Can I get ears in a loaf pan or a non-Dutch oven bake?
A: Using the double loaf pan method is a bit more challenging. Loaf pans limit the shape and trap less steam around the sides, making it harder to form an ear. Baking with a steam tray, on the other hand, helps get a nice ear.
Q: Should I score early or late?
A: Score just before baking. You can also experiment with delayed scoring, about 5-6 minutes into the bake, which helps create a more pronounced ear.
Q: Do different scoring patterns affect ears?
A: Yes. A single long slash, particularly at an angle and off-center, tends to produce a nice ear.
Q: Can I get ears with high hydration dough (over 75%)?
A: Yes, but high-hydration dough is trickier to work with, making it harder to shape, score, and maintain tension. Ears usually turn out more reliably with moderate hydration.
Let's talk sourdough
I hope you find these tips truly helpful. If you have any questions about proofing times, hydration, or scoring, feel free to leave a comment below.
Comments
No Comments