
Going on vacation is exciting, but if you are a sourdough baker, it feels a little nerve-wracking. Your starter is a living culture, and the thought of leaving it alone for days (or even weeks!) makes any baker anxious.
But with a few simple strategies, you can keep your starter happy and healthy, and ready to bake again.

Why your starter needs care while you are away
Sourdough starter is a living ecosystem of wild yeast and lactic acid bacteria. These microorganisms eat flour and water to grow and produce gas, which makes your bread rise.
Without food, your starter will eventually run out of nutrients and become weak.
Keeping it in an excessively hot environment will make it overly active, producing liquid on top ("hooch") or causing it to become weak and acidic.
By keeping it in the fridge, its activity slows, and your starter will become dormant. It can generally survive this way for a while.
Once you understand these dynamics, you can choose the right storage method based on how long you will be away.
Short trips: Up to 3 days
If you are only gone for a weekend, your starter doesn't need dramatic changes. Here is what you can do:
- Feed your starter before leaving: Give it a normal feeding the evening before your trip. A healthy, well-fed starter usually survives 2-3 days at room temperature (around 70-75°F / 21-24°C).
- Store in the fridge (optional): Place the starter in the fridge about 2 hours after feeding. Cold slows down the fermentation, giving your starter a little extra safety.
- Check for hooch: When you return, your starter may have a layer of hooch on top. This is normal. Stir it back in or pour it off, then feed as usual.
Medium trips: 4-7 days
For trips longer than a few days, refrigeration is usually necessary. Here is what you should do:
- Feed and refrigerate: Feed your starter at a higher feeding ratio, such as 1:3:3, let it sit on the counter for a couple of hours, then place it in the fridge. A cold environment slows yeast activity, allowing your starter to survive a week without feeding.
- Use a larger jar: Your starter may expand slightly even in the fridge. A jar with extra room prevents overflow.
- Double the starter (optional): Some bakers like to split their starter into two smaller jars. This reduces risk: if one has issues, you have a backup.
- Revive when back: Bring it back to room temperature and feed it a few times before baking to regain full strength.
Long vacations: 1-4 weeks
Longer absences require more careful planning. You have a few options, depending on your comfort level and the starter's hydration status.
1. Refrigerator maintenance
- Feed generously and refrigerate: Give your starter a hearty feeding before storing. To make a stiff starter, use a 1:3:2 ratio (1 part starter, 3 parts flour, 2 parts water) to create a thick, firm dough. Let it sit on the counter for a couple of hours, then place it in the fridge.
- Stir in extra flour (alternatively): Mix roughly 1 part starter with 2 parts flour by weight (no added water) until a firm dough forms. Place the dough ball in a jar and generously cover it with flour. A dry starter is ideal for long-term storage.
- Revive when back: When you return, feed it a few times to bring it back to full activity.
2. Drying your starter
Drying your starter is ideal for very long trips or if you want to completely pause its activity. Spread a thin layer of starter on parchment paper and let it air dry completely (12-24 hours). Then, break into pieces and store in an airtight container at room temperature (see my guide on dehydrating sourdough starter).
When you return, rehydrate your starter and feed it daily until it is ready to bake with (see my guide on when sourdough starter is ready for baking).
3. Crumbling your starter
Mix extra flour into your starter to create a very stiff dough, then crumble it into small pieces and let them dry fully before storing in an airtight container. This method slows fermentation and preserves the culture well (see my guide on storing sourdough starter).
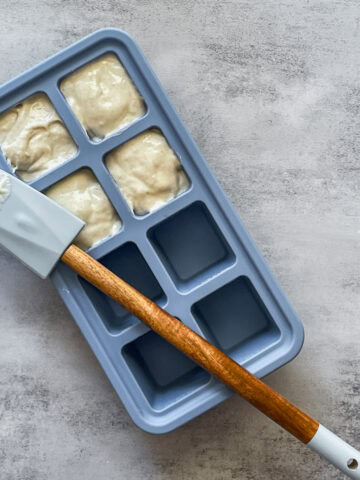
4. Freezing your starter
Freezing is another great option. Feed your starter and let it peak. Store a portion in a freezer-safe container. Thaw and feed it a couple of times before baking (see my guide on freezing sourdough starter).
5. Find a friend
Ask a fellow baker to feed your starter while you are away. This works especially well if they already maintain their own sourdough starter and are familiar with regular feeding schedules.
Before you leave, show them how you normally feed your starter, note the feeding ratio, and let them know whether you prefer to store it at room temperature or in the fridge.
5. Checking your starter into a hotel
Believe it or not, sourdough hotels exist. In Sweden, bakeries like Urban Deli in Stockholm let bakers "check in" their starter while they travel. The pros feed and monitor your starter so it stays healthy and bubbly, ready for you to pick up when you return.
This seems like a perfect solution if you don't want to worry about feedings while on vacation. While rare, it shows just how much people love their living cultures.
Special tips for different types of starters
- 100% Hydration starter (Equal parts flour and water): Easier to revive and more forgiving.
- Stiff starter (Low hydration): Can survive longer without feeding and is often easier to store.
- Liquid starter (High hydration): Requires more careful refrigeration. It tends to develop hooch more quickly.
When you return
Once you are back home, take your starter out of the fridge and let it come to room temperature. If there is any liquid hooch on top, discard it or stir it back in, depending on your preference.
Give your starter one or two feedings (depending on how long you were absent) before you bake, and watch for signs that it is alive and happy. Look for bubbles, a pleasant sour smell, and a slight rise after a couple of first feedings.
Continue regular feedings and watch for signs such as doubling (even tripling) the starter's volume and a strong peak in sourdough starter activity.
Sourdough starters are remarkably resilient, even if yours looks a bit sleepy at first, a few feedings will bring it back to life. Some bakers even say their starters seem to come back stronger after a little "rest"!
Let's talk sourdough
What do you usually do with your starter when you go on vacation? Leave it in the fridge and hope for the best? Bring it along? Or worry about it the entire trip? Please share your experience in the comments below.
Ready to keep learning?
With starter care covered, you can start shaping flavor. Learn how to make sourdough more sour by adjusting fermentation, starter use, and temperature.


Sofia says
Thank you so much for this guide!!!! I've just started my sourdough journey, and I was so worried about what was going to do when I leave for vacation!!! This was super helpful!!
Irina Totterman says
Hello Sofia, I'm happy to hear that the blog post's information is helpful!