
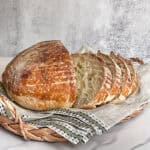
While it seems easy for some bakers to create bread recipes with different flavor profiles, I have decided to post this extra sour sourdough bread recipe.
It is just easy to follow, with no guesswork about the starter amount or the baking schedule. I even created a sourdough baking log to help you track each bake.
This recipe requires an active sourdough starter that reliably doubles in 4-6 hours. It's designed for bakers who are comfortable with sourdough basics and know how to recognize when bulk fermentation is complete.
The recipe uses a smaller amount of sourdough starter to enable a longer bulk fermentation. The less starter you use, the longer the bulk fermentation, the deeper the flavor of the baked bread (see my guide on how to make sourdough more sour).

If you are new to sourdough, start with my Beginner's Sourdough Guide, make your own sourdough starter, or buy or borrow one (here are a few options for where to buy sourdough starter). Then, try baking your very first Beginner Sourdough Bread.
What makes sourdough bread sour
Sourdough gets its signature tangy flavor from a natural, prolonged fermentation process thanks to wild yeast and lactic acid bacteria.
As the dough ferments, these microorganisms produce organic acids, mainly lactic and acetic acid, which give sourdough its characteristic taste.
Bulk fermentation and proofing sourdough in the fridge (cold retard) are two main steps in developing that flavor. During bulk fermentation, the yeast and bacteria work together to build the dough's structure and start producing acids.
During cold proofing, fermentation slows, but the bacteria continue to produce acids. This extended microbial activity is the key to the complex, tangy flavor that sourdough lovers seek.
The type of starter you use also makes a difference. For example, the classic San Francisco starter is known for its bold tanginess. This is because it has a well-established culture of acetic acid-producing bacteria, mainly Fructilactobacillus sanfranciscensis. These bacteria thrive in cooler, slower environments.
How to control the sourness of your sourdough bread
The balance between lactic and acetic acids in long-fermented sourdough depends on a few key factors:
- Amount of starter: Using less starter gives the acids more time to develop, resulting in a tangier flavor. For extra-sour sourdough, a good range is 8-12% starter. Dropping to 4-6% will dramatically slow fermentation and can push the bulk well beyond a practical timeline. For most home bakers who want a strong sour flavor without a 20-hour bulk, a 10% starter is the ideal balance.
- Type of flour: Whole-grain flours provide more nutrients for the microbes, often improving the sour character of the baked bread. Read more about sourdough bread ingredients.
- Hydration: Higher sourdough hydration tends to produce a milder, softer flavor, while stiffer dough tends to develop more acetic acid.
- Room temperature: Cooler conditions encourage acetic acid production and a sharper tang, whereas warmer temperatures favor lactic acid production and a softer sourness (see my guide to how temperature affects sourdough).
- Bulk fermentation: A longer bulk allows acids to develop and increases tang, but it is mainly about developing structure first and flavor second. You don't need bulk to do all the flavor work. For an extra-sour loaf, limit bulk fermentation to 10-14 hours.
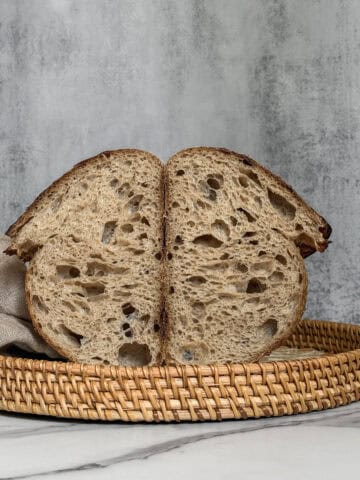
- Cold proofing: This is where deep sour flavor truly develops, especially acetic acid. A 24-hour cold proof creates a mild tang, 36-48 hours produces a pronounced sour taste, and 48-72 hours results in a very bold, sharp sour profile.
Ingredients
- Flour: Use unbleached bread flour with a high protein content. You can experiment with a flour blend (bread and all-purpose flour or bread and whole wheat flour). I am using King Arthur bread flour (12.7% protein).
- Water: Use unchlorinated tap, filtered, or spring water.
- Levain/Sourdough Starter: Use a 100% hydration sourdough starter at peak.
- Salt: Use fine sea salt, but avoid iodized table salt. I am using Redmond Ancient Fine Sea Salt.
- White Rice Flour is used to dust the work surface and the banneton.
Final bread formula
| Ingredient | Baker's Percentage | Weight |
|---|---|---|
| Bread flour | 100% | 500g |
| Water | 75% | 375g |
| Levain/Active starter, 100% hydration | 10% | 50g |
| Salt | 2% | 10g |
- Total dough weight is 935g. To adjust the bread formula for your own loaf, see my guide to baker's percentages and use my sourdough calculator.
- My kitchen temperature is 73°F (23°C) and the humidity is 40%.
- Bulk fermentation: 8-10 hours with a 75-80% increase in dough size.
- Proofing time: 36-48 hours cold-proof in the fridge.
- Bake in a conventional oven at 450°F (232°C) with the lid on for 20 minutes; without the lid, 17-20 minutes.
Tools & Equipment
For all the tools and equipment I use, check out my Essential Sourdough Tools & Equipment guide. It covers everything you need to bake sourdough bread successfully.
How to make extra sour sourdough bread
1. Make levain (active starter) overnight
In the evening, feed your starter at a 1:6:6 ratio (4 g starter, 25 g flour, 25 g water). Let it ferment overnight until it reaches its peak and is ready to use (see my post about sourdough starter peak).
Note: You will need to adjust your starter feeding ratio to match your starter activity.
You can also make levain in the morning using a 1:1:1 ratio (18 g starter, 18 g flour, 18 g water), but this method takes longer for the starter to reach its peak.
2. Autolyse
In a mixing bowl, combine the water and flour and mix. Cover the bowl and let it rest for 30 minutes (see my guide on how to autolyse sourdough).
3. Add levain and salt
Pour in the levain (active starter at peak) and mix. Sprinkle in the fine sea salt and incorporate it using your preferred bread dough mixing technique.
Cover the bowl with a damp kitchen towel or plastic wrap, and let it rest for 30 minutes. Once you add your levain, bulk fermentation starts.
4. Bulk fermentation
Perform two sets of stretch and folds and two sets of coil folds, with a 30-minute rest between sets. For each set, stretch the dough in all four directions. Cover the dough and let it rise.
If the dough feels slack or doesn't hold its shape after the final fold, add one or two additional sets of coil folds.
After the last set of coil folds, let the dough bulk ferment, tracking its rise to avoid under- or overfermentation. The warmer your kitchen, the faster the bulk fermentation; the colder it is, the slower.
Note: I usually aim for about a 75-80% rise at 73°F (24°C), but with King Arthur bread flour and proper mixing, I can sometimes push it to 90%.
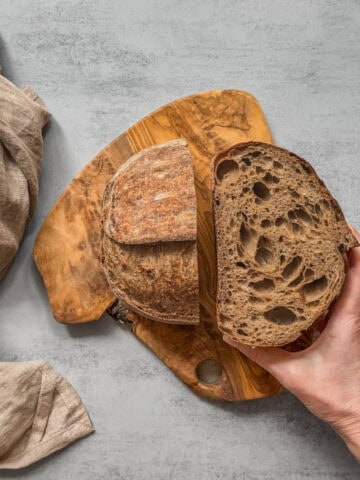
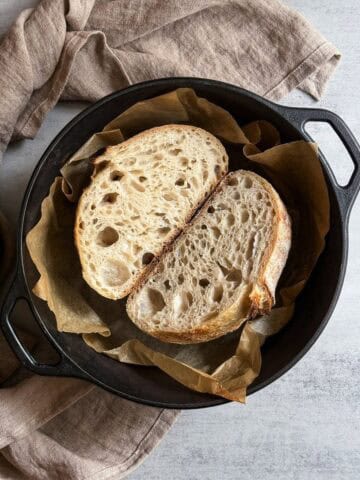
By the end of bulk fermentation, the dough should show bubbles on the surface and along the sides of the bowl (if using glass). The edges where the dough meets the bowl should be slightly domed, and the dough should jiggle gently when you shake the bowl from side to side.
5. Preshape the dough
Preshape the dough into a round, then let it rest uncovered for 15-20 minutes (see my guide to preshaping bread dough). If you are making a single loaf, skip preshaping.
6. Shape the dough
Shape the dough into a batard (or a boule) and place it in a prepared 12-inch oval banneton, seam-side up (see my guide to shaping bread dough).
7. Proof
Cover the banneton with a clean towel, disposable plastic cap, or place it inside a reusable plastic bag. Place the dough in the fridge for 24-48 hours. The longer the proof, the more pronounced the sourdough flavor will be.
8. Bake
Preheat the oven to 500°F (260°C) with a Dutch oven inside for 25-30 minutes. Carefully transfer the dough onto parchment paper, score the top, and place it in the Dutch oven.
Lower the oven temperature to 450°F (232°C) and bake covered for 20 minutes. Then, uncover and bake for another 17-20 minutes, until the loaf is golden and crisp, and the bread's internal temperature reaches at least 205°F (96°C).
Remove the bread from the Dutch oven and cool on a wire rack for at least 2 hours before slicing. Read about how to cut sourdough bread and how to store sourdough bread in separate blog posts.
Bulk fermentation expectations
How long your dough needs to bulk ferment depends on a few key factors: the amount of starter, the starter's hydration, and the room temperature, which affect the dough temperature.
Most sourdough recipes use 20% starter as a standard, but this recipe reduces it to 10% to encourage more acid development and a deeper sour flavor. With a smaller amount of starter, fermentation naturally moves more slowly.
A helpful rule of thumb is that halving the starter roughly doubles the bulk fermentation time, but the relationship is not perfectly linear.
Note: These are estimates. The exact time will depend on your starter's activity, the flour, and your kitchen conditions. Always use visual cues (dough volume, surface bubbles, jiggly texture) to determine when bulk fermentation is done, especially when working with a very low inoculation percentage.
Expert tips
- Adjust the dough hydration to a level that feels comfortable for you to handle.
- Avoid relying solely on countertop proofing if your goal is extra tang. It isn't enough to develop a deep sour flavor.
- Extend the cold proof in the fridge to 36-48 hours for a pronounced tang. You can experiment with longer fermentation, up to 72 hours, for an even more developed flavor. Just keep in mind that fermentation continues in the fridge until the dough cools to 39°F (4°C), so stop bulk fermentation earlier, especially in a warm kitchen or during summer.
- Experiment with a few bakes to adjust both the tanginess of your bread and your baking schedule.
- Always use oven mitts while handling hot equipment.
- Advanced notes: Monitor bulk fermentation using the aliquot jar method. Check the dough temperature after each set of folds and every 30-40 minutes. Stop bulk fermentation once the dough reaches the target rise.
Sample baking schedule
| Day 1 | |
| 9:00 PM | Build levain (active starter) overnight |
| Day 2 | |
| 7:00 AM | Autolyse, rest for 30 minutes |
| 7:30 AM | Add levain (starter) and salt, rest for 30 minutes |
| 8:00 AM | Stretch & folds #1, rest for 30 minutes |
| 8:30 AM | Stretch & folds #2, rest for 30 minutes |
| 9:00 AM | Coil folds #1, rest for 30 minutes |
| 9:30 AM | Coil folds #2, rest for 30 minutes |
| 10:00 AM | Continue bulk fermentation |
| 5:30 PM | Preshape and shape |
| 5:45 PM | Cold proof for 24-48 hours |
| Day 3 or 4 | |
| 8:00 AM | Bake |
Recipe
Extra Sour Sourdough Bread Recipe
Bake a bold, tangy loaf with this extra sour sourdough bread recipe. Perfect for sourdough lovers, it uses a longer cold proof and a carefully reduced starter to develop deep, complex flavor.
- Prep Time: 34 hours
- Cook Time: 40 minutes
- Total Time: 34 hours, 40 minutes
- Yield: 1 loaf 1x
- Method: Baking
- Cuisine: American
Ingredients
For the levain (an active starter):
- 4 g sourdough starter
- 25 g bread flour
- 25 g water
For the bread dough:
- 500 g bread flour (I use King Arthur organic bread flour)
- 375 g water (75% hydration)
- 50 g levain (active starter at peak)
- 10 g fine sea salt (I use Redmond ancient fine sea salt)
10 g white rice flour (for dusting)
Instructions
- Make levain (active starter) overnight. Feed your starter at a 1:6:6 ratio (4 g starter, 25 g flour, 25 g water) and let it ferment overnight until it reaches its peak. You can create levain in the morning at a 1:1:1 ratio (18 g starter, 18 g flour, 18 g water), but it takes time for the starter to peak
- Autolyse: Mix water with flour in a large mixing bowl. Cover and leave for 30 minutes.
- Add levain and salt: Pour in the levain (active, at its peak) and mix. Sprinkle in the fine sea salt and mix well.
- Bulk fermentation: Perform two sets of stretch and folds and two sets of coil folds, with a 30-minute rest between sets. After the final fold, cover the dough and let it ferment. Bulk fermentation is done when the dough shows bubbles on the surface and along the sides of the bowl (if using glass). The edges where the dough meets the bowl should be slightly domed, and the dough should jiggle gently when you shake the bowl from side to side.
- Preshape and shape: Lightly flour the work surface, preshape the dough into a round, and let it rest for 10-15 minutes. If you are making a single loaf, you can skip the preshaping step. Then, shape the dough into a boule or batard and place it in a prepared 10-inch banneton.
- Cold proofing: Place the dough in the fridge for 24-48 hours.
- Bake the loaf: Preheat the oven to 500°F (260°C) with a Dutch oven inside for 25-30 minutes. Carefully transfer the dough onto parchment paper, score the top, and place it in the Dutch oven. Lower the oven temperature to 450°F (232°C) and bake covered for 20 minutes. Then, uncover and bake for another 17-20 minutes, until the loaf is golden and crisp, and the bread's internal temperature reaches at least 205°F (96°C).
- Cool the bread: Remove the bread from the Dutch oven and cool on a wire rack for at least 2 hours before slicing.
Notes
- Build levain overnight instead of on mixing day to save time. This lets you use the daytime for the longer bulk fermentation.
- Adjust the dough hydration to a level that feels comfortable for you to handle.
- Avoid relying solely on countertop proofing if your goal is extra tang. It isn't enough to develop a deep sour flavor.
- Extend the cold proof in the fridge to 36-48 hours for a pronounced tang. You can experiment with longer fermentation, up to 72 hours, for an even more developed flavor. Just keep in mind that fermentation continues in the fridge until the dough cools to 39°F (4°C), so stop bulk fermentation earlier, especially in a warm kitchen or during summer.
- Experiment with the bread sourness: You may need to bake a few times to adjust both the tanginess of your bread and your baking schedule.
- Safety tip: Always use oven mitts or silicone gloves when handling hot pans.
- Check for doneness: Use a digital probe thermometer to check if your bread is fully baked. The internal temperature should reach 205-210°F (96-99°C). I usually aim for 207°F (97°C) or higher.
- Storage and freezing: Store sourdough bread at room temperature for 3-5 days. Freeze for up to 3 months. Thaw at room temperature. Freeze individual slices for up to 1-2 weeks, a whole loaf for 1-2 months.
- Create your own bread formula: Try my sourdough calculator.
- Getting started: Check out my beginner's sourdough bread guide to learn sourdough basics first.
- Note: Nutritional information does not include the white rice flour used for dusting.
Nutrition
- Calories: 1911
- Sugar: 1.4g
- Sodium: 3898mg
- Fat: 5.2g
- Saturated Fat: 0.8g
- Carbohydrates: 400.6g
- Fiber: 14.2g
- Protein: 54.2g
- Cholesterol: 0mg
Comments
No Comments