
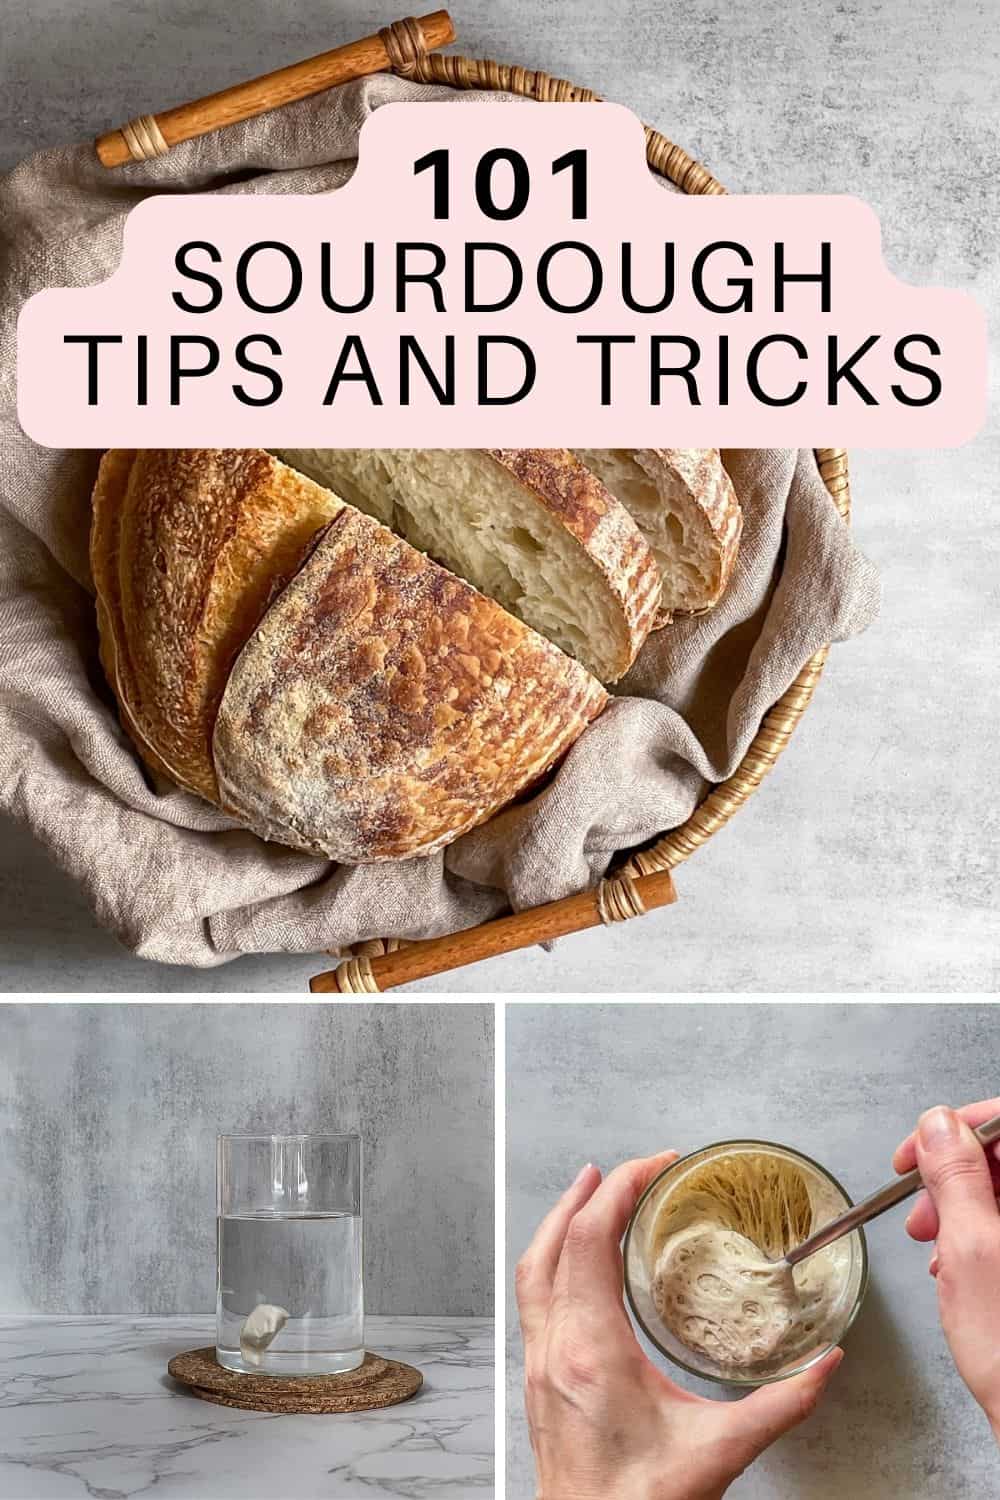
After becoming obsessed with baking sourdough, I gathered the best sourdough tips and tricks for making the perfect bread loaf.
Essential sourdough tips
- Use a kitchen scale: Measure ingredients with a digital kitchen scale, as the recipe ingredients and starter feeding ratios rely on weight, not volume. Pre-weigh all of your ingredients the night before dough day.
- Develop a routine: Create a feeding schedule for your starter and baker's timeline for your dough days.
- Use the right tools: Invest in a probe thermometer, a banneton, a Dutch oven, and a bread lame.
- Avoid cross-contamination: Maintain high hygiene standards when caring for your starter and baking your bread.
- Adjust for seasons: Understand how different seasons affect sourdough baking and learn how to adapt your process.
Choosing your perfect recipe
- Choose the right recipe: Read the recipe and note whether it mentions room temperature and humidity level. Be careful with recipes that require the dough to bulk ferment until it doubles in size, as the endpoint of bulk fermentation is influenced by dough temperature. In many cases, doubling can result in over-proofed dough.
- Stick with a single recipe: Follow the recipe and bake until you make it. Baking sourdough is not just about the recipe. It is about understanding the seasons, temperatures, and techniques, and developing a baker's intuition.
- Learn baker's math: Master baking percentages to understand and create recipes and scale them to produce multiple loaves.
- Start small: Begin with a single loaf recipe and focus on perfecting basic sourdough before trying multiple loaves or adding inclusions and unique shapes like turkey or pumpkin. The right time for these will come.
- Observe and adapt: Pay close attention to your starter and dough, and adjust as needed. Try to change ONE thing at a time to gain valuable insights. If you change multiple things at once, it makes it difficult to identify and resolve the issues.
- Keep notes for each bake: Record the recipe ingredients, steps, timing, dough temperature, and results, using a sourdough baking log. This way, you can review what you have done and identify areas where to tweak for next time.
Related articles
- Baker's Math or Sourdough Baker's Percentage: Dive deeper into baker's math and learn how to calculate the perfect sourdough recipe based on flour weight.
- The Perfect Sourdough Loaf: What makes it perfect? Explore the key elements of a perfect sourdough loaf, from its shape and ear to the texture of the crumb and the color of the crust.
Ingredient essentials for success
- Use fresh ingredients: Make sure all ingredients are fresh. Buy flour from a grocery store with a high turnover.
- Choose the right flour: Use high-quality, unbleached flour with 12-13% protein content. The choice of flour greatly impacts the outcome of your bread. Stick with the same flour and dial your technique.
- Prepare a flour blend ahead: To save time with flour mixtures, combine the flour in a large jar, give it a good shake, and use it as needed. Refill the jar when running low.
- Flour flexibility: The flour used to create your starter doesn't have to be the same as the flour in your dough.
- Opt for filtered water: Choose filtered or bottled spring water over tap water that can be treated with chlorine and chloramine. Use tap water if you are sure it is of good quality. Otherwise, use a water filter or let the tap water sit in an open container overnight to allow the chlorine to evaporate.
- Weigh ingredients separately: Measure the starter and dough ingredients (flour, water, salt, levain) in separate containers. Although you can add ingredients one at a time using the scales' tare function, be cautious, as scales can malfunction or stop working, or you get distracted, especially when baking multiple loaves.
Related articles
- Sourdough Bread Ingredients: Learn about the essential ingredients of a great sourdough loaf, from flour to water and salt.
- The Best Baker's Scale: Discover the importance of a good baker's scale and how it helps you achieve consistent, accurate sourdough results every time.
Sourdough starter tips and tricks
- Obtain a starter: Although you can make a sourdough starter from scratch, you can buy a well-established starter online or get some from a local bakery. This approach can save you time and effort when starting fresh.
- Maintain a single starter: A white starter offers great versatility, eliminating the need for multiple jars. To make levain, use a variety of flours and mixtures.
- Opt for high-quality flour: Choose the highest quality flour possible for your starter, and if organic options are available, take advantage of them.
- Start with a 100% hydration starter: As a beginner, use equal parts water and flour to feed it. Don't experiment with liquid or stiff starters yet.
- Be patient: For the best results, allow the new starter to establish before baking. Wait at least ten days (ideally about a month) for optimal results before using a new starter.
- Feed your starter properly: When feeding sourdough starter, add at least an equal weight of flour and water to that of the starter. Don't use less flour and water than the starter's weight.
- Keep consistent warmth: Keep your starter in a steady, warm setting at 73-75°F (23-24°C), but don't exceed 80°F (27°C). Avoid placing it in the switched-off oven, as it might accidentally be cooked.
- Cover your starter with a loose lid: It allows the gas produced during fermentation to escape.
- Store your starter properly: Depending on how often you bake, keep your starter on the counter or in the fridge. However, remember that daily feeding on the counter yields superior bread, just like in professional bakeries.
- Don't feed your starter before it peaks: Avoid feeding it before it peaks, as it can weaken it.
- Build starter strength: Feed your starter consistently to allow it to develop fully. It can take 3-4 months.
- Discard without regret: For a newly created starter, discard it for the first ten days (according to some, 7 days).
- Invest in a reliable thermometer and hygrometer: If you live in a hot climate, track your kitchen's humidity and temperature to understand your environment and determine the best place to store your starter.
- Smell your starter: A healthy starter should have a tangy, pleasant aroma. Pay attention to the vinegar, alcohol, or unpleasant smell.
- Control starter acidity: Feed your starter regularly to maintain the desired acidity. If it is stored on the counter, feed it at a 1:2:2 or 1:3:3 ratio twice daily, or at a 1:5:5 ratio once daily. Keep in mind that every starter is different, so you need to adjust the feeding ratios and schedule to suit yours.
- Be flexible: Be ready to adjust feeding ratios as you learn more about your starter.
- Adapt feeding times: Shorten or lengthen feeding intervals based on starter activity.
- Keep a small amount of starter: To reduce wastage, maintain about 20-30g (or less) of starter on the counter.
- Discard with feedings: This helps maintain an active, strong starter and manage its amount.
- Don't collect discard: There is no need to collect 'discard' for sourdough discard recipes. Feed your starter to produce the amount required by the recipe.
- Maintain your starter properly: Replace your jar periodically to keep the starter environment clean.
- Practice regular cleanup: Don't let the sourdough starter dry out. Clean it out immediately. Use cold water to wash baking utensils and your hands, as it helps dissolve flour without activating it. Place a fine-mesh strainer in the sink or use a sink drain strainer basket to capture all starter residue. To prevent clogs, do not pour the starter directly down the drain.
- Check your starter for discoloration: It can range from gray, green, blue, or black to pink or even orange and indicate mold or harmful bacterial growth, suggesting the starter may be unsafe to use.
- Troubleshoot your starter problems: Diagnose starter issues by reading about common sourdough starter issues.
- Start fresh: If all the attempts to revive the starter fail, don't be afraid to start over.
- Preserve your starter: Dehydrate or freeze sourdough starter as a backup because life can be unpredictable.
Sourdough bread tips and tricks
- Create a levain: Build the levain for baking days separately from your "mother" starter.
- Use the levain (active starter) at peak: Recognize the signs that show when the starter is ready for baking. Understand the differences between the levain/active starter at peak, before, and after peak.
- Don't rely entirely on a float test: It may not always be accurate.
- Adjust your schedule: Align baking with your daily routine to reduce stress.
- Keep the weather in mind: Adjust the bread recipe based on humidity and temperature.
- Adjust to elevation: If you are at a higher elevation, adjust the bread recipe, proofing, and baking process.
- Use your time efficiently: Use downtime during baking to prepare for future steps.
- Hydrate your dough thoughtfully: Select a hydration level that suits your skill level. Begin with 65-70% hydration and gradually increase by 2% once you are confident with the initial level. Take your time.
- Calculate the overall hydration: Include the water in the starter in the total hydration percentage. You can use a sourdough calculator to make it easier.
- Start with a beginner-friendly bread recipe: For beginners, use the bread formula: 500g flour (100%), 68% water, 20% starter, and 2% salt. Master this sourdough bread recipe before moving on to others.
- Get your hands dirty: Don't be afraid to get hands-on with your dough. It is an essential part of the bread-making process and helps you understand its texture and hydration.
- Avoid overmixing: Learn to use a spiral mixer to mix sourdough effectively.
- Master the autolyse and fermentolyse: Let flour and water (plus levain for fermentolyse) rest together to improve gluten development.
- Add salt late: Introduce salt after the autolyse or fermentolyse to preserve gluten structure.
- Warm up your dough: Invest in a dough proofer or heating pad if proofing in a cold kitchen.
- Manage dough temperature: Aim for a desired dough temperature (DDT) between 75-78°F (24-25.5°C) for optimal bulk fermentation.
- Protect your dough from drying out: Keep the dough covered during bulk fermentation.
- Understand bulk fermentation: Learn the signs of properly fermented dough. Rather than relying on time, focus on the dough temperature and percentage rise.
- Master folding techniques: Learn stretch and fold and coil fold techniques to strengthen the dough.
- Measure the dough temperature: After every stretch and fold and coil fold, check the dough temperature and continue to do so every 30 minutes.
- Document your findings: Record your results in a sourdough baking log to monitor bulk fermentation and refine your process for future baking.
- Focus on technique: Refine each process step to improve overall results.
- Opt for a straight-sided container: A transparent container with square, rectangular, or cylindrical sides is ideal for observing dough rise.
- Keep a close eye on your dough: Learn how the dough looks and feels throughout the bulk fermentation period.
- Explore the aliquot jar method: An aliquot jar is handy for identifying the endpoint of bulk fermentation. It helps measure the dough rise without a straight-sided container.
- Check the gluten development: Perform the windowpane test throughout bulk fermentation.
- Assess dough texture: Learn to read the dough for texture and elasticity.
- Try different shaping techniques: Experiment with different shaping techniques to achieve unique loaf textures and shapes.
- Use rice flour to dust the banneton and prevent sticking. If you don't have it, grind some uncooked rice.
- Utilize cold proofing: Use the fridge to slow fermentation and deepen flavor.
- Keep an eye on fridge temperature: Purchase an affordable digital refrigerator thermometer to maintain a temperature below 40°F (4°C). Different shelves in the fridge may have varying temperatures.
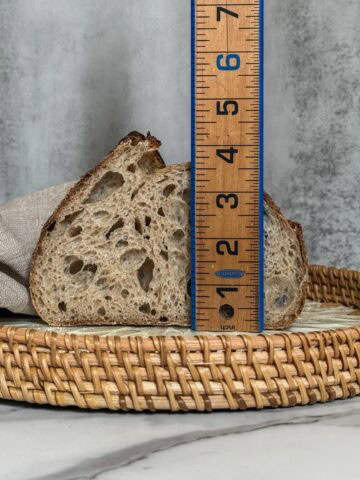
- Master your scoring skills: Begin by mastering a single slash. Don't rush into different scoring patterns. The time will come to add a personal touch to your loaves.
- Invest in a quality oven thermometer: Check the oven temperature to verify accurate heat during baking.
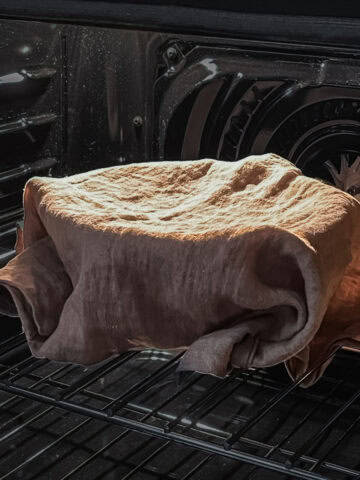
- Explore different baking methods: Try baking in a Dutch oven, cast iron skillet, loaf pan, or baking steel to achieve different textures and crusts. Learn the "open bake method" as soon as possible.
- Check the bread temperature: After baking, use a probe thermometer to check the bread's internal temperature to make sure it is fully cooked. It should be 200-210°F (93-99°C). I aim for 207°F (97°C).
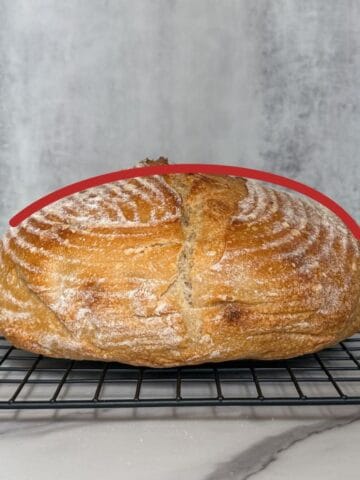
- Let cool completely: Allow the loaf to cool for at least 2 hours before slicing to retain structure.
- Use a good bread knife: A quality bread knife, typically featuring a long, serrated blade, is specifically designed to handle crispy crust and chewy, airy interior with ease.
Related articles
- Float Test: Learn how to use the float test to check if your sourdough starter is ready for baking, and why it is not 100% reliable.
- Bulk Fermentation Guide: Discover everything you need to know about bulk fermentation and how to perfect it for a lighter, airier sourdough loaf.
- Dough Temperature and Percentage Rise: Learn how to use dough temperature and percentage rise to track bulk fermentation.
Additional pro tips
- Set timers or alarms: Invest in digital kitchen timers to track autolyse (fermentolyse), bulk fermentation, and baking times with and without steam.
- Photograph your bread crumb: This helps with analysis, comparison, and understanding of how to read the crumb.
- Stick to what works: If your bread turns out great, don't change ingredients, the recipe, or the techniques.
- Share and learn: Join our Facebook group devoted to sourdough baking and chat with other bakers about tips and tricks.
- Focus on your baking: Don't compare your baking results with others. Each baker lives in a different climate, has a unique starter, and has different environmental conditions, such as kitchen temperature and humidity, distinct ovens, different skills, and their own baking goals.
- Don't rush for Instagram-worthy loaves: Achieving an open crumb often requires years of practice. You will reach this milestone at your own pace.
- Watch instructional videos: Visual learning helps with understanding techniques.
- Accept imperfections: Don't be discouraged by imperfections in your loaves. Each of them has character and uniqueness. If your dough overproofs and becomes sticky, bake it in a loaf pan: it is still bread. Use imperfect results as learning opportunities.
- Read widely: Learn from various sources, such as library books, Kindle, and online articles, to build your knowledge and skills.
- Bake frequently: Practice regularly to master bulk fermentation. The more you bake, the better you understand how your dough behaves.
- Learn to read your dough: Notice how it feels, smells, and ferments. Understanding these signs will help you bake the perfect loaf.
- Don't give up: If you follow the recipe to a T, including the same flour and temperatures specified by the author, and your baking doesn't succeed, don't give up. Factors such as starter strength or humidity could be involved. Keep baking until you get it right.
- Be generous: Share your starter if possible. When you pass it on to someone else, it will adapt to the unique yeast in the host's environment and on their hands, leading to different results. Remember, just because your starter is robust doesn't mean it will react the same way in a new setting.
- Enjoy your baking journey: Remember to have fun and enjoy the process. Baking bread is a journey, not a destination. Keep learning and experimenting to improve your skills and create delicious loaves for yourself and others.
Expert-level tips
- Try different flours and flour blends: Experiment with different types of flour, such as rye or whole wheat, and flour blends to create unique flavors and textures in your loaves.
- Experiment with different starter ratios: Try different flour-to-water ratios in your starter.
- Explore different bread flavors: Learn how to make the bread more or less sour.
- Play with dough hydration: Once you have mastered dough with 68-70% hydration, gradually increase it by 2% increments and perfect each level. Eventually, try experimenting with 100% sourdough hydration.
- Experiment with add-ins: Add seeds, nuts, or dried fruits for additional texture and flavor.
- Market your bread: Launch your sales with top-quality bread. Don't offer anything less than exceptional.
- Comply with regulations: Obtain a Food Cottage Permit or Food Processor License to sell sourdough bread legally in the USA. If you are outside the USA, familiarize yourself with local regulations.
Related articles
- How to Make Multiple Loaves: Learn the best techniques for scaling up your sourdough baking and managing multiple loaves for a successful bake.
- How to Sell Sourdough Bread: Discover the steps to turn your passion for sourdough into a lovely micro bakery, from pricing to marketing your loaves.
Let's talk sourdough
Have you learned any new tips from this list? Or perhaps you have a trick or two that you use? Share your experiences in the comments below.
Pin it for later

Comments
No Comments